Last time around we reviewed some of the technical details behind the IPv6 Neighbor Discovery cache. This time we’ll look at how to observe the IPv6 Neighbor Discovery cache in operation.
IPv6 was conceived and designed primarily to overcome IPv4’s limited total number of unique node addresses and the address exhaustion that has resulted from this. But the redesign was also an opportunity to improve other aspects of IPv4. In particular, the original IPv4 protocol offered no inherent auto-addressing functionality; i.e., the ability of nodes to obtain their own unique Layer 3 address, whether local or global in scope. DHCP was created as a workaround for this lack of functionality but the designers of IPv6 wanted to include a stand-alone auto-addressing function in the protocol definition (i.e., one that wouldn’t require an additional standard/application like DHCP). Stateless Address Auto Configuration (SLAAC) is the mechanism built-in to IPv6 that provides this. While IPv6 Neighbor Discovery works perfectly well on a single link, providing addresses of link-local scope (e.g., fe80::a43e:44ff:fe16:565a), for SLAAC to be useful, a router on the link must send Router Advertisements to announce the availability of an IPv6 prefix with a non-local scope (e.g., a GUA or ULA prefix).
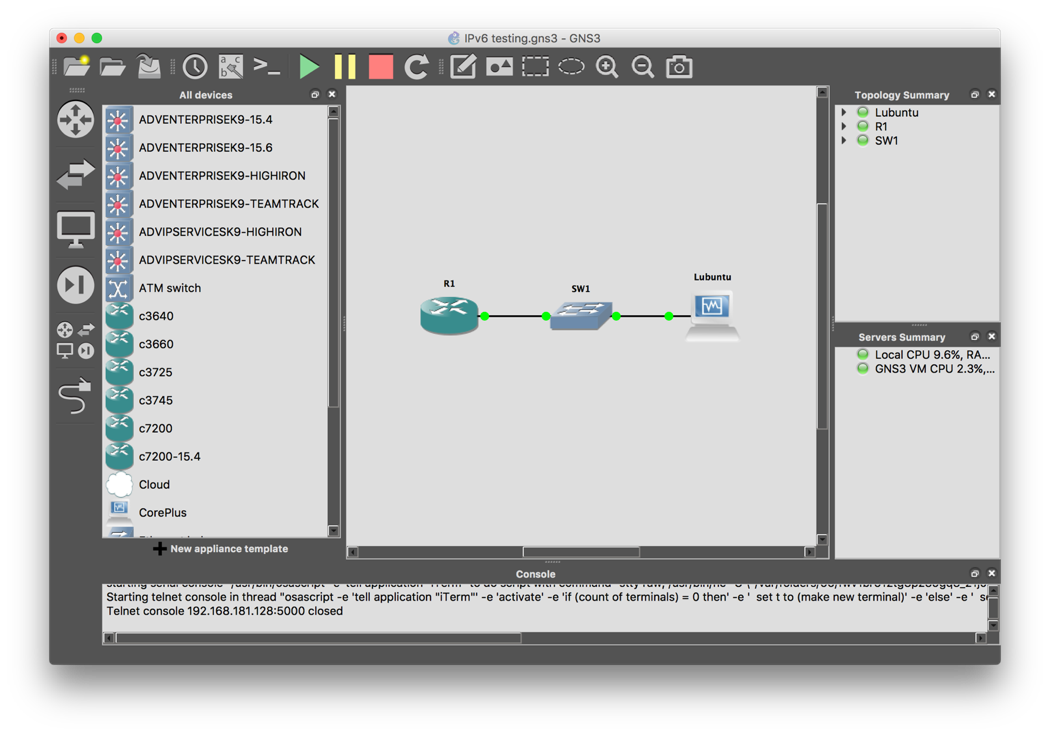
To demonstrate this mechanism, here’s a very simple virtual network topology (using GNS3) with one router and one host connected via a switch:
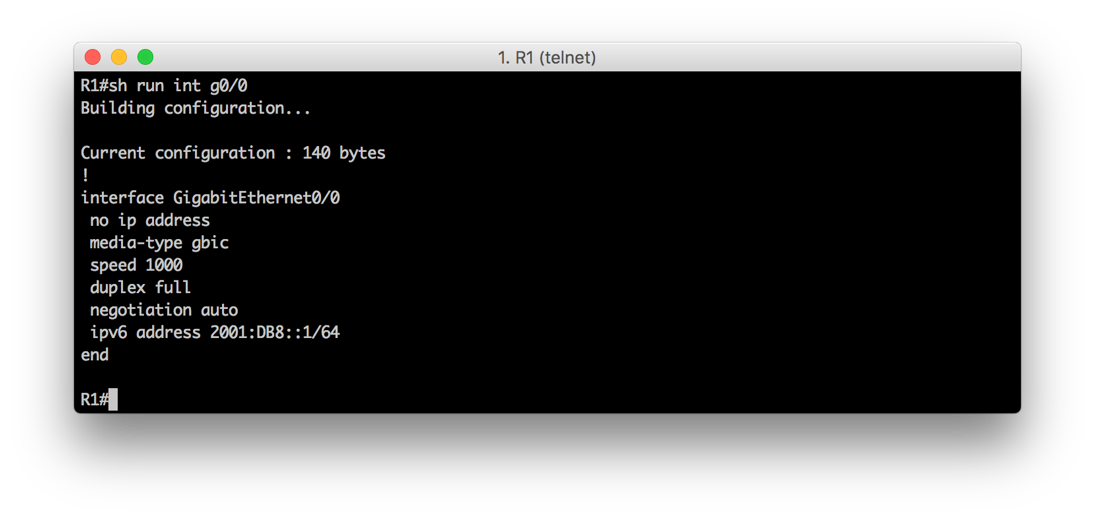
The interface configuration on the router is simply a GUA address/prefix from the documentation range: 2001:db8::1/64:
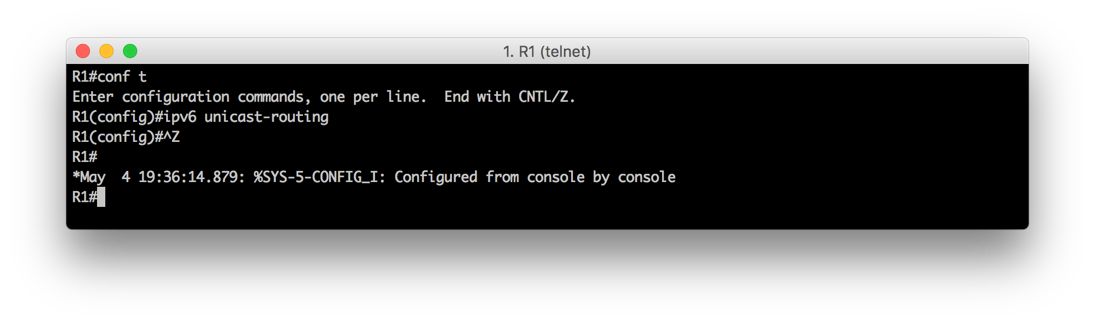
In addition, we need to enter the global command ipv6 unicast-routing to enable router advertisements. Otherwise, SLAAC will not work and the host will not auto-configure an address:
We can now verify on the host that it has configured itself with an IPv6 address using the prefix announced in the router advertisement:

Notice that two GUA addresses and one link-local address have been self-configured. Note also that none of these addresses appear to use the EUI-64 method of construction (the absence of the “ff:fe” in nibbles 23-26 indicates this). Instead, the link-local address and one of the GUA addresses appear to be constructed using the method from RFC 3972, Cryptographically Generated Addresses. These addresses are permanent and would only change if the operating system were to be reinstalled. The remaining GUA address is a temporary address and will change once we reboot the system.
Now that we have IPv6 addresses configured on the router and the node, we can examine the neighbor discovery cache on each device and observe its state as well as how that state changes.
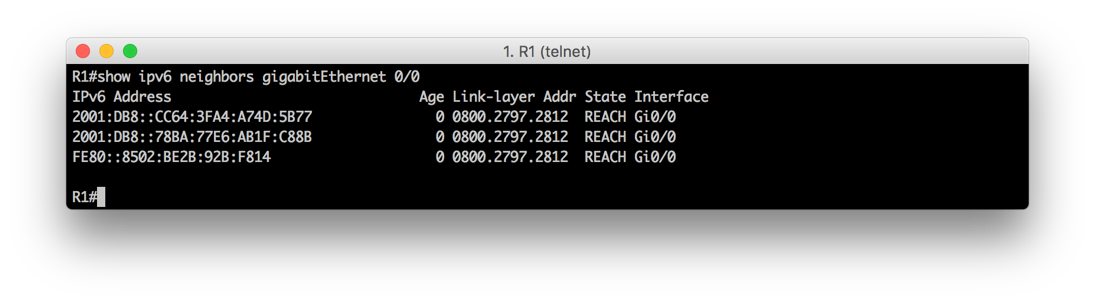
The command to examine the neighbor discovery cache on the router is show ipv6 neighbors <interface n/n>:

The first column lists the IPv6 address in the neighbor discovery cache.
The next column is the age of the entry in minutes.
The next column shows the link-layer address the IPv6 address in the first column is mapped to.
The next column shows the state of the entry. As covered in the previous post, the possible entry states are as follows
- Incomplete
- Reachable
- Stale
- Delay
- Probe
Notice that the three entries correspond to the addresses assigned on the host. Two of them are reachable according to the status column, while one entry is marked as stale.
Recall that a status of reachable indicates that a positive confirmation of reachability for the associated ND cache entry was received within a certain time interval (defined as the ReachableTime).
Meanwhile, a stale ND cache entry means the ReachableTime has elapsed before a subsequent confirmation of reachability has been received.
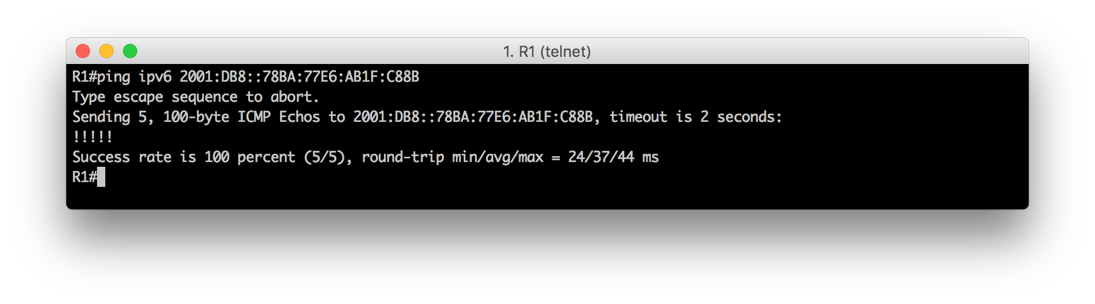
Recall also that confirmation of reachability is accomplished by an upper layer protocol’s use of the ND entry. We can demonstrate this by sending an ICMPv6 ping to the entry’s corresponding address:
Running the show ipv6 neighbors command again now shows the updated cache entry:
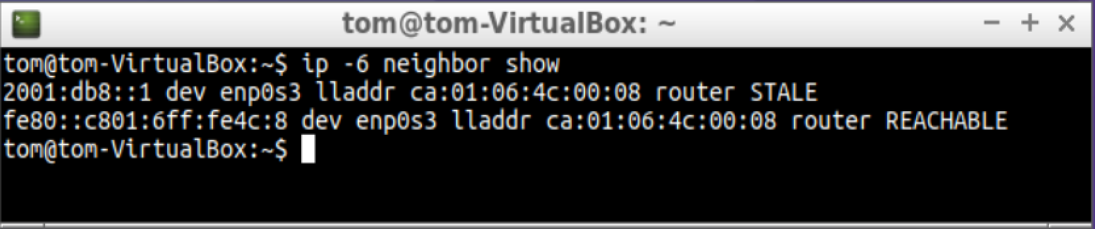
Now let’s look at the neighbor discover cache on the host. The command for most Linux systems is ip -6 neigh show:
As with our router example, we’ll go ahead and send a ping to force the IPv6 neighbor discovery cache state to change for the entry that is currently listed as stale:
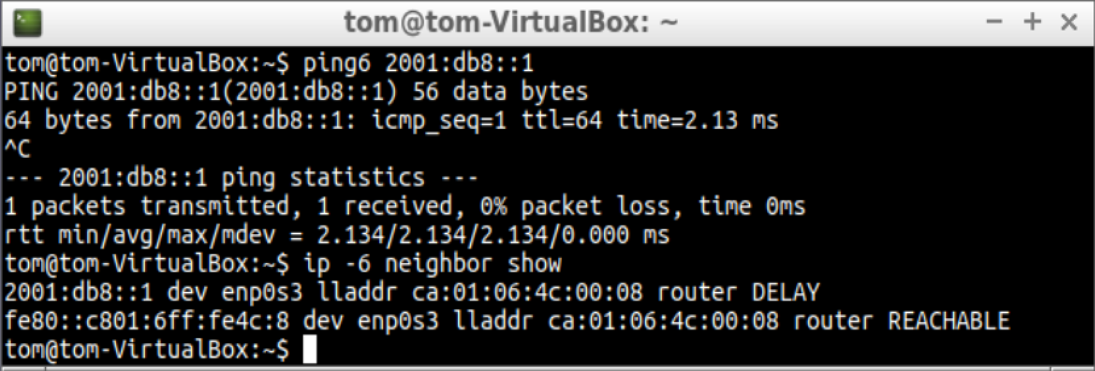
Upon completion of the ping, we run the ip -6 neigh show command again and notice that the status of the entry is now listed as delay.
Recall from our last post that a status of delay indicates that, though the ReachableTime has expired, a packet was recently sent to the cache entry’s address by an upper-layer protocol. After a defined interval, a Neighbor Solicitation is sent and the ND cache entry is changed to probe status. The delay status merely provides time for upper-layer protocols to potentially refresh the cache entry without resorting to a Neighbor Solicitation.
Had we been running a packet capture, after sending the ping we would see the router issue a Neighbor Solicitation and the entry state would briefly change to probe before updating to reachable again.
As with IPv4 ARP it’s possible to statically map an IPv6 neighbor entry. The syntax of the command to do so in Cisco IOS is ipv6 neighbor <IPv6 address> <interface n/n> <48-bit hardware address>:
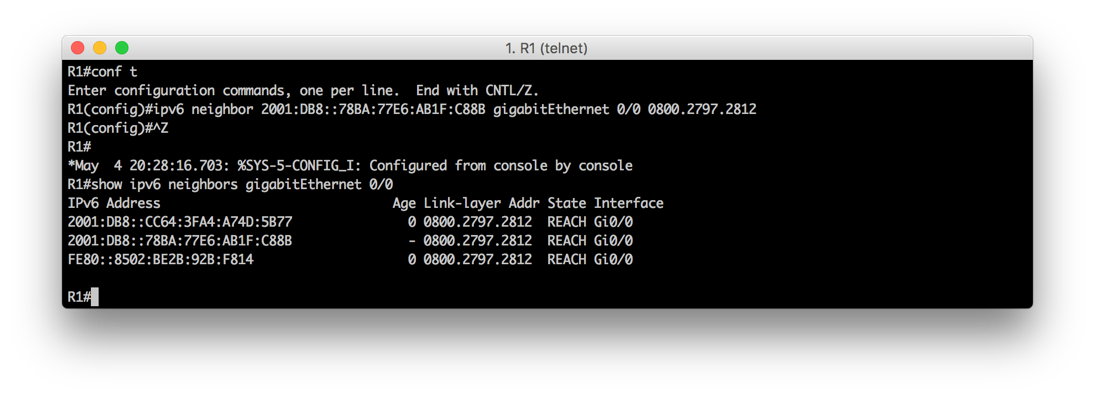
After configuring a static IPv6 ND entry, the ND cache looks identical but with two key exceptions: first, the age is shown as a hyphen, indicating that the entry is static (and will not age out). According to the Cisco website “Static entries in the IPv6 neighbor discovery cache are not modified by the neighbor discovery process.”
The two possible states for statically defined entries are:
INCMP (Incomplete)–The interface for this entry is down.
REACH (Reachable)–The interface for this entry is up.
To view overall statistics for the IPv6 ND cache use the command show ipv6 neighbor statistics:

As evident, Cisco provides data for ND cache entries that goes beyond the formally defined ND cache entry states we’ve listed so far. For instance, gleaned entries are “the number of ND neighbor entries gleaned (that is, learned from a neighbor NA or other ND packet).” High-water indicates the “maximum amount (so far) of ND neighbor entries in ND cache.” Values beyond the baseline for either of these fields may be used to detect excessive ND activity on the attached segments — activity which could indicate an underlying problem. For more info on these commands, check out the Cisco IPv6 command reference.
Knowledge of the IPv6 Neighbor Discovery cache, how to observe and modify it, is a critical tool in the belt of the network administrator tasked with deploying and maintaining IPv6. I hope you find the above information useful in helping to enhance your IPv6 administration skills.
As always, please leave a comment if you have questions or examples of your own experience with the IPv6 ND cache.
https://blogs.infoblox.com/ipv6-coe/ipv6-neighbor-discovery-cache-part-2-of-2/