产生背景
为了解决异步线程产生的回调地狱
//传统回调方式
api.login(phone,psd).enquene(new Callback<User>(){
  public void onSuccess(User user){
    api.submitAddress(address).enquene(new Callback<Result>(){
      public void onSuccess(Result result){
        ...
      }
    });
  }
});
//使用协程后
val user=api.login(phone,psd)
api.submitAddress(address)
...
协程是什么
本质上,协程是轻量级的线程。
协程关键名词
val job = GlobalScope.launch {
    delay(1000)
    println("World World!")
}
-
CoroutineScope(作用范围)
控制协程代码块执行的线程,生命周期等,包括GlobeScope、lifecycleScope、viewModelScope以及其他自定义的CoroutineScope
GlobeScope:全局范围,不会自动结束执行
lifecycleScope:生命周期范围,用于activity等有生命周期的组件,在DESTROYED的时候会自动结束,需额外引入
viewModelScope:viewModel范围,用于ViewModel中,在ViewModel被回收时会自动结束,需额外引入
-
Job(作业)
协程的计量单位,相当于一次工作任务,launch方法默认返回一个新的Job
-
suspend(挂起)
作用于方法上,代表该方法是耗时任务,例如上面的delay方法
public suspend fun delay(timeMillis: Long) {
    ...
}
协程的引入
主框架($coroutines_version替换为最新版本,如1.3.9,下同)
implementation "org.jetbrains.kotlinx:kotlinx-coroutines-core:$coroutines_version"
lifecycleScope(可选,版本2.2.0)
implementation 'androidx.activity:activity-ktx:$lifecycle_scope_version'
viewModelScope(可选,版本2.3.0-beta01)
implementation "androidx.lifecycle:lifecycle-viewmodel-ktx:$coroutines_viewmodel_version"
简单使用
先举个简单例子
lifecycleScope.launch {
    delay(2000)
    tvTest.text="Test"
}
上面这个例子实现的功能是等待2秒,然后修改id为tvTest的TextView控件的text值为Test
自定义延迟返回方法
在kotlin里面,对于需要延迟才能返回结果的方法,需要用suspend标明
lifecycleScope.launch {
    val text=getText()
    tvTest.text = text
}
suspend fun getText():String{
    delay(2000)
    return "getText"
}
如果在其他线程,需要使用Continuation进行线程切换,可使用suspendCancellableCoroutine 或 suspendCoroutine包裹(前者可取消,相当于后者的扩展),成功调用it.resume(),失败调用it.resumeWithException(Exception()),抛出异常
suspend fun getTextInOtherThread() = suspendCancellableCoroutine<String> {
    thread {
        Thread.sleep(2000)
        it.resume("getText")
    }
}
异常捕获
协程里面的失败都可以通过异常捕获,来统一处理特殊情况
lifecycleScope.launch {
    try {
        val text=getText()
        tvTest.text = text
    } catch (e:Exception){
        e.printStackTrace()
    }
}
取消功能
下面执行了两个job,第一个是原始的,第二个是在1秒后取消第一个job,这会导致tvText的文本并不会改变
val job = lifecycleScope.launch {
    try {
        val text=getText()
        tvTest.text = text
    } catch (e:Exception){
        e.printStackTrace()
    }
}
lifecycleScope.launch {
    delay(1000)
    job.cancel()
}
设置超时
这个相当于系统封装了自动取消功能,对应函数withTimeout
lifecycleScope.launch {
    try {
        withTimeout(1000) {
            val text = getText()
            tvTest.text = text
        }
    } catch (e:Exception){
        e.printStackTrace()
    }
}
带返回值的Job
与launch类似的还有一个async方法,它会返回一个Deferred对象,属于Job的扩展类,Deferred可以获取返回的结果,具体使用如下
lifecycleScope.launch {
    val one= async {
        delay(1000)
        return@async 1
    }
    val two= async {
        delay(2000)
        return@async 2
    }
    Log.i("scope test",(one.await()+two.await()).toString())
}
高级进阶
自定义CoroutineScope
先看CoroutineScope源码
public interface CoroutineScope {
    public val coroutineContext: CoroutineContext
}
CoroutineScope中主要包含一个coroutineContext对象,我们要自定义只需实现coroutineContext的get方法
class TestScope() : CoroutineScope {
    override val coroutineContext: CoroutineContext
        get() = TODO("Not yet implemented")
}
要创建coroutineContext,得要先知道CoroutineContext是什么,我们再看CoroutineContext源码
/**
 * Persistent context for the coroutine. It is an indexed set of [Element] instances.
 * An indexed set is a mix between a set and a map.
 * Every element in this set has a unique [Key].
 */
public interface CoroutineContext {
    public operator fun <E : Element> get(key: Key<E>): E?
    public fun <R> fold(initial: R, operation: (R, Element) -> R): R
    public operator fun plus(context: CoroutineContext): CoroutineContext =
        ...
    public fun minusKey(key: Key<*>): CoroutineContext

    public interface Key<E : Element>
    public interface Element : CoroutineContext {
        ...
    }
}
通过注释说明,我们知道它本质就是一个包含Element的集合,只是不像set和map集合一样,它自己实现了获取(get),折叠(fold,添加和替换的组合),相减(minusKey,移除),对象组合(plus,如val coroutineContext=coroutineContext1+coroutineContext2)
它的主要内容是Element,而Element的实现有
- Job 任务
- ContinuationInterceptor 拦截器
- AbstractCoroutineContextElement
- CoroutineExceptionHandler
- ThreadContextElement
- DownstreamExceptionElement
- …
可以看到很多地方都有实现Element,它主要目的是限制范围以及异常的处理。这里我们先了解两个重要的Element,一个是Job,一个是CoroutineDispatcher
Job
- Job:子Job取消,会导致父job和其他子job被取消;父job取消,所有子job被取消
- SupervisorJob:父job取消,所有子job被取消
CoroutineDispatcher
- Dispatchers.Main:主线程执行
- Dispatchers.IO:IO线程执行
我们模拟一个类似lifecycleScope的自定义TestScope
class TestScope() : CoroutineScope {
    override val coroutineContext: CoroutineContext
        get() = SupervisorJob() +Dispatchers.Main
}
这里我们定义了一个总流程线SupervisorJob()以及具体执行环境Dispatchers.Main(Android主线程),假如我们想替换掉activity的lifecycleScope,就需要在activity中创建实例
val testScope=TestScope()
然后在activity销毁的时候取消掉所有job
override fun onDestroy() {
    testScope.cancel()
    super.onDestroy()
}
其他使用方式同lifecycleScope,如
testScope.launch{
    val text = getText()
    tvTest.text = text
}
深入理解Job
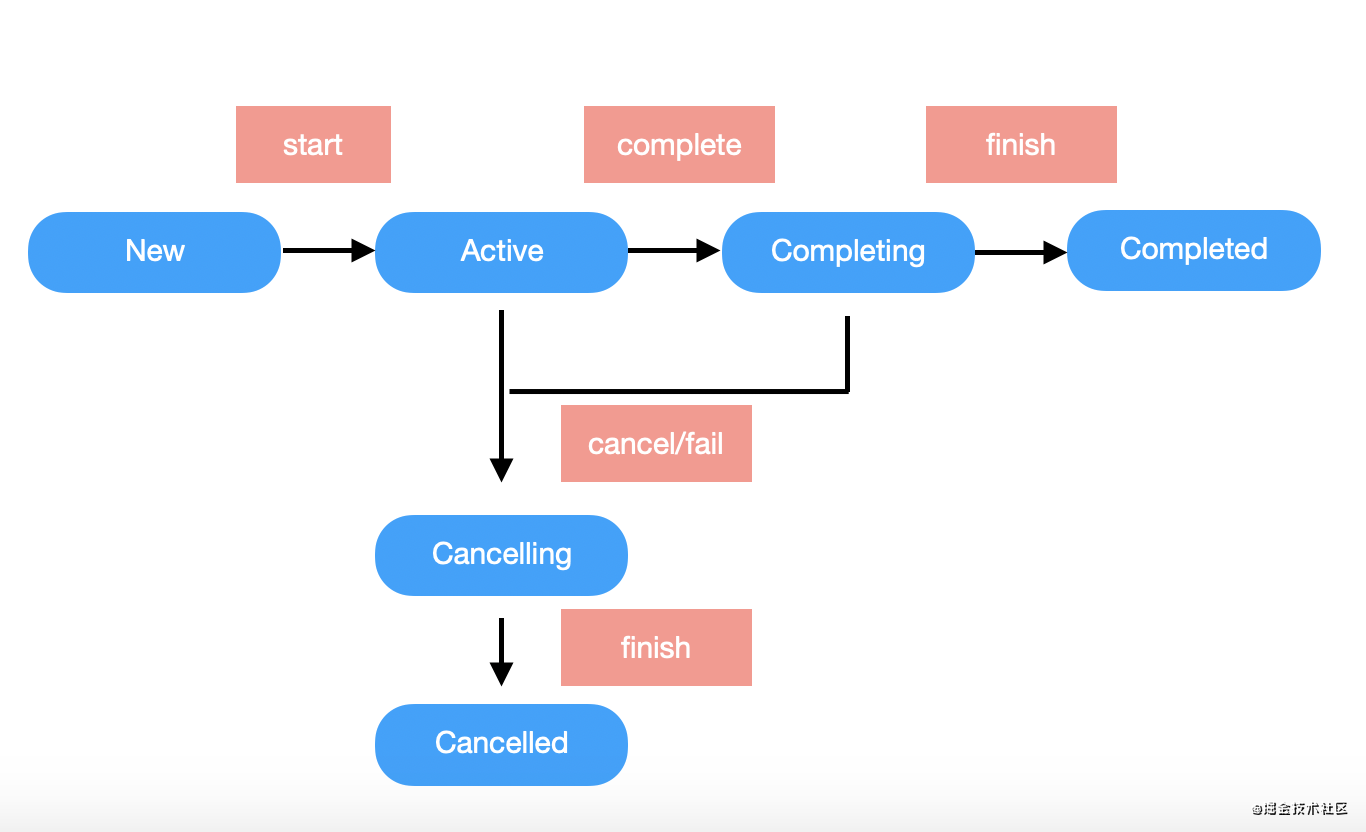
CoroutineScope中包含一个主Job,之后调用的launch或其他方法创建的job都属于CoroutineScope的子Job,每个job都有属于自己的状态,其中包括isActive、isCompleted、isCancelled,以及一些基础操作start()、cancel()、join(),具体的转换流程如下
我们先从创建job开始,当调用launch的时候默认有三个参数CoroutineContext、CoroutineStart以及代码块参数。
- context:CoroutineContext的对象,默认为CoroutineStart.DEFAULT,会与CoroutineScope的context进行折叠
- start:CoroutineStart的对象,默认为CoroutineStart.DEFAULT,代表立即执行,同时还有CoroutineStart.LAZY,代表非立即执行,必须调用job的start()才会开始执行
val job2= lifecycleScope.launch(start =  CoroutineStart.LAZY) {
    delay(2000)
    Log.i("scope test","lazy")
}
job2.start()
当使用这种模式创建时默认就是new状态,此时isActive,isCompleted,isCancelled都为false,当调用start后,转换为active状态,其中只有isActive为true,如果它的任务完成了则会进入Completing状态,此时为等待子job完成,这种状态下还是只有isActive为true,如果所有子job也完成了则会进入Completed状态,只有isCompleted为true。如果在active或Completing状态下出现取消或异常,则会进入Cancelling状态,如果需要取消父job和其他子job则会等待它们取消完成,此时只有isCancelled为true,取消完成后最终进入Cancelled状态,isCancelled和isCompleted都为true
| State | isActive | isCompleted | isCancelled |
|---|---|---|---|
| New | FALSE | FALSE | FALSE |
| Active | TRUE | FALSE | FALSE |
| Completing | TRUE | FALSE | FALSE |
| Cancelling | FALSE | FALSE | TRUE |
| Cancelled | FALSE | TRUE | TRUE |
| Completed | FALSE | TRUE | FALSE |
不同job交互需使用join()与cancelAndJoin()
- join():将当前job添加到其他协程任务里面
- cancelAndJoin():取消操作,只是添加进去后再取消
val job1= GlobleScope.launch(start =  CoroutineStart.LAZY) {
    delay(2000)
    Log.i("scope test","job1")
}
lifecycleScope.launch {
    job1.join()
    delay(2000)
    Log.i("scope test","job2")
}
深入理解suspend
suspend作为kotlin新增的方法修饰词,最终实现还是java,我们先看它们的差异性
suspend fun test1(){}
fun test2(){}
对应java代码
public final Object test1(@NotNull Continuation $completion) {
  return Unit.INSTANCE;
}
public final void test2() {
}
对应字节码
public final test1(Lkotlin/coroutines/Continuation;)Ljava/lang/Object;
  ...
   L0
    LINENUMBER 6 L0
    GETSTATIC kotlin/Unit.INSTANCE : Lkotlin/Unit;
    ARETURN
   L1
    LOCALVARIABLE this Lcom/lieni/android_c/ui/test/TestActivity; L0 L1 0
    LOCALVARIABLE $completion Lkotlin/coroutines/Continuation; L0 L1 1
    MAXSTACK = 1
    MAXLOCALS = 2

public final test2()V
   L0
    LINENUMBER 9 L0
    RETURN
   L1
    LOCALVARIABLE this Lcom/lieni/android_c/ui/test/TestActivity; L0 L1 0
    MAXSTACK = 0
    MAXLOCALS = 1
可以看到,加了suspend的方法其实和普通方法一样,只是传入时多了个Continuation对象,并返回了Unit.INSTANCE对象
Continuation是一个接口,包含了context对象和resumeWith方法
public interface Continuation<in T> {
    public val context: CoroutineContext
    public fun resumeWith(result: Result<T>)
}
而Continuation的具体实现在BaseContinuationImpl中
internal abstract class BaseContinuationImpl(...) : Continuation<Any?>, CoroutineStackFrame, Serializable {
    public final override fun resumeWith(result: Result<Any?>) {
        ...
        while (true) {
            ...
            with(current) {
              	val outcome = invokeSuspend(param)
                ...
                releaseIntercepted()
                if (completion is BaseContinuationImpl) {
                    ...
                } else {
                    ...
                    return
                }
            }
        }
    }
    ...
}
当我们调用resumeWith时,它会一直执行一个循环,调用invokeSuspend(param)和releaseIntercepted() ,直到最顶层completion执行完成后返回,并且释放协程的interceptor
最终的释放在ContinuationImpl中实现
internal abstract class ContinuationImpl(...) : BaseContinuationImpl(completion) {
    ...
    protected override fun releaseIntercepted() {
        val intercepted = intercepted
        if (intercepted != null && intercepted !== this) {
            context[ContinuationInterceptor]!!.releaseInterceptedContinuation(intercepted)
        }
        this.intercepted = CompletedContinuation
    }
}
通过这里知释放最终通过CoroutineContext中为ContinuationInterceptor的Element来实现
而暂停也是同理,继续看suspendCoroutine
public suspend inline fun <T> suspendCoroutine(crossinline block: (Continuation<T>) -> Unit): T =
    suspendCoroutineUninterceptedOrReturn { c: Continuation<T> ->
        val safe = SafeContinuation(c.intercepted())
        ...
    }
默认会调用Continuation的intercepted()方法
internal abstract class ContinuationImpl(...) : BaseContinuationImpl(completion) {
    ...
    public fun intercepted(): Continuation<Any?> =intercepted
            ?: (context[ContinuationInterceptor]?.interceptContinuation(this) ?: this)
                .also { intercepted = it }
}
可以看到暂停最终也是通过CoroutineContext中为ContinuationInterceptor的Element来实现
流程总结(线程切换)
- 创建新的Continuation
- 调用CoroutineScope中的context的ContinuationInterceptor的interceptContinuation方法暂停父任务
- 执行子任务(如果指定了线程,则在新线程执行,并传入Continuation对象)
- 执行完毕后用户调用Continuation的resume或者resumeWith返回结果
- 调用CoroutineScope中的context的ContinuationInterceptor的releaseInterceptedContinuation方法恢复父任务
阻塞与非阻塞
CoroutineScope默认是不会阻塞当前线程的,如果需要阻塞可以使用runBlocking,如果在主线程执行下面代码,会出现2s白屏
runBlocking {
    delay(2000)
    Log.i("scope test","runBlocking is completed")
}
阻塞原理:执行runBlocking默认会创建BlockingCoroutine,而BlockingCoroutine中会一直执行一个循环,直到当前Job为isCompleted状态才会跳出循环
public fun <T> runBlocking(...): T {
    ...
    val coroutine = BlockingCoroutine<T>(newContext, currentThread, eventLoop)
    coroutine.start(CoroutineStart.DEFAULT, coroutine, block)
    return coroutine.joinBlocking()
}
private class BlockingCoroutine<T>(...) : AbstractCoroutine<T>(parentContext, true) {
    ...
    fun joinBlocking(): T {
      ...
      while (true) {
        ...
        if (isCompleted) break
        ...
      }
      ...
    }
}
下面分享给大家一份谷歌大佬编写高级Kotlin强化实战手册(附Demo)。
第一章 Kotlin入门教程
- Kotlin 概述
- Kotlin 与 Java 比较
- 巧用 Android Studio
- 认识 Kotlin 基本类型
- 走进 Kotlin 的数组
- 走进 Kotlin 的集合
- 集合问题
- 完整代码
- 基础语法

第二章 Kotlin 实战避坑指南
- 方法入参是常量,不可修改
- 不要 Companion 、INSTANCE ?
- Java 重载,在 Kotlin 中怎么巧妙过渡一下?
- Kotlin 中的判空姿势
- Kotlin 复写 Java 父类中的方法
- Kotlin “狠”起来,连TODO 都不放过!
- is、as` 中的坑
- Kotlin 中的 Property 的理解
- also 关键字
- takeIf 关键字
- takeIf 关键字
- 单例模式的写法

第三章 项目实战《Kotlin Jetpack 实战》
- 从一个膜拜大神的 Demo 开始
- Kotlin 写 Gradle 脚本是一种什么体验?
- Kotlin 编程的三重境界
- Kotlin 高阶函数
- Kotlin 泛型
- Kotlin 扩展
- Kotlin 委托
- 协程“不为人知”的调试技巧
- 图解协程:suspend

需要这份PDF文档的朋友都可以加入这边的交流裙,前面:1102,中间:405,最后:044,裙里从学生到大佬都有,资源免费分享,不见不散哦!