Springboot-web的访问
#thymeleaf 模板配置
spring:
  thymeleaf:
    prefix: classpath:/templates/
    suffix: .html
    cache: false
Controller 类的配置
    @RequestMapping("/")
    public String demo(){


        return "index";
    }
 thymeleaf 的认识以及语法
之前我们用jsp 跟后台做交互。而Springboot 项目首先是以jar 的方式,不是war .像第二,我们用的还是嵌入式的Tomcat,所以,是不支持jsp 的
Springboot 推荐使用的是模板引擎,springboot 推荐使用的是thymeleaf .
简单的案例demo
html
<!DOCTYPE html>
<html lang="en" xmlns:th="http://www.w3.org/1999/xhtml">
<head>
    <meta charset="UTF-8">
    <title>hhh</title>
</head>
<body>
<!--获取的是普通前台的文本-->
<div th:text="${msg}"></div>
<!--获取的是一个前台的h1 标签-->
<div th:utext="${msg}"></div>
<table>
    <tr th:each="prod:${session.username}">
        <td th:text=${prod.id}></td>
        <td th:text=${prod.name}></td>
        <td th:text="${prod.pwd}"></td>
    </tr>

</table>

</body>
</html>
Controller
package com.jj.demo.Controller;


import com.jj.demo.pojo.Username;
import org.springframework.stereotype.Controller;
import org.springframework.ui.Model;
import org.springframework.web.bind.annotation.RequestMapping;

import javax.servlet.http.HttpServletRequest;
import javax.servlet.http.HttpSession;

@Controller
public class TestController {


//自己课上的
    @RequestMapping("login")
    public String login(HttpServletRequest request){


        Username username = new Username();
        String name="娇娇";
        username.setName(name);
        username.setId(1);
        username.setPwd("123");

        HttpSession session = request.getSession();
        session.setAttribute("username",username);
        return "index";
    }

//    web的
    @RequestMapping("/class1")
    public String Class1(Model model){


//        设置属性
        model.addAttribute("msg","<h1>msg</h1>");
        return "index";
    }

}
不连接数据库的小demo
1,准备工作 实体类
package com.jj.demo.pojo;

import lombok.*;

//部门表
@Data
@AllArgsConstructor
@NoArgsConstructor
@Getter
@Setter
public class Department {


    private Integer id;
    private String departmentName;

}
package com.jj.demo.pojo;

import lombok.*;

import java.util.Date;
@Data
@NoArgsConstructor
@Getter
@Setter
public class Employee {


    private  Integer id;
    private String lastName;
    private String email;
    private Integer gender;
    private Department department;
    private Date birth;


    public Employee(Integer id, String lastName, String email, Integer gender, Department department) {


        this.id = id;
        this.lastName = lastName;
        this.email = email;
        this.gender = gender;
        this.department = department;
        //默认自动生成日期
        this.birth = new Date();
    }
}
dao 层
package com.jj.demo.dao;

import com.jj.demo.pojo.Department;
import org.springframework.stereotype.Repository;

import java.util.Collection;
import java.util.HashMap;
import java.util.Map;

//部门的dao
@Repository
public class Deptdao {


//    添加数据
    private static Map<Integer, Department> dept=null;
//    静态内部类
    static {


    dept = new HashMap<Integer,Department>();


//    添加假的数据

    dept.put(101,new Department(101,"开发部"));
    dept.put(102,new Department(102,"教学部"));
    dept.put(103,new Department(103,"学工部"));
    dept.put(104,new Department(104,"教研部"));
    dept.put(105,new Department(105,"后勤部"));
}
//全查
    public Collection<Department> show(){


        return dept.values();
    }
//    根据id 查询
    public Department Departmentbyid(Integer id){


        return dept.get(id);
    }
}
package com.jj.demo.dao;

import com.jj.demo.pojo.Department;
import com.jj.demo.pojo.Employee;
import org.springframework.beans.factory.annotation.Autowired;
import org.springframework.stereotype.Repository;

import java.util.Collection;
import java.util.HashMap;
import java.util.Map;

@Repository
public class Empdao {


    @Autowired
    Deptdao deptdao;
    //    添加数据
    private static Map<Integer, Employee> emp=null;
    //    静态内部类
    static {


        emp = new HashMap<Integer,Employee>();


//    添加假的数据
        emp.put(1001,new Employee(101,"zyh","[email protected]",1,new Department(101,"开发部")));
        emp.put(1002,new Employee(102,"fjj","[email protected]",0,new Department(102,"教学部")));
        emp.put(1003,new Employee(103,"xhm","[email protected]",0,new Department(103,"学工部")));
        emp.put(1004,new Employee(104,"zzb","[email protected]",0,new Department(104,"教研部")));
        emp.put(1005,new Employee(105,"ll","[email protected]",1,new Department(105,"后勤部")));
    }
//    设置主键id 自增加
    private static Integer id =1006;
//    自增加的方法
    public void add(){


        Employee employee = new Employee();
        if (employee.getId()==null){


            employee.setId(id++);
        }
        employee.setDepartment(deptdao.Departmentbyid(employee.getDepartment().getId()));
        emp.put(employee.getId(),employee);
    }
//    查询全部员工信息
//全查
public Collection<Employee> show(){


    return emp.values();
}
//通过id 查
    public Employee Employeebyid(Integer id){


       return emp.get(id);
    }
//    通过id 删
    public void del(Integer id){


    emp.remove(id);
    }
}
登录的页面
记得引入thymeleaf 的命名空间
<!DOCTYPE html>
<html lang="en"   xmlns:th="http://www.thymeleaf.org">
	<head>
		<meta http-equiv="Content-Type" content="text/html; charset=UTF-8">
		<meta name="viewport" content="width=device-width, initial-scale=1, shrink-to-fit=no">
		<meta name="description" content="">
		<meta name="author" content="">
		<title>Signin Template for Bootstrap</title>
		<!-- Bootstrap core CSS -->
		<link th:href="@{/css/bootstrap.min.css}" rel="stylesheet">
		<!-- Custom styles for this template -->
		<link th:href="@{/css/signin.css}" rel="stylesheet">
	</head>

	<body class="text-center">
		<form class="form-signin" action="dashboard.html">
			<img class="mb-4" th:src="@{/img/bootstrap-solid.svg}" alt="" width="72" height="72">
			<h1 class="h3 mb-3 font-weight-normal" th:text="#{login.tip}">Please sign in</h1>
			<label class="sr-only">Username</label>
			<input type="text" class="form-control" placeholder="Username" required="" autofocus="">
			<label class="sr-only">Password</label>
			<input type="password" class="form-control" placeholder="Password" required="">
			<div class="checkbox mb-3">
				<label>
          <input type="checkbox" value="remember-me"> Remember me
        </label>
			</div>
			<button class="btn btn-lg btn-primary btn-block" type="submit">Sign in</button>
			<p class="mt-5 mb-3 text-muted">© 2019-2020</p>
			<a class="btn btn-sm">中文</a>
			<a class="btn btn-sm">English</a>
		</form>

	</body>

</html>
国际化
在resources 下创建一个名叫 i18n 的文件夹
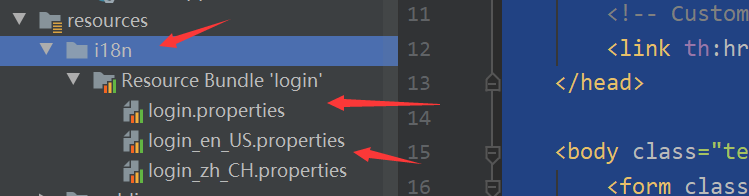
可以在里面添加一些国际化的

 可以同时写了
在页面可以这样获取

 配置文件的配置
#thymeleaf 模板配置
spring:
  thymeleaf:
    prefix: classpath:/templates/
    suffix: .html
#    关闭缓存
    cache: false
#    邮箱的配置
  mail:
    host: smtp.163.com
    username: [email protected]
    password: ***
    protocol: smtp
    default-encoding: UTF-8
    #数据库的配置
  datasource:
    driver-class-name: com.mysql.cj.jdbc.Driver
    url: jdbc:mysql://localhost:3306/op?useUnicode=true&characterEncoding=utf8&serverTimezone=GMT
    username: root
    password: 123456
    #配置国际化
  messages:
    basename: i18n/login
如何设置点击中英文实现切换国际化
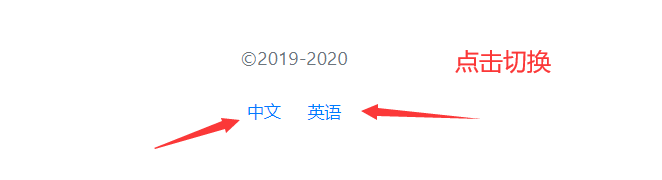
1,先在html 更改
	<a class="btn btn-sm" th:href="@{/index.html(l='zh_CN')}">中文</a>
			<a class="btn btn-sm" th:href="@{/index.html(l='en_US')}">English</a>
2,写一个自己的MylocaleResolver 类 实现人家 spring boot 自己的 localeResolver
package com.jj.demo.config;

import org.springframework.util.StringUtils;
import org.springframework.web.servlet.LocaleResolver;

import javax.servlet.http.HttpServletRequest;
import javax.servlet.http.HttpServletResponse;
import java.util.Locale;

public class MylocaleResolver implements LocaleResolver {


    @Override
    public Locale resolveLocale(HttpServletRequest Request) {


//        获取请求中的语言参数
        String l = Request.getParameter("l");
        Locale aDefault = Locale.getDefault();//如果没有就改变默认的
//        如果请求的连接携带了国际化的参数
        if (!StringUtils.isEmpty(l)){


//            分割
            String[] s = l.split("_");
            aDefault = new Locale(s[0], s[1]);
        }
return aDefault;
    }

    @Override
    public void setLocale(HttpServletRequest httpServletRequest, HttpServletResponse httpServletResponse, Locale locale) {


    }
}
3,写一个扩展类 因为人家springboot 的源码也大都是 加一个@bean 所以只要写的跟他一样,加上该有的注释,就可以实现配置自己了啦
package com.jj.demo.config;

import org.springframework.context.annotation.Bean;
import org.springframework.context.annotation.Configuration;
import org.springframework.web.servlet.LocaleResolver;
import org.springframework.web.servlet.config.annotation.ViewControllerRegistry;
import org.springframework.web.servlet.config.annotation.WebMvcConfigurer;

@Configuration

public class MyMvcConfig implements WebMvcConfigurer {


    @Override
    public void addViewControllers(ViewControllerRegistry registry) {


        registry.addViewController("/").setViewName("index");
        registry.addViewController("/index.html").setViewName("index");
    }
    @Bean
    public LocaleResolver localeResolver(){


        return new MylocaleResolver();
    }
}
跑项目就可以实现点击切换中英文了。记得配置上面的那个

实现登录功能。由于没有真的数据,我们就做几个简单的判断。
先在我们自己的扩展类做一下假的的跳转登录。就是登录之后不能让别人知道你是咋跳过来的
package com.jj.demo.config;

import org.springframework.context.annotation.Bean;
import org.springframework.context.annotation.Configuration;
import org.springframework.web.servlet.LocaleResolver;
import org.springframework.web.servlet.config.annotation.ViewControllerRegistry;
import org.springframework.web.servlet.config.annotation.WebMvcConfigurer;

@Configuration

public class MyMvcConfig implements WebMvcConfigurer {


    @Override
    public void addViewControllers(ViewControllerRegistry registry) {


        registry.addViewController("/").setViewName("index");
        registry.addViewController("/index.html").setViewName("index");
        registry.addViewController("/jj.html").setViewName("dashboard");
    }
    @Bean
    public LocaleResolver localeResolver(){


        return new MylocaleResolver();
    }
}
在控制类写
package com.jj.demo.Controller;

import org.springframework.stereotype.Controller;
import org.springframework.ui.Model;
import org.springframework.util.StringUtils;
import org.springframework.web.bind.annotation.RequestMapping;
import org.springframework.web.bind.annotation.RequestParam;
import org.springframework.web.bind.annotation.ResponseBody;


@Controller
public class DomeController {


    @RequestMapping("login")
//    @ResponseBody
    public String demo(@RequestParam("name") String name, @RequestParam("pwd") String pwd, Model model){


        if (!StringUtils.isEmpty(name)&& "123456".equals(pwd)){


            return "redirect:jj.html";
        }
        else {


            model.addAttribute("msg","你的是无法的!!");
            return "index";
        }

    }
}
前台做一下判断,用来实现如果密码输入错误友好提示

就可以实现了,样式

如果密码账号输入正确

是个假的登录,看不到我们的信息。
实现拦截器的功能
记得在控制层设置session 会话
1,写拦截器类,获取session 会话 ,判断是否为空
package com.jj.demo.config;

import org.springframework.web.servlet.HandlerInterceptor;
import org.springframework.web.servlet.ModelAndView;

import javax.servlet.http.HttpServletRequest;
import javax.servlet.http.HttpServletResponse;
import javax.servlet.http.HttpSession;

public class loginInterceptor implements HandlerInterceptor {


    @Override
    public boolean preHandle(HttpServletRequest request, HttpServletResponse response, Object handler) throws Exception {


        //        获取session 会话
        HttpSession session = request.getSession();
        Object name = session.getAttribute("name");
//        判断名字是否为空
        if (name == null) {


//            提示用户
            request.setAttribute("msg", "没有登录");
            request.getRequestDispatcher("/index.html").forward(request, response);
            return false;
        }else {


            return true;
        }

    }
}
2,在自己的扩展类里写上关于拦截器的 给 记得给资源放行
//拦截器的
    @Override
    public void addInterceptors(InterceptorRegistry registry) {


    registry.addInterceptor(new loginInterceptor()).addPathPatterns("/**").excludePathPatterns("/index.html","/","/login","/css/*","/js/**","/img/**");
    }
}
实现全查的方法
控制层
@RequestMapping("emps")
    public String demo(Model model){


    Collection<Employee> show = empdao.show();
    model.addAttribute("emps", show);
    return "emps/list";

}
前端页面 关键代码
<!--	引入头部导航栏组件 -->
		<div th:replace="~{common/common::topBar}"></div>

		<div class="container-fluid">
			<div class="row">
<!--				dashboard是指的页面名称 ~{.. :: ..}是insert格式 sideBar是dashboard页面的侧边栏组件名-->
			<div th:replace="~{common/common::sideBar}"></div >
				<main role="main" class="col-md-9 ml-sm-auto col-lg-10 pt-3 px-4">
					<h2>Section title</h2>
					<div class="table-responsive">
						<table class="table table-striped table-sm">
							<thead>
								<tr>
									<th>id</th>
									<th>名字</th>
									<th>邮箱</th>
									<th>性别</th>
									<th>部门</th>
									<th>生日</th>
									<th>操作</th>
								</tr>
							</thead>
							<tbody>
								<tr th:each="emp:${emps}">
									<td th:text="${emp.id}"></td>
									<td th:text="${emp.lastName}"></td>
									<td th:text="${emp.email}"></td>
									<td th:text="${emp.gender==0?'女':'男'}"></td>
									<td th:text="${emp.department.getDepartmentName()}"></td>
									<td th:text="${#dates.format(emp.getBirth(),'yyyy-MM-dd HH:mm:ss')}"></td>
									<td>
										<button class="btn btn-sm btn-primary">编辑</button>
										<button class="btn btn-sm btn-danger">编辑</button>
									</td>
								</tr>

							</tbody>
						</table>
					</div>
				</main>
			</div>
		</div>
样式

这里是抽取公共部分的代码


可以用replace获取也可以用insert
添加功能的实现
 控制层
控制层

更新的页面
<!DOCTYPE html>
<!-- saved from url=(0052)http://getbootstrap.com/docs/4.0/examples/dashboard/ -->
<html lang="en" xmlns:th="http://www.thymeleaf.org">

	<head>
		<meta http-equiv="Content-Type" content="text/html; charset=UTF-8">
		<meta name="viewport" content="width=device-width, initial-scale=1, shrink-to-fit=no">
		<meta name="description" content="">
		<meta name="author" content="">

		<title>Dashboard Template for Bootstrap</title>
		<!-- Bootstrap core CSS -->
		<link th:href="@{/css/bootstrap.min.css}" rel="stylesheet">

		<!-- Custom styles for this template -->
		<link th:href="@{/css/dashboard.css}" rel="stylesheet">
		<style type="text/css">
			/* Chart.js */

			@-webkit-keyframes chartjs-render-animation {


				from {


					opacity: 0.99
				}
				to {


					opacity: 1
				}
			}

			@keyframes chartjs-render-animation {


				from {


					opacity: 0.99
				}
				to {


					opacity: 1
				}
			}

			.chartjs-render-monitor {


				-webkit-animation: chartjs-render-animation 0.001s;
				animation: chartjs-render-animation 0.001s;
			}
		</style>
	</head>

	<body>
<!--	引入头部导航栏组件 -->
		<div th:replace="~{common/common::topBar}"></div>

		<div class="container-fluid">
			<div class="row">
<!--				dashboard是指的页面名称 ~{.. :: ..}是insert格式 sideBar是dashboard页面的侧边栏组件名-->
			<div th:replace="~{common/common::sideBar}"></div >
				<main role="main" class="col-md-9 ml-sm-auto col-lg-10 pt-3 px-4">
					<form class="form-horizontal" th:action="@{/add}" method="post">
						<div class="form-group">
							<label for="inputPassword3" class="col-sm-2 control-label">名字</label>
							<div class="col-sm-10">
								<input type="text" class="form-control" id="inputPassword3" placeholder="name" name="lastName">
							</div>
						</div>
						<div class="form-group">
							<label for="inputEmail3" class="col-sm-2 control-label">Email</label>
							<div class="col-sm-10">
								<input type="email" class="form-control" id="inputEmail3" placeholder="Email" name="email">
							</div>
						</div>
						<div class="form-group">
							<label for="inputEmail3" class="col-sm-2 control-label">性别</label>
						<label class="radio-inline">
							<input type="radio" name="gender" id="inlineRadio1" value="0"> 男
						</label>
						<label class="radio-inline">
							<input type="radio" name="gender" id="inlineRadio2" value="1"> 女
						</label>
						</div>
						<div class="form-group">
							<label for="inputEmail3" class="col-sm-2 control-label">部门</label>
							<select class="form-control" name="department.id">
								<option th:each="dept:${show}" th:text="${dept.getDepartmentName()}" th:value="${dept.getId()}"></option>


							</select>
<!--							<label for="inputEmail3" class="col-sm-2 control-label">部门</label>-->
<!--							<div class="col-sm-10">-->
<!--								<input type="text" class="form-control" id="inputEmail" placeholder="部门">-->
<!--							</div>-->
						</div>
						<div class="form-group">
							<label for="inputEmail3" class="col-sm-2 control-label">出生日期</label>
							<div class="col-sm-10">
								<input type="text" class="form-control" id="inp" placeholder="出生的日期" name="birth">
							</div>
						</div>


						<div class="form-group">
							<div class="col-sm-offset-2 col-sm-10">
								<button type="submit" class="btn btn-default">提交</button>
							</div>
						</div>
					</form>
				</main>
			</div>
		</div>

		<!-- Bootstrap core JavaScript
    ================================================== -->
		<!-- Placed at the end of the document so the pages load faster -->
		<script type="text/javascript" th:src="@{/js/jquery-3.2.1.slim.min.js}"></script>
		<script type="text/javascript" th:src="@{/js/popper.min.js}"></script>
		<script type="text/javascript" th:src="@{/js/bootstrap.min.js}"></script>

		<!-- Icons -->
		<script type="text/javascript" th:src="@{/js/feather.min.js}"></script>
		<script>
			feather.replace()
		</script>

		<!-- Graphs -->
		<script type="text/javascript" th:src="@{/js/Chart.min.js}"></script>
		<script>
			var ctx = document.getElementById("myChart");
			var myChart = new Chart(ctx, {


				type: 'line',
				data: {


					labels: ["Sunday", "Monday", "Tuesday", "Wednesday", "Thursday", "Friday", "Saturday"],
					datasets: [{


						data: [15339, 21345, 18483, 24003, 23489, 24092, 12034],
						lineTension: 0,
						backgroundColor: 'transparent',
						borderColor: '#007bff',
						borderWidth: 4,
						pointBackgroundColor: '#007bff'
					}]
				},
				options: {


					scales: {


						yAxes: [{


							ticks: {


								beginAtZero: false
							}
						}]
					},
					legend: {


						display: false,
					}
				}
			});
		</script>

	</body>

</html>
用RESTful 风格

结果


修改
修改页面
<!DOCTYPE html>
<!-- saved from url=(0052)http://getbootstrap.com/docs/4.0/examples/dashboard/ -->
<html lang="en" xmlns:th="http://www.thymeleaf.org">

	<head>
		<meta http-equiv="Content-Type" content="text/html; charset=UTF-8">
		<meta name="viewport" content="width=device-width, initial-scale=1, shrink-to-fit=no">
		<meta name="description" content="">
		<meta name="author" content="">

		<title>Dashboard Template for Bootstrap</title>
		<!-- Bootstrap core CSS -->
		<link th:href="@{/css/bootstrap.min.css}" rel="stylesheet">

		<!-- Custom styles for this template -->
		<link th:href="@{/css/dashboard.css}" rel="stylesheet">
		<style type="text/css">
			/* Chart.js */

			@-webkit-keyframes chartjs-render-animation {


				from {


					opacity: 0.99
				}
				to {


					opacity: 1
				}
			}

			@keyframes chartjs-render-animation {


				from {


					opacity: 0.99
				}
				to {


					opacity: 1
				}
			}

			.chartjs-render-monitor {


				-webkit-animation: chartjs-render-animation 0.001s;
				animation: chartjs-render-animation 0.001s;
			}
		</style>
	</head>

	<body>
<!--	引入头部导航栏组件 -->
		<div th:replace="~{common/common::topBar}"></div>

		<div class="container-fluid">
			<div class="row">
<!--				dashboard是指的页面名称 ~{.. :: ..}是insert格式 sideBar是dashboard页面的侧边栏组件名-->
			<div th:replace="~{common/common::sideBar}"></div >
				<main role="main" class="col-md-9 ml-sm-auto col-lg-10 pt-3 px-4">
					<form class="form-horizontal" th:action="@{/updateemp}" method="post">
						<input type="hidden" th:value="${employeebyid.id}"  name="id">

						<div class="form-group">
							<label  class="col-sm-2 control-label">名字</label>
							<div class="col-sm-10">
								<input type="text" th:value="${employeebyid.lastName}" class="form-control"  name="lastName">
							</div>
						</div>
						<div class="form-group">
							<label for="inputEmail3" class="col-sm-2 control-label">Email</label>
							<div class="col-sm-10">
								<input type="email" th:value="${employeebyid.email}" class="form-control" id="inputEmail3" placeholder="Email" name="email">
							</div>
						</div>
						<div class="form-group">
							<label for="inputEmail3" class="col-sm-2 control-label">性别</label>
						<label class="radio-inline">
							<input type="radio" name="gender" id="inlineRadio1" value="0" th:checked="${employeebyid.getGender()==1}"> 男
						</label>
						<label class="radio-inline">
							<input type="radio" name="gender" id="inlineRadio2" value="1" th:checked="${employeebyid.getGender()==0}"> 女
						</label>
						</div>
						<div class="form-group">
							<label for="inputEmail3" class="col-sm-2 control-label">部门</label>
							<select class="form-control" name="department.id">
								<option th:selected="${dept.id==employeebyid.getDepartment().id}" th:each="dept:${show}" th:text="${dept.getDepartmentName()}" th:value="${dept.getId()}">


								</option>


							</select>
<!--							<label for="inputEmail3" class="col-sm-2 control-label">部门</label>-->
<!--							<div class="col-sm-10">-->
<!--								<input type="text" class="form-control" id="inputEmail" placeholder="部门">-->
<!--							</div>-->
						</div>
						<div class="form-group">
							<label  class="col-sm-2 control-label">出生日期</label>
							<div class="col-sm-10">
								<input type="text" th:value="${#dates.format(employeebyid.getBirth(),'yyyy/MM/dd')}" class="form-control"  placeholder="出生的日期" name="birth">
							</div>
						</div>


						<div class="form-group">
							<div class="col-sm-offset-2 col-sm-10">
								<button type="submit" class="btn btn-default">提交</button>
							</div>
						</div>
					</form>
				</main>
			</div>
		</div>

		<!-- Bootstrap core JavaScript
    ================================================== -->
		<!-- Placed at the end of the document so the pages load faster -->
		<script type="text/javascript" th:src="@{/js/jquery-3.2.1.slim.min.js}"></script>
		<script type="text/javascript" th:src="@{/js/popper.min.js}"></script>
		<script type="text/javascript" th:src="@{/js/bootstrap.min.js}"></script>

		<!-- Icons -->
		<script type="text/javascript" th:src="@{/js/feather.min.js}"></script>
		<script>
			feather.replace()
		</script>

		<!-- Graphs -->
		<script type="text/javascript" th:src="@{/js/Chart.min.js}"></script>
		<script>
			var ctx = document.getElementById("myChart");
			var myChart = new Chart(ctx, {


				type: 'line',
				data: {


					labels: ["Sunday", "Monday", "Tuesday", "Wednesday", "Thursday", "Friday", "Saturday"],
					datasets: [{


						data: [15339, 21345, 18483, 24003, 23489, 24092, 12034],
						lineTension: 0,
						backgroundColor: 'transparent',
						borderColor: '#007bff',
						borderWidth: 4,
						pointBackgroundColor: '#007bff'
					}]
				},
				options: {


					scales: {


						yAxes: [{


							ticks: {


								beginAtZero: false
							}
						}]
					},
					legend: {


						display: false,
					}
				}
			});
		</script>

	</body>

</html>
控制层,写的是回显的代码
//    修改的
    @GetMapping("emp/{id}")

    public String demo4(Model model, @PathVariable("id") Integer id){


//调用通过id 查询的方法
        Employee employeebyid = empdao.Employeebyid(id);
//        设置到会话
        model.addAttribute("employeebyid",employeebyid);
        System.out.println("employeebyid = " + employeebyid);
        System.out.println("我来了");
//        调用 部门表全查的方法
        Collection<Department> show = deptdao.show();
//    绑定到会话,方便后台获取
        model.addAttribute("show",show);
        return "emps/update";
    }
    @PostMapping("updateemp")
    public String demo6(Employee employee){


        //        重定向到首页全查
        empdao.add(employee);
        return "redirect:/emps";

    }
删除的 控制层
//    删除的方法
    @GetMapping("delemp/{id}")
    public String demo9(@PathVariable("id") Integer id){


        empdao.del(id);
        return "redirect:/emps";
    }
最后一些404 ,500 的 只需要在 就行了!!
