导读:如何自定义你的Mac上的Shell终端,本篇供参考。

在Mac OSX上自定义Shell
如果你是Mac的忠实用户,而且有大量时间使用Shell,你一定会知道在OSX Shell下是非常笨拙的,效率并不怎么高。
那么问题来了,如何使OSX Shell更具生产力?
背景
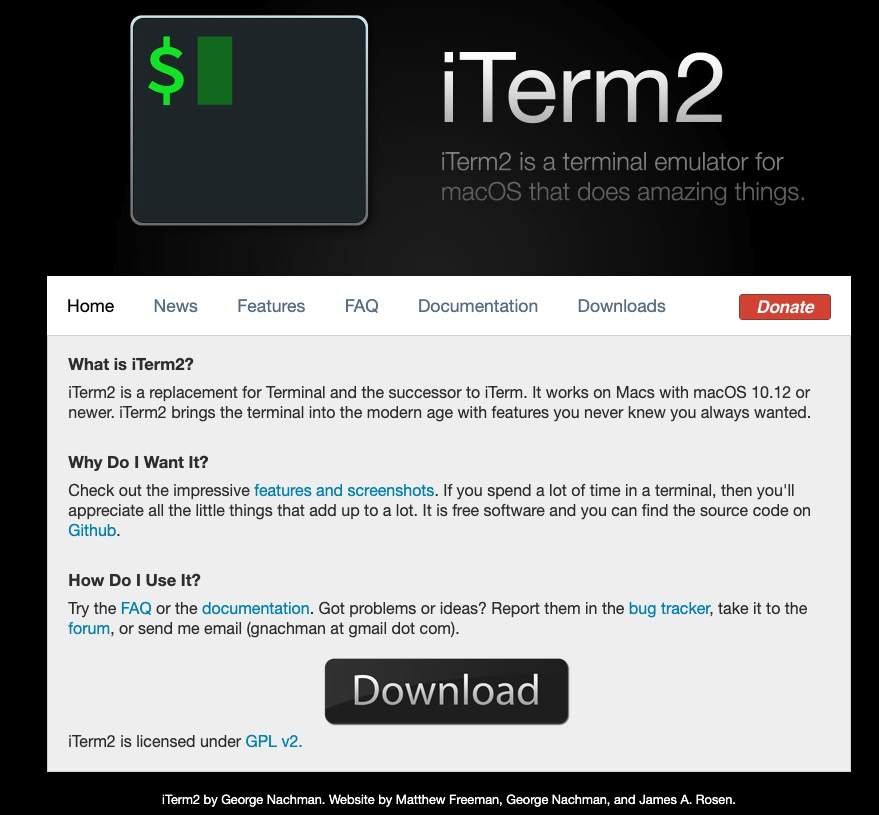
安装/部署 iTerm2
iTearm2是Mac终端命令行的替代品,是第一版本iTerm的增强二代产品,它给人们带来了多项新功能和优化,可以让开发者更加灵活高效。
首先,我们从iTerm官网上下载iTerm2。
官方网址:https://iterm2.com
iTerm2提供了很多有意义的功能,如拆分窗格、搜索、自动填写
即时重现等。
安装XCode
开始安装Xcode,请在iTearm的命令行下运行。
xcode-select --install

提示窗口后,点击同意协议,开始安装,直到它安装完成为止。
部署自制软件
Homebrew(https://brew.sh/)是Mac系统中最常用的软件包管理器,用它来安装管理应用最合适不过。
下面来安装它。安装Homebrew是一个很简单的过程,只需要在iTerm2下运行如下之命令:
/bin/bash -c "$(curl -fsSL https://raw.githubusercontent.com/Homebrew/install/master/install.sh)"
如果出现curl: (7) Failed to connect to raw.githubusercontent.com port 443: Connection refused的信息。
我们找到一位中国热心网友的GitHub,直接Clone就可以。地址为:
https://github.com/jackzhaoyu/ceshi.git
下载下来的rb文件,你可以随便放,但是你能找到就可以。首先你先执行curl 看是不是有这句提示:
curl: try 'curl --help' or 'curl --manual' for more information
没有问题的话,然后cd到你保存rb文件的那个目录,继续执行
ruby ***********.rb
执行完毕之后,回报如下信息:
然后执行brew,就可以了。
Homebrew安装成功后,就可以对其升级更新。如下:
brew updatebrew upgrade
Mac OSX默认状态下安装了Python 2.7,可以用Brew将Python更新到最新版本。接下来,将部署git和vim的最新版本,安装neovim作为vim的替代品。此外,将安装更多有用的软件包,稍后介绍。
brew install python git neovim coreutils inetutilsbrew install vim --env-std --override-system-vimpython --versiongit --version
对于Python,我们可以使用pip进行进安装,可以添加我们可能需要的任何软件包/模块。
pip3 install pygmentssudo pip install powerline-status
现在,我们新的Shell发光时间到。
添加以下代码行到你的 ~/.bash_profile中,然后在终端中执行~/.bashrc。
[[ -f ~/.bashrc ]] && . ~/.bashrctest -e "${HOME}/.iterm2_shell_integration.bash" && source "${HOME}/.iterm2_shell_integration.bash"
现在,我们就可以给Shell添加更加丰富多彩和有用的功能了。在~/.bashrc文件中,添加如下代码:
# ~/.bashrc# If not running interactively, don't do anything[[ $- != *i* ]] && returnif [ -f /etc/bashrc ]; then . /etc/bashrcfiif [ -f /etc/bash_completion ]; then . /etc/bash_completionfi[ -z "$PS1" ] && returnif [[ ${EUID} == 0 ]] ; thenPS1='\[\e[01;31m\]\h\[\e[01;34m\] \W \$\[\e[00m\] 'elsePROMPT_COMMAND='__git_ps1 "\[\e[01;32m\]\u@\h\[\e[01;34m\] \W\[\e[00m\]" " \\\$ "'fi
现在,我们就可以配置其余的bash,如history,手册的别名,为less和cat命令提供更好的颜色输出。
在~/.bashrc文件中添加如下几行:
export EDITOR=vimexport HISTSIZE=100000export HISTFILESIZE=1000000HISTCONTROL=ignoreboth:erasedups:ignorespaceshopt -s histappendPROMPT_COMMAND="history -a; history -c; history -r;$PROMPT_COMMAND"# aliasesalias la='/usr/local/bin/gls --color -lah --group-directories-first'alias ls="ls -G";alias cat="pygmentize -f terminal256 -g -P style=monokai";alias dmesg="dmesg --color=always | less";alias sudo="sudo -i";alias vdir="vdir --color=auto";alias grep="grep --color=auto";alias fgrep="fgrep --color=auto";alias egrep="egrep --color=auto";alias mv="mv -i";alias rm="rm -i";alias cp="cp -i";alias exit="clear ; exit";alias ping="ping -c3";# less colorsexport LESSOPEN='|pygmentize -f terminal256 -g -P style=monokai %s'export LESS='-R'# man pages in coloresman() { LESS_TERMCAP_md=\e[01;31m' \ LESS_TERMCAP_me=\e[0m' \ LESS_TERMCAP_se=\e[0m' \ LESS_TERMCAP_so=\e[01;44;33m' \ LESS_TERMCAP_ue=\e[0m' \ LESS_TERMCAP_us=\e[01;32m' \ command man "$@"}export LC_ALL=en_US.UTF-8export.UTF-8
~/.vimrc的例子:
这样的就可以增强history命令,不必再使用上下箭头在整个历史记录中循环。
接着在主目录里创建一个文件 .inputrc,添加如下条目。
#.inputrc"\e[A": history-search-backward"\e[B": history-search-forward"\e[C": forward-char"\e[D": backward-charset match-hidden-files offset page-completions offset completion-query-items 350set completion-ignore-case onset show-all-if-ambiguous onset bell-style noneTAB: menu-complete
在~/.bashrc中导入~/.inputrc设置:
# import input rc for bash historyexport INPUTRC=~/.inputrc
如果你是一个Git用户,经常在shell下运行CLI命令,现在可以直接知道在哪个分支,而不用再输入 git branch。
在命令行下,使用curl下载两个文件到你的主目录中。
curl -O https://raw.githubusercontent.com/git/git/master/contrib/completion/git-completion.bash --output ~/.git-completion.bashcurl https://raw.githubusercontent.com/git/git/master/contrib/completion/git-prompt.sh --output ~/.git-prompt.sh
并且在~/.bashrc中添加以下两行:
# git completionsource ~/.git-completion.bash# git prompthsource ~/.git-prompt.sh
Master分支
Tmux
另一个有用的工具是TMUX。TMUX是一个终端复用工具,可以让我们在单个窗口中同时使用多个会话,这对于同时运行多个命令行程序很有用。它还可以用于将进程与控制终端分离,让SSH会话保持激活状态,但又不会被看到。
使用如下命令:
brew install tmux
安装后的TMUX
以下是TMUX的配置文件,供各位参考:
# -- general -------------------------------------------------------------------set -g default-terminal "screen-256color" # colors!setw -g xterm-keys onset -s escape-time 10 # faster command sequencesset -sg repeat-time 600 # increase repeat timeoutset -s focus-events onset -g prefix2 C-a # GNU-Screen compatible prefixbind C-a send-prefix -2unbind C-b # Unbind original key activisioinset -q -g status-utf8 on # expect UTF-8 (tmux < 2.2)setw -q -g utf8 onset -g history-limit 406000 # boost history# reload configurationbind r source-file ~/.tmux.conf \; display '~/.tmux.conf sourced'# -- display -------------------------------------------------------------------set -g base-index 1 # start windows numbering at 1setw -g pane-base-index 1 # make pane numbering consistent with windowssetw -g automatic-rename on # rename window to reflect current programset -g renumber-windows on # renumber windows when a window is closedset -g set-titles on # set terminal titleset -g set-titles-string '#H:#S.#I.#P #W #T'set -g display-panes-time 800 # slightly longer pane indicators display timeset -g display-time 1000 # slightly longer status messages display timeset -g status-interval 10 # redraw status line every 10 seconds# clear both screen and historybind -n C-l send-keys C-l \; run 'sleep 0.1' \; clear-history# activityset -g monitor-activity onset -g visual-activity off# -- navigation ----------------------------------------------------------------# create sessionbind C-c new-session# find sessionbind C-f command-prompt -p find-session 'switch-client -t %%'# split current window horizontallybind - split-window -v# split current window verticallybind \ split-window -h# pane navigationbind -r h select-pane -L # move leftbind -r j select-pane -D # move downbind -r k select-pane -U # move upbind -r l select-pane -R # move rightbind > swap-pane -D # swap current pane with the next onebind < swap-pane -U # swap current pane with the previous one# maximize current panebind + run 'cut -c3- ~/.tmux.conf | sh -s _maximize_pane "#{session_name}" #D'# pane resizingbind -r H resize-pane -L 2bind -r J resize-pane -D 2bind -r K resize-pane -U 2bind -r L resize-pane -R 2# window navigationunbind nunbind pbind -r C-h previous-window # select previous windowbind -r C-l next-window # select next windowbind Tab last-window # move to last active window# Bellsset -g visual-bell onset -g bell-action any# Don't lose track of SSH_AGENT etc. from parent environment.set -g update-environment -r# Scroll in shellset -g terminal-overrides 'xterm*:smcup@:rmcup@'set -wg xterm-keys 1# Set status barset -g status-bg blackset -g status-fg whiteset -g status-left-style fg=green# default statusbar colorsset -g status-fg whiteset -g status-bg blackset -g status-style bright# default window title colorsset-window-option -g window-status-style fg=whiteset-window-option -g window-status-style bg=defaultset-window-option -g window-status-style dim# active window title colorsset-window-option -g window-status-current-style fg=whiteset-window-option -g window-status-current-style bg=defaultset-window-option -g window-status-current-style bright# Highlight active windowset-window-option -g window-status-current-style bg=red# Set window notificationssetw -g monitor-activity onset -g visual-activity on
以上配置文件将tmux的激活键从Ctrl+b更改为Ctrl+a,类似于上述屏幕。
至此,配置好了外观漂亮的bash shell和终端,并学习了如何利用添加选项,这样我们可以转到更好的终端Shell,比如使用外观更现代用户体验更好的FISH shell代替bash。
接下来我们来安装FISH终端,并增加一些主题管理器:
brew install fishcurl -L https://get.oh-my.fish | fishomf install bobthefishomf theme bobthefishomf reload
以上,我们安装了FISH和oh-my-fish并部署了bobthefish作为主题。
为了让FISH看起来更好看,再安装几个字体。
sudo pip install powerline-status# install powerline fontsgit clone https://github.com/powerline/fonts.git --depth=1cd fonts/./install.sh
接下来将FISH Shell设置为默认值,使用chsh命令把bash替换为FISH的路径。
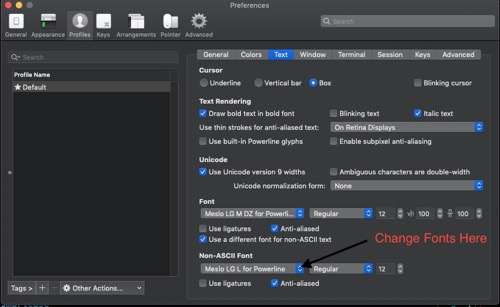
不要忘记为iTerm2修改为新安装的字体,在Preferences../Profile/Text。
以上配置文件将tmux的激活键从Ctrl+b更改为Ctrl+a,类似于上述屏幕。
至此,配置好了外观漂亮的bash shell和终端,并学习了如何利用添加选项,这样我们可以转到更好的终端Shell,比如使用外观更现代用户体验更好的FISH shell代替bash。
接下来我们来安装FISH终端,并增加一些主题管理器:
brew install fishcurl -L https://get.oh-my.fish | fishomf install bobthefishomf theme bobthefishomf reload
以上,我们安装了FISH和oh-my-fish并部署了bobthefish作为主题。
为了让FISH看起来更好看,再安装几个字体。
sudo pip install powerline-status# install powerline fontsgit clone https://github.com/powerline/fonts.git --depth=1cd fonts/./install.sh
接下来将FISH Shell设置为默认值,使用chsh命令把bash替换为FISH的路径。
不要忘记为iTerm2修改为新安装的字体,在Preferences../Profile/Text中,如下图。
还可以通过编辑如下代码为FISH增加其它选项。文件名为~/.config/fish/config.fish
set -g theme_display_git yesset -g theme_display_git_dirty yesset -g theme_display_git_untracked yesset -g theme_display_git_ahead_verbose yesset -g theme_display_git_dirty_verbose yesset -g theme_display_git_stashed_verbose yesset -g theme_display_git_master_branch yesset -g theme_git_worktree_support noset -g theme_display_vagrant noset -g theme_display_docker_machine yesset -g theme_display_k8s_context yesset -g theme_display_hg noset -g theme_display_virtualenv yesset -g theme_display_ruby noset -g theme_display_user sshset -g theme_display_hostname sshset -g theme_display_vi noset -g theme_display_date noset -g theme_display_cmd_duration yesset -g theme_title_display_process yesset -g theme_title_display_path yesset -g theme_title_display_user yesset -g theme_title_use_abbreviated_path noset -g theme_avoid_ambiguous_glyphs yesset -g theme_powerline_fonts yesset -g theme_nerd_fonts noset -g theme_show_exit_status yesset -g theme_color_scheme darkset -g fish_prompt_pwd_dir_length 0set -g theme_project_dir_length 1set -x EDITOR vimset -Ux LC_ALL en_US.UTF-8set -Ux LANG en_US.UTF-8
想要让tmux以FISH界面启动,可以在~/.tmux.conf的开头添加如下两行:
source /usr/local//lib/python3.7/site-packages/powerline/bindings/tmux/powerline.confset-option -g default-shell "/usr/local/bin/fish"
可以在 ~/.config/fish/functions/中添加别名。可以在https://github.com/mudrii/.files/tree/master/HWD_Mac/.config/fish/functions找到更多实例。
使用FISH和tmux,我们的终端应该看起来更好。如下图:
改进的终端视图与部局
还没有完全完成,我们需要让shell主题和VIM编辑器都看起来不错,这样才更完美。
第一步来安装vim-plug(https://github.com/junegunn/vim-plug),它是vim的插件管理器,可以用来安装、卸载vim的相关插件。
curl -fLo〜 / .vim / autoload / plug.vim --create -dirs \ https://raw.githubusercontent.com/junegunn/vim-plug/master/plug.vim
编辑~/.vimrc配置文件,添加以下代码行:
call plug#begin()Plug 'scrooloose/nerdTree'Plug 'ctrlpvim/ctrlp.vim'Plug 'bling/vim-airline'Plug 'tpope/vim-fugitive'call plug#end()let g:airline_powerline_fonts = 1if !exists('g:airline_symbols') let g:airline_symbols = {}endiflet g:airline_symbols.space = "\ua0"let g:airline#extensions#tabline#enabled = 1let g:airline#extensions#tabline#show_buffers = 0let g:airline_theme = 'dark'let g:airline#extensions#hunks#enabled=0let g:airline#extensions#branch#enabled=1let NERDTreeShowHidden=1
打开vim编辑器并运行 PlugInstall,这将安装所有的插件。其定义文件在 ~/.vimrc。如下图:
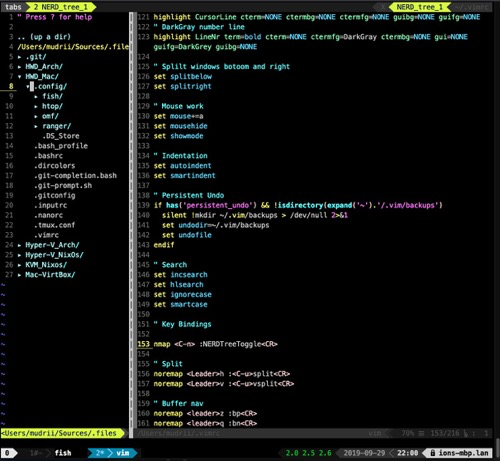
在vim编辑器上添加插件
余下的 ~/.vimrc(一些编辑器的简洁选项),可以在https://github.com/mudrii/.files/blob/master/HWD_Mac/.vimrc。
相关配置文件可以在以下GitHub地址找到。
https://github.com/mudrii/.files/tree/master