
我们经常会用NFS做后端存储来做测试,因为其部署简单。但是在生产中我们并不会去选择NFS,更多的是Ceph、Glusterfs等等,今天就来带大家了解在kubernetes中使用Glusterfs。
一、安装Glusterfs
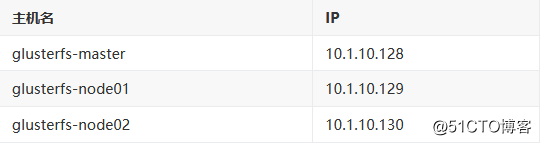
1.1、规划
1.2、安装
我们这里采用的是YUM安装,有兴趣的也可以用其他安装方式,比如源码安装
(1)、配置hosts(/etc/hosts)
10.1.10.129 glusterfs-node01

10.1.10.130 glusterfs-node02

10.1.10.128 glusterfs-master
(2)、YUM安装
# yum install centos-release-gluster -y

# yum install -y glusterfs glusterfs-server glusterfs-fuse glusterfs-rdma
(3)、启动并配置开机自启动
# systemctl start glusterd.service && systemctl enable glusterd.service(4)、如果防火墙是开启的需要配置防火墙
# 如果需要可以加iptables

# iptables -I INPUT -p tcp -m state --state NEW -m tcp --dport 24007 -j  ACCEPT

# iptables -I INPUT -p tcp -m state --state NEW -m tcp --dport 24008 -j ACCEPT

# iptables -I INPUT -p tcp -m state --state NEW -m tcp --dport 2222 -j ACCEPT

# iptables -I INPUT -p tcp -m state --state NEW -m multiport --dports 49152:49251 -j ACCEPT
(5)、将节点加入集群
# gluster peer probe glusterfs-master

# gluster peer probe glusterfs-node01

# gluster peer probe glusterfs-node02
(6)、查看集群状态
# gluster peer status

Number of Peers: 2

Hostname: k8s-node01

Uuid: bb59f0ee-1901-443c-b721-1fe3a1edebb4

State: Peer in Cluster (Connected)

Other names:

glusterfs-node01

10.1.10.129

Hostname: glusterfs-node02

Uuid: a0d1448a-d0f2-432a-bb45-b10650db106c

State: Peer in Cluster (Connected)

Other names:

10.1.10.130
1.3、测试
(1)、创建volume
# 创建数据目录,节点都要操作

# mkdir /data/gluster/data -p

# gluster volume create glusterfs_volume replica 3 master:/data/gluster/data node1:/data/gluster/data node2:/data/gluster/data force
(2)、查看volume
# gluster volume info

Volume Name: glusterfs_volume

Type: Replicate

Volume ID: 53bdad7b-d40f-4160-bd42-4b70c8278506

Status: Created

Snapshot Count: 0

Number of Bricks: 1 x 3 = 3

Transport-type: tcp

Bricks:

Brick1: master:/data/gluster/data

Brick2: node1:/data/gluster/data

Brick3: node2:/data/gluster/data

Options Reconfigured:

transport.address-family: inet

storage.fips-mode-rchecksum: on

nfs.disable: on

performance.client-io-threads: off
(3)、启动volume
# gluster volume start glusterfs_volume(4)、安装client
# yum install -y glusterfs glusterfs-fuse(5)、挂载
# mount -t glusterfs glusterfs-master:glusterfs_volume /mnt1.4、调优
# 开启 指定 volume 的配额

$ gluster volume quota k8s-volume enable

# 限制 指定 volume 的配额

$ gluster volume quota k8s-volume limit-usage / 1TB

# 设置 cache 大小, 默认32MB

$ gluster volume set k8s-volume performance.cache-size 4GB

# 设置 io 线程, 太大会导致进程崩溃

$ gluster volume set k8s-volume performance.io-thread-count 16

# 设置 网络检测时间, 默认42s

$ gluster volume set k8s-volume network.ping-timeout 10

# 设置 写缓冲区的大小, 默认1M

$ gluster volume set k8s-volume performance.write-behind-window-size 1024MB
二、在k8s中测试
2.1、简单测试
(1)、配置endpoints
# curl -O https://raw.githubusercontent.com/kubernetes/examples/master/volumes/glusterfs/glusterfs-endpoints.json修改glusterfs-endpoints.json,配置GlusterFS集群信息
 {

  "kind": "Endpoints",

  "apiVersion": "v1",

  "metadata": {

    "name": "glusterfs-cluster"

  },

  "subsets": [

    {

      "addresses": [

        {

          "ip": "10.1.10.128"

        }

      ],

      "ports": [

        {

          "port": 2020

        }

      ]

    }

  ]

}
port可以随意写,ip为GlusterFS的IP地址
创建配置文件
# kubectl apply -f glusterfs-endpoints.json

# kubectl get ep

NAME                ENDPOINTS          AGE

glusterfs-cluster   10.1.10.128:2020   7m26s

kubernetes          10.1.10.128:6443   27d
(2)、配置service
curl -O https://raw.githubusercontent.com/kubernetes/examples/master/volumes/glusterfs/glusterfs-service.json修改配置文件,我这里仅修改了端口
{

  "kind": "Service",

  "apiVersion": "v1",

  "metadata": {

    "name": "glusterfs-cluster"

  },

  "spec": {

    "ports": [

      {"port": 2020}

    ]

  }

}
创建service对象
# kubectl apply -f glusterfs-service.json

# kubectl get svc

NAME                TYPE        CLUSTER-IP      EXTERNAL-IP   PORT(S)    AGE

glusterfs-cluster   ClusterIP   10.254.44.189   <none>        2020/TCP   10m

kubernetes          ClusterIP   10.254.0.1      <none>        443/TCP    27d
(3)、创建pod测试
curl -O https://raw.githubusercontent.com/kubernetes/examples/master/volumes/glusterfs/glusterfs-pod.json修改配置文件,修改volumes下的path为我们上面创建的volume名
{

    "apiVersion": "v1",

    "kind": "Pod",

    "metadata": {

        "name": "glusterfs"

    },

    "spec": {

        "containers": [

            {

                "name": "glusterfs",

                "image": "nginx",

                "volumeMounts": [

                    {

                        "mountPath": "/mnt/glusterfs",

                        "name": "glusterfsvol"

                    }

                ]

            }

        ],

        "volumes": [

            {

                "name": "glusterfsvol",

                "glusterfs": {

                    "endpoints": "glusterfs-cluster",

                    "path": "glusterfs_volume",

                    "readOnly": true

                }

            }

        ]

    }

}
创建Pod对象
# kubectl apply -f glusterfs-pod.yaml

# kubectl get pod

NAME        READY   STATUS    RESTARTS   AGE

glusterfs   1/1     Running   0          51s

pod-demo    1/1     Running   8          25h

# kubectl exec -it glusterfs -- df -h

Filesystem                  Size  Used Avail Use% Mounted on

overlay                      17G  2.5G   15G  15% /

tmpfs                        64M     0   64M   0% /dev

tmpfs                       910M     0  910M   0% /sys/fs/cgroup

/dev/mapper/centos-root      17G  2.5G   15G  15% /etc/hosts

10.1.10.128:glusterfs_volume   17G  5.3G   12G  31% /mnt/glusterfs

shm                          64M     0   64M   0% /dev/shm

tmpfs                       910M   12K  910M   1% /run/secrets/kubernetes.io/serviceaccount

tmpfs                       910M     0  910M   0% /proc/acpi

tmpfs                       910M     0  910M   0% /proc/scsi

tmpfs                       910M     0  910M   0% /sys/firmware
我们从磁盘挂载情况可以看到挂载成功了。
2.2、静态PV测试
(1)、创建pv(glusterfs-pv.yaml)
apiVersion: v1

kind: PersistentVolume

metadata:

  name: glusterfs-pv

spec:

  capacity:

    storage: 5Mi

  accessModes:

  - ReadWriteMany

  glusterfs:

    endpoints: glusterfs-cluster

    path: glusterfs_volume

---

apiVersion: v1

kind: PersistentVolumeClaim

metadata:

  name: glusterfs-pvc

spec:

  accessModes:

  - ReadWriteMany

  resources:

    requests:

      storage: 5Mi
创建pv和pvc对象
# kubectl apply -f  glusterfs-pv.yaml

# kubectl get pv

NAME           CAPACITY   ACCESS MODES   RECLAIM POLICY   STATUS   CLAIM                   STORAGECLASS   REASON   AGE

glusterfs-pv   5Mi        RWX            Retain           Bound    default/glusterfs-pvc                           15s

# kubectl get pvc

NAME            STATUS   VOLUME         CAPACITY   ACCESS MODES   STORAGECLASS   AGE

glusterfs-pvc   Bound    glusterfs-pv   5Mi        RWX                           18s
从上面可知绑定成功,可以自定写一个pod进行测试。
2.3、动态PV测试
在这里我们需要借助heketi来管理Glusterfs。
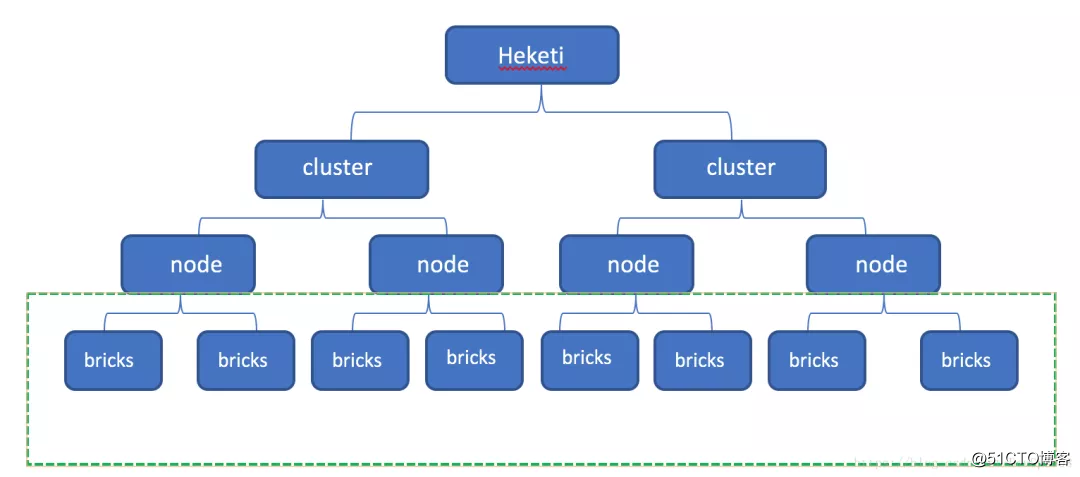
Heketi 提供了丰富的RESTful API 用来对于Glusterfs的volume进行管理。Heketi可以同时管理多个cluster,每个cluster由多个node组成,每个node都是一个物理机,准确的说是一个裸盘。然后每个裸设备有多个bricks,而volume就是多个bricks组成的,但是,一个volume不可以跨node组成。示意图如下所示。
参考文档:https://blog.csdn.net/DevOps008/article/details/80757974
2.3.1、安装Heketi
(1)、安装
# yum -y install heketi heketi-client(2)、配置heketi(/etc/heketi/heketi.json)
{

  "_port_comment": "Heketi Server Port Number",

  "port": "48080",            # 请求端口,默认是8080

  "_use_auth": "Enable JWT authorization. Please enable for deployment",

  "use_auth": false,

  "_jwt": "Private keys for access",

  "jwt": {

    "_admin": "Admin has access to all APIs",

    "admin": {

      "key": "admin@P@ssW0rd"            # 管理员密码

    },

    "_user": "User only has access to /volumes endpoint",

    "user": {

      "key": "user@P@ssW0rd"            # 普通用户密码

    }

  },

  "_glusterfs_comment": "GlusterFS Configuration",

  "glusterfs": {

    "_executor_comment": [

      "Execute plugin. Possible choices: mock, ssh",

      "mock: This setting is used for testing and development.",

      "      It will not send commands to any node.",

      "ssh:  This setting will notify Heketi to ssh to the nodes.",

      "      It will need the values in sshexec to be configured.",

      "kubernetes: Communicate with GlusterFS containers over",

      "            Kubernetes exec api."

    ],

    "executor": "ssh",

    "_sshexec_comment": "SSH username and private key file information",

    "sshexec": {

      "keyfile": "/etc/hekeit/private_key",            # ssh私钥目录

      "user": "root",                                                        # ssh用户

      "port": "22",                                                            # ssh端口

      "fstab": "/etc/fstab"

    },

    "_kubeexec_comment": "Kubernetes configuration",

    "kubeexec": {

      "host" :"https://kubernetes.host:8443",

      "cert" : "/path/to/crt.file",

      "insecure": false,

      "user": "kubernetes username",

      "password": "password for kubernetes user",

      "namespace": "OpenShift project or Kubernetes namespace",

      "fstab": "Optional: Specify fstab file on node.  Default is /etc/fstab"

    },

    "_db_comment": "Database file name",

    "db": "/var/lib/heketi/heketi.db",

    "_loglevel_comment": [

      "Set log level. Choices are:",

      "  none, critical, error, warning, info, debug",

      "Default is warning"

    ],

    "loglevel" : "debug"

  }

}
说明:heketi用来管理cluster的,其中配置地方在executor,其管理方式有以下三种
-
mock
-
ssh
- kubernetes
mock,顾名思义就是测试,在这种模式下,可以对于自己的配置文件什么的进行检验,但是处于此模式下,虽然你可以看到node添加成功,volume创建成功,但是这些volume是不可用的,无法挂载的。所以如果要在SVT或者PROD环境用的话,一定要用ssh或者kubernetes模式。我们这里是用的ssh模式。
(3)、配置免密
# ssh-keygen -t rsa -q -f /etc/heketi/private_key -N ""

# ssh-copy-id -i /etc/heketi/private_key.pub [email protected]

# ssh-copy-id -i /etc/heketi/private_key.pub [email protected]

# ssh-copy-id -i /etc/heketi/private_key.pub [email protected]
(4)、启动heketi
# systemctl enable heketi.service && systemctl start heketi.service

# 测试

# curl http://10.1.10.128:48080/hello

Hello from Heketi
(5)、配置topology
拓扑信息用于让Heketi确认可以使用的存储节点、磁盘和集群,必须自行确定节点的故障域。故障域是赋予一组节点的整数值,这组节点共享相同的交换机、电源或其他任何会导致它们同时失效的组件。必须确认哪些节点构成一个集群,Heketi使用这些信息来确保跨故障域中创建副本,从而提供数据冗余能力,Heketi支持多个Gluster存储集群。
配置Heketi拓扑注意以下几点:
-
可以通过topology.json文件定义组建的GlusterFS集群;
-
topology指定了层级关系:clusters --> nodes --> node/devices --> hostnames/zone;
-
node/hostnames字段的manage建议填写主机ip,指管理通道,注意当heketi服务器不能通过hostname访问GlusterFS节点时不能填写hostname;
-
node/hostnames字段的storage建议填写主机ip,指存储数据通道,与manage可以不一样,生产环境管理网络和存储网络建议分离;
-
node/zone字段指定了node所处的故障域,heketi通过跨故障域创建副本,提高数据高可用性质,如可以通过rack的不同区分zone值,创建跨机架的故障域;
- devices字段指定GlusterFS各节点的盘符(可以是多块盘),必须是未创建文件系统的裸设备。
以文字内容来源:https://www.cnblogs.com/itzgr/p/11913342.html#_labelTop
配置文件如下(/etc/heketi/topology.json)
  {

    "clusters": [

        {

            "nodes": [

                {

                    "node": {

                        "hostnames": {

                            "manage": [

                                "10.1.10.128"

                            ],

                            "storage": [

                                "10.1.10.128"

                            ]

                        },

                        "zone": 1

                    },

                    "devices": [

                        "/dev/sdb1"    # 必须是未创建文件系统的裸磁盘

                    ]

                },

                {

                    "node": {

                        "hostnames": {

                            "manage": [

                                "10.1.10.129"

                            ],

                            "storage": [

                                "10.1.10.129"

                            ]

                        },

                        "zone": 1

                    },

                    "devices": [

                        "/dev/sdb1"

                    ]

                },

                {

                    "node": {

                        "hostnames": {

                            "manage": [

                                "10.1.10.130"

                            ],

                            "storage": [

                                "10.1.10.130"

                            ]

                        },

                        "zone": 1

                    },

                    "devices": [

                        "/dev/sdb1"

                    ]

                }

            ]

        }

    ]

}
重要说明:devices字段指定GlusterFS各节点的盘符(可以是多块盘),必须是未创建文件系统的裸设备
由于每次使用heketi-cli命令的时候都需要写用户名、密码等,我们就将其写入环境变量,方便操作。
# echo "export HEKETI_CLI_SERVER=http://10.1.10.128:48080" >> /etc/profile.d/heketi.sh

# echo "alias heketi-cli='heketi-cli --user admin --secret admin@P@ssW0rd'" >> ~/.bashrc

# source /etc/profile.d/heketi.sh

# source ~/.bashrc

# echo $HEKETI_CLI_SERVER

http://10.1.10.128:48080
(6)、创建cluster
# heketi-cli --server $HEKETI_CLI_SERVER --user admin --secret admin@P@ssW0rd topology load --json=/etc/heketi/topology.json

Creating cluster ... ID: cca360f44db482f03297a151886eea19

    Allowing file volumes on cluster.

    Allowing block volumes on cluster.

    Creating node 10.1.10.128 ... ID: 5216dafba986a087d7c3b1e11fa36c05

        Adding device /dev/sdb1 ... OK

    Creating node 10.1.10.129 ... ID: e384286825957b60213cc9b2cb604744

        Adding device /dev/sdb1 ... OK

    Creating node 10.1.10.130 ... ID: 178a8c6fcfb8ccb02b1b871db01254c2

        Adding device /dev/sdb1 ... OK
(7)、查看集群信息
# 查看集群列表

# heketi-cli cluster list

Clusters:

Id:cca360f44db482f03297a151886eea19 [file][block]

# 查看集群详细信息

# heketi-cli cluster info cca360f44db482f03297a151886eea19

# 查看节点信息

# heketi-cli node list

# 查看节点详细信息

# heketi-cli node info 68f16b2d54acf1c18e354ec46aa736ad
2.3.2、创建volume测试
# heketi-cli volume create --size=2 --replica=2

Name: vol_4f1a171ab06adf80460c84f2132e96e0

Size: 2

Volume Id: 4f1a171ab06adf80460c84f2132e96e0

Cluster Id: cca360f44db482f03297a151886eea19

Mount: 10.1.10.129:vol_4f1a171ab06adf80460c84f2132e96e0

Mount Options: backup-volfile-servers=10.1.10.130,10.1.10.128

Block: false

Free Size: 0

Reserved Size: 0

Block Hosting Restriction: (none)

Block Volumes: []

Durability Type: replicate

Distribute Count: 1

Replica Count: 2

# heketi-cli volume list

Id:4f1a171ab06adf80460c84f2132e96e0    Cluster:cca360f44db482f03297a151886eea19    Name:vol_4f1a171ab06adf80460c84f2132e96e0

# heketi-cli volume info 4f1a171ab06adf80460c84f2132e96e0

Name: vol_4f1a171ab06adf80460c84f2132e96e0

Size: 2

Volume Id: 4f1a171ab06adf80460c84f2132e96e0

Cluster Id: cca360f44db482f03297a151886eea19

Mount: 10.1.10.129:vol_4f1a171ab06adf80460c84f2132e96e0

Mount Options: backup-volfile-servers=10.1.10.130,10.1.10.128

Block: false

Free Size: 0

Reserved Size: 0

Block Hosting Restriction: (none)

Block Volumes: []

Durability Type: replicate

Distribute Count: 1

Replica Count: 2

# 挂载

# mount -t glusterfs 10.1.10.129:vol_4f1a171ab06adf80460c84f2132e96e0 /mnt

# 删除

# heketi-cli volume delete 4f1a171ab06adf80460c84f2132e96e0
2.3.3、在k8s中测试
(1)、创建需要使用的secret(heketi-secret.yaml)
apiVersion: v1

kind: Secret

metadata:

  name: heketi-secret

data:

  key: YWRtaW5AUEBzc1cwcmQ=

type: kubernetes.io/glusterfs
其中key必须是base64转码后的,命令如下:
echo -n "admin@P@ssW0rd" | base64(2)、创建storageclass(heketi-storageclass.yaml)
apiVersion: storage.k8s.io/v1

kind: StorageClass

metadata:

    name: heketi-storageclass

parameters:

    resturl: "http://10.1.10.128:48080"

    clusterid: "cca360f44db482f03297a151886eea19"

    restauthenabled: "true"          # 若heketi开启认证此处也必须开启auth认证

    restuser: "admin"

    secretName: "heketi-secret"      # name/namespace与secret资源中定义一致

    secretNamespace: "default"

    volumetype: "replicate:3"

provisioner: kubernetes.io/glusterfs

reclaimPolicy: Delete
说明:
provisioner:表示存储分配器,需要根据后端存储的不同而变更;
reclaimPolicy: 默认即”Delete”,删除pvc后,相应的pv及后端的volume,brick(lvm)等一起删除;设置为”Retain”时则保留数据,若需删除则需要手工处理;
resturl:heketi API服务提供的url;
restauthenabled:可选参数,默认值为”false”,heketi服务开启认证时必须设置为”true”;
restuser:可选参数,开启认证时设置相应用户名;
secretNamespace:可选参数,开启认证时可以设置为使用持久化存储的namespace;
secretName:可选参数,开启认证时,需要将heketi服务的认证密码保存在secret资源中;
clusterid:可选参数,指定集群id,也可以是1个clusterid列表,格式为”id1,id2”;
- volumetype:可选参数,设置卷类型及其参数,如果未分配卷类型,则有分配器决定卷类型;如”volumetype: replicate:3”表示3副本的replicate卷,”volumetype: disperse:4:2”表示disperse卷,其中‘4’是数据,’2’是冗余校验,”volumetype: none”表示distribute卷
(3)、创建pvc(heketi-pvc.yaml)
apiVersion: v1

kind: PersistentVolumeClaim

metadata:

  name: heketi-pvc

  annotations:

    volume.beta.kubernetes.io/storage-class: heketi-storageclass

spec:

  accessModes:

  - ReadWriteOnce

  resources:

    requests:

      storage: 1Gi
(4)、查看sc和pvc的信息
# kubectl get sc

NAME                  PROVISIONER               RECLAIMPOLICY   VOLUMEBINDINGMODE   ALLOWVOLUMEEXPANSION   AGE

heketi-storageclass   kubernetes.io/glusterfs   Delete          Immediate           false                  6m53s

# kubectl get pvc

NAME            STATUS   VOLUME                                     CAPACITY   ACCESS MODES   STORAGECLASS          AGE

glusterfs-pvc   Bound    glusterfs-pv                               5Mi        RWX                                  26h

heketi-pvc      Bound    pvc-0feb8666-6e7f-451d-ae6f-7f205206b225   1Gi        RWO            heketi-storageclass   82s
(5)、创建Pod挂载pvc(heketi-pod.yaml)
kind: Pod

apiVersion: v1

metadata:

  name: heketi-pod

spec:

  containers:

  - name: heketi-container

    image: busybox

    command:

    - sleep

    - "3600"

    volumeMounts:

    - name: heketi-volume

      mountPath: "/pv-data"

      readOnly: false

  volumes:

  - name: heketi-volume

    persistentVolumeClaim:

      claimName: heketi-pvc
创建Pod对象并查看结果
# kubectl apply -f heketi-pod.yaml

# kubectl get pod

NAME         READY   STATUS    RESTARTS   AGE

glusterfs    1/1     Running   0          26h

heketi-pod   1/1     Running   0          2m55s
在pod中写入文件进行测试
# kubectl exec -it heketi-pod -- /bin/sh

/ # cd /pv-data/

/pv-data # echo "text" > 1111.txt

/pv-data # ls

1111.txt
在存储节点查看是否有我们在pod中写入的文件
# cd /var/lib/heketi/mounts/vg_bffb11849513dded78f671f64e76750c/brick_6ff640a2d45a7f146a296473e7145ee7

[root@k8s-master brick_6ff640a2d45a7f146a296473e7145ee7]# ll

total 0

drwxrwsr-x 3 root 2000 40 Feb  7 14:27 brick

[root@k8s-master brick_6ff640a2d45a7f146a296473e7145ee7]# cd brick/

[root@k8s-master brick]# ll

total 4

-rw-r--r-- 2 root 2000 5 Feb  7 14:27 1111.txt
完