Spring框架(第3天)——AOP和声明式事务
回顾
- 能够使用JdbcTemplate完成增删查改操作
| JdbcTemplate类 | 说明 |
|---|---|
| public JdbcTemplate(DataSource dataSource) | 创建一个模板对象,注入数据源 |
| public int update(String sql, Object…args) | 增删改操作 |
| <T> T queryForObject(String sql, RowMapper<T> rowMapper, Object… args) | 查询1条记录 |
| List<T> query(String sql, RowMapper<T> rowMapper, Object… args) | 查询多条记录 |
| BeanPropertyRowMapper类的构造方法 | 说明 |
|---|---|
| public BeanPropertyRowMapper(Class<T> mappedClass) | 用于行映射的实现类 |
-
使用注解改造CRUD工程
@Repository:配置在DAO层
@Service:配置在业务层
@Autowired:注入对象
-
基于纯注解改造CRUD工程
| 注解 | 作用 |
|---|---|
| @Configuration | 表示这是一个配置类 |
| @ComponentScan | 扫描基包 |
| @Import | 导入其它的配置类 |
| @PropertySource | 将属性文件加载到容器中 |
| @Value | 注入属性值 |
| @Bean | 放在方法: 1. 把方法的返回值放在容器中 2. 可以指定对象的id,如果没有指定id就是方法名字 3. 如果方法有参数,从容器中按类型匹配的方式注入 |
- 能够实现Spring框架整合Junit
| 注解名 | 属性作用 |
|---|---|
| @RunWith(SpringJUnit4ClassRunner.class) @ExtendWith (JUnit5) |
作用:指定第三方运行器 在JUnit中这个注解变了 |
| @ContextConfiguration | locations: 默认指定XML的配置文件 |
| classes: 配置类的类型 |
扩展:JUnit5
<!--junit-->
<dependency>
    <groupId>org.junit.jupiter</groupId>
    <artifactId>junit-jupiter</artifactId>
    <version>5.5.2</version>
    <scope>test</scope>
</dependency>
package com.itheima.test;

import com.itheima.entity.Account;
import com.itheima.service.AccountService;
import org.junit.jupiter.api.Test;
import org.junit.jupiter.api.extension.ExtendWith;
import org.springframework.beans.factory.annotation.Autowired;
import org.springframework.test.context.ContextConfiguration;
import org.springframework.test.context.junit.jupiter.SpringExtension;

import java.util.List;

//指定运行器
@ExtendWith(SpringExtension.class)
@ContextConfiguration("classpath:applicationContext.xml")  //指定配置文件
public class TestAccount2 {


    //获取业务层对象
    @Autowired
    AccountService accountService;

    //查询所有记录
    @Test
    public void testFindAll() {


        List<Account> accountList = accountService.findAll();
        accountList.forEach(System.out::println);
    }

}
@BeforeAll 修饰静态方法,在类加载的时候执行1次
@BeforeEach 在每个测试方法运行前运行
@Test 用在测试类上
@AfterEach 在每个测试方法后运行
@AfterAll 修饰静态方法,在所有测试结束以后,只执行1次
学习目标
- 理解AOP相关概念和术语
- 理解AspectJ表达式语言
- 掌握AOP的注解实现
- 能够理解事务的隔离级别
- 能够理解事务的传播行为
- 能够应用声明式事务
- 基于AOP配置的事务控制案例
- 基于AOP注解的事务控制案例
1. AOP的基本概念
目标
- 什么是切面?
- 什么是面向切面编程?
- 面向切面编程好处?
AOP概念和应用场景
引入案例
比如银行系统会有一个取款流程,传统程序的流程是这样的:
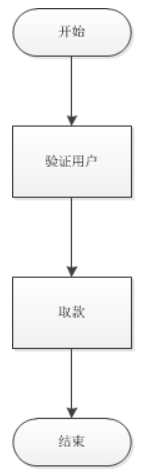
另外系统还会有一个查询余额流程

把这两个流程放到一起:
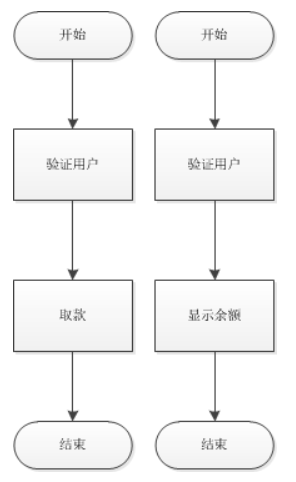
两者有一个相同的验证流程:
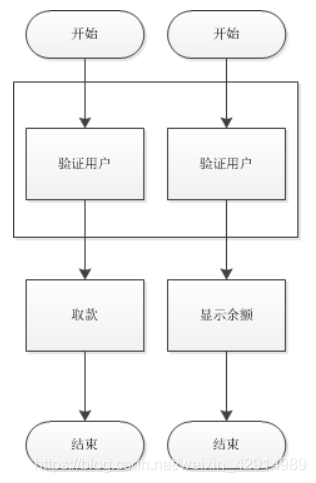
- 发现验证用户的功能是相同的,但又在不同地方出现,我们可以把它提取出来,做成切面类在程序执行的时候动态的添加到业务程序中去,这个切面类可以在不同的地方重用,这叫面向切面编程。
- 面向切面编程的核心就是代理模式
基本概念
AOP(Aspect Oriented Programming),即面向切面编程。 (OOP:Object 面向对象编程)
有了AOP,你写代码时不需要把这个验证用户步骤写进去,即完全不考虑验证用户。只写取款和显示余额的业务代码。而在另一个地方,写好验证用户的代码。这个验证用户的代码就是切面代码,以后在执行取款和显示余额的时候,利用代理模式。将验证用户的功能在执行取款和显示余额前调用。
代码在Spring容器中执行的时候,通过配置告诉Spring你要把这段代码加到哪几个地方,Spring就会在执行正常业务流程的时候帮你把验证代码和取款代码织入到一起。
AOP真正目的是:你写代码的时候,只需考虑主流程,而不用考虑那些不重要的,但又必须要写的其它相同的代码,这些其它的相同代码所在的类就是切面类。
AOP中类与切面的关系
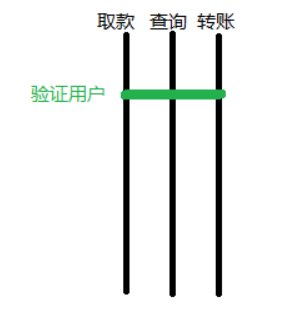
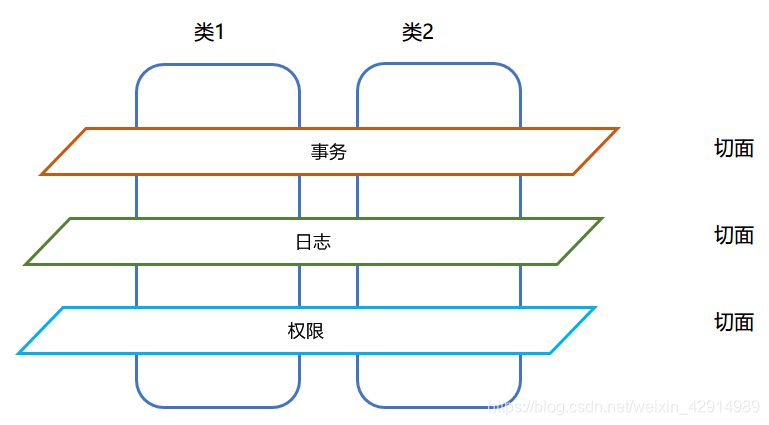
AOP的本质是在一系列纵向的控制流程中,把那些相同的子流程(如:验证用户)提取成一个横向的面。将分散在主流程中相同的代码提取出来,然后在程序编译或运行时,将这些提取出来的切面代码应用到需要执行的地方。
如:"取款,查询,转账"前都要进行验证用户,则验证用户就可以做成切面类。在执行"取款,查询,转账"的操作时,由Spring容器将验证用户的代码织入到它们的前面,从而达到验证用户的目的。而验证用户的代码只需要编写一次,我们也可以将编程的精力放在"取款,查询,转账"的主要业务上。
常用场景
如:通过切面可以分别在类1和类2方法中加入了事务,日志,权限控制等功能。
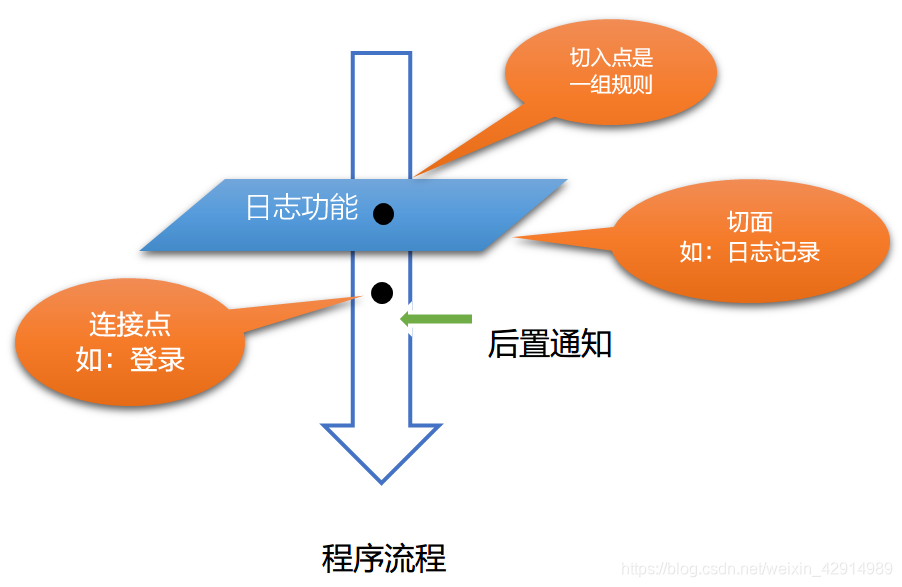
AOP术语
JoinPoint(连接点):在程序执行过程中的某个阶段点,连接点就是指主业务方法的调用,它是客观存在的。
Pointcut(切入点):切入点指的是类或者方法名,满足某一规则的类或方法都是切入点,通过切入点表达式来制定规则。
Advice(通知):切入点处所要执行的程序代码,即切面类中要执行的公共方法。通知的类型有: 前置通知,后置通知,异常通知,最终通知,环绕通知。
Target(目标对象):被代理的对象。比如动态代理案例中的明星,房东。
Weaving(织入):织入指的是把新增的功能用于目标对象,创建代理对象的过程。
Proxy(代理):一个类被AOP织入增强后产生的结果类,即代理类。比如动态代理案例中的经纪人或中介
Aspect(切面):切面指的是切入点(规则)和通知(织入方法)的类 = 切入点+通知
Spring中代理方式的说明
- Spring在AOP编程中使用代理的方式
- 目标对象有接口:使用JDK代理
- 目标对象没有接口:使用CGLIB代理
- 在Spring的AOP编程中,代理对象则由Spring创建,不用自己写了。
- 我们要做的就是配置AOP
小结:使用AOP的好处
1. 在不修改原来代码的前提下对功能进行增强
2. 程序员可以将精力放在主业务代码上
3. 减少冗余的通用代码
2. AOP编程:基于XML的配置【重点】
目标
使用XML配置AOP完成案例
需求
当向数据库中保存账户的时候,使用日志记录下这次保存操作
面向切面编程的流程
- 开发业务类:添加账户
- 开发切面类:记录日志
- 使用AOP将业务类与切面类织入到一起,实现需求的功能
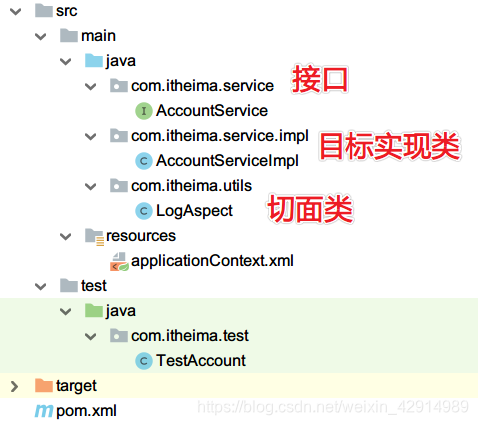
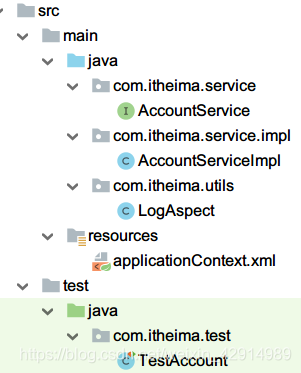
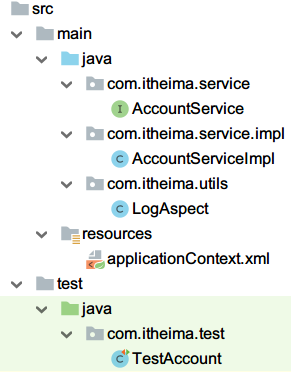
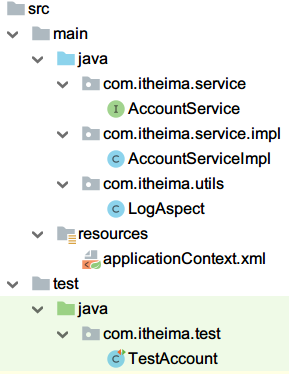
步骤
- AccountService业务接口有void save() 添加账户的方法
- AccountServiceImpl实现业务接口类,输出"保存账户"
- 创建LogAspect切面类,编写通知方法void printLog(),输出:“执行添加操作”
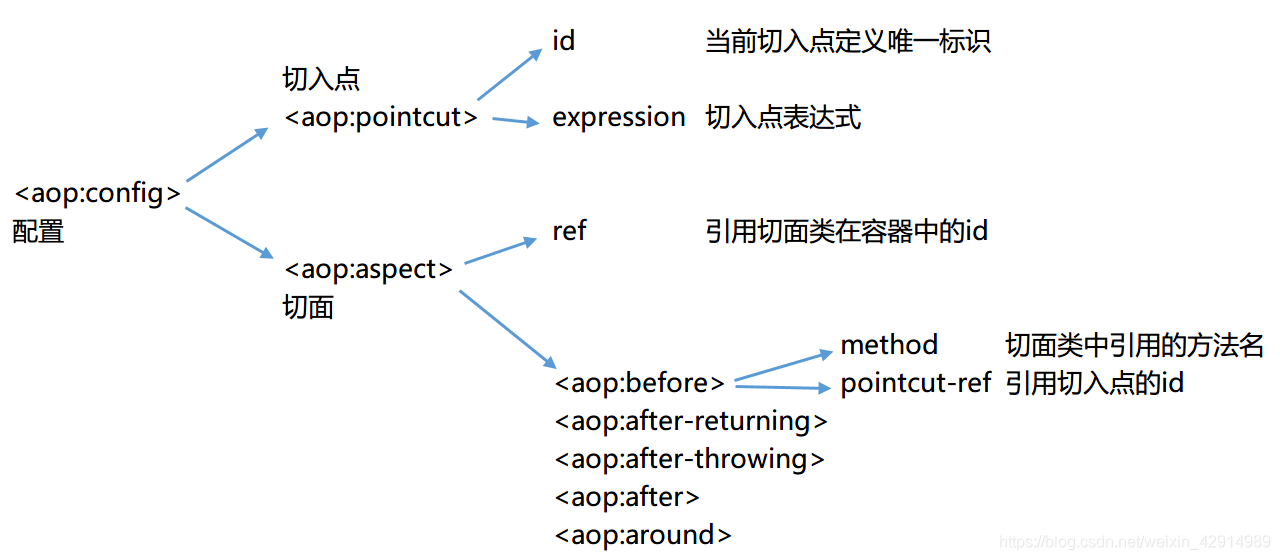
- 配置文件applicationContext.xml
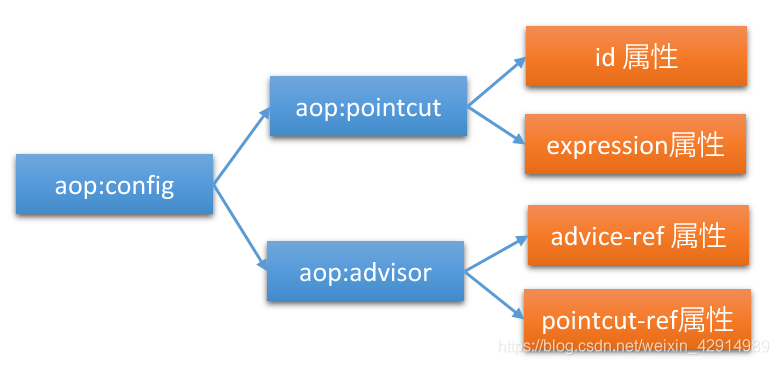
- <aop:config>
- <aop:pointcut>
- <aop:aspect>
- <aop:before>
操作
创建项目
pom.xml
-
导入spring-context
-
导入开源的面向切面编程的组件: aspectjweaver
-
导入JUnit5
<?xml version="1.0" encoding="UTF-8"?>
<project xmlns="http://maven.apache.org/POM/4.0.0"
         xmlns:xsi="http://www.w3.org/2001/XMLSchema-instance"
         xsi:schemaLocation="http://maven.apache.org/POM/4.0.0 http://maven.apache.org/xsd/maven-4.0.0.xsd">
    <modelVersion>4.0.0</modelVersion>

    <groupId>com.itheima</groupId>
    <artifactId>day47_01_AOP</artifactId>
    <version>1.0-SNAPSHOT</version>


    <dependencies>
        <!-- Spring IOC 依赖以及Cglib支持 -->
        <dependency>
            <groupId>org.springframework</groupId>
            <artifactId>spring-context</artifactId>
            <version>5.2.0.RELEASE</version>
        </dependency>
        <!-- AspectJ切面表达式支持 -->
        <dependency>
            <groupId>org.aspectj</groupId>
            <artifactId>aspectjweaver</artifactId>
            <version>1.8.13</version>
        </dependency>
        <!-- 测试 -->
        <dependency>
            <groupId>org.springframework</groupId>
            <artifactId>spring-test</artifactId>
            <version>5.2.0.RELEASE</version>
            <scope>test</scope>
        </dependency>
        <!--junit5-->
        <dependency>
            <groupId>org.junit.jupiter</groupId>
            <artifactId>junit-jupiter</artifactId>
            <version>5.5.2</version>
            <scope>test</scope>
        </dependency>
    </dependencies>
</project>
业务接口
package com.itheima.service;

/**
 * 账户业务接口
 */
public interface AccountService {


    /**
     * 保存账户
     */
    void save();
}
业务实现类
实现业务接口类,输出"保存账户"
package com.itheima.service.impl;

import com.itheima.service.AccountService;

public class AccountServiceImpl implements AccountService {


    /**
     * 保存账户
     */
    @Override
    public void save() {


        System.out.println("保存账户");
    }
}
记录日志的工具类
- 编写日志类(切面类),类名com.itheima.utils.LogAspect
- 在类中编写方法:public void printLog(),输出:执行了操作
package com.itheima.utils;

import java.sql.Timestamp;

/**
 * 记录日志功能的类:切面类 = 切入点(规则)+通知(方法)
 */
public class LogAspect {


    /**
     * 记录日志
     */
    public void printLog() {


        System.out.println(new Timestamp(System.currentTimeMillis()) + " 记录日志");
    }
}
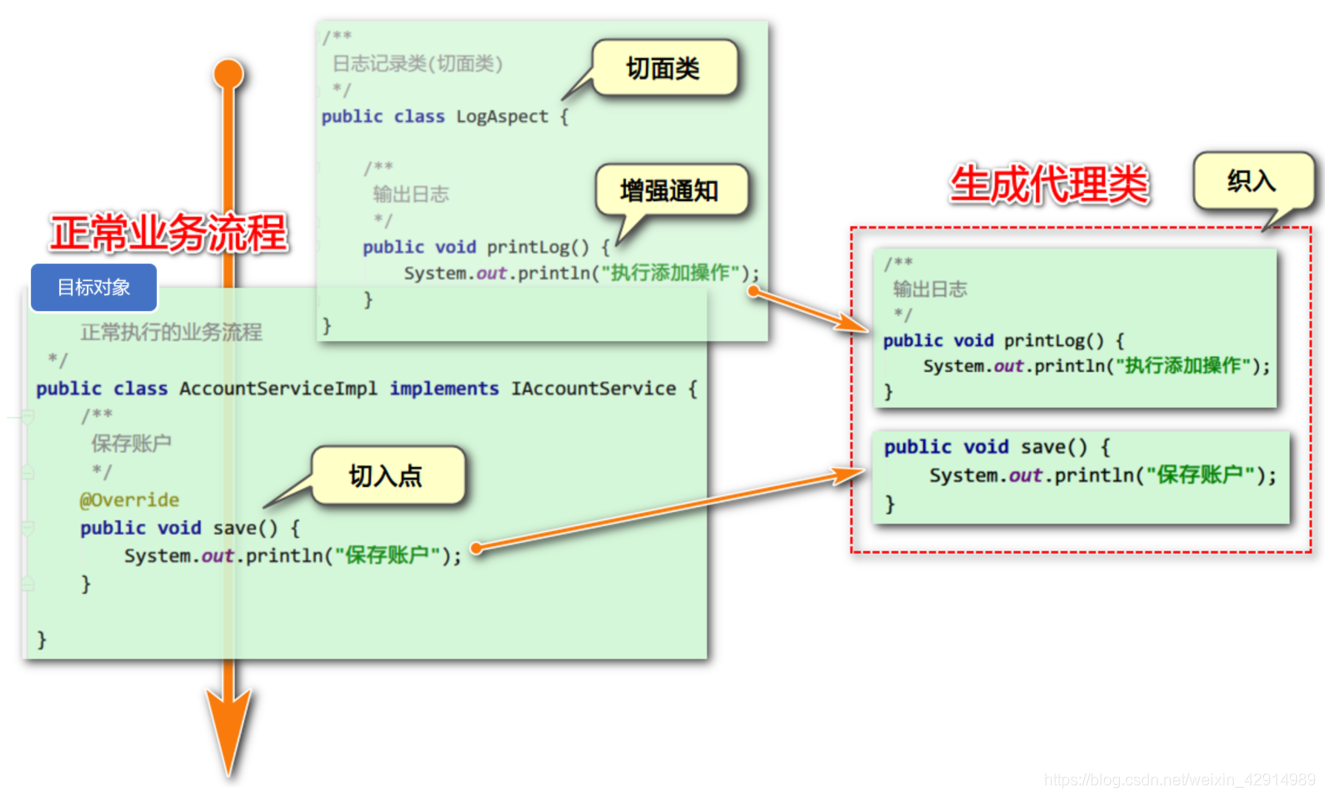
执行流程分析
技术点
XML中关于AOP的配置
applicationContext.xml配置文件
- 配置日志记录类,这是切面类:LogAspect
- 配置正常的业务类:AccountServiceImpl
- AOP配置,配置流程参考上图
切点表达式:execution(public void com.itheima.service.impl.AccountServiceImpl.save())
注:在导入aop的命名空间,idea可以自动导入
<?xml version="1.0" encoding="UTF-8"?>
<beans xmlns="http://www.springframework.org/schema/beans"
xmlns:xsi="http://www.w3.org/2001/XMLSchema-instance" xmlns:aop="http://www.springframework.org/schema/aop"
xsi:schemaLocation="http://www.springframework.org/schema/beans http://www.springframework.org/schema/beans/spring-beans.xsd http://www.springframework.org/schema/aop https://www.springframework.org/schema/aop/spring-aop.xsd">
<!--正常业务对象-->
<bean class="com.itheima.service.impl.AccountServiceImpl" id="accountService"/>
<!-- 切面类:日志记录对象 -->
<bean class="com.itheima.utils.LogAspect" id="logAspect"/>
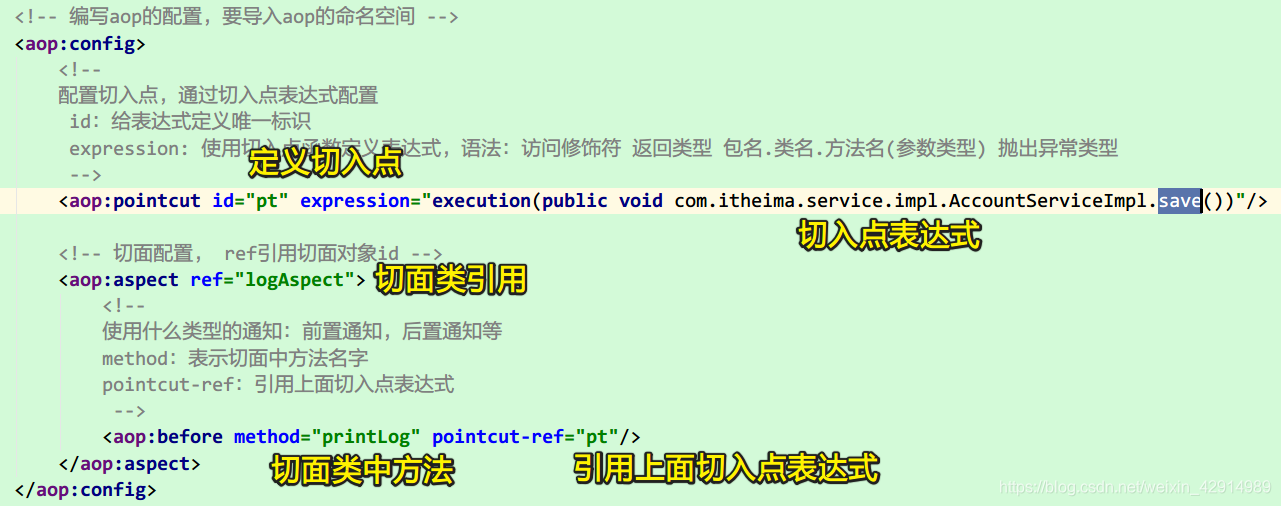
<!-- 编写aop的配置,要导入aop的命名空间 -->
<aop:config>
<!--
配置切入点,通过切入点表达式配置
id:给表达式定义唯一标识
expression: 使用切入点函数定义表达式,语法:访问修饰符 返回类型 包名.类名.方法名(参数类型) 抛出异常类型
-->
<aop:pointcut id="pt" expression="execution(public void com.itheima.service.impl.AccountServiceImpl.save())"/>
<!-- 切面配置, ref引用切面对象id -->
<aop:aspect ref="logAspect">
<!--
使用什么类型的通知:前置通知,后置通知等
method:表示切面中方法名字
pointcut-ref:引用上面切入点表达式
-->
<aop:before method="printLog" pointcut-ref="pt"/>
</aop:aspect>
</aop:config>
</beans>
测试类
- 调用业务方法
- 输出业务类的getClass()查看输出的代理类对象
package com.itheima.test;

import com.itheima.service.AccountService;
import org.junit.jupiter.api.Test;
import org.junit.jupiter.api.extension.ExtendWith;
import org.springframework.beans.factory.annotation.Autowired;
import org.springframework.test.context.ContextConfiguration;
import org.springframework.test.context.junit.jupiter.SpringExtension;

/**
 * 测试类
 */
@ExtendWith(SpringExtension.class)  //指定第三方运行类
@ContextConfiguration("classpath:applicationContext.xml")
public class TestAccount {


    @Autowired
    private AccountService accountService;

    @Test
    public void testSave() {


        System.out.println("业务对象类型:" + accountService.getClass());
        accountService.save();
    }

}
执行效果
业务对象类型:class com.sun.proxy.$Proxy17
2020-12-31 09:22:10.164 记录日志
保存账户
小结
AOP的配置,本质上就是使用代理模式实现功能增强。不需要自己编写代理模式,而通过配置就可以实现。
3. AspectJ表达式
目标
掌握切入点表达式语法
作用
切入点表达式的作用:一组规则,指定哪些类和方法要被切入
切点函数
| 切入点函数 | 作用 |
|---|---|
| execution | 细粒度函数,精确到方法 |
| within | 粗粒度,只能精确到类 |
| bean | 粗粒度,精确到类,从容器中通过id获取对象 |
execution表达式语法
?表示出现0次或1次

方法中参数个数通配符写法:
()  没有参数
(*) 1个或多个参数
(..) 0个或多个参数
类全名的包通配符写法:
.. 表示当前包和子包
举例
execution(public void com.itheima.service.impl.AccountServiceImpl.save())
最精确的写法
execution(* com.itheima.service..*.*(String))
service的包和子包下面所有的类和方法,方法参数是String类型
execution(* *(..))
匹配所有的类和方法
execution(* save(..)) || execution(* update(..))
匹配方法名是save或update的方法
也可以使用&&符号,虽然语法是正确的,但没有意义
!execution(* save(..))
除了方法名是save的所有方法
within(com.itheima..*)
匹配包和子包中所有的类
bean(accountService)
从容器中获取一个id为accountService的类中所有方法
bean(*Service)
从容器中获取所有Service的方法
切点表达式使用案例
-
复制项目
-
修改AccountService接口,创建方法int update(String name),并且实现方法。
AccountService接口
package com.itheima.service;

/**
 * 账户业务类
 */
/**
 * 账户业务接口
 */
public interface AccountService {


    /**
     * 保存账户
     */
    void save();

    /**
     * 更新账户
     * @param name
     * @return
     */
    int update(String name);
}
AccountServiceImpl实现类
package com.itheima.service.impl; import com.itheima.service.AccountService; public class AccountServiceImpl implements AccountService { /** * 保存账户 */ @Override public void save() { System.out.println("保存账户"); } /** * 更新账户 * @param name * @return */ @Override public int update(String name) { System.out.println("更新了" + name + "的账户"); return 1; } } -
LogAspect类,输出:“现在时间是:xxx” (没变)
-
修改测试类,同时调用save()和update()方法
package com.itheima.test; import com.itheima.service.AccountService; import org.junit.jupiter.api.Test; import org.junit.jupiter.api.extension.ExtendWith; import org.springframework.beans.factory.annotation.Autowired; import org.springframework.test.context.ContextConfiguration; import org.springframework.test.context.junit.jupiter.SpringExtension; /** * 测试类 */ @ExtendWith(SpringExtension.class) //指定第三方运行类 @ContextConfiguration("classpath:applicationContext.xml") public class TestAccount { @Autowired private AccountService accountService; @Test public void testSave() { System.out.println("业务对象类型:" + accountService.getClass()); accountService.save(); accountService.update("小乔"); } } -
分别修改applicationContext.xml中切入点表达式,执行不同的效果
切入点表达式
execution(* com.itheima.service.impl.*.*(..)) execution(* com.itheima.service..*.*(String)) execution(* update*(..)) execution(* save(..)) || execution(* update(..)) !execution(* save(..)) within(com.itheima..*) bean(accountService) -
applicationContext.xml代码
<?xml version="1.0" encoding="UTF-8"?>
<beans xmlns="http://www.springframework.org/schema/beans"
       xmlns:xsi="http://www.w3.org/2001/XMLSchema-instance" xmlns:aop="http://www.springframework.org/schema/aop"
       xsi:schemaLocation="http://www.springframework.org/schema/beans http://www.springframework.org/schema/beans/spring-beans.xsd http://www.springframework.org/schema/aop https://www.springframework.org/schema/aop/spring-aop.xsd">

    <!--正常业务对象-->
    <bean class="com.itheima.service.impl.AccountServiceImpl" id="accountService"/>

    <!-- 切面类:日志记录对象 -->
    <bean class="com.itheima.utils.LogAspect" id="logAspect"/>

    <!-- 编写aop的配置,要导入aop的命名空间 -->
    <aop:config>
        <!--
        配置切入点,通过切入点表达式配置
         id:给表达式定义唯一标识
         expression: 使用切入点函数定义表达式,语法:访问修饰符 返回类型 包名.类名.方法名(参数类型) 抛出异常类型
         -->
        <aop:pointcut id="pt" expression="bean(accountService) "/>

        <!-- 切面配置, ref引用切面对象id -->
        <aop:aspect ref="logAspect">
            <!--
            使用什么类型的通知:前置通知,后置通知等
            method:表示切面中方法名字
            pointcut-ref:引用上面切入点表达式
             -->
            <aop:before method="printLog" pointcut-ref="pt"/>
        </aop:aspect>
    </aop:config>
</beans>
小结
- 切入点表达式由以下部分组成:
execution(modifiers-pattern? ret-type-pattern declaring-type-pattern?name-pattern(param-pattern) throws-pattern?)
访问修饰符 返回类型 包名.类名.方法名(参数类型) 抛出异常类型
-
必须的参数是哪三个?
返回类型 方法名 参数类型 -
以下切点函数的作用:
指示符 作用 execution 细粒度,精确到方法 within 粗粒度,精确到类 bean 粗粒度,精确到类(从容器中获取)
4. AOP编程:常用标签和通知类型
目标
- 常用的AOP标签和属性
- 每种通知类型的介绍
AOP中的标签

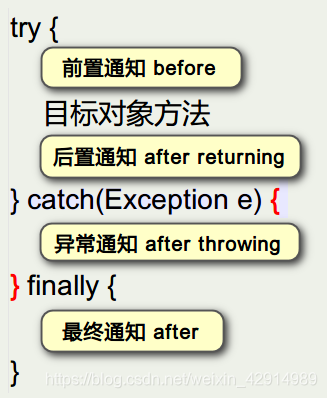
通知类型介绍
- 前置通知:在主业务方法前执行
- 后置通知:在主业务方法后执行
- 异常通知:在主业务方法抛出异常的时候执行
- 最终通知:无论主业务方法是否出现异常,都会执行。注:如果配置在后置通知的前面,会先执行最终通知
- 环绕通知:相当于上面所有通知的组合
伪代码
5. AOP案例:前置、后置、异常、最终通知
目标
通过案例学习前四种通知的使用
需求
- 给LogAspect日志记录类添加:前置,后置,异常,最终通知的方法
- 在applicationContext.xml配置文件中配置上面的通知,分别查看不同的结果。
步骤
-
修改LogAspect中的方法
public void before() public void afterReturning() public void afterThrowing() public void after() -
修改AccountService的int update(String name)方法
如果账户名为NewBoy,则抛出运行时异常:“余额不足”
-
修改applicationContext.xml
- 指定切点表达式execution(* update(…))
- 前置通知
- 后置通知
- 异常通知
- 最终通知
-
注:如果after标签放在afterReturning标签之前,则after会先执行
代码
LogAspect.java
package com.itheima.utils;

import java.sql.Timestamp;

/**
 * 记录日志功能的类:切面类 = 切入点(规则)+通知(方法)
 */
public class LogAspect {


    public void before() {


        System.out.println("---前置通知---");
    }

    public void afterReturning() {


        System.out.println("---后置通知---");
    }

    public void afterThrowing() {


        System.out.println("---异常通知---");
    }

    public void after() {


        System.out.println("---最终通知---");
    }
}
applicationContext.xml
<?xml version="1.0" encoding="UTF-8"?>
<beans xmlns="http://www.springframework.org/schema/beans"
       xmlns:xsi="http://www.w3.org/2001/XMLSchema-instance" xmlns:aop="http://www.springframework.org/schema/aop"
       xsi:schemaLocation="http://www.springframework.org/schema/beans http://www.springframework.org/schema/beans/spring-beans.xsd http://www.springframework.org/schema/aop https://www.springframework.org/schema/aop/spring-aop.xsd">

    <!--正常业务对象-->
    <bean class="com.itheima.service.impl.AccountServiceImpl" id="accountService"/>

    <!-- 切面类:日志记录对象 -->
    <bean class="com.itheima.utils.LogAspect" id="logAspect"/>

    <!-- 编写aop的配置,要导入aop的命名空间 -->
    <aop:config>
        <!--
        配置切入点,通过切入点表达式配置
         id:给表达式定义唯一标识
         expression: 使用切入点函数定义表达式,语法:访问修饰符 返回类型 包名.类名.方法名(参数类型) 抛出异常类型
         -->
        <aop:pointcut id="pt" expression="execution(* update(..))"/>

        <!-- 切面配置, ref引用切面对象id -->
        <aop:aspect ref="logAspect">
            <!--
            使用什么类型的通知:前置通知,后置通知等
            method:表示切面中方法名字
            pointcut-ref:引用上面切入点表达式
             -->
            <aop:before method="before" pointcut-ref="pt"/>
            <!-- 后置通知 -->
            <aop:after-returning method="afterReturning" pointcut-ref="pt"/>
            <!-- 异常通知,与后置通知只会执行一个 -->
            <aop:after-throwing method="afterThrowing" pointcut-ref="pt"/>
            <!--无论是否有异常都会执行,如果配置在后置通知的前面,会先执行最终通知-->
            <aop:after method="after" pointcut-ref="pt"/>
        </aop:aspect>
    </aop:config>
</beans>
AccountServiceImpl.java
package com.itheima.service.impl;

import com.itheima.service.AccountService;

public class AccountServiceImpl implements AccountService {


    /**
     * 保存账户
     */
    @Override
    public void save() {


        System.out.println("保存账户");
    }

    /**
     * 更新账户
     * @param name
     * @return
     */
    @Override
    public int update(String name) {


        System.out.println("更新了" + name + "的账户");
        if ("newboy".equals(name)) {


            throw new RuntimeException("这是个穷人");
        }
        return 1;
    }
}
测试类
package com.itheima.test;

import com.itheima.service.AccountService;
import org.junit.jupiter.api.Test;
import org.junit.jupiter.api.extension.ExtendWith;
import org.springframework.beans.factory.annotation.Autowired;
import org.springframework.test.context.ContextConfiguration;
import org.springframework.test.context.junit.jupiter.SpringExtension;

/**
 * 测试类
 */
@ExtendWith(SpringExtension.class)  //指定第三方运行类
@ContextConfiguration("classpath:applicationContext.xml")
public class TestAccount {


    @Autowired
    private AccountService accountService;

    @Test
    public void testSave() {


        accountService.update("孙悟空");
    }

}
小结
| 标签 | 通知类型 | 属性 |
|---|---|---|
| <aop:before> | 前置通知 | method: 指定切面中方法名字 pointcut-ref: 指定切入点表达式的id |
| <aop:after-returning> | 后置通知 | |
| <aop:after-throwing> | 异常通知 | |
| <aop:after> | 最终通知 | |
| <aop:around> | 环绕通知 |
6.AOP编程:环绕通知【重点】
目标
- ProceedingJoinPoint接口
- 案例:环绕通知的使用
环绕通知的功能
- 可以环绕目标方法来执行
- 可以获取目标方法的各种信息
- 可以修改目标方法的参数和返回值
环绕通知和其他通知的区别
- 可以决定是否调用目标方法
- 可以控制方法返回的对象值
ProceedingJoinPoint接口
Spring框架提供了ProceedingJoinPoint接口,作为环绕通知的参数。在环绕通知执行的时候,Spring框架会提供接口的对象,我们直接使用即可。
| ProceedingJoinPoint接口中方法 | 功能 |
|---|---|
| Object[] getArgs() | 获取目标方法的参数 |
| proceed(Object[] args) | 调用目标方法,如果没有执行这句话,目标方法不会执行 |
| proceed() | 调用目标方法,使用它原来的参数 |
| getSignature() | 获取目标方法其它的信息,如:类名,方法名等 |
步骤
-
复制项目
-
删除update方法
-
修改接口AccountService中的save方法
- 添加参数int id, String name, double money
- 返回值int
- 抛出RuntimeException异常
package com.itheima.service; /** * 账户业务类 */ /** * 账户业务接口 */ public interface AccountService { /** * 保存账户 */ int save(int id, String name, double money); } -
修改实现类AccountServiceImpl
package com.itheima.service.impl; import com.itheima.service.AccountService; public class AccountServiceImpl implements AccountService { /** * 保存账户 */ @Override public void save() { System.out.println("保存账户"); } /** * 更新账户 * @param name * @return */ @Override public int update(String name) { System.out.println("更新了" + name + "的账户"); if ("newboy".equals(name)) { throw new RuntimeException("这是个穷人"); } return 1; } } -
在通知类中编写环绕通知方法:
Object around(ProceedingJoinPoint point) 在方法中:
- 获取目标方法的参数
- 获取当前执行的方法名
- 调用目标方法
- 输出方法返回值
-
环绕通知方法中输出
- 在方法调用前输出:[环绕前]
- 在方法调用后输出:[环绕后]
- 在异常中输出:[环绕异常]
- 在最终中输出:[环绕最终]
package com.itheima.utils; import org.aspectj.lang.ProceedingJoinPoint; import org.aspectj.lang.Signature; import java.util.Arrays; /** * 记录日志功能的类:切面类 = 切入点(规则)+通知(方法) */ public class LogAspect { /** * 环绕通知方法 * @param joinPoint 接口,由Spring注入对象 * @return 方法的返回值 */ public Object around(ProceedingJoinPoint joinPoint) { //获取目标方法签名对象 Signature signature = joinPoint.getSignature(); System.out.println("目标方法名字:" + signature.getName()); //获取参数的数组 Object[] args = joinPoint.getArgs(); System.out.println("目标方法参数:" + Arrays.toString(args)); System.out.println("目标对象实现接口的全名:" + signature.getDeclaringTypeName()); Object result = null; //修改目标方法参数 args[0] = "白骨精"; try { System.out.println("前置通知"); //如果修改了参数,要使用带参数的方法。(如果不执行这句话,目标方法不会执行) result = joinPoint.proceed(args); //直接调用目标方法 System.out.println("后置通知"); } catch (Throwable throwable) { System.out.println("异常通知"); } finally { System.out.println("最终通知"); } return 99; } } -
修改方法输入参数和返回值
- 得到参数的数组,修改数组中的值,即可以修改输入的参数
- 因为需要使用修改后的参数,需要调用有参的proceed(args)方法
- 在通知方法中修改方法的返回值
-
applicationContext.xml 配置环绕通知的配置
<?xml version="1.0" encoding="UTF-8"?>
<beans xmlns="http://www.springframework.org/schema/beans"
       xmlns:xsi="http://www.w3.org/2001/XMLSchema-instance" xmlns:aop="http://www.springframework.org/schema/aop"
       xsi:schemaLocation="http://www.springframework.org/schema/beans http://www.springframework.org/schema/beans/spring-beans.xsd http://www.springframework.org/schema/aop https://www.springframework.org/schema/aop/spring-aop.xsd">

    <!--正常业务对象-->
    <bean class="com.itheima.service.impl.AccountServiceImpl" id="accountService"/>

    <!-- 切面类:日志记录对象 -->
    <bean class="com.itheima.utils.LogAspect" id="logAspect"/>

    <!-- 编写aop的配置,要导入aop的命名空间 -->
    <aop:config>
        <!--
        配置切入点,通过切入点表达式配置
         id:给表达式定义唯一标识
         expression: 使用切入点函数定义表达式,语法:访问修饰符 返回类型 包名.类名.方法名(参数类型) 抛出异常类型
         -->
        <aop:pointcut id="pt" expression="execution(* update(..))"/>

        <!-- 切面配置, ref引用切面对象id -->
        <aop:aspect ref="logAspect">
            <!--
            使用什么类型的通知:前置通知,后置通知等
            method:表示切面中方法名字
            pointcut-ref:引用上面切入点表达式
             -->
            <aop:around method="around" pointcut-ref="pt"/>
        </aop:aspect>
    </aop:config>
</beans>
- 测试类
package com.itheima.test;

import com.itheima.service.AccountService;
import org.junit.jupiter.api.Test;
import org.junit.jupiter.api.extension.ExtendWith;
import org.springframework.beans.factory.annotation.Autowired;
import org.springframework.test.context.ContextConfiguration;
import org.springframework.test.context.junit.jupiter.SpringExtension;

/**
 * 测试类
 */
@ExtendWith(SpringExtension.class)  //指定第三方运行类
@ContextConfiguration("classpath:applicationContext.xml")
public class TestAccount {


    @Autowired
    private AccountService accountService;

    @Test
    public void testSave() {


        int row = accountService.update("孙悟空");
        System.out.println("返回值:" + row);
    }

}
小结
环绕通知和其他通知的区别是什么?
代替其它四个通知
可以修改方法的参数
可以修改方法的返回值
可以拦截目标方法不执行
7. AOP编程:注解方式实现【重点】
目标
使用注解的方式实现AOP的编程
相关的注解
基于XML声明式的AOP需要在配置文件中配置不少信息。为了解决这个问题,AspectJ框架为AOP的实现提供了一套注解,用以取代applicationContext.xml文件中配置代码。
| 注解 | 说明 |
|---|---|
| @Aspect | 用在类上,表示这是一个切面类。 这个切面类要放到IoC容器中,所以类上还要加@Component注解 |
| @Before | 用在方法上,表示这是一个前置通知 value:指定切入点表达式 |
| @AfterReturning | 用在方法上,表示这是一个后置通知 |
| @AfterThrowing | 用在方法上,表示这是一个异常通知 |
| @After | 用在方法上,表示这是一个最终通知。注:最终通知在后置通知之前执行 |
| @Around | 用在方法上,表示这是一个环绕通知 |
| @Pointcut | 用在方法上,用来定义切入点表达式 方法名:随意起 返回值:void 方法体:为空 |
相关的配置标签
作用:开启Spring中自动代理,注解的方式来使用AOP
| <aop:aspectj-autoproxy/>标签 | 作用 |
|---|---|
| proxy-target-class | true 使用CGLIB进行代理 |
| false 默认使用JDK代理,如果有接口才起作用 |
案例:使用前置,后置,异常,最终通知
-
复制项目
-
AccountServiceImpl,使用@Service注解的方式,指定名字为accountService
package com.itheima.service.impl; import com.itheima.service.AccountService; import org.springframework.stereotype.Service; @Service public class AccountServiceImpl implements AccountService { /** * 保存账户 */ @Override public void save() { System.out.println("保存账户"); } /** * 更新账户 * @param name * @return */ @Override public int update(String name) { System.out.println("更新了" + name + "的账户"); if ("newboy".equals(name)) { throw new RuntimeException("这是个穷人"); } return 1; } } -
applicationContext.xml 配置XML文件
- 开启注解扫描
- 开启aop自动代理
<?xml version="1.0" encoding="UTF-8"?> <beans xmlns="http://www.springframework.org/schema/beans" xmlns:xsi="http://www.w3.org/2001/XMLSchema-instance" xmlns:context="http://www.springframework.org/schema/context" xmlns:aop="http://www.springframework.org/schema/aop" xsi:schemaLocation="http://www.springframework.org/schema/beans http://www.springframework.org/schema/beans/spring-beans.xsd http://www.springframework.org/schema/context https://www.springframework.org/schema/context/spring-context.xsd http://www.springframework.org/schema/aop https://www.springframework.org/schema/aop/spring-aop.xsd"> <!-- 扫描基包 --> <context:component-scan base-package="com.itheima"/> <!-- 配置使用注解来实现aop --> <aop:aspectj-autoproxy/> </beans> -
使用@Pointcut注解优化切点表达式
- 方法没有返回值,方法体为空
- 使用注解,编写切入点表达式
- 在其它通知方法上引用这个方法名
-
修改切面类,使用注解
-
切面类使用@Aspect和@Component
-
编写前置通知方法,使用注解:@Before
-
编写后置通知,使用注解:@AfterReturning
-
编写异常通知,@AfterThrowing
-
编写最终通知,使用注解:@After
注:最终通知会在后置通知前面执行,但如果出现异常则先执行异常通知
-
package com.itheima.utils;

import org.aspectj.lang.annotation.*;
import org.springframework.stereotype.Component;

/**
 * 记录日志功能的类:切面类 = 切入点(规则)+通知(方法)
 */
@Component
@Aspect  //这是一个切面类
public class LogAspect {


    //定义切入点函数
    @Pointcut("execution(* com.itheima.service..*(..))")
    public void pt() {


    }

    @Before("pt()")  //写方法的名字
    public void before() {


        System.out.println("---前置通知---");
    }

    @AfterReturning("pt()")
    public void afterReturning() {


        System.out.println("---后置通知---");
    }

    @AfterThrowing("pt()")
    public void afterThrowing() {


        System.out.println("---异常通知---");
    }

    @After("pt()")
    public void after() {


        System.out.println("---最终通知---");
    }
}
- 测试类
package com.itheima.test;

import com.itheima.service.AccountService;
import org.junit.jupiter.api.Test;
import org.junit.jupiter.api.extension.ExtendWith;
import org.springframework.beans.factory.annotation.Autowired;
import org.springframework.test.context.ContextConfiguration;
import org.springframework.test.context.junit.jupiter.SpringExtension;

/**
 * 测试类
 */
@ExtendWith(SpringExtension.class)  //指定第三方运行类
@ContextConfiguration("classpath:applicationContext.xml")
public class TestAccount {


    @Autowired
    private AccountService accountService;

    @Test
    public void testSave() {


        accountService.save();
    }


    @Test
    public void testUpdate() {


        accountService.update("张三");
    }

}
效果
正常执行输出后置通知
---前置通知---
更新了张三的账户
---最终通知---
---后置通知---
出现异常输出异常信息
---前置通知---
更新了newboy的账户
---异常通知---
---后置通知---
小结
相关的注解:
| 注解 | 说明 |
|---|---|
| @Component | 将对象放在容器中 |
| @Aspect | 放在切面类上,表示这是一个切面类 |
| @Pointcut | 放在方法上,表示这是一个切入点表达式 |
注:最终通知会在后置通知前面执行
8.AOP注解:使用环绕通知
目标
使用AOP注解的方式实现环绕通知
步骤
- 方法带参数ProceedingJoinPoint
- 方法有返回值Object,并且抛出Throwable异常
- 使用注解@Around,指定切点表达式为com.itheima.service下面的类
- 分别输出:前置,后置,异常,最终通知。
测试
-
调用目标方法,并且输出方法的参数
-
将<aop:aspectj-autoproxy proxy-target-class=“true”/> 在测试方法中输出目标对象的类型
效果
正常执行效果
目标方法名字:update
目标方法参数:[张三]
目标对象实现接口的全名:com.itheima.service.impl.AccountServiceImpl
前置通知
更新了白骨精的账户
后置通知
最终通知
class com.itheima.service.impl.AccountServiceImpl$$EnhancerBySpringCGLIB$$c29d8113
代码
与上面是相同的
/**
 * 环绕通知方法
 * @param joinPoint 接口,由Spring注入对象
 * @return 方法的返回值
 */
@Around("pt()")
public Object around(ProceedingJoinPoint joinPoint) {


    //获取目标方法签名对象
    Signature signature = joinPoint.getSignature();
    System.out.println("目标方法名字:" + signature.getName());
    //获取参数的数组
    Object[] args = joinPoint.getArgs();
    System.out.println("目标方法参数:" + Arrays.toString(args));
    System.out.println("目标对象实现接口的全名:" + signature.getDeclaringTypeName());
    Object result = null;
    //修改目标方法参数
    args[0] = "白骨精";
    try {


        System.out.println("前置通知");
        //如果修改了参数,要使用带参数的方法。(如果不执行这句话,目标方法不会执行)
        result = joinPoint.proceed(args);  //直接调用目标方法
        System.out.println("后置通知");
    } catch (Throwable throwable) {


        System.out.println("异常通知");
    } finally {


        System.out.println("最终通知");
    }
    return 99;
}
小结
说说以下注解的作用:
| 注解 | 说明 |
|---|---|
| @Around | 用在方法上,表示这是环绕通知 |
9.事务知识点回顾
目标
- 事务的概念
- 事务的四大特性
- 事务的隔离级别
事务的概念
事务以后我们主要用在业务层
业务层中一个方法会多次调用DAO层中增删改,所有的方法必须全部执行成功,如果有一个方法执行失败,就要进行回滚。要么全部成功,要么全部失败。
事务的特性
| 事务特性 | 说明 |
|---|---|
| 原子性(Automicity) | 每个事务是一个最小的执行单元,它做为一个整体运行,不可再拆分 |
| 一致性(Consistency) | 事务执行前和执行后对数据库的状态影响是一致的 如:转账前和转账后的总金额是一致的 |
| 隔离性(Isolation) | 事务与事务之间不能相互影响,它们之间是相互隔离的 |
| 持久性(Durability) | 事务提交后对数据库的影响是永久的,关机以后也是存在的 |
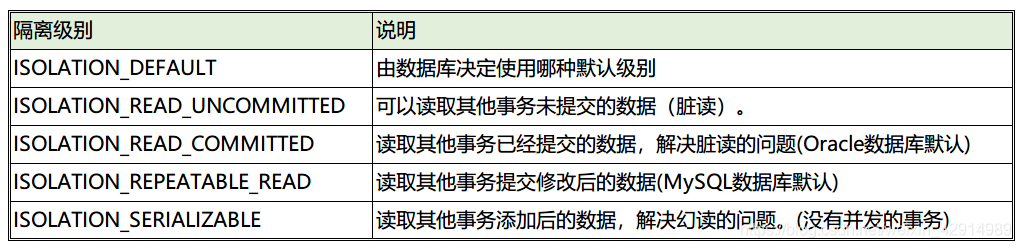
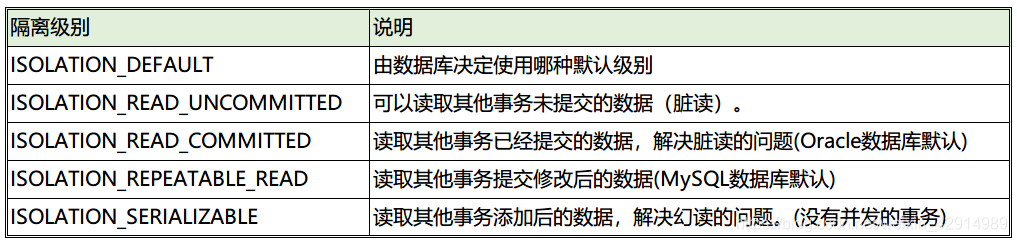
事务的隔离级别
10.声明式事务:介绍
目标
什么是声明式事务
Spring对事务的处理方式介绍
事务是切面,主业务类还是以前的方法
- JavaEE体系进行分层开发,事务处理位于业务层。
- Spring 框架为我们提供了一组事务控制的接口,这组接口是在spring-tx-版本.RELEASE.jar中。
- Spring 的事务控制都是基于 AOP 的,它既可以使用编程的方式实现,也可以使用配置的方式实现。这种基于AOP方式实现的事务称为声明式事务。
- 我们学习的重点是使用配置的方式实现声明式事务。
事务管理方式介绍
-
编程式事务管理:
通过编写代码实现的事务管理,包括定义事务的开始,正常执行后事务提交和异常时的事务回滚。
-
声明式事务管理:
-
通过AOP技术实现事务管理,主要思想是将事务管理作为一个"切面"代码单独编写,然后通过AOP技术将事务管理的"切面"代码织入到业务目标类中。
-
优点在于开发者无须通过编程的方式来管理事务,只需在配置文件中进行相关的事务规则声明,就可以将事务规则应用到业务逻辑中。
-
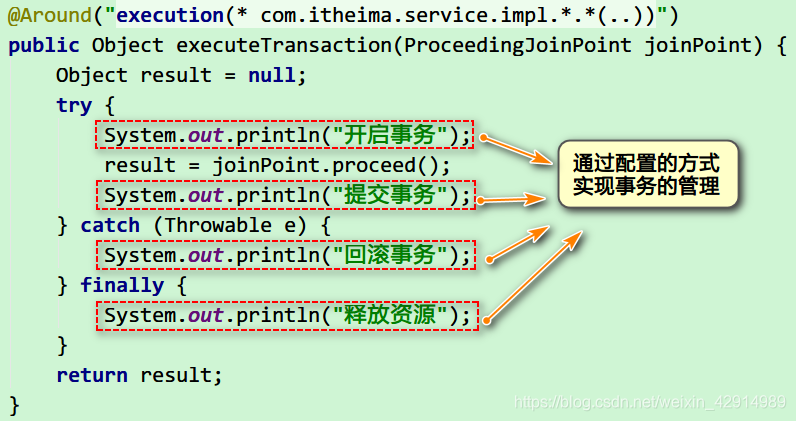
-
将下面的这些事务处理代码通过配置的方式来实现
11. 声明式事务有关API【了解】
目标
这些接口和方法了解就行,编程的时候不会用到
- PlatformTransactionManager事务管理器接口
- TransactionDefinition事务定义接口
- TransactionStatus事务状态接口
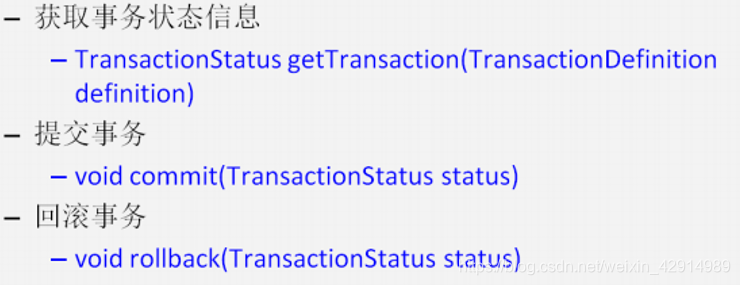
事务管理器:PlatformTransactionManager
功能:事务的顶层接口,定义了:提交事务、获取事务、回滚事务的方法。
该接口提供了我们操作事务的常用方法,方法不需要我们主动去调用,由Spring容器去调用。
事务管理器接口的实现类
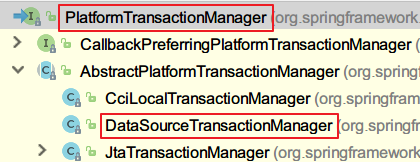
org.springframework.jdbc.datasource.DataSourceTransactionManager作用:支持使用spring jdbc 或者 Mybatis框架的事务管理器。
事务定义对象:TransactionDefinition
功能:定义了事务的隔离级别、传播行为、超时时间等。
事务的隔离级别
事务指定一个隔离级别,该隔离级别定义一个事务必须与由其他事务进行的资源或数据更改相隔离的程度。隔离级别从允许的并发副作用(例如,脏读 或 幻读)的角度进行描述。
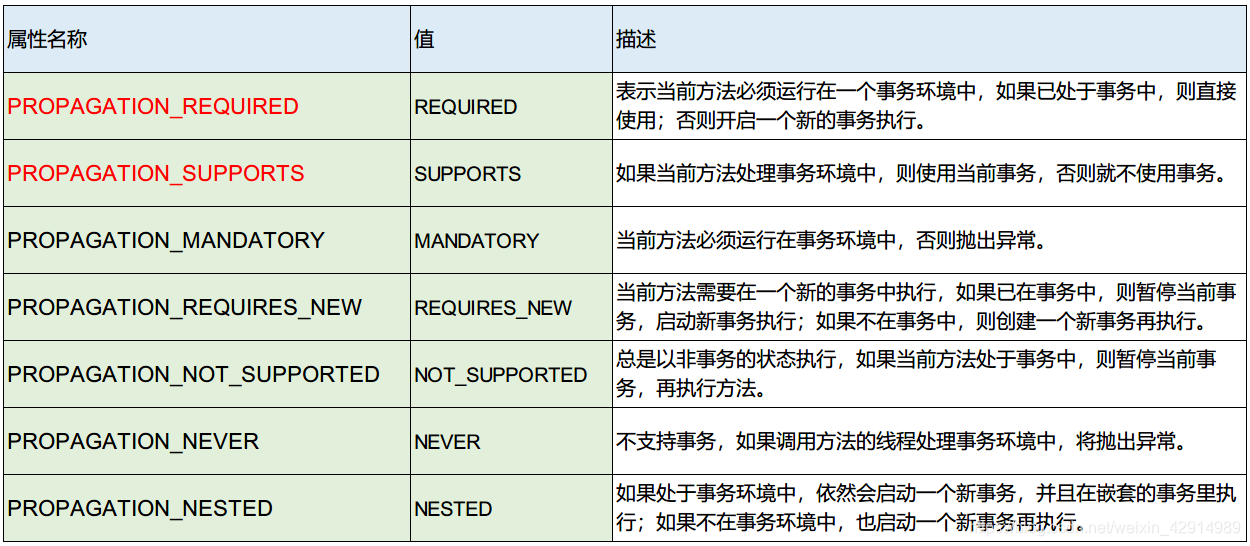
事务的传播行为
什么叫事务传播行为?即然是传播,那么至少有两个东西,才可以发生传播。单体不存在传播这个行为。
事务传播行为(propagation behavior)指的就是当一个事务方法被另一个事务方法调用时,这个事务方法应该如何进行。
例如:methodA()事务方法调用methodB()事务方法时,methodB()是继续在调用者methodA()的事务中运行呢,还是为自己开启一个新事务运行,这就是由methodB()的事务传播行为决定的。

PROPAGATION_REQUIRED(必须)
如果存在一个事务,则支持当前事务。如果没有事务则开启一个新的事务。

举例有两个方法:
@Transactional(propagation = Propagation.REQUIRED)
public void methodA() {


   methodB();
   // do something
}

@Transactional(propagation = Propagation.REQUIRED)
public void methodB() {


   // do something
}

psvm(){


    methodA()
}
- 单独调用methodB方法时,因为当前上下文不存在事务,所以会开启一个新的事务。
- 调用methodA方法时,因为当前上下文不存在事务,所以会开启一个新的事务。
- 当执行到methodB时,methodB发现当前上下文有事务,因此就加入到当前事务中来
PROPAGATION_SUPPORTS(可有可无)
如果存在一个事务,支持当前事务。如果没有事务,则非事务的执行。
@Transactional(propagation = Propagation.REQUIRED)
public void methodA() {


  methodB();
  // do something
}

// 事务属性为SUPPORTS
@Transactional(propagation = Propagation.SUPPORTS)
public void methodB() {


    // do something
}
- 单纯的调用methodB时,methodB方法是非事务的执行的。
- 当调用methdA时,methodB则加入了methodA的事务中,以事务地方式执行。
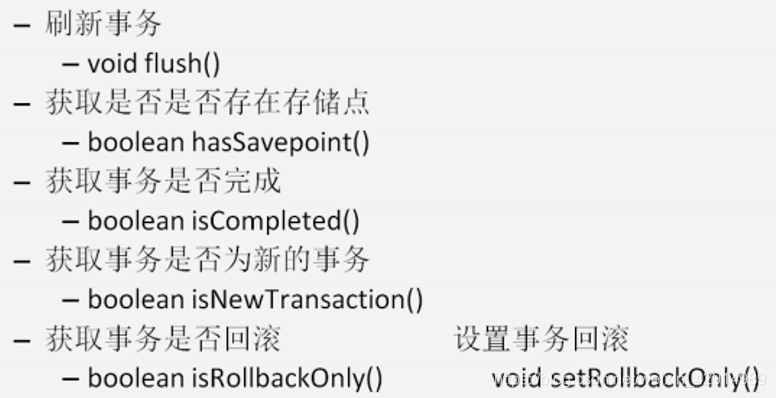
事务状态:TransactionStatus
提供了获取事务状态的方法,事务是否是新的,事务是否完成,事务是否是只读等
idea快捷键操作
快速找一个类:ctrl+shift+alt+n
显示类的继承结构:ctrl+h
显示类的成员:ctrl+f12
小结
说说每个类的功能:
- PlatformTransactionManager:事务管理器,使用它的子类DataSourceTransactionManager
- 提交事务
- 回滚事务
- TransactionDefinition:
- 隔离级别
- 传播行为
- REQUIRED:用于增删改
- SUPPORTS:用于查询
- TransactionStatus:获取事务状态
12.XML实现part1:非事务的执行情况
目标
使用声明式事务实现账户转账的功能:环境搭建
需求
用户A要给用户B转账,使用Spring IoC+JdbcTemplate实现
分析
转账需要执行几条SQL语句?
-- Jack给Rose转账
-- Jack扣钱
UPDATE account SET money = money - 200 WHERE `name`='Jack';
-- Rose加钱
UPDATE account SET money = money + 200 WHERE `name`='Rose';
技术
- 技术方案:SpringIoC容器 + Druid连接池 + JdbcTemplate
- 使用声明式事务实现账户转账的功能
没有事务的情况:步骤
-
创建项目

-
pom.xml文件中导入jar包
<dependencies> <!--spring核心包--> <dependency> <groupId>org.springframework</groupId> <artifactId>spring-context</artifactId> <version>5.2.0.RELEASE</version> </dependency> <!--声明式事务支持--> <dependency> <groupId>org.springframework</groupId> <artifactId>spring-tx</artifactId> <version>5.2.0.RELEASE</version> </dependency> <!--jdbcTemplate支持--> <dependency> <groupId>org.springframework</groupId> <artifactId>spring-jdbc</artifactId> <version>5.2.0.RELEASE</version> </dependency> <!--aspect框架--> <dependency> <groupId>org.aspectj</groupId> <artifactId>aspectjweaver</artifactId> <version>1.8.7</version> </dependency> <!--数据库连接池--> <dependency> <groupId>com.alibaba</groupId> <artifactId>druid</artifactId> <version>1.1.10</version> </dependency> <!--mysql驱动--> <dependency> <groupId>mysql</groupId> <artifactId>mysql-connector-java</artifactId> <version>5.1.30</version> </dependency> <!--junit--> <dependency> <groupId>junit</groupId> <artifactId>junit</artifactId> <version>4.12</version> </dependency> <!--spring-test--> <dependency> <groupId>org.springframework</groupId> <artifactId>spring-test</artifactId> <version>5.2.0.RELEASE</version> </dependency> </dependencies> -
创建表
drop table if exists `account`; CREATE TABLE `account` ( `id` int(11) NOT NULL AUTO_INCREMENT, `name` varchar(10) DEFAULT NULL, `money` double DEFAULT NULL, PRIMARY KEY (`id`) ); insert into account values(null, 'Jack', 1000); insert into account values(null, 'Rose', 1000); select * from account; -
实体类Account,属性类型可以使用包装类
package com.itheima.entity; public class Account { private Integer id; private String name; private Double money; @Override public String toString() { return "Account{" + "id=" + id + ", name='" + name + '\'' + ", money=" + money + '}'; } public Integer getId() { return id; } public void setId(Integer id) { this.id = id; } public String getName() { return name; } public void setName(String name) { this.name = name; } public Double getMoney() { return money; } public void setMoney(Double money) { this.money = money; } } -
复制类库下的druid.properties配置文件到resources目录下
jdbc.url=jdbc:mysql://localhost:3306/day47?characterEncoding=utf8 jdbc.username=root jdbc.password=root jdbc.driverClassName=com.mysql.jdbc.Driver -
applicationContext.xml
- 开启注解扫描
- 加载外部的配置文件druid.properties
- 创建数据源,引用上面的属性
- 创建JdbcTemplate,注入数据源
<?xml version="1.0" encoding="UTF-8"?> <beans xmlns="http://www.springframework.org/schema/beans" xmlns:xsi="http://www.w3.org/2001/XMLSchema-instance" xmlns:context="http://www.springframework.org/schema/context" xsi:schemaLocation="http://www.springframework.org/schema/beans http://www.springframework.org/schema/beans/spring-beans.xsd http://www.springframework.org/schema/context https://www.springframework.org/schema/context/spring-context.xsd"> <!--1. 开启注解扫描--> <context:component-scan base-package="com.itheima"/> <!--2. 加载外部的配置文件druid.properties--> <context:property-placeholder location="classpath:druid.properties"/> <!--3. 创建数据源,引用上面的属性--> <bean class="com.alibaba.druid.pool.DruidDataSource" id="dataSource"> <property name="username" value="${jdbc.username}"/> <property name="password" value="${jdbc.password}"/> <property name="url" value="${jdbc.url}"/> <property name="driverClassName" value="${jdbc.driverClassName}"/> </bean> <!--4. 创建JdbcTemplate,注入数据源--> <bean class="org.springframework.jdbc.core.JdbcTemplate" id="jdbcTemplate"> <property name="dataSource" ref="dataSource"/> </bean> </beans> -
SQL语句:分别正常执行测试和出现异常执行,并且还原数据库的数据
-- 更新账户的余额 update account set money=money + ? where name=? -- 还原金额 update account set money=1000; select * from account; -
AccountDao接口和实现类
- 注入JdbcTemplate对象
- 编写void updateAccount(String name, double money)
package com.itheima.dao;

public interface AccountDao {


    /**
     * 更新账户余额的方法
     */
    void updateAccount(String name, double money);
}
实现类
package com.itheima.dao.impl;

import com.itheima.dao.AccountDao;
import org.springframework.beans.factory.annotation.Autowired;
import org.springframework.jdbc.core.JdbcTemplate;
import org.springframework.stereotype.Repository;

@Repository
public class AccountDaoImpl implements AccountDao {


 @Autowired
 private JdbcTemplate jdbcTemplate;
 /**
  * 更新账户余额的方法
  * @param name
  * @param money
  */
 @Override
 public void updateAccount(String name, double money) {


     jdbcTemplate.update("UPDATE account SET money=money + ? WHERE `name`=?", money, name);
 }
}
-
AccountService接口和实现类
- 注入AccountDao实现类
- 编写void transfer(String fromUser, String toUser, double money)
package com.itheima.service;

public interface AccountService {


    /**
     * 实现转账的功能
     * @param fromUser 转出账户
     * @param toUser 转入账户
     * @param money 金额
     */
    void transfer(String fromUser, String toUser, double money);
}
实现类
package com.itheima.service.impl; import com.itheima.dao.AccountDao; import com.itheima.service.AccountService; import org.springframework.beans.factory.annotation.Autowired; import org.springframework.stereotype.Service; @Service public class AccountServiceImpl implements AccountService { @Autowired private AccountDao accountDao; /** * 实现转账的功能 * @param fromUser 转出账户 * @param toUser 转入账户 * @param money 金额 */ @Override public void transfer(String fromUser, String toUser, double money) { //扣钱 accountDao.updateAccount(fromUser, -money); //加钱 accountDao.updateAccount(toUser, money); System.out.println("转账成功"); } } -
测试类
- 正常执行测试类,查看结果后还原数据库记录。
- 给业务层在两个更新方法之间添加会出现异常的代码,再次执行测试类。
package com.itheima.test;

import com.itheima.service.AccountService;
import org.junit.Test;
import org.junit.runner.RunWith;
import org.springframework.beans.factory.annotation.Autowired;
import org.springframework.test.context.ContextConfiguration;
import org.springframework.test.context.junit4.SpringJUnit4ClassRunner;

@RunWith(SpringJUnit4ClassRunner.class)
@ContextConfiguration("classpath:applicationContext.xml")
public class TestAccount {


    @Autowired
    private AccountService accountService;

    @Test
    public void testTransfer() {


        accountService.transfer("Jack","Rose",200);
    }
}
小结
如果没有事务控制,转账业务出现异常会怎么样?
钱被扣了,收款人没有收到钱,所以要使用事务
13. XML实现part2:声明式事务的配置【重点】
目标
声明式事务的配置
技术点
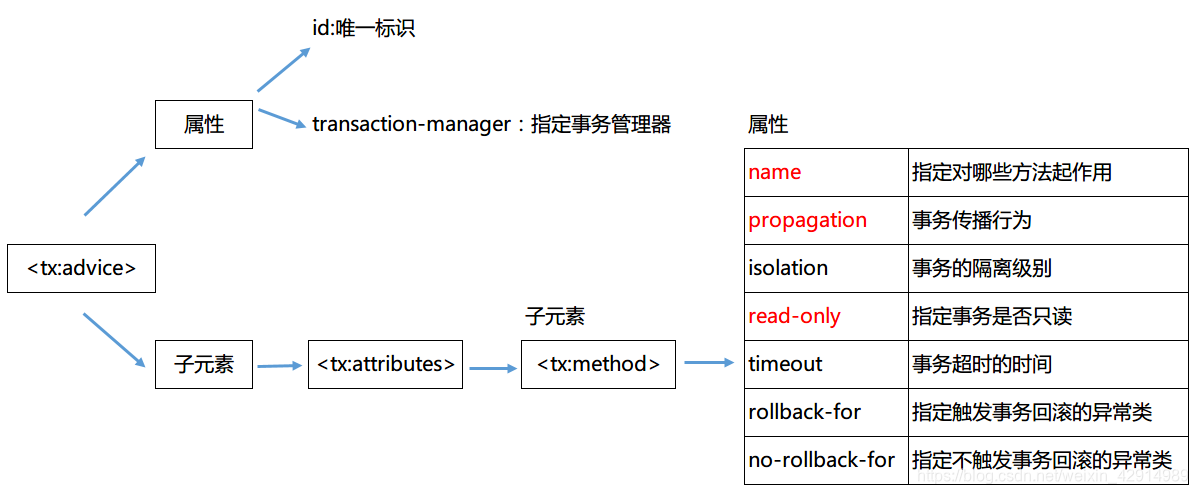
<tx:advice>
使用之前要需要导入tx命名空间,注:不要选错了,事务的空间,而不是缓存
功能:事务通知配置的父元素
| 属性 | 说明 |
|---|---|
| id | 事务通知配置的标识 |
| transaction-manager | 从容器中获取事务管理器对象,前提:在IoC中要存在一个事务管理器对象 |
<tx:attributes>
功能:tx:method标签的父标签,指定不同方法事务的属性
<tx:method>
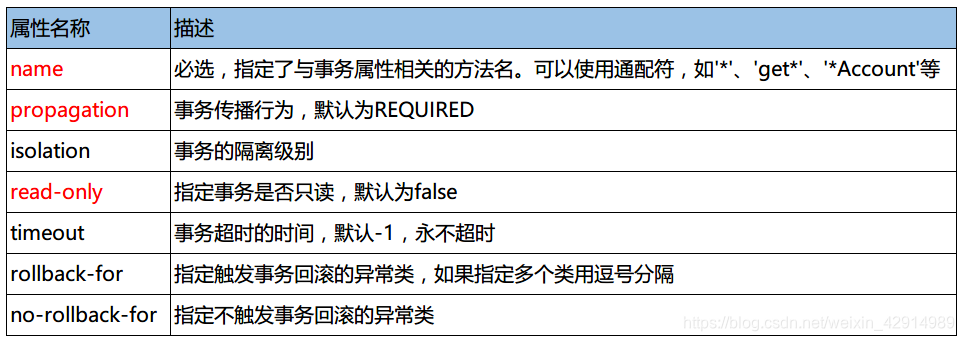
事务通知的配置
这里事务是切面类,要织入到主业务类中的对象
步骤:Spring声明式事务控制配置
- 配置事务管理器DataSourceTransactionManager(spring提供的事务切面类)
- 注入dataSource的对象
- 使用tx命名空间配置通知规则,表示拦截到方法后匹配这里的规则。
- 配置<tx:advice> ,注:导入的是事务空间,而不是同名的tx缓存空间
- id属性给下面的AOP使用,指定配置事务管理器
- 配置transfer方法,指定事务的传播行为REQUIRED,不是只读事务
- 配置查询方法find开头的方法,传播行为SUPPORTS,只读事务
- AOP的配置<aop:config>
- 配置切入点表达式<aop:pointcut>
- 建立切入点表达式与通知规则的对应关系<aop:advisor>
- 执行测试类
代码
- 配置文件
<?xml version="1.0" encoding="UTF-8"?>
<beans xmlns="http://www.springframework.org/schema/beans"
       xmlns:xsi="http://www.w3.org/2001/XMLSchema-instance" xmlns:context="http://www.springframework.org/schema/context"
       xmlns:tx="http://www.springframework.org/schema/tx" xmlns:aop="http://www.springframework.org/schema/aop"
       xsi:schemaLocation="http://www.springframework.org/schema/beans http://www.springframework.org/schema/beans/spring-beans.xsd http://www.springframework.org/schema/context https://www.springframework.org/schema/context/spring-context.xsd http://www.springframework.org/schema/tx http://www.springframework.org/schema/tx/spring-tx.xsd http://www.springframework.org/schema/aop https://www.springframework.org/schema/aop/spring-aop.xsd">
    <!--1. 开启注解扫描-->
    <context:component-scan base-package="com.itheima"/>

    <!--2. 加载外部的配置文件druid.properties-->
    <context:property-placeholder location="classpath:druid.properties"/>

    <!--3. 创建数据源,引用上面的属性-->
    <bean class="com.alibaba.druid.pool.DruidDataSource" id="dataSource">
        <property name="username" value="${jdbc.username}"/>
        <property name="password" value="${jdbc.password}"/>
        <property name="url" value="${jdbc.url}"/>
        <property name="driverClassName" value="${jdbc.driverClassName}"/>
    </bean>

    <!--4. 创建JdbcTemplate,注入数据源-->
    <bean class="org.springframework.jdbc.core.JdbcTemplate" id="jdbcTemplate">
        <property name="dataSource" ref="dataSource"/>
    </bean>

    <!-- 配置事务管理器 -->
    <bean class="org.springframework.jdbc.datasource.DataSourceTransactionManager" id="transactionManager">
        <!--注入数据源-->
        <property name="dataSource" ref="dataSource"/>
    </bean>

    <!-- 声明式事务切面的配置,指定事务管理器 -->
    <tx:advice id="interceptor" transaction-manager="transactionManager">
        <tx:attributes>
            <!--
            指定哪些方法需要使用事务,以及使用事务的规则
            read-only: 是否只读事务
            propagation:传播行为
            isolation:隔离级别
             -->
            <tx:method name="transfer" read-only="false" propagation="REQUIRED" isolation="DEFAULT"/>
            <tx:method name="find*" read-only="true" propagation="SUPPORTS"/>
        </tx:attributes>
    </tx:advice>

    <!-- AOP的配置 -->
    <aop:config>
        <!-- 切面表达式的配置 -->
        <aop:pointcut id="pt" expression="execution(* com.itheima.service..*.*(..))"/>
        <!-- 配置上面的事务 -->
        <aop:advisor advice-ref="interceptor" pointcut-ref="pt"/>
    </aop:config>
</beans>
- 业务层代码(模拟转账失败)
package com.itheima.service.impl;

import com.itheima.dao.AccountDao;
import com.itheima.service.AccountService;
import org.springframework.beans.factory.annotation.Autowired;
import org.springframework.stereotype.Service;

@Service
public class AccountServiceImpl implements AccountService {


    @Autowired
    private AccountDao accountDao;
    /**
     * 实现转账的功能
     * @param fromUser 转出账户
     * @param toUser 转入账户
     * @param money 金额
     */
    @Override
    public void transfer(String fromUser, String toUser, double money) {


        //扣钱
        accountDao.updateAccount(fromUser, -money);
        //模拟出现异常
        //System.out.println(1 / 0);
        //加钱
        accountDao.updateAccount(toUser, money);
        System.out.println("转账成功");
    }
}
- 执行测试类(不变)
小结
声明式事务本质上就是AOP应用,将事务代码定义成切面,我们只需要在配置文件中配置这个切面
以及方法使用事务的规则
14.注解实现声明式事务的API【重点】
目标
注解实现声明式事务的API
引入
- 配置方式创建声明式事务的好处:
- 业务代码,事务代码,配置文件都是分开,降低代码耦合度
- 只需要在配置文件中写一次就可以了,业务代码就再也不用关注与事务相关的代码了
-
声明式事务的不足:
在XML中需要比较多的配置,如何简化呢?使用注解
分析
需要去掉XML中的配置
-
有关事务通知的配置
-
AOP的配置
注解式事务的步骤
-
在配置文件中:配置事务管理器,注入数据源。(已经做了)
<!-- 配置事务管理器 --> <bean class="org.springframework.jdbc.datasource.DataSourceTransactionManager" id="transactionManager"> <!--注入数据源--> <property name="dataSource" ref="dataSource"/> </bean> -
在配置文件中配置注解式事务驱动:<tx:annotation-driven>,指定事务管理器
<!--配置注解式事务的驱动,指定事务管理器 --> <tx:annotation-driven transaction-manager="transactionManager"/> -
在业务代码中类或方法上使用注解:@Transactional
package com.itheima.service.impl;
import com.itheima.dao.AccountDao;
import com.itheima.service.AccountService;
import org.springframework.beans.factory.annotation.Autowired;
import org.springframework.stereotype.Service;
import org.springframework.transaction.annotation.Propagation;
import org.springframework.transaction.annotation.Transactional;
@Service
public class AccountServiceImpl implements AccountService {
   @Autowired
   private AccountDao accountDao;
   /**
    * 实现转账的功能
    * @param fromUser 转出账户
    * @param toUser 转入账户
    * @param money 金额
    */
   @Override
   @Transactional(noRollbackFor = ArithmeticException.class, propagation = Propagation.REQUIRED)
   public void transfer(String fromUser, String toUser, double money) {
       //扣钱
       accountDao.updateAccount(fromUser, -money);
       //模拟出现异常
       //System.out.println(1 / 0);
       //加钱
       accountDao.updateAccount(toUser, money);
       System.out.println("转账成功");
   }
}
## @Transactional
#### 作用
放在类或方法上,让这个方法使用事务
#### 注解的应用范围
1. 类上面:表示这个类中所有的方法都使用事务
2. 方法上面:表示这个方法使用事务
3. 接口:表示只要实现这个接口的所有子类中所有方法都使用事务
4. 接口中方法:表示实现这个接口的子类中这个方法使用事务
#### 注解的参数和作用
| 参数名称 | 描述 |
| ------------- | ------------------------------------------------ |
| propagation | 传播行为 |
| isolation | 隔离级别 |
| readOnly | 是否只读 |
| timeout | 超时时间,默认是-1,表示不超时 |
| rollbackFor | 哪些异常会进行回滚,默认只对非运行时异常进行回滚 |
| noRollbackFor | 哪些异常不进行回滚 |
### 代码
```java
package com.itheima.service.impl;
import com.itheima.dao.AccountDao;
import com.itheima.service.AccountService;
import org.springframework.beans.factory.annotation.Autowired;
import org.springframework.stereotype.Service;
import org.springframework.transaction.annotation.Propagation;
import org.springframework.transaction.annotation.Transactional;
@Service
public class AccountServiceImpl implements AccountService {
@Autowired
private AccountDao accountDao;
/**
* 实现转账的功能
* @param fromUser 转出账户
* @param toUser 转入账户
* @param money 金额
*/
@Override
@Transactional(noRollbackFor = ArithmeticException.class, propagation = Propagation.REQUIRED)
public void transfer(String fromUser, String toUser, double money) {
//扣钱
accountDao.updateAccount(fromUser, -money);
//模拟出现异常
//System.out.println(1 / 0);
//加钱
accountDao.updateAccount(toUser, money);
System.out.println("转账成功");
}
}
小结
- @Transactional注解用在哪些范围上?
类,方法,接口,接口中方法
- 配置注解式事务的步骤
配置事务管理器,注入数据源
开启注解事务驱动<tx:annotation-driven/>
在方法或类上使用@Transactional
15.纯注解实现事务: 配置类
目标
- 分析使用哪些注解
- 编写配置管理类
分析
所有配置文件都要删除,使用相应的注解代替,applicationContext.xml配置如下:
-
注解扫描基包
-
加载外部的配置文件druid.properties
-
创建数据源DruidDataSource
-
创建JdbcTemplate
-
创建事务管理器DataSourceTransactionManager
-
开启事务管理器的注解
@EnableTransactionManagement
功能:开启Spring声明式事务管理的注解支持
相当于:<tx:annotation-driven transaction-manager="transactionManager"/>
步骤
- 复制项目
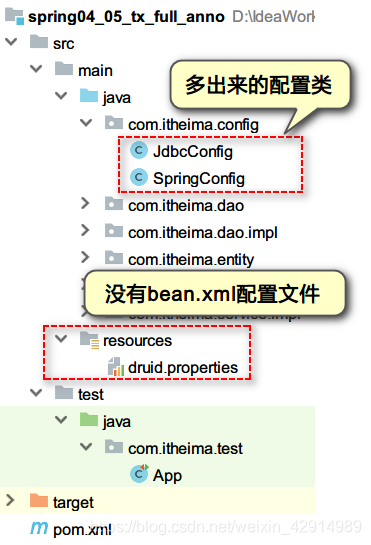
步骤
- 编写JdbcConfig.java,编写数据库相关的代码
- SpringConfiguration中导入JdbcConfig.java
- 在测试类中使用纯注解的方式加载容器运行
技术点
通过构造方法创建事务管理器,参数:传入数据源
public DataSourceTransactionManager(DataSource dataSource)
代码
-
编写JdbcConfig,封装数据库连接相关配置
- @PropertySource注解:加载类路径下的配置文件
- @Value注解:获取配置文件中数据库连接参数信息
- @Bean注解:编写方法,创建连接池,加入IoC容器
- @Bean注解:编写方法JdcTemplate对象,注入dataSource,加入IoC容器
- @Bean注解:编写方法,创建事务管理器,注入dataSource,加入IoC容器
- 编写配置管理类SpringConfig,使用注解
- @Configuration
- @ComponentScan
- @EnableTransactionManagement
- 在测试类中使用纯注解的方式加载容器运行
小结
说说下面注解的功能:
| 注解 | 功能 |
|---|---|
| @PropertySource | 加载属性文件 |
| @Value | 注入属性值 |
| @Bean | 把方法的返回值放到容器中 |
| @Import | 导入另一个配置文件 |
| @EnableTransactionManagement | 开启事务注解的支持 |
学习总结
-
理解AOP相关概念和术语
- JoinPoint(连接点):在程序执行过程中的某个阶段点,连接点就是指主业务方法的调用,它是客观存在的。
- Pointcut(切入点):切入点指的是类或者方法名,满足某一规则的方法都是切入点,后面会学习切入点表达式来制定规则。
- Advice(通知):切入点处所要执行的程序代码,即切面类中要执行的公共方法。通知的类型包含: 前置通知,后置通知,异常通知,最终通知,环绕通知。
- Target(目标对象):被代理的对象。比如动态代理案例中的演员。
- Weaving(织入):织入指的是把新增的功能用于目标对象,创建代理对象的过程。
- Proxy(代理):一个类被AOP织入增强后,即产生一个结果代理类。比如动态代理案例中的经纪人。
- Aspect(切面):切面指的是切入点和通知的结合类
-
理解AspectJ表达式语言
切点函数 作用 execution 细粒度,精确到方法 within 精确到类 bean 精确到类,从容器中获取 语法:

通过配符:-
方法:
() 没有参数 (*) 1个或多个参数 (..) 0个或多个参数 -
类全名的包
.. 表示当前包和子包
-
-
编写AOP的通知代码
-
掌握AOP的注解实现
注解 说明 @Aspect 放在类上表示这是一个切面类 @Before 放在方法上:前置通知 @AfterReturning 后置通知 @AfterThrowing 异常通知 @After 最终通知 @Around 环绕通知 @Pointcut 定义切入点表达式 -
能够理解事务的隔离级别
-
能够理解事务的传播行为
- 增删改使用必须的
- 查使用可要可不要
7. 能够应用声明式事务


8. 使用注解的方式配置事务
1. 配置事务管理器
2. 配置注解的驱动`<tx:annotation-driven/>`
3. 在类或方法上使用@Transactional
Memorial Day is 513 days |