Elastic Search 6.8.0http请求基于用户名密码方式认证实现
使用elasticsearch-xpack基于用户名密码进行安全认证。
ES6.8.0下载地址
ES 安装目录:/home/kduser/ljb/elastic/elasticsearch-6.8.0
安装步骤:
- 更改Elastic Search的配置文件
cd /home/kduser/ljb/elastic/elasticsearch-6.8.0/config
vim elasticsearch.yml
添加以下内容
xpack.security.enabled: true
network.host: 172.18.1.80 #节点IP
xpack.security.transport.ssl.enabled: true
- 启动elasticsearch
cd /home/kduser/ljb/elastic/elasticsearch-6.8.0/bin
./elasticsearch
- 复制一个窗口并切入bin目录,手动生成密码
cd /home/kduser/ljb/elastic/elasticsearch-6.8.0/bin
./elasticsearch-setup-passwords interactive
- 重启elasticearch
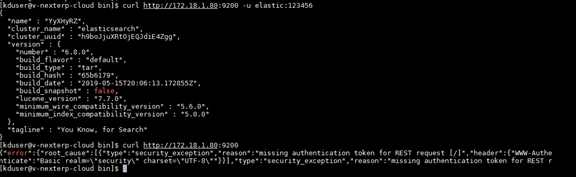
- 验证
6.java客户端验证结果
public static void main(String[] args) throws Exception {
		System.out.println(indexExists("twitter"));

	}

	private static JestClient createJestClient() {
		JestClientFactory factory = new JestClientFactory();
		factory.setHttpClientConfig(new HttpClientConfig.Builder("http://172.18.1.80:9200")
				.defaultCredentials("elastic", "123456").build());
		JestClient jestClient = factory.getObject();
		return jestClient;
	}

	public static boolean indexExists(String indexName) throws IOException {

		JestResult jestResult = createJestClient().execute(new IndicesExists.Builder(indexName).build());
		if (jestResult.isSucceeded()) {
			return true;
		} else if (jestResult.getResponseCode() == 404) {
			return false;

		} else {
			throw new IOException(jestResult.getResponseCode() + "," + jestResult.getErrorMessage());
		}

	}
7.maven依赖
<dependencies>
		<dependency>
			<groupId>org.elasticsearch</groupId>
			<artifactId>elasticsearch</artifactId>
			<version>6.8.0</version>
		</dependency>
		<dependency>
			<groupId>io.searchbox</groupId>
			<artifactId>jest</artifactId>
			<version>5.3.3</version>
		</dependency>
</dependencies>
``