前言
LayoutManager是RecyclerView中的重要一环,使用LayoutManager就跟玩捏脸蛋的游戏一样,即使好看的五官(好看的子View)都具备了,也不一定能捏出漂亮的脸蛋,好在RecyclerView为我们提供了默认的模板:LinearLayoutManager、GridLayoutManager和StaggeredGridLayoutManager。
说来惭愧,如果不是看了GridLayoutManager的源码,我还真不知道GridLayoutManager竟然可以这么使用,图片来自网络:

不过呢,今天我们讲解的源码不是来自GridLayoutManager,而是线性布局LinearLayoutManager(GridLayoutManager也是继承自LinearLayoutManager),分析完源码,我还将给大家带来实战,完成以下的效果:
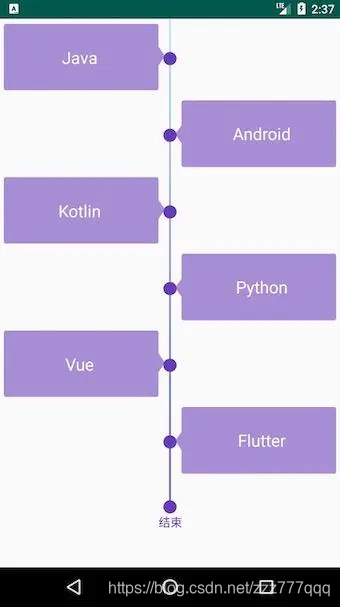
时间轴的效果来自TimeLine,自己稍微处理了一下,现在开始进入正题。
代码地址:https://github.com/mCyp/Orient-Ui
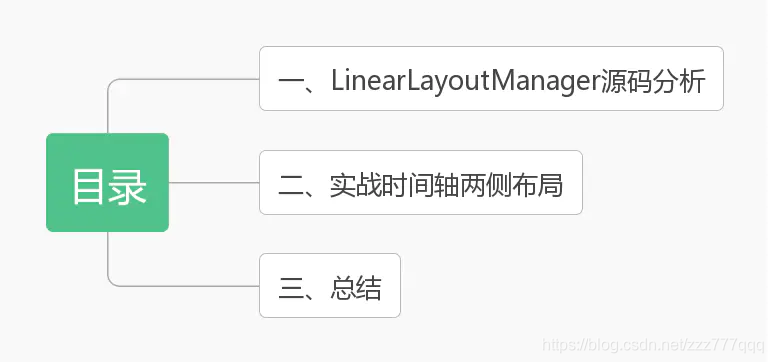
目录
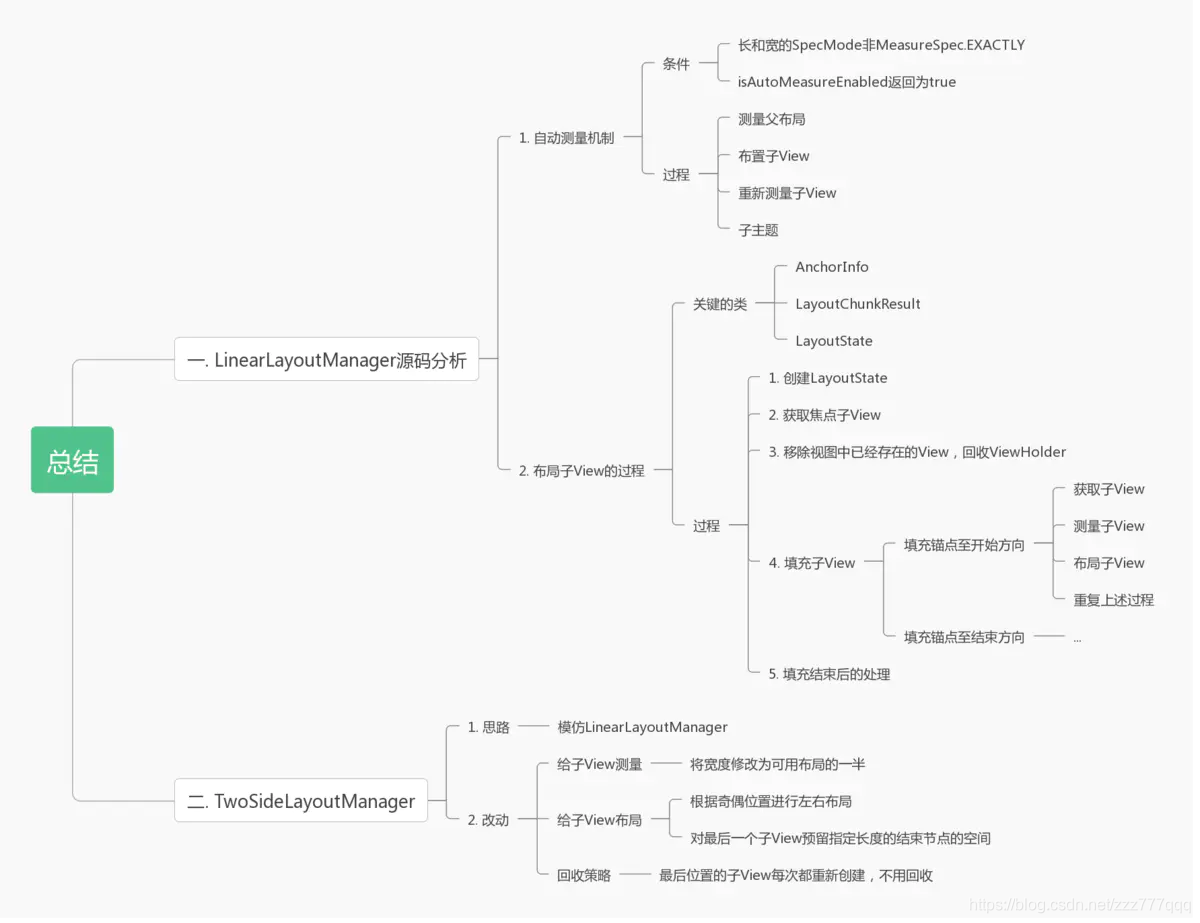
一、源码分析
本着认真负责的精神,我把RecyclerView中用到LayoutManager的地方大致看了一遍,发现其负责的主要业务:
- 回收和复用子View(当然,这会交给
Recyler处理)。 - 测量和布局子View。
- 关于滑动的处理。
回收和复用子View显然不是LayoutManager实际完成的,不过,子View的新增和删除都是LayoutManager通知的,除此以外,滑动处理的本质还是对子View进行管理,所以,本文要讨论的只有测量和布局子View的。
测量和布局子View发生在RecyclerView三大工作流程,又…又回到了最初的起点?这是我们在上篇讨论过的,如果不涉及到LayoutManager的知识,我们将一笔带过即可。
1. 自动测量机制
在RecyclerView#onMeasure方法中,LayoutManager是否支持自动测量会走不同的流程:
protected void onMeasure(int widthSpec, int heightSpec) {
    // ...
    if (mLayout.isAutoMeasureEnabled()) {
        final int widthMode = MeasureSpec.getMode(widthSpec);
        final int heightMode = MeasureSpec.getMode(heightSpec);
        // 未复写的情况下默认调用RecyclerView#defaultOnMeasure方法
        mLayout.onMeasure(mRecycler, mState, widthSpec, heightSpec);
        final Boolean measureSpecModeIsExactly =
                            widthMode == MeasureSpec.EXACTLY && heightMode == MeasureSpec.EXACTLY;
        // 长和宽的MeasureSpec都为EXACTLY的情况下会return
        if (measureSpecModeIsExactly || mAdapter == null) {
            return;
        }
        if (mState.mLayoutStep == State.STEP_START) {
            dispatchLayoutStep1();
        }
        // 1\. 计算宽度和长度等
        mLayout.setMeasureSpecs(widthSpec, heightSpec);
        mState.mIsMeasuring = true;
        // 2\. 布局子View
        dispatchLayoutStep2();
        // 3\. 测量子View的宽和高,并再次测量父布局
        mLayout.setMeasuredDimensionFromChildren(widthSpec, heightSpec);
        if (mLayout.shouldMeasureTwice()) {
            // 再走一遍1,2,3
        }
    } else {
        // ...
        mLayout.onMeasure(mRecycler, mState, widthSpec, heightSpec);
        // ....
    }
}
从代码上来看,使用自动测量机制需要具备:
RecyclerView布局的长和宽的SpecMode不能是MeasureSpec.EXACTLY(大概率指的是布局中RecyclerView长或宽中有WrapContent)。RecyclerView设置的LayoutManger的isAutoMeasureEnabled返回为true。
当设置自动测量机制的时候,我们的流程如下:
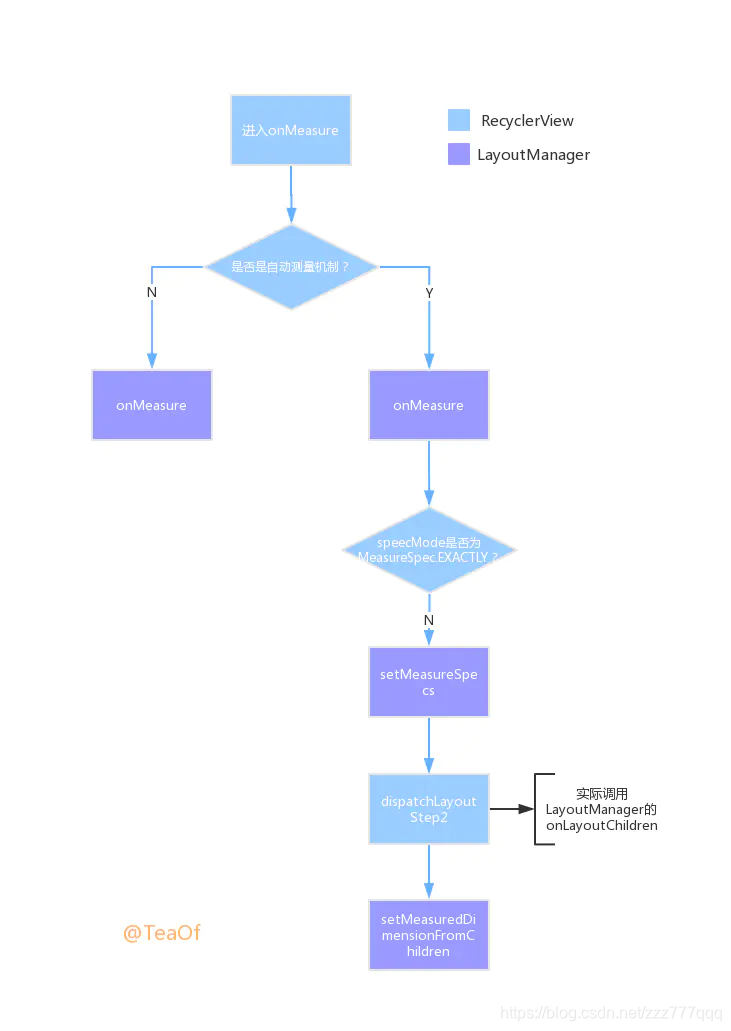
从上图可以看出,是否使用自动测量机制带来的差距还是挺明显的,使用自动测量机制需要经历那么多流程,反正都要使用LayoutManager#onMeasure方法,还不如不使用测量机制呢!
显然,这种想法是不对的,因为官方是这么说的,如果不使用自动测量机制,需要在自定义LayoutManager过程中复写LayoutManager#onMeasure方法,所以呢,这个方法应该是包括自动测量机制的全部过程,包括:测量父布局-布置子View-重新测量子View-重新测量父布局,而使用自动测量机制是不需要复写这个方法的,该方法默认测量父布局。
需要提及的是,我们平时使用的三大LayoutManager都开启了自动测量机制。
2. onLayoutChildren
即使RecyclerView在onMeasure方法中逃过了布局子View,那么在onLayout中也不可避免,在上一篇博客中,我们了解到RecyclerView通过LayoutManager#onLayoutChildren方法实现给子View布局,我们以LinearLayoutManager为例,看看其中的奥秘。
在正式开始之前,我们先看看LinearLayoutManager中几个重要的类:
| 重要的类 | 解释 |
|---|---|
LinearLayoutManager |
这个大家都懂,线性布局。 |
AnchorInfo |
绘制子View的时候,记录其位置、偏移量、方向等基础信息。 |
LayoutChunkResult |
加载子View结果情况的记录,比如已经填充的子View的数量。 |
LayoutState |
当前加载的状态记录,比如当前绘制的偏移量,屏幕还剩余多少空间等 |
直接看最重要的LinearLayoutManager#onLayoutChildren,代码被我一删再删后如下:
public void onLayoutChildren(RecyclerView.Recycler recycler, RecyclerView.State state) {
    //... 省略的代码为:数据为0的情况下移除所有的子View,将子View加入到缓存
    // 第一步:初始化LayoutState 配置LayoutState参数
    ensureLayoutState();
    mLayoutState.mRecycle = false;
    // ...
    // 第二步:寻找焦点子View
    final View focused = getFocusedChild();
    // ...
    // 第三步:移除界面中已经存在的子View,并放入缓存
    detachAndScrapAttachedViews(recycler);
    if (mAnchorInfo.mLayoutFromEnd) {
        // ...
    } else {
        // 第四步:更新LayoutSatete,填充子View
        // 填充也分为两步:1.从锚点处向结束方向填充 2.从锚点处向开始方向填充

        // fill towards end 往结束方向填充子View
        // 更新LayoutState
        updateLayoutStateToFillEnd(mAnchorInfo);
        fill(recycler, mLayoutState, state, false);
        //...
        // fill towards start 往开始方向填充子View
        // 更新LayoutState等信息
        updateLayoutStateToFillStart(mAnchorInfo);
        fill(recycler, mLayoutState, state, false);
        if (mLayoutState.mAvailable > 0) {
            // 如果还有剩余空间
            updateLayoutStateToFillEnd(lastElement, endOffset);
            fill(recycler, mLayoutState, state, false);
            // ...
        }
    }
    // ...
    // 第五步:整理一些参数,以及做一下结束处理
    // 不是预布局的状态下结束给子View布局,否则,重置锚点信息
    if (!state.isPreLayout()) {
        mOrientationHelper.onLayoutComplete();
    } else {
        mAnchorInfo.reset();
    }
    //...
}
整个onLayoutChildren可以分为如下五个过程:
- 第一步:创建
LayoutState - 第二步:获取焦点
子View - 第三步:移除视图中已经存在的
View,回收ViewHolder - 第四步:填充子
View - 第五步:填充结束后的处理
2.1 第一步、第二步
第一步是创建LayoutState,第二步是获取屏幕中的焦点子View,代码比较简单,感兴趣的同学们可以自己查询。
2.2 第三步
在填充子View前,如果当前已经存在子View并将继续存在的时候,会先从屏幕中暂时移除,将ViewHolder暂存在Recycler的一级缓存mAttachedScrap中:
/**
 * Temporarily detach and scrap all currently attached child views. Views will be scrapped
 * into the given Recycler. The Recycler may prefer to reuse scrap views before
 * other views that were previously recycled.
 *
 * @param recycler Recycler to scrap views into
 */
public void detachAndScrapAttachedViews(Recycler recycler) {
    final int childCount = getChildCount();
    for (int i = childCount - 1; i >= 0; i--) {
        final View v = getChildAt(i);
        scrapOrRecycleView(recycler, i, v);
    }
}

private void scrapOrRecycleView(Recycler recycler, int index, View view) {
    final ViewHolder viewHolder = getChildViewHolderint(view);
    if (viewHolder.shouldIgnore()) {
        return;
    }
    if (viewHolder.isInvalid() && !viewHolder.isRemoved()
                        && !mRecyclerView.mAdapter.hasStableIds()) {
        // 无效的ViewHolder会被添加进RecyclerPool
        removeViewAt(index);
        recycler.recycleViewHolderInternal(viewHolder);
    } else {
        // 添加进一级缓存
        detachViewAt(index);
        recycler.scrapView(view);
        mRecyclerView.mViewInfoStore.onViewDetached(viewHolder);
    }
}
上面的英文注释其实就是我开始所说的,暂时保存被detach的ViewHolder,至于Recycler如何保存,我们在上一篇博客中已经讨论过,这里不再赘述。
2.3 第四步
最复杂的就是子View的填充过程,回到LinearLayoutManager#onLayoutChildren方法,我们假设mAnchorInfo.mLayoutFromEnd为false,那么LinearLayoutManager会先从锚点处往下填充,直至填满,往下填充前,会先更新LayoutState:
private void updateLayoutStateToFillEnd(AnchorInfo anchorInfo) {
    updateLayoutStateToFillEnd(anchorInfo.mPosition, anchorInfo.mCoordinate);
}

private void updateLayoutStateToFillEnd(int itemPosition, int offset) {
    // mAvailable:可以填充的距离
    mLayoutState.mAvailable = mOrientationHelper.getEndAfterPadding() - offset;
    // 填充方向
    mLayoutState.mItemDirection = mShouldReverseLayout ? LayoutState.ITEM_DIRECTION_HEAD :
                    LayoutState.ITEM_DIRECTION_TAIL;
    // 当前位置
    mLayoutState.mCurrentPosition = itemPosition;
    mLayoutState.mLayoutDirection = LayoutState.LAYOUT_END;
    // 当前位置的偏移量
    mLayoutState.mOffset = offset;
    mLayoutState.mScrollingOffset = LayoutState.SCROLLING_OFFSET_NaN;
}
更新完LayoutState以后,就是子View的真实填充过程LinearLayoutManager#fill:
int fill(RecyclerView.Recycler recycler, LayoutState layoutState,
            RecyclerView.State state, Boolean stopOnFocusable) {
    // 获取可以使用的空间
    final int start = layoutState.mAvailable;
    if (layoutState.mScrollingOffset != LayoutState.SCROLLING_OFFSET_NaN) {
        // ...
        // 滑动发生时回收ViewHolder
        recycleByLayoutState(recycler, layoutState);
    }
    int remainingSpace = layoutState.mAvailable + layoutState.mExtra;
    LayoutChunkResult layoutChunkResult = mLayoutChunkResult;
    // 核心加载过程
    while ((layoutState.mInfinite || remainingSpace > 0) && layoutState.hasMore(state)) {
        //...
        layoutChunk(recycler, state, layoutState, layoutChunkResult);
        //... 省略的是:加载一个ViewHolder之后处理状态信息
    }
    // 返回消费的空间
    return start - layoutState.mAvailable;
}
最核心的就是while循环里面的LinearLayoutManager#layoutChunk,最后来看一下该方法如何实现的:
void layoutChunk(RecyclerView.Recycler recycler, RecyclerView.State state,
            LayoutState layoutState, LayoutChunkResult result) {
    // 利用缓存策略获取 与Recycler相关
    View view = layoutState.next(recycler);
    // 添加或者删除 最后会通知父布局新增或者移除子View
    if (layoutState.mScrapList == null) {
        if (mShouldReverseLayout == (layoutState.mLayoutDirection
                                    == LayoutState.LAYOUT_START)) {
            addView(view);
        } else {
            addView(view, 0);
        }
    } else {
        if (mShouldReverseLayout == (layoutState.mLayoutDirection
                                    == LayoutState.LAYOUT_START)) {
            addDisappearingView(view);
        } else {
            addDisappearingView(view, 0);
        }
    }
    // 测量子View
    measureChildWithMargins(view, 0, 0);
    // 布局子View
    layoutDecoratedWithMargins(view, left, top, right, bottom);
    // ... 设置LayoutChunkResult参数
}
首先,View view = layoutState.next(recycler);就是我们在上一节中讨论利用缓存Recycler去获取ViewHolder,接着获取ViewHolder中绑定的子View,给它添加进父布局RecyclerView,然后给子View测量一下宽高,最后,有了宽高信息,给它放置到具体的位置就完事了,过程清晰明了。
回到上个方法LinearLayoutManager#fill,在While循环并且有数据的情况下,不断的将子View填充至RecyclerView中,直至该方向填满。
再回到一开始的LinearLayoutManager#onLayoutChildren方法,除了调用了我们第四步一开始介绍的LinearLayoutManager#updateLayoutStateToFillEnd,还调用了LinearLayoutManager#updateLayoutStateToFillStart,所以从整体上来看,它是先填充锚点至结束的方向,再填充锚点至开始的方向(不绝对),如果用一图表示,我觉得可以是这样:
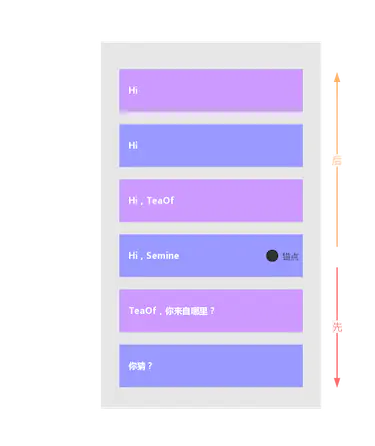
先从锚点向下填充,再从锚点向上填充,不过,也有可能是先向上,再向下,由一些参数决定。
第五步
第五步就是对之前的子View的填充结果做一些处理,不做过多介绍。
二、实战
看了Vivian的TimeLine,你可能会这么吐槽,人家的库借助StaggeredGridLayoutManager就可以实现时间轴,为何还要多此一举,使用我的TwoSideLayoutManager(我给实现的布局方式起名叫TwoSideLayoutManager)呢?因为使用瀑布流StaggeredGridLayoutManager想要在时间轴上实现子View平均分布的效果还是比较困难的,但是,使用TwoSideLayoutManager实现起来就简单多了。
那么我们如何实现RecyclerView的两侧布局呢?一张图来打开思路:
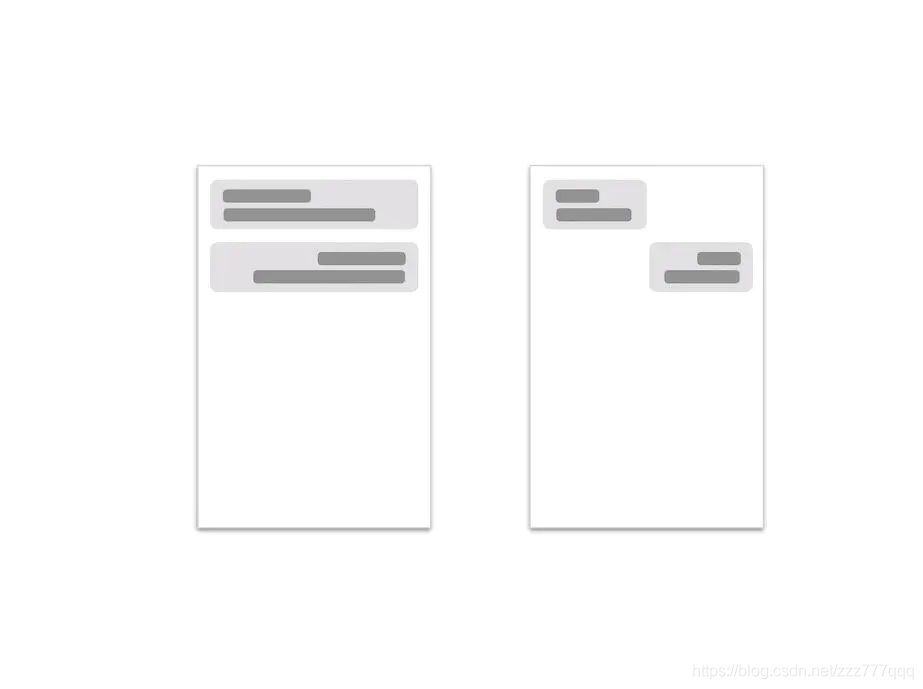
显然,TwoSideLayoutManager的布局实现可以利用LinearLayoutManager的实现方式,仅需要修改添加子View以后的测量逻辑和布局逻辑即可。
上面我们提到过,添加子View,给子View测量,布局都在LinearLayoutManager#layoutChunk中实现,那我们完全可以照搬LinearLayoutManager的填充逻辑,稍微改几处代码,限于篇幅,我们就看一下核心方法TwoSideLayoutManager#layoutChunk:
private void layoutChunk(RecyclerView.Recycler recycler, RecyclerView.State state,
                             LayoutState layoutState, LayoutChunkResult result) {
    View view = layoutState.next(recycler);
    if (view == null) {
        // 没有更多的数据用来生成子View
        result.mFinished = true;
        return;
    }
    RecyclerView.LayoutParams params = (RecyclerView.LayoutParams) view.getLayoutParams();
    // 添加进RecyclerView
    if (layoutState.mLayoutDirection != LayoutState.LAYOUT_START) {
        addView(view);
    } else {
        addView(view, 0);
    }
    // 第一遍测量子View
    measureChild(view);
    // 布局子View
    layoutChild(view, result, params, layoutState, state);
    // Consume the available space if the view is not removed OR changed
    if (params.isItemRemoved() || params.isItemChanged()) {
        result.mIgnoreConsumed = true;
    }
    result.mFocusable = view.hasFocusable();
}
整体逻辑在注释中已经写得很清楚了,挨个看一下主要方法。
1. measureChild
测量子View:
private void measureChild(View view) {
    final RecyclerView.LayoutParams lp = (RecyclerView.LayoutParams) view.getLayoutParams();
    int verticalUsed = lp.bottomMargin + lp.topMargin;
    int horizontalUsed = lp.leftMargin + lp.rightMargin;
    // 设置测量的长度为可用空间的一半
    final int availableSpace = (getWidth() - (getPaddingLeft() + getPaddingRight())) / 2;
    int widthSpec = getChildMeasureSpec(availableSpace, View.MeasureSpec.EXACTLY
                    , horizontalUsed, lp.width, true);
    int heightSpec = getChildMeasureSpec(mOrientationHelper.getTotalSpace(), getHeightMode(),
                    verticalUsed, lp.height, true);
    measureChildWithDecorationsAndMargin(view, widthSpec, heightSpec, false);
}
高度的使用方式跟LinearLayoutManager一样,宽度控制在屏幕可用空间的一半。
2. layoutChild
布局子View:
private void layoutChild(View view, LayoutChunkResult result
, RecyclerView.LayoutParams params, LayoutState layoutState, RecyclerView.State state) {
final int size = mOrientationHelper.getDecoratedMeasurement(view);
final RecyclerView.LayoutParams lp = (RecyclerView.LayoutParams) view.getLayoutParams();
result.mConsumed = size;
int left, top, right, bottom;
int num = params.getViewAdapterPosition() % 2;
// 根据位置 奇偶位来进行布局
// 如果起始位置为左侧,那么偶数位为左侧,奇数位为右侧
if (isLayoutRTL()) {
if (num == mStartSide) {
right = (getWidth() - getPaddingRight()) / 2;
left = right - mOrientationHelper.getDecoratedMeasurementInOther(view);
} else {
right = getWidth() - getPaddingRight();
left = right - mOrientationHelper.getDecoratedMeasurementInOther(view) - (getWidth() - getPaddingRight()) / 2;
}
} else {
if (num == mStartSide) {
left = getPaddingLeft();
right = left + mOrientationHelper.getDecoratedMeasurementInOther(view);
} else {
left = getPaddingLeft() + (getWidth() - getPaddingRight()) / 2;
right = left + mOrientationHelper.getDecoratedMeasurementInOther(view);
}
}
if (layoutState.mLayoutDirection == LayoutState.LAYOUT_START) {
bottom = layoutState.mOffset;
top = layoutState.mOffset - result.mConsumed;
} else {
top = layoutState.mOffset;
bottom = layoutState.mOffset + result.mConsumed;
if (mLayoutState.mCurrentPosition == state.getItemCount() && lastViewOffset != 0) {
lp.setMargins(lp.leftMargin, lp.topMargin, lp.rightMargin, lp.bottomMargin + lastViewOffset);
view.setLayoutParams(lp);
bottom += lastViewOffset;
}
}
layoutDecoratedWithMargins(view, left, top, right, bottom);
}
public void layoutDecoratedWithMargins(@NonNull View child, int left, int top, 
int right, int bottom) {
RecyclerView.LayoutParams lp = (RecyclerView.LayoutParams)child.getLayoutParams();
Rect insets = lp.mDecorInsets;
child.layout(left + insets.left + lp.leftMargin, top + insets.top + lp.topMargin, right - insets.right - lp.rightMargin, bottom - insets.bottom - lp.bottomMargin);
}
给子View测量完宽高之后,根据奇偶位和初始设置的一侧mStartSide布局子View。如果需要显示时间轴的结束节点,那么需要在创建TwoSideLayoutManager对象的时候设置lastViewOffset,预留最后位置的空间,不过,需要注意的是,如果设置了时间轴的结束节点,那么,最后一个子View最好还是不要回收,不然,最后一个子View回收给其他数据使用的时候还得处理Margin。只要在回收的时候稍稍处理就行了,具体的代码不再贴出了。
三、总结
写这个布局花的时间还挺多的,说明自己需要提升的地方还很多,有的时候代码虽然能看懂,自己却不一定能写出来。水平有限,难免有误,欢迎指出哟。
文末
感谢大家关注我,分享Android干货,交流Android技术。
对文章有何见解,或者有何技术问题,都可以在评论区一起留言讨论,都会看的哦~
Android架构师系统进阶学习路线、58万字学习笔记、教学视频免费分享地址:我的GitHub
