目录
Spring是一个开放源代码的设计层面框架,他解决的是业务逻辑层和其他各层的松耦合问题,因此它将面向接口的编程思想贯穿整个系统应用。
Spring是于2003 年兴起的一个轻量级的Java 开发框架,由Rod Johnson创建。简单来说,Spring是一个分层的JavaSE/EE full-stack(一站式) 轻量级开源框架。
Spring是一个非常活跃的开源框架,基于IOC和AOP来构架多层JavaEE系统,以帮助分离项目组件之间的依赖关系。它的主要目地是简化企业开发。
一、Spring的作用
- IOC思想 方便解耦,简化开发:Spring 就是一个大工厂,可以将所有对象创建和依赖关系维护,交给 Spring容器管理!
- AOP 编程(面向切面编程)的支持:Spring 提供面向切面编程,可以方便的实现对程序进行权限拦截、运行监控等功能!
- 声明式事务的支持:只需要通过配置就可以完成对事务的管理,而无需手动编程 SSM SSS SSH
- 方便程序的测试:Spring 对 Junit4 支持,可以通过注解方便的测试 Spring 程序,Spring-test :Spring的测试模块!
- 方便集成各种优秀框架:Spring 不排斥各种优秀的开源框架,其内部提供了对各种优秀框架(如:Struts2、Hibernate、MyBatis、Quartz(定时任务)等)的直接支持,Spring框架可以无缝整合其他的框架:MyBatis、Hibernate、Redis、Activiti、SpringMVC、SpringDATA...
- 降低 JavaEE API 的使用难度:Spring对 JavaEE 开发中非常难用的API(JDBC、JavaMail、远程调用等),都提供了封装,使这些 API 应用难度大大降低
二、Spring-IOC思想
依赖注入或控制反转的定义中,调用者不负责被调用者的实例创建工作,该工作由Spring框架中的容器来负责,它通过开发者的配置来判断实例类型,创建后再注入调用者。
由于Spring容器负责被调用者实例,实例创建后又负责将该实例注入调用者,因此称为依赖注入。
而被调用者的实例创建工作不再由调用者来创建而是由Spring来创建,控制权由应用代码转移到了外部容器,控制权发生了反转,因此称为控制反转。
1、IOC-控制反转
IOC-Inversion of Control,即控制反转。它不是什么技术,而是一种设计思想。
传统的创建对象的方法是直接通过 new 关键字,而 spring 则是通过 IOC 容器来创建对象,也就是说我们将创建对象的控制权交给了 IOC 容器。
我们可以用一句话来概括 IOC:
IOC 让程序员不在关注怎么去创建对象,而是关注与对象创建之后的操作,把对象的创建、初始化、销毁等工作交给spring容器来做。
IOC概念:程序中开发者不需要人工的创建对象,而是把创建的对象权利或者工作转交给Spring容器(IOC容器),让Spring容器去创建并管理这些对象,以达到程序的高度解耦的目的!
2、DI-依赖注入
Dependency Injection,说的是创建对象实例时,同时为这个对象注入它所依赖的属性。相当于把每个bean与bean之间的关系交给容器管理。而这个容器就是spring。
例如我们通常在 Service 层注入它所依赖的 Dao 层的实例;在 Controller层注入 Service层的实例。
DI 给对象属性赋值的过程叫做依赖注入!

3、IOC使用
pom.xml文件
<?xml version="1.0" encoding="UTF-8"?>
<project xmlns="http://maven.apache.org/POM/4.0.0"
         xmlns:xsi="http://www.w3.org/2001/XMLSchema-instance"
         xsi:schemaLocation="http://maven.apache.org/POM/4.0.0 http://maven.apache.org/xsd/maven-4.0.0.xsd">
    <modelVersion>4.0.0</modelVersion>

    <groupId>testspring</groupId>
    <artifactId>testspring</artifactId>
    <version>1.0-SNAPSHOT</version>

    <dependencies>
        <dependency>
            <groupId>org.springframework</groupId>
            <artifactId>spring-context</artifactId>
            <version>4.3.7.RELEASE</version>
        </dependency>
        <dependency>
            <groupId>org.springframework</groupId>
            <artifactId>spring-core</artifactId>
            <version>4.3.7.RELEASE</version>
        </dependency>
        <dependency>
            <groupId>org.springframework</groupId>
            <artifactId>spring-beans</artifactId>
            <version>4.3.7.RELEASE</version>
        </dependency>
        <dependency>
            <groupId>org.springframework</groupId>
            <artifactId>spring-context-support</artifactId>
            <version>4.3.7.RELEASE</version>
        </dependency>
        <dependency>
            <groupId>org.springframework</groupId>
            <artifactId>spring-expression</artifactId>
            <version>4.3.7.RELEASE</version>
        </dependency>

        <!--单元测试包-->
        <dependency>
            <groupId>junit</groupId>
            <artifactId>junit</artifactId>
            <version>4.12</version>
            <scope>test</scope>
        </dependency>
    </dependencies>

</project>
创建一个javaBean类
public class Person {
    private String name;
    private int age;
    // 构造方法 + GetterAndSetter + toString
}
创建配置文件
建议命名: applicationContext.xml
<?xml version="1.0" encoding="UTF-8"?>
<beans xmlns="http://www.springframework.org/schema/beans"
       xmlns:xsi="http://www.w3.org/2001/XMLSchema-instance"
       xsi:schemaLocation="http://www.springframework.org/schema/beans http://www.springframework.org/schema/beans/spring-beans.xsd">

    <!-- id 和 name 可以同时存在,作为bean的标识 class添加的应该是class的全路径 -->
    <bean id="person1" name="person1" class="bean.Person" scope="singleton" lazy-init="true">
        <!--属性通过set方法赋值-->
        <property name="name" value="merry"/>
        <property name="age" value="18"/>
    </bean>

</beans>
测试用例
public class TestSpring {
    @Test
    public void test1() {
        // 启动加载配置文件,并启动Spring框架
        ApplicationContext applicationContext = new ClassPathXmlApplicationContext("applicationContext.xml");
        // 获取配置文件中的对象
        Person person = applicationContext.getBean("person1", Person.class);
        System.out.println(person);
    }
}
4、bean标签和属性
bean标签:bean标签,是根标签beans内部必须包含的标签,它是用于声明具体的类的对象!
name属性:name不能重复!name之间可以指定多个逗号隔开!可以使用特殊字符,也可以根据name属性获取一个对象!
id属性:id属性作用和name几乎相同,但是也有细微的差别,id不可重复,且不能使用特殊字符
<!-- id 和 name 可以同时存在,作为bean的标识 class添加的应该是class的全路径 -->
<bean id="person1" name="personName1,personName2,personName3" class="bean.Person" />
通过java代码获取
ApplicationContext applicationContext = new ClassPathXmlApplicationContext("applicationContext.xml");
Person personId = applicationContext.getBean("personId", Person.class);
Person personName1 = applicationContext.getBean("personName1", Person.class);
Person personName2 = applicationContext.getBean("personName2", Person.class);
Person personName3 = applicationContext.getBean("personName3", Person.class);scope属性(作用域):bean标签中添加scope属性,设置bean对应对象生成规则。
scope = "singleton" 默认值,Spring容器默认创建的对象是单例!单例,默认值,适用于实际开发中的绝大部分情况。
scope="prototype" ,创建的对象是多例(每次使用对象的时候额外创建一个新的)多例,适用于Struts2、SpringMvc中的action配置
lazy-init属性
注意: 只对单例有效,设置scope="singleton"时测试延时创建属性.
lazy-init="default" 默认值,不延迟创建,即在框架启动时候就立即创建对象。
lazy-init="false" 默认值,不延迟创建,即在框架启动时候就立即创建对象。
lazy-init="true" 延迟初始化,在用到对象的时候才会创建对象。
三、Spring创建对象的四种方式
Spring的核心思想四IOC,即所有对象的创建都是通过Spring,而不需要自己手动生成。Spring创建对象有以下几种方式:
- 无参构造器
- 有参构造器
- 工厂模式:静态方法 + 非静态方法
1、无参构造函数
默认调用无参数,之前使用的方式调用了类的无参构造函数
applicationContext.xml配置
<!-- 方式1:调用的是无参数的构造方法 -->
    <bean id="person1" name="person1" class="bean.Person" scope="singleton" lazy-init="true">
        <!--属性通过set方法赋值-->
        <property name="name" value="merry"/>
        <property name="age" value="18"/>
    </bean>
2、有参数构造函数
applicationContext.xml配置
<!--方式2:调用用有参数的构造方法-->
    <bean id="person2" class="bean.Person">
        <constructor-arg index="0" type="java.lang.String" value="Bob"/>
        <constructor-arg index="1" type="int" value="18"/>
    </bean>
在调用有参数的构造方法的时候,推荐 name和index 一起用 或者 type和index一起用,以防歧义问题!
3、静态工厂模式
创建工厂类:
public class PersonFactory {
    public static Person createPerson(){
        return new Person("jack",18);
    }
}
applicationContext.xml配置
<!--方式3:使用一个静态工厂创建对象-->
    <bean id="person3" class="factory.PersonFactory" factory-method="createPerson"/>
4、非静态工厂
创建工厂类
public class NoStaticPersonFactory {
    public Person createPerson(){
        return new Person("Tom",20);
    }
}
applicationContext.xml配置
<!--方式3:使用非静态工厂-->
    <bean id="factory" class="factory.NoStaticPersonFactory"/>
    <bean id="person4" factory-bean="factory" factory-method="createPerson"/>
测试:
public class TestSpring {
@Test
public void test1() {
// 启动加载配置文件,并启动Spring框架
ApplicationContext applicationContext = new ClassPathXmlApplicationContext("applicationContext.xml");
// 获取配置文件中的对象
Person person1 = applicationContext.getBean("person1", Person.class);
System.out.println(person1);
Person person2 = applicationContext.getBean("person2", Person.class);
System.out.println(person2);
Person person3 = applicationContext.getBean("person3", Person.class);
System.out.println(person3);
Person person4 = applicationContext.getBean("person4", Person.class);
System.out.println(person4);
}
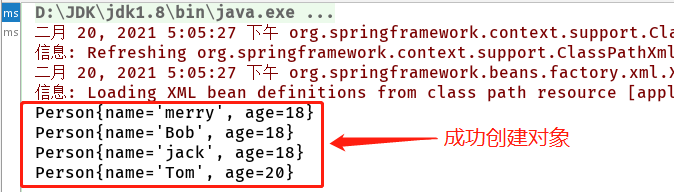
}测试结果:
四、依赖注入的四种方式
1、set方法注入
默认是调用属性的setXXX()方法赋值!
<bean id="person1" name="person1" class="bean.Person" scope="singleton" lazy-init="true">
        <!--属性通过set方法赋值-->
        <property name="name" value="merry"/>
        <property name="age" value="18"/>
</bean>引入类型值注入——使用ref
创建Car对象
public class Car {
    private String name;
    private String color;
    // getterAndSetter + 构造器 + toString
}
修改Person.java,在Person中引入Car
public class Person {
    private String name;
    private int age;
    private Car car;
    // getterAndSetter + 构造器 + toString
}
配置:利用ref属性给 person的car属性赋值
<bean id="person1" name="person1" class="bean.Person" scope="singleton" lazy-init="true">
        <!--属性通过set方法赋值-->
        <property name="name" value="merry"/>
        <property name="age" value="18"/>
        <property name="car" ref="car"/>
    </bean>

    <bean id="car" name="car" class="bean.Car">
        <!--属性通过set方法赋值-->
        <property name="name" value="MINI"/>
        <property name="color" value="red"/>
    </bean>
执行结果:

2、构造函数注入
在Person中创建有参构造函数:
public class Person {

    private String name;
    private int age;

    public Person() {
    }

    public Person(String name, int age) {
        this.name = name;
        this.age = age;
    }
    // GetterAndSetter + toString
}
applicationContext.xml配置
<bean id="person2" class="bean.Person">
        <constructor-arg index="0" type="java.lang.String" value="Bob"/>
        <constructor-arg index="1" type="int" value="18"/>
</bean>index属性:按参数索引注入,参数名一致,但位置不一致时,使用 index;同时使用 index 也可以确定调用哪个构造函数

type属性:按参数类型注入,参数名和位置一致,但类型不一致时,使用type
3、p名称空间注入
导入p名称空间:

使用p:属性名 完成注入,走set方法
- - 基本类型值: p:属性名="值"
- - 引入类型值: P:属性名-ref="bean名称"
applicationContext.xml配置
<bean id="person1" name="person1" class="bean.Person" p:name="merry" p:age="18"/>4、spel注入
spring Expression Language:spring表达式语言
applicationContext.xml配置
<!--person1-->
    <bean id="person1" name="person1" class="bean.Person" p:name="merry" p:age="18"/>
    <!--person2-->
    <bean id="person2" class="bean.Person">
        <constructor-arg index="0" type="java.lang.String" value="Bob"/>
        <constructor-arg index="1" type="int" value="20"/>
    </bean>
    <!--person3-->
    <bean id="person3" class="bean.Person">
        <property name="name" value="#{person1.name}"/>
        <property name="age" value="#{person2.age}"/>
    </bean>
执行结果:
