目录
1.1 入门程序
- 因为是安全框架,所以先简单写一个登录的
html,然后用controller去接收他。
<!DOCTYPE html>
<html lang="en">
<head>
    <meta charset="UTF-8">
    <title>Title</title>
</head>
<body>
    <form action="/login" method="post">
        <!-- 这个必须叫username和password,否则会报错 -->
        用户名:<input type="text" name="username"><br>
        密码:<input type="password" name="password"><br>
        <input type="submit" value="登录">
    </form>
</body>
</html>
package com.jerry.springsecuritydemo.controller;

import org.springframework.web.bind.annotation.RequestMapping;
import org.springframework.web.bind.annotation.RestController;

/**
 * 登录
 */
@RestController
public class LoginController {


    @RequestMapping("/login")
    public String login() {


        System.out.println("执行了登陆方法");
        return "redirect:main:html";
    }
}
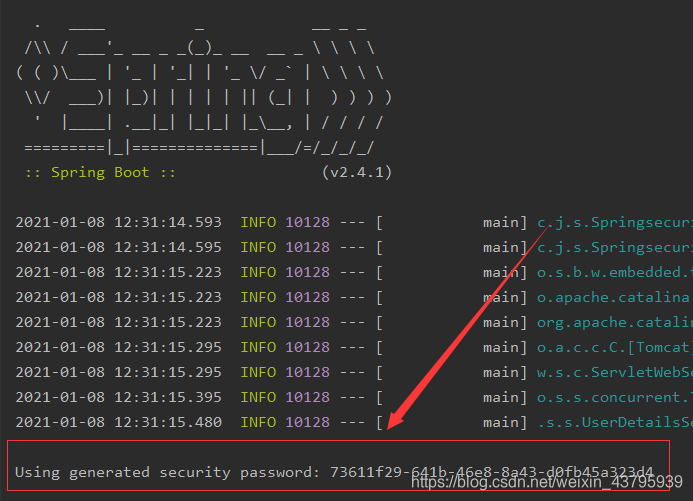
- 此时我们访问
localhost:8080/login.html会跳到localhost:8080/login中,这是springsecurity带给我们的一个界面,默认的用户名是user,密码是启动时给的。如下:
登录之后才会到我们自己的登录界面。
这就是最简单的案例。
1.2 自定义登陆逻辑
现在我们的登陆账号和密码都是固定死的,每次由springsecurity给我们生成,如果我们想要使用自己的数据库中的数据的话,需要以下几点:
- 实现
UserDetailsService接口并注入到容器中 - 通过重写
loadUserByUsername即可
loadUserByUsername方法返回了一个UserDetails接口,从接口中可以看到它有获取用户名密码权限是否可用等方法。
通过查看UserDetails的结构可以看到他有一个User类,我们只需要返回这个实现类即可。
因为在数据库中的密码都是加密过的,所以我们需要一个PasswordEncoder来进行密码的编码和验证。
由于PasswordEncoder也是一个接口,并且方法中的注释:
/**
* Encode the raw password. Generally, a good encoding algorithm applies a SHA-1 or
* greater hash combined with an 8-byte or greater randomly generated salt.
*/
推荐了我们使用什么方法,我们可以采用他的子类BCryptPasswordEncoder
具体实现:
- SpringSecurity要求Spring容器中必须有一个PasswordEncoder的实例,所以先注入
// 配置类,注入PasswordEncoder
import org.springframework.context.annotation.Bean;
import org.springframework.context.annotation.Configuration;
import org.springframework.security.crypto.bcrypt.BCryptPasswordEncoder;
import org.springframework.security.crypto.password.PasswordEncoder;

@Configuration
public class SecurityConfig {


    /**
     * SpringSecurity要求Spring容器中必须有一个PasswordEncoder的实例
     * @return
     */
    @Bean
    public PasswordEncoder getPasswordEncoder() {


        return new BCryptPasswordEncoder();
    }

}
- 实现UserDetailsService
// 注意@Service注解,或者其余的注解。总之要注入到spring容器中
import org.springframework.beans.factory.annotation.Autowired;
import org.springframework.security.core.authority.AuthorityUtils;
import org.springframework.security.core.userdetails.User;
import org.springframework.security.core.userdetails.UserDetails;
import org.springframework.security.core.userdetails.UserDetailsService;
import org.springframework.security.core.userdetails.UsernameNotFoundException;
import org.springframework.security.crypto.password.PasswordEncoder;
import org.springframework.stereotype.Service;

@Service
public class UserDetailsServiceImpl implements UserDetailsService {


    @Autowired
    private PasswordEncoder passwordEncoder;

    @Override
    public UserDetails loadUserByUsername(String username) throws UsernameNotFoundException {


        // 判断用户名是否存在,不存在要抛出异常UsernameNotFoundException
        if (!"admin".equals(username)) {


            throw new UsernameNotFoundException("用户名不存在");
        }
        // 把查询出来的密码(数据库加密过的密码)进行解析,或者直接把密码放入构造方法
        String password = passwordEncoder.encode("mypassword");
        System.out.println("password:" + password);
        return new User(username, password, AuthorityUtils.commaSeparatedStringToAuthorityList("admin,normal"));
    }
}
接下来,我们在用原来的user|显示的密码已经进不去了,反而admin|mypassword可以进去。
到此我们可以在自定义账号和密码了。
1.3 自定义登陆界面
一般都不会采用springsecurity的自带的界面。
修改登陆界面需要:
- 使用一个配置去去继承
WebSecurityConfigurerAdapter重写configure方法 - 修改登陆界面,登录跳转界面,还有登录路径
- 关闭csrf
import org.springframework.context.annotation.Bean;
import org.springframework.context.annotation.Configuration;
import org.springframework.security.config.annotation.web.builders.HttpSecurity;
import org.springframework.security.config.annotation.web.configuration.WebSecurityConfigurerAdapter;
import org.springframework.security.crypto.bcrypt.BCryptPasswordEncoder;
import org.springframework.security.crypto.password.PasswordEncoder;

@Configuration
public class SecurityConfig extends WebSecurityConfigurerAdapter {


    @Override
    protected void configure(HttpSecurity http) throws Exception {


        // 表单提交
        http.formLogin()
                .loginProcessingUrl("/login") // 发现/login时认为登录,这个地方必须和login.html提交的那个action一样
                .loginPage("/login.html") // 登录的界面
                .successForwardUrl("/toMain");
        // 其实上面定义了登录界面和成功之后跳转到哪,思考之后发现login方法已经没有用了
        // 判断已经有UserDetailsServiceImpl来代替了


        http.authorizeRequests() // 类似拦截器
                .antMatchers("/login.html").permitAll() // 放行login.html
                .anyRequest() // 任何请求
                .authenticated(); // 必须都被授权
		// 关闭csrf
        http.csrf().disable();
    }

    /**
     * SpringSecurity要求Spring容器中必须有一个PasswordEncoder的实例
     * @return
     */
    @Bean
    public PasswordEncoder getPasswordEncoder() {


        return new BCryptPasswordEncoder();
    }

}
package com.jerry.springsecuritydemo.controller;

import org.springframework.stereotype.Controller;
import org.springframework.web.bind.annotation.RequestMapping;
import org.springframework.web.bind.annotation.RestController;

/**
 * 登录
 */
@Controller
public class LoginController {


    // 因为login已经没有用了,所以之前的login方法删掉了
    // 这个login方法是因为配置类中的successForwardUrl不可以直接跳到页面,会显示method不对
    // 跳到这个方法中然后重定向即可
    @RequestMapping("/toMain")
    public String login() {


        System.out.println("执行了登陆方法");
        return "redirect:main.html";
    }
}
1.4 自定义错误界面
还是修改WebSecurityConfigurerAdapter的configure方法即可
package com.jerry.springsecuritydemo.config;


import org.springframework.context.annotation.Bean;
import org.springframework.context.annotation.Configuration;
import org.springframework.security.config.annotation.web.builders.HttpSecurity;
import org.springframework.security.config.annotation.web.configuration.WebSecurityConfigurerAdapter;
import org.springframework.security.crypto.bcrypt.BCryptPasswordEncoder;
import org.springframework.security.crypto.password.PasswordEncoder;

@Configuration
public class SecurityConfig extends WebSecurityConfigurerAdapter {


    @Override
    protected void configure(HttpSecurity http) throws Exception {


        // 表单提交
        http.formLogin()
                .loginProcessingUrl("/login") // 发现/login时认为登录
                .loginPage("/login.html")
                // post请求
                .successForwardUrl("/toMain")
            	// 错误的话经过controller跳转
                .failureForwardUrl("/toError");

        http.authorizeRequests() // 类似拦截器
            	// 这里也要注意放行
                .antMatchers("/login.html", "/error.html").permitAll() // 放行login.html
                .anyRequest() // 任何请求
                .authenticated(); // 必须都被授权

        http.csrf().disable();
    }

    /**
     * SpringSecurity要求Spring容器中必须有一个PasswordEncoder的实例
     * @return
     */
    @Bean
    public PasswordEncoder getPasswordEncoder() {


        return new BCryptPasswordEncoder();
    }

}
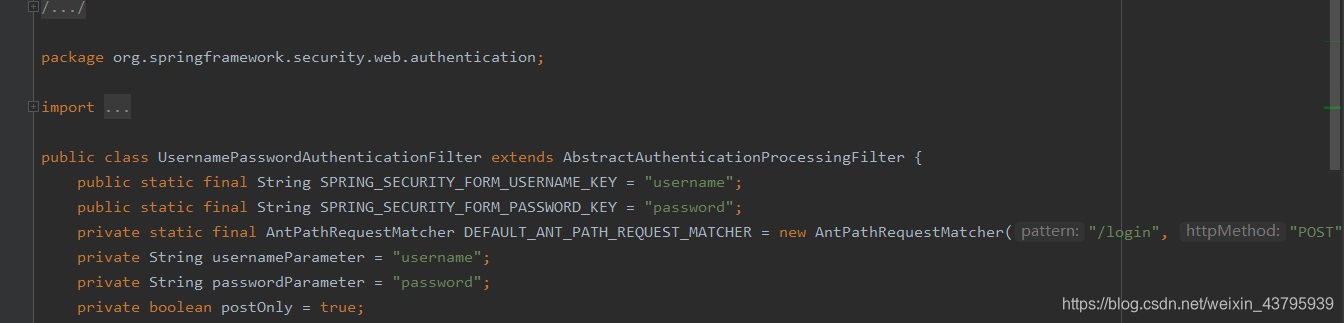
1.5 为什么只能用Username和password这两个name
// 表单提交
http.formLogin()
    .usernameParameter("myusername")
    .passwordParameter("mypassword")
    .loginProcessingUrl("/login") // 发现/login时认为登录
    .loginPage("/login.html")
    // post请求
    .successForwardUrl("/toMain")
    .failureForwardUrl("/toError");
<!DOCTYPE html>
<html lang="en">
<head>
    <meta charset="UTF-8">
    <title>Title</title>
</head>
<body>
    <form action="/login" method="post">
        用户名:<input type="text" name="myusername"><br>
        密码:<input type="password" name="mypassword"><br>
        <input type="submit" value="登录">
    </form>
</body>
</html>
1.6 前后端分离怎么办?
通过查看successForwardUrl这个类的源码发现
public FormLoginConfigurer<H> successForwardUrl(String forwardUrl) {


    this.successHandler(new ForwardAuthenticationSuccessHandler(forwardUrl));
    return this;
}
本质上是调用了 successHandler这个方法,而HttpSecurity也可以调用这个方法
再看ForwardAuthenticationSuccessHandler这个处理器
public class ForwardAuthenticationSuccessHandler implements AuthenticationSuccessHandler {


    private final String forwardUrl;

    public ForwardAuthenticationSuccessHandler(String forwardUrl) {


        Assert.isTrue(UrlUtils.isValidRedirectUrl(forwardUrl), () -> {


            return "'" + forwardUrl + "' is not a valid forward URL";
        });
        this.forwardUrl = forwardUrl;
    }

    public void onAuthenticationSuccess(HttpServletRequest request, HttpServletResponse response, Authentication authentication) throws IOException, ServletException {


        request.getRequestDispatcher(this.forwardUrl).forward(request, response);
    }
}
实际上就是调用了onAuthenticationSuccess,下面的我们都很熟悉,就是servlet的转发
所以呢?我们只需要重写一个处理器然后实现AuthenticationSuccessHandler这个接口
在调用时换成自己的处理器即可
步骤:
- 重写处理器实现
AuthenticationSuccessHandler - 在配置类中替换掉原来的处理器
public class MyAuthenticationSuccessHandler implements AuthenticationSuccessHandler {


    private String url;
    public MyAuthenticationSuccessHandler(String url) {


        this.url = url;
    }

    @Override
    public void onAuthenticationSuccess(HttpServletRequest httpServletRequest, HttpServletResponse httpServletResponse, Authentication authentication) throws IOException, ServletException {


        httpServletResponse.sendRedirect(url);
    }

    // 额外:authentication这个对象就是登录的User对象
    //    User principal = (User) authentication.getPrincipal();
    //    System.out.println(principal.getUsername());
    // 	  安全原因会打印null
    //    System.out.println(principal.getPassword());
    //    System.out.println(principal.getAuthorities());
}
@Configuration
public class SecurityConfig extends WebSecurityConfigurerAdapter {


    @Override
    protected void configure(HttpSecurity http) throws Exception {


        // 表单提交
        http.formLogin()
                // .successForwardUrl("/toMain")
            	// 替换即可
            	.successHandler(new MyAuthenticationSuccessHandler("http://www.baidu.com")) // 现在这里也可以直接跳转到/main.html
            	// failture和success是一样的
		// .....
    }

}
2.1 antMatchers
antMatchers的参数是可变类型,并且允许做一个匹配
http.authorizeRequests() // 类似拦截器
    .antMatchers("/login.html", "/error.html").permitAll() // 放行login.html
    .antMatchers("/js/**", "/css/**", "/images/**").permitAll()
    .anyRequest() // 任何请求
    .authenticated(); // 必须都被授权
1. ** 代表任何个数的目录
2. * 代表任意的字符
3. ? 代表一个字符
还有另一个参数的
http.authorizeRequests() // 类似拦截器
    .antMatchers(HttpMethod.POST, "/login.html", "/error.html").permitAll() // 放行login.html
    .antMatchers("/js/**", "/css/**", "/images/**").permitAll()
    .anyRequest() // 任何请求
    .authenticated(); // 必须都被授权

HttpMethod是enum类型
2.2 regexMatchers
和ant一样,只不过参数变成了正则表达式
http.authorizeRequests() // 类似拦截器
    .antMatchers("/login.html", "/error.html").permitAll() // 放行login.html
    //                .antMatchers("/js/**", "/css/**", "/images/**").permitAll()
    .regexMatchers(".+[.]png").permitAll()
    .anyRequest() // 任何请求
    .authenticated(); // 必须都被授权
2.3 mvcMatchers
http.authorizeRequests() // 类似拦截器
    .mvcMatchers("/images/**").servletPath("/prefix").permitAll()
    .anyRequest() // 任何请求
    .authenticated(); // 必须都被授权
spring:
  mvc:
    servlet:
      path: /prefix
2.4 security有几种访问控制的方法
public final class ExpressionUrlAuthorizationConfigurer<H extends HttpSecurityBuilder<H>> extends AbstractInterceptUrlConfigurer<ExpressionUrlAuthorizationConfigurer<H>, H> {


    static final String permitAll = "permitAll";
    private static final String denyAll = "denyAll"; // 都不能访问
    private static final String anonymous = "anonymous"; // 可以匿名访问
    private static final String authenticated = "authenticated"; // 必须授权
    private static final String fullyAuthenticated = "fullyAuthenticated"; // 完全认证,不能通过rememberMe
    private static final String rememberMe = "rememberMe"; // 记住我
、
3.1 角色权限判断
http.authorizeRequests() // 类似拦截器
    .antMatchers("/login.html", "/error.html").permitAll() // 放行login.html
    .antMatchers("/main1.html").hasAuthority("admin-mo") // 严格区分大小写
    .antMatchers("/main1.html").hasAnyAuthority("admin", "adminJ")
    // ....
3.2 角色判断
http.authorizeRequests()
    .antMatchers("/login.html", "/error.html").permitAll() // 放行login.html
    .antMatchers("/main1.html").hasRole("abc")
    .antMatchers("/main1.html").hasAnyAuthority("abC", "abc")
@Service
public class UserDetailsServiceImpl implements UserDetailsService {


    @Autowired
    private PasswordEncoder passwordEncoder;

    @Override
    public UserDetails loadUserByUsername(String username) throws UsernameNotFoundException {


        // 判断用户名是否存在,不存在要抛出异常UsernameNotFoundException
        if (!"admin".equals(username)) {


            throw new UsernameNotFoundException("用户名不存在");
        }
        // 把查询出来的密码(数据库加密过的密码)进行解析,或者直接把密码放入构造方法
        String password = passwordEncoder.encode("mypassword");
        // ROLE_xxx 表示xxx是它的角色
        return new User(username, password, AuthorityUtils.commaSeparatedStringToAuthorityList("admin,normal,ROLE_abc"));
    }
}
3.3 判断IP
http.authorizeRequests() // 类似拦截器
    .antMatchers("/login.html", "/error.html").permitAll() // 放行login.html
    .antMatchers("/main.html").hasIpAddress("127.0.0.1")
3.4 自定义403处理
- 实现
AccessDeniedHandler接口并重写handle方法 - 配置类中用http参数修改异常处理
@Component
public class MyAccessDeniedHandler implements AccessDeniedHandler {


    @Override
    public void handle(HttpServletRequest httpServletRequest, HttpServletResponse httpServletResponse, AccessDeniedException e) throws IOException, ServletException {


        httpServletResponse.setStatus(HttpServletResponse.SC_FORBIDDEN);
        httpServletResponse.setHeader("Content-Type", "text/html;charset=UTF-8");
        PrintWriter writer = httpServletResponse.getWriter();
        writer.write("赶快冲会员吧");
        writer.flush();
        writer.close();
    }
}
// myAccessDeniedHandler是注入到SecurityConfig中的
// 异常处理
http.exceptionHandling()
    .accessDeniedHandler(myAccessDeniedHandler);
4.1 基于表达式的访问控制
access
底层其实都是access的表达式
antMatchers("/login.html").access("permitAll()")
自定义access
- 写一个普通的接口
- 实现
- 调用
public interface MyService {


    boolean hasPermission(HttpServletRequest request, Authentication authentication);
}

@Service
public class MyServiceImpl implements MyService {


    @Override
    public boolean hasPermission(HttpServletRequest request, Authentication authentication) {


        Object principal = authentication.getPrincipal();
        if (principal instanceof UserDetails) {


            UserDetails userDetails = (UserDetails) principal;
            Collection<? extends GrantedAuthority> authorities = userDetails.getAuthorities();
            System.out.println("requst----->:" + request.getRequestURI());
            // 如果权限包含了这个路径,就允许
            return authorities.contains(new SimpleGrantedAuthority(request.getRequestURI()));
        }
        return false;
    }
}

http.authorizeRequests() // 类似拦截器
                .antMatchers("/login.html").access("permitAll()")
                .anyRequest().access("@myServiceImpl.hasPermission(request,authentication)");
4.2 注解
需要开启注解可用
@EnableGlobalMethodSecurity(securedEnabled = true)
@Secured("ROLE_abc") // 此处必须ROLE_开头
@RequestMapping("/toMain")
public String login() {


    System.out.println("执行了登陆方法");
    return "redirect:main.html";
}
4.3 RememberMe功能
在Config中
http.rememberMe()
    .tokenValiditySeconds(60) // 60秒有效
    //.rememberMeParameter("rem")
    .userDetailsService(userDetailsService)
    .tokenRepository(persistentTokenRepository);
// 默认的失效时间是2周
需要的userDetailsService是验证规则(处理登录那个地方)
persistentTokenRepository如下:
@Bean
public PersistentTokenRepository getPersistentTokenRepository() {


    JdbcTokenRepositoryImpl jdbcTokenRepository = new JdbcTokenRepositoryImpl();
    jdbcTokenRepository.setDataSource(dataSource);
    // 自动建表,第二次启动一定要注释掉,或者自己创建表
    //        jdbcTokenRepository.setCreateTableOnStartup(true);
    return jdbcTokenRepository;
}
因为记录基于jdbc,所以要导入jdbc和mysql的相关依赖
5.1 退出
<a href="/logout"></a>
// 更换跳转页面
http.logout().logoutSuccessUrl("/login.html");
.logoutUrl("/user/logout") // 可以通过这个替换a的href参数 这方法多少沾点
5.2 CSRF
http.csrf().disable(); // 这东西默认开启,我们把它删了他就开启了
// 然后我们的web端就进不来了
// 我们需要携带一个参数叫_csrf, 值是token
6 JWT
JSON Web Token
由三部分组成:
- 头部:描述JWT最基本的信息,例如类型以及所用签名等
- 载荷:存放有效信息的地方
- 签名:
<dependency>
    <groupId>io.jsonwebtoken</groupId>
    <artifactId>jjwt</artifactId>
    <version>0.9.0</version>
</dependency>
JwtBuilder jwtBuilder = Jwts.builder()
                .setId("8888")
                .setSubject("jerry")
                .setIssuedAt(new Date())
                .signWith(SignatureAlgorithm.HS256, "password");

String token = jwtBuilder.compact();

String[] split = token.split("\\.");

System.out.println(token);
System.out.println(Base64Codec.BASE64.decodeToString(split[0]));
System.out.println(Base64Codec.BASE64.decodeToString(split[1]));
eyJhbGciOiJIUzI1NiJ9.eyJqdGkiOiI4ODg4Iiwic3ViIjoiamVycnkiLCJpYXQiOjE2MTAxNjk5NDZ9.LUZJLmhxOxgiK4uxJburqphrsY0C0uIJAI5PgGwn5b8
{"alg":"HS256"}
{"jti":"8888","sub":"jerry","iat":1610169946}
6.2 JWT解析
String token = "eyJhbGciOiJIUzI1NiJ9.eyJqdGkiOiI4ODg4Iiwic3ViIjoiamVycnkiLCJpYXQiOjE2MTAxNjk5NDZ9.LUZJLmhxOxgiK4uxJburqphrsY0C0uIJAI5PgGwn5b8";
// 解析token
// 载荷中声明的对象
Claims claims = Jwts.parser()
    .setSigningKey("password")
    .parseClaimsJws(token)
    .getBody();
System.out.println(claims.getId());
System.out.println(claims.getSubject());
System.out.println(claims.getIssuedAt());
8888
jerry
Sat Jan 09 13:25:46 CST 2021
6.3 过期校验
 public void createExpireTime() {


     long now = System.currentTimeMillis();
     now += 60 * 1000; // 一分钟失效时间
     JwtBuilder jwtBuilder = Jwts.builder()
         .setId("8888")
         .setSubject("jerry")
         .setIssuedAt(new Date())
         .signWith(SignatureAlgorithm.HS256, "password")
         .setExpiration(new Date(now));
     String token = jwtBuilder.compact();

     String[] split = token.split("\\.");

     System.out.println(token);
     System.out.println(Base64Codec.BASE64.decodeToString(split[0]));
     System.out.println(Base64Codec.BASE64.decodeToString(split[1]));
 }
eyJhbGciOiJIUzI1NiJ9.eyJqdGkiOiI4ODg4Iiwic3ViIjoiamVycnkiLCJpYXQiOjE2MTAxNzA3NzYsImV4cCI6MTYxMDE3MDgzNn0.1Fc75VS4MxqEqSKMX87ZsbY_TlOuMs5D8yfKGjdvJJ8
{

    "alg":"HS256"}
{

    "jti":"8888","sub":"jerry","iat":1610170776,"exp":161017083
public void parseExpireTime() {


    String token = "eyJhbGciOiJIUzI1NiJ9.eyJqdGkiOiI4ODg4Iiwic3ViIjoiamVycnkiLCJpYXQiOjE2MTAxNzA3NzYsImV4cCI6MTYxMDE3MDgzNn0.1Fc75VS4MxqEqSKMX87ZsbY_TlOuMs5D8yfKGjdvJJ8";
    Claims claims = Jwts.parser()
        .setSigningKey("password")
        .parseClaimsJws(token)
        .getBody();
    System.out.println(claims.getId());
    System.out.println(claims.getSubject());
    System.out.println(claims.getIssuedAt());
    SimpleDateFormat simpleDateFormat = new SimpleDateFormat("yyyy-MM-dd HH:mm:ss");
    System.out.println("签发时间" + simpleDateFormat.format(claims.getIssuedAt()));
    System.out.println("过期时间" + simpleDateFormat.format(claims.getExpiration()));
    System.out.println("当前时间" + simpleDateFormat.format(new Date()));
}
8888
jerry
Sat Jan 09 13:39:36 CST 2021
签发时间2021-01-09 13:39:36
过期时间2021-01-09 13:40:36
当前时间2021-01-09 13:40:15
token失效异常抛出
io.jsonwebtoken.ExpiredJwtException
6.4 自定义声明
  /**
     * 自定义声明
     */
    @Test
    public void testCreateTokenByClaims() {


        JwtBuilder jwtBuilder = Jwts.builder()
                .setId("8888")
                .setSubject("jerry")
                .setIssuedAt(new Date())
                .signWith(SignatureAlgorithm.HS256, "password")
                .claim("roles", "admin")
                .claim("logo", "j.jpg")
//                .addClaims(new HashMap<>())
                ;

        String token = jwtBuilder.compact();

        String[] split = token.split("\\.");

        System.out.println(token);
        System.out.println(Base64Codec.BASE64.decodeToString(split[0]));
        System.out.println(Base64Codec.BASE64.decodeToString(split[1]));

    }

    @Test
    public void parseTokenByClaims() {


        String token = "eyJhbGciOiJIUzI1NiJ9.eyJqdGkiOiI4ODg4Iiwic3ViIjoiamVycnkiLCJpYXQiOjE2MTAxNzEyMTEsInJvbGVzIjoiYWRtaW4iLCJsb2dvIjoiai5qcGcifQ.ib3qRL2nEkCBRKlVRthA9Gbh-6UneC9TdiApCRSnqb0";
        // 解析token
        // 载荷中声明的对象
        Claims claims = Jwts.parser()
                .setSigningKey("password")
                .parseClaimsJws(token)
                .getBody();
        System.out.println(claims.getId());
        System.out.println(claims.getSubject());
        System.out.println(claims.getIssuedAt());
        System.out.println("roles:" + claims.get("roles"));
        System.out.println("logo:" + claims.get("logo"));
    }