文章目录
1.接口测试的背景
接口测试的方式有很多,比如可以用工具(jmeter,postman)之类,也可以自己写代码进行接口测试,工具的使用相对来说都比较简单,重点是要搞清楚项目接口的协议是什么,然后有针对性的进行选择,甚至当工具不太适合项目时需要自己进行开发。
在我们项目的初期,我们采用的是jmeter进行接口测试,当时觉得这个工具上手简单,团队成员学习成本低,并且接口测试的脚本稍微调整一下还可以用来做性能测试。
不过随着项目规模、团队人数的不断增长,渐渐的这个工具有适应不了当前项目的需求了,为此我们项目也重新开发了相关接口自动化的平台。但是,但是。。。可能是我让大家中毒太深,现在很多同学一提到接口测试关联到jmeter,为此,我深深感到不安。毕竟jmeter只是个工具,换个项目换个协议你是否还能玩转接口测试呢?session和cookie有什么区别?工具又是怎么实现的呢?
比如session如何保存,接口依赖如何处理,case如何管理及执行顺序,测试数据如何管理等等题,这个过程也有助于我们更加深刻的理解接口测试和http协议。
2.python实现接口自动化测试
python中http协议接口相关的库有urllib,urllib2以及reqeusts库,这其中reqeusts库用来起来最方便,因此我也主要采用requests库来做http协议的接口测试。首先来看下需要哪些环境信息:
2.1 安装requests库:
pip install requests
2.2 http测试工具:
一个使用 Python + Flask 编写的 HTTP 请求和响应服务,该服务主要用于测试 HTTP 库。后续测试我们都基于这个网站。
http://httpbin.org
考虑到测试时要不断访问 httpbin 网站,请求过多担心被拉到黑名单,我们自己在本志搭建一套httpbin服务。
1、安装:pip install gunicorn

2、安装:pip install httpbin

3、启动:gunicorn httpbin:app
3.requests简单介绍
requests官方文档
requests的一些简单使用,主要包括:
requests常用请求方法使用,包括:get,post
requests库中的Session、Cookie的使用
其它高级部分:认证、代理、证书验证、超时配置、错误异常处理等。
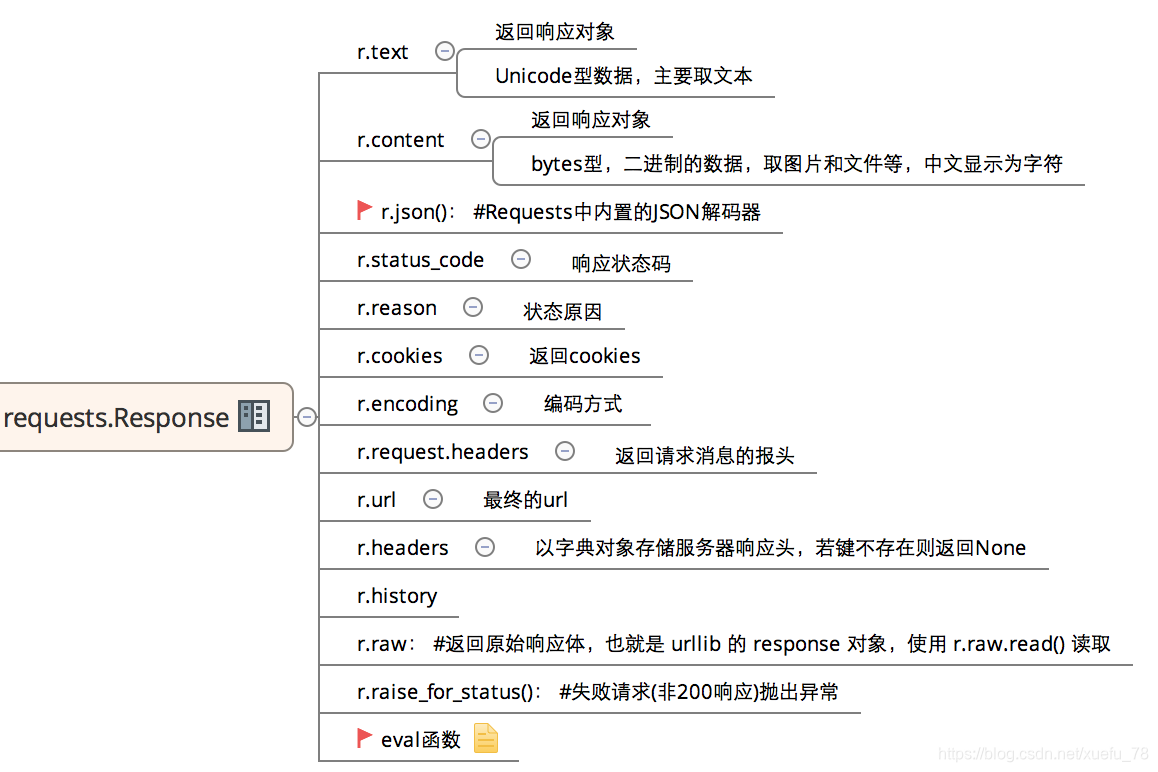
HTTP协议是一个基于请求/响应模式的、无状态的,应用层协议。既然有请求,就有响应,来看下resquest中常用的响应信息:

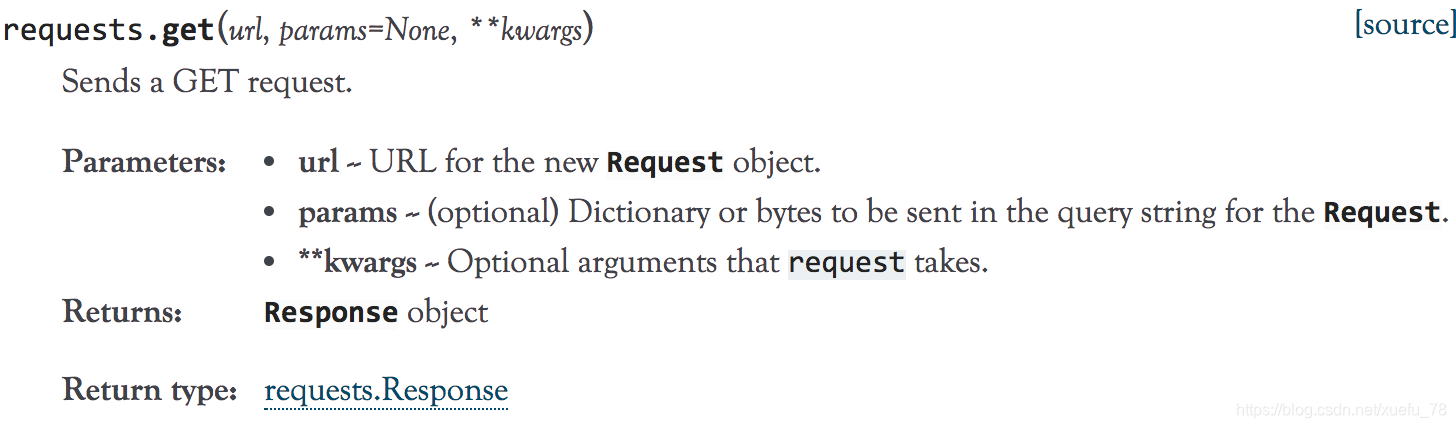
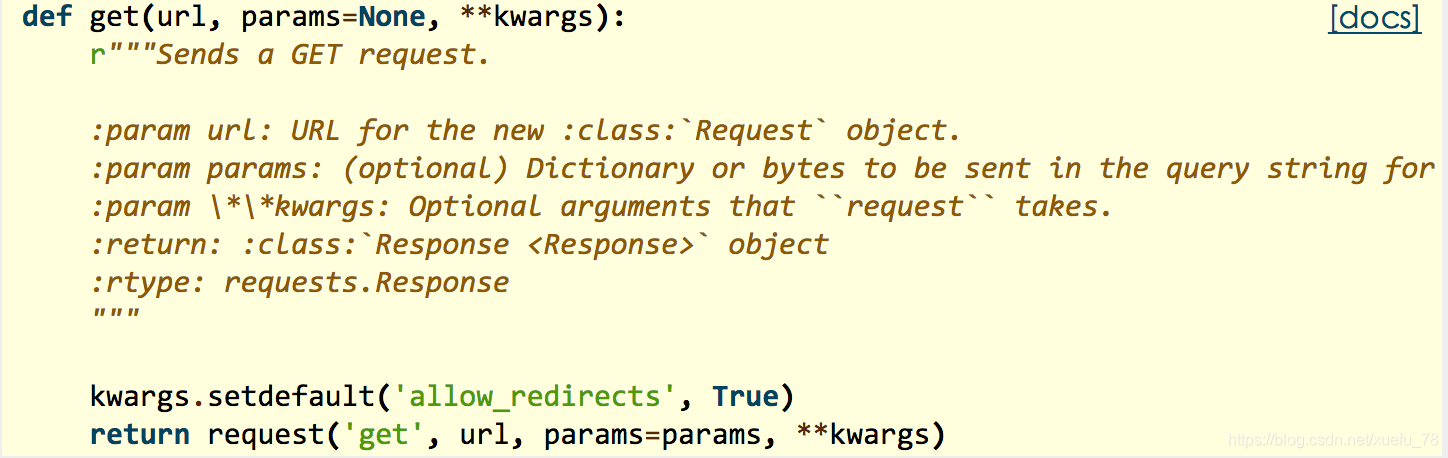
4.request的get使用示例:
源码如下:
4.1 get请求
import requests
import json

host = "http://httpbin.org/"
endpoint = "get"

url = ''.join([host,endpoint])
r = requests.get(url)
response = r.json()

# print(type(r.text))
# print(eval(r.text))
print(response)
response输出为
{

    'args': {

    },
 'headers': {

    'Accept': '*/*', 'Accept-Encoding': 'gzip, deflate', 'Host': 'httpbin.org',    'User-Agent': 'python-requests/2.25.0', 'X-Amzn-Trace-Id': 'Root=1-60053d88-737a67c47f49df213dae0ba1'},
 'origin': '139.159.170.1',
 'url': 'http://httpbin.org/get'
 }
4.2 带参数的get
#带参数的get

import requests
import json

host = "http://httpbin.org/"
endpoint = "get"

url = ''.join([host,endpoint])
params = {

    "show_env":"1"}
r = requests.get(url=url,params=params)
print(r.json())
输出:
{


'args': {

    'show_env': '1'},
'headers': {

    'Accept': '*/*',
            'Accept-Encoding': 'gzip, deflate',
            'Host': 'httpbin.org',
            'User-Agent': 'python-requests/2.25.0',
            'X-Amzn-Trace-Id': 'Root=1-60053eec-5f331979381012d16064f971',
            'X-Forwarded-For': '139.159.170.1',
            'X-Forwarded-Port': '80',
            'X-Forwarded-Proto': 'http'},
'origin': '139.159.170.1',
'url': 'http://httpbin.org/get?show_env=1'
}
4.3 带header的get
import requests
import json

host = "http://httpbin.org/"
endpoint = "get"

url = ''.join([host,endpoint])
headers = {

    "User-Agent":"test request headers"}

r = requests.get(url,headers=headers)
response = r.json()
print(response)
输出(可以看到在headers里面有我们输入的内容):
{

    'args': {

    },
 'headers': {

    'Accept': '*/*',
             'Accept-Encoding': 'gzip, deflate',
             'Host': 'httpbin.org',
             'User-Agent': 'test request headers',
             'X-Amzn-Trace-Id': 'Root=1-60054099-236ec0c056e06e344dc6c7a4'},
 'origin': '139.159.170.1',
 'url': 'http://httpbin.org/get'}
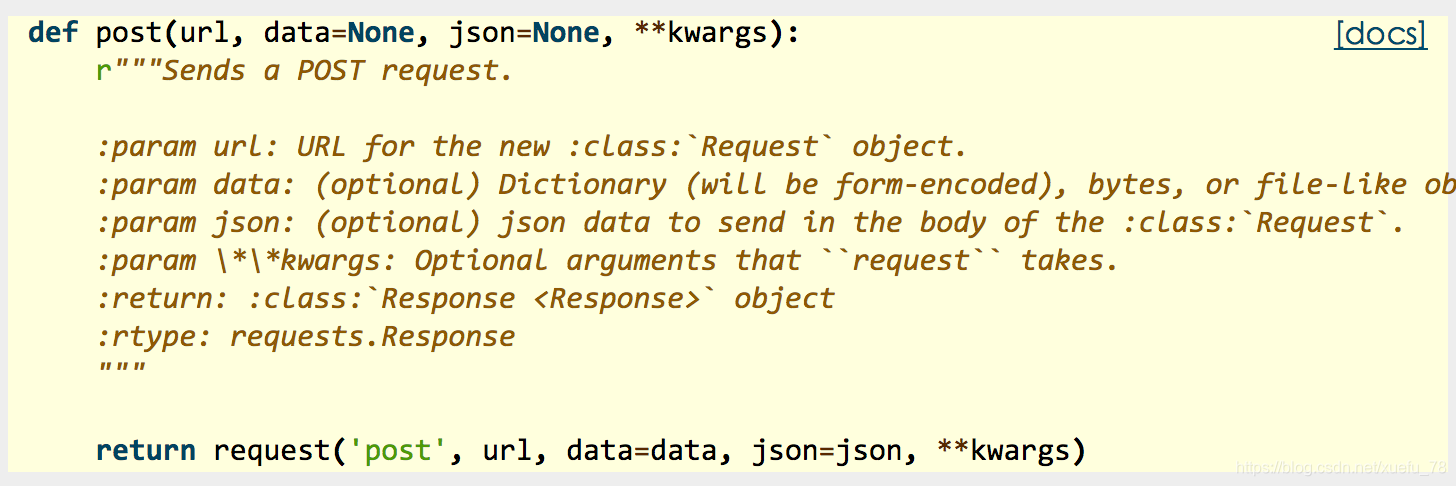
5.request的post使用示例:
源码如下:

常用返回信息:
post方法简单使用:
1、带数据的post
# -*- coding:utf-8 -*-
import requests
import json

host = "http://httpbin.org/"
endpoint = "post"
url = ''.join([host,endpoint])
data = {

    'key1':'value1','key2':'value2'}

r = requests.post(url,data=data)
#response = r.json()
print (r.text)
输出:
{


  "args": {

    },
  "data": "",
  "files": {

    },
  "form": {


    "key1": "value1",
    "key2": "value2"
  },
  "headers": {


    "Accept": "*/*",
    "Accept-Encoding": "gzip, deflate",
    "Content-Length": "23",
    "Content-Type": "application/x-www-form-urlencoded",
    "Host": "httpbin.org",
    "User-Agent": "python-requests/2.25.0",
    "X-Amzn-Trace-Id": "Root=1-60054295-373ea4ae237542795a40f480"
  },
  "json": null,
  "origin": "139.159.170.1",
  "url": "http://httpbin.org/post"
}
2、带header的post
# -*- coding:utf-8 -*-
import requests
import json

host = "http://httpbin.org/"
endpoint = "post"

url = ''.join([host,endpoint])
headers = {

    "User-Agent":"test request headers"}


r = requests.post(url,headers=headers)
print(r.json())
输出(header参数里面有):
{

    'args': {

    },
 'data': '',
 'files': {

    },
 'form': {

    },
 'headers': {


            'Accept': '*/*',
            'Accept-Encoding': 'gzip, deflate',
            'Content-Length': '0',
            'Host': 'httpbin.org',
            'User-Agent': 'test request headers',
            'X-Amzn-Trace-Id': 'Root=1-600542f8-17b7ab4b3732533a3c59cea7'},
 'json': None,
 'origin': '139.159.170.1',
 'url': 'http://httpbin.org/post'}
3、带json的post
与普通参数不同的是post方法里面的参数为json
# -*- coding:utf-8 -*-
import requests
import json

host = "http://httpbin.org/"
endpoint = "post"

url = ''.join([host,endpoint])
data = {


    "sites": [
                {

     "name":"test" , "url":"www.test.com" },
                {

     "name":"google" , "url":"www.google.com" },
                {

     "name":"weibo" , "url":"www.weibo.com" }
    ]
}

r = requests.post(url,json=data)
response = r.json()
print(response)
输出:
{

    'args': {

    },
 'data': '{"sites": [{"name": "test", "url": "www.test.com"}, {"name": "google", "url": "www.google.com"}, {"name": "weibo", "url": "www.weibo.com"}]}',
 'files': {

    },
 'form': {

    },
 'headers': {


            'Accept': '*/*',
            'Accept-Encoding': 'gzip, deflate',
            'Content-Length': '140',
            'Content-Type': 'application/json',
            'Host': 'httpbin.org',
            'User-Agent': 'python-requests/2.25.0',
            'X-Amzn-Trace-Id': 'Root=1-600543a5-28c1a2354b8df81d58f74df3'},
 'json': {

    'sites': [{

    'name': 'test', 'url': 'www.test.com'}, {

    'name': 'google', 'url': 'www.google.com'}, {

    'name': 'weibo', 'url': 'www.weibo.com'}]},
 'origin': '139.159.170.1',
 'url': 'http://httpbin.org/post'}
4、带参数的post
# -*- coding:utf-8 -*-
import requests
import json

host = "http://httpbin.org/"
endpoint = "post"

url = ''.join([host,endpoint])
params = {

    'key1':'params1','key2':'params2'}

# r = requests.post(url)
r = requests.post(url,params=params)
#response = r.json()
print (r.text)
输出:
{


  "args": {


    "key1": "params1",
    "key2": "params2"
  },
  "data": "",
  "files": {

    },
  "form": {

    },
  "headers": {


    "Accept": "*/*",
    "Accept-Encoding": "gzip, deflate",
    "Content-Length": "0",
    "Host": "httpbin.org",
    "User-Agent": "python-requests/2.25.0",
    "X-Amzn-Trace-Id": "Root=1-60054496-755476a66b6f56a8357c4f4c"
  },
  "json": null,
  "origin": "139.159.170.1",
  "url": "http://httpbin.org/post?key1=params1&key2=params2"
}
5、普通文件上传
# -*- coding:utf-8 -*-
import requests
import json

host = "http://httpbin.org/"
endpoint = "post"

url = ''.join([host,endpoint])
#普通上传
files = {


            'file':open('test.txt','rb')
        }

r = requests.post(url,files=files)
print(r.text)
6、定制化文件上传
# -*- coding:utf-8 -*-
import requests
import json

host = "http://httpbin.org/"
endpoint = "post"

url = ''.join([host,endpoint])
#自定义文件名,文件类型、请求头
files = {


        'file':('test.png',open('test.png','rb'),'image/png')
}

r = requests.post(url,files=files)
print(r.text)
7、多文件上传
# -*- coding:utf-8 -*-
import requests
import json

host = "http://httpbin.org/"
endpoint = "post"

url = ''.join([host,endpoint])
#多文件上传
files = [
    ('file1',('test.txt',open('test.txt', 'rb'))),
    ('file2', ('test.png', open('test.png', 'rb')))
    ]

r = requests.post(url,files=files)
print(r.text)
8.流式上传
# -*- coding:utf-8 -*-
import requests
import json

host = "http://httpbin.org/"
endpoint = "post"

url = ''.join([host,endpoint])

#流式上传
with open( 'test.txt' ) as f:
    r = requests.post(url,data = f)

print(r.text)
6.Cookie&Session
掌握了前面几节的的内容,就可以做一些简单的http协议接口的请求发送了,但是这些还不够。HTTP协议是一个无状态的应用层协议,也就是说前后两次请求是没有任何关系的,那如果我们测试的接口之前有相互依赖关系怎么办呢(比如我要在博客园发文章,是需要先登录的),这时我们就要用到cookie和session技术来保持客户端与服务器端连接的状态,这也就是本节要介绍的内容:
6.1获取Cookie
# -*- coding:utf-8 -*-
#获取cookie
import requests
import json

url = "https://www.baidu.com/"
r = requests.get(url)

#将RequestsCookieJar转换成字典
c = requests.utils.dict_from_cookiejar(r.cookies)

print(r.cookies)
print(c)

for a in r.cookies:
    print(a.name,a.value)
输出:
<RequestsCookieJar[<Cookie BDORZ=27315 for .baidu.com/>]>
{

    'BDORZ': '27315'}
BDORZ 27315
发送Cookie:
复制代码
# -*- coding:utf-8 -*-
#发送cookie到服务器
import requests
import json

host = "http://httpbin.org/"
endpoint = "cookies"

url = ''.join([host,endpoint])
#方法一:简单发送
# cookies = {"aaa":"bbb"}
# r = requests.get(url,cookies=cookies)
# print(r.text)

#方法二:复杂发送
s = requests.session()
c = requests.cookies.RequestsCookieJar()
c.set('c-name','c-value',path='/xxx/uuu',domain='.test.com')
s.cookies.update(c)
6.2 Session
- 保持会话同步:
# -*- coding:utf-8 -*-
import requests
import json

host = "http://httpbin.org/"
endpoint = "cookies"

url = ''.join([host,endpoint])
url1 = "http://httpbin.org/cookies/set/sessioncookie/123456789"

r = requests.get(url)
print(r.text)

print("------")


s = requests.session()    #初始化一个session对象
s.get(url1)               #cookie的信息存在了session中
r = s.get(url)

print(r.text)
输出:
{


  "cookies": {

    }
}

------
{


  "cookies": {


    "sessioncookie": "123456789"
  }
}
- 保存会话信息:
# -*- coding:utf-8 -*-
import requests
import json

host = "http://httpbin.org/"
endpoint = "headers"

url = ''.join([host,endpoint])

header1 = {

    "testA":"AAA"}
header2 = {

    "testB":"BBB"}

s = requests.session()    #初始化一个session对象
s.headers.update(header1)   #已经存在于服务中的信息
r = s.get(url,headers=header2) #发送新的信息

print(r.text)
输出:
{


  "headers": {


    "Accept": "*/*",
    "Accept-Encoding": "gzip, deflate",
    "Host": "httpbin.org",
    "Testa": "AAA",
    "Testb": "BBB",
    "User-Agent": "python-requests/2.25.0",
    "X-Amzn-Trace-Id": "Root=1-60054832-734d8bd92fdd83ff1642b676"
  }
}
- 删除已存在的会话信息,保存为None
# -*- coding:utf-8 -*-
import requests
import json

host = "http://httpbin.org/"
endpoint = "headers"

url = ''.join([host,endpoint])

header1 = {

    "testA":"AAA"}
header2 = {

    "testB":"BBB"}

s = requests.session()    #初始化一个session对象
s.headers.update(header1)   #已经存在于服务中的信息
r = s.get(url,headers=header2) #发送新的信息

print(r.text)

print('--------')

s.headers['testA'] = None   #删除会话里的信息testA
r1 = s.get(url,headers = header2)
print(r1.text)
输出:
{


  "headers": {


    "Accept": "*/*",
    "Accept-Encoding": "gzip, deflate",
    "Host": "httpbin.org",
    "Testa": "AAA",
    "Testb": "BBB",
    "User-Agent": "python-requests/2.25.0",
    "X-Amzn-Trace-Id": "Root=1-600548eb-4ac67494094838e91557b84a"
  }
}

--------
{


  "headers": {


    "Accept": "*/*",
    "Accept-Encoding": "gzip, deflate",
    "Host": "httpbin.org",
    "Testb": "BBB",
    "User-Agent": "python-requests/2.25.0",
    "X-Amzn-Trace-Id": "Root=1-600548ec-735326c57837e3bf2e71b432"
  }
}
- 提供默认数据:
s = requests.Session()
s.auth = ('user', 'pass')
s.headers.update({

    'x-test': 'true'})

# both 'x-test' and 'x-test2' are sent
s.get('http://httpbin.org/headers', headers={

    'x-test2': 'true'})
7.其他(认证&代理&超时设置)
7.1 认证
7.1.1 基本认证:
# -*- coding:utf-8 -*-
import requests

url = "http://httpbin.org/basic-auth/user/passwd"

r1 = requests.get(url)
print("未提供用户名密码:" + str(r1.status_code))

#Basic Authentication
r2 = requests.get(url,auth=('user','passwd'))
print("已提供用户名密码:" + str(r2.status_code))
7.1.2 数字认证
# -*- coding:utf-8 -*-
from requests.auth import HTTPDigestAuth
import requests
url = 'http://httpbin.org/digest-auth/auth/user/pass'
s=requests.get(url, auth=HTTPDigestAuth('user', 'pass'))
print(s.json())
输出:
{

    'authenticated': True, 'user': 'user'}
7.1.3 OAuth认证:
参考:http://docs.python-requests.org/en/master/user/authentication/
7.2 代理
7.2.1 方法一:proxy参数:
import requests

proxies = {


  "https": "http://41.118.132.69:4433"
}
r = requests.post("http://httpbin.org/post", proxies=proxies)
print r.text
7.3 证书验证
7.3.1 SSL证书(HTTPS):
import requests

#跳过12306 的证书验证,把 verify 设置为 False:
r = requests.get('https://kyfw.12306.cn/otn/', verify=False)
print(r.text)
7.3.2 客户端证书:
# -*- coding:utf-8 -*-
import requests
requests.get('https://kennethreitz.org', cert=('/path/client.cert', '/path/client.key'))
或者
s = requests.Session()
s.cert = '/path/client.cert'
7.4 超时配置
7.4.1 利用timeout参数来配置最大请求时间:
r = requests.get('https://github.com', timeout=5)
7.4.2 设置timeout=None,告诉请求永远等待响应,而不将请求作为超时值传递
r = requests.get('https://github.com', timeout=None)
8.错误异常:
-
所有Requests显式抛出的异常都继承自:requests.exctptions.RequestException
-
遇到网络问题(如:DNS查询失败,拒绝连接等)时,requests会抛出一个 ConnectionError 异常
-
遇到罕见的无效HTTP响应时,Request则会抛出一个 HTTPError 异常
-
若请求超时,则抛出一个 Timeout 异常
-
若请求超过了最大的重写向次数,则会抛出一个 TooManyRedirects 异常