父子组件通信
父组件向数据
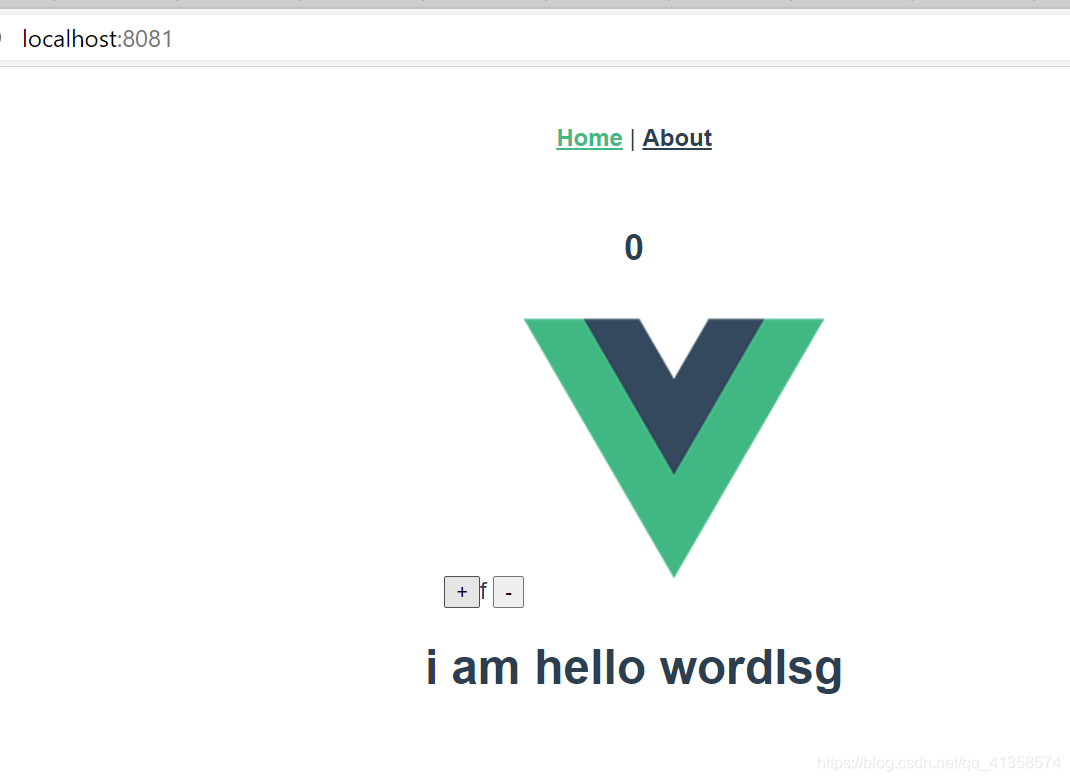
先创建Home.vue和HelloWorld.vue:
<template>
  <div class="home">
    <h2>{

   {count}}</h2>
    <button @click="count++">+</button>f
    <button @click="count--">-</button>
    <img alt="Vue logo" src="../assets/logo.png">
    <HelloWorld />
  </div>
</template>

<script>
// @ is an alias to /src
import HelloWorld from '@/components/HelloWorld.vue'
export default {


  name: 'Home',
  data () {


    return {


      count: 0
    }
  },
  components: {


    // eslint-disable-next-line no-unused-expressions
    HelloWorld
  }

}
</script>
其中引入的语句:
import HelloWorld from ‘@/components/HelloWorld.vue’
components: {
// eslint-disable-next-line no-unused-expressions
HelloWorld
}
< HelloWorld />(这句话加上以后会显示HelloWorld中的内容)
HelloWorld:
<template>
  <div class="hello">
    <h1>i am hello wordlsg</h1>

  </div>
</template>

<script>

export default {


  name: 'HelloWorld',

  props: {


    msg: String
  }
}
</script>

<!-- Add "scoped" attribute to limit CSS to this component only -->
<style scoped>
h3 {


  margin: 40px 0 0;
}
ul {


  list-style-type: none;
  padding: 0;
}
li {


  display: inline-block;
  margin: 0 10px;
}
a {


  color: #42b983;
}
</style>
效果:
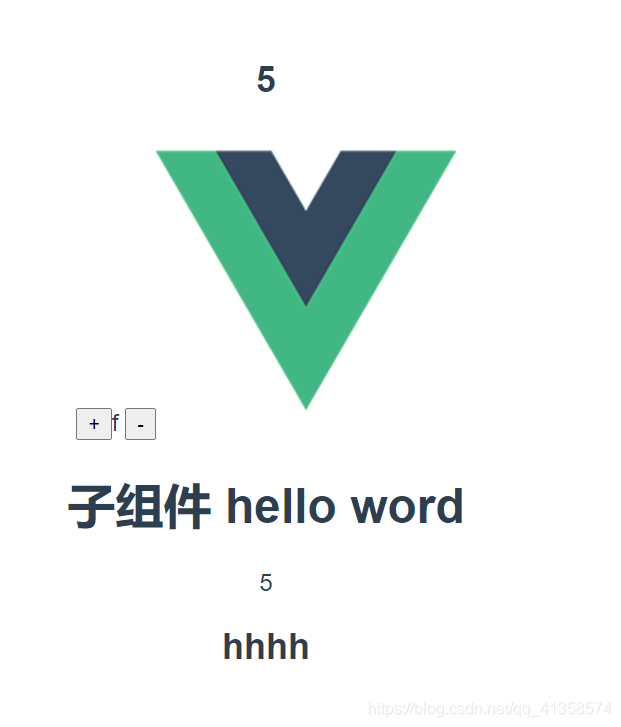
父组件向子组件传变量:
父组件:
    <HelloWorld :count="count"/>
      <h2>hhhh</h2>
子组件:
<div class="hello">
    <h1>子组件 hello word</h1>
{

   {count}}
  </div>
   props: {

    count: Number
  }
可以看到:
vuex的使用
在store下的js文件:
import Vue from 'vue'
import Vuex from 'vuex'

Vue.use(Vuex)

export default new Vuex.Store({


  state: {


    num: 0
  },
  mutations: {


  },
  actions: {


  },
  modules: {


  }
})
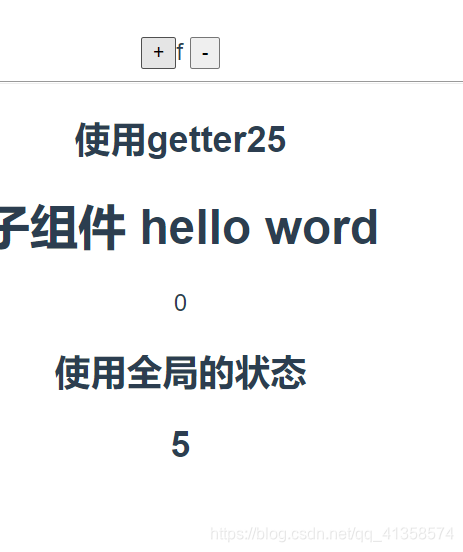
Home组件:
   <h2>使用全局的状态</h2>
    <h2>{

   {$store.state.num}}</h2>

使用mutation和getter中的计算属性:
mutation:
组件中:
methods: {
    subb () {
      this.$store.commit('sub')
    }
  }
index.js中:
mutations: {
    sub (state) {
      state.num--
    }
  },
在home中使用:
<h2>使用getter:{

   {$store.getters.power}}</h2>
store下面的index.js:
getters:{


power(state){


return state.num*state.num;}
}
//这个state参数是默认的,实际使用并不需要加参数
现在home组件的内容:
<template>
  <div class="home">
    <h2>{

   {count}}</h2>
    <button @click="$store.state.num++">+</button>f
    <button @click="subb">-</button>
    <hr>
  <h2>使用getter{

   {$store.getters.power}}</h2>

    <HelloWorld :count="count"/>
    <h2>使用全局的状态</h2>
    <h2>{

   {$store.state.num}}</h2>
  </div>
</template>

<script>
// @ is an alias to /src
import HelloWorld from '@/components/HelloWorld.vue'
export default {


  name: 'Home',
  data () {


    return {


      count: 0
    }
  },
  components: {


    // eslint-disable-next-line no-unused-expressions
    HelloWorld
  },
  methods: {


    subb () {


      this.$store.commit('sub')
    }
  }

}
</script>
注意:getters中的方法第一个参数是state(是固定的,要访问state中的数据时必须写,不然无法正常运行)使用第一个参数state可以访问数据,使用getters参数可以访问访问器中的其它访问器函数。
想复用getters中已经使用了的计算属性:
store/index.js:
 state: {


 cartlist:[
 {

    name:'<细说>',price:10},
  {

    name:'<细说>',price:20},
   {

    name:'<细说>',price:30},
      {

    name:'<细说>',price:40},]
  },
getters:
第一个参数就是state
 vxnumpow(state){


 return state.num*state.num
 / totalprice(state){


 return state. cartlist. reduce((s,n)=>s+n.price, 0);
 goodsgt(state){


 return state.cartlist.filter(n=>n.price>30);
},//过滤掉价钱小于30的商品
 totalprice(state
,getters){


 return getters. goodsgt. reduce((s,n)=>s+n.price, 0);
 },
getters中的方法第二个参数固定是getters,如果想加自定义参数则返回一个方法:
goodself(state,getter){


return function(price){


return state.cartlist.filter(n => n.price>price)
}}
//或者写成:
return price=>state.cartlist.filter(n => n.price>price)
在组件中使用:
<h3>{

   {$store.getters.goodself(30)}}</h3>
action中的方法
actions: {


    demo (context) {


      setTimeout(() => {


        context.state.num = 99
        // context.commit('sub')
      }, 3000)
    }
  },
利用mutation修改状态:利用 context.commit(‘sub’)
效果(三秒钟后变成99):
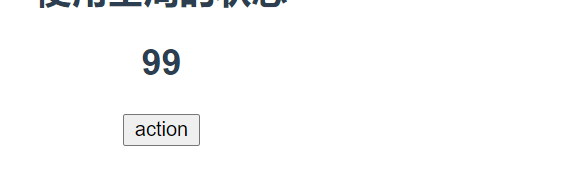
Home.vue:
    <button @click="cnum">action</button>
    methods:{
   cnum () {
      this.$store.dispatch('demo')
    }
    }
注意action中的方法要用dispatch
多模块的使用
利用const cart = {};
const goods = {};
export default new Vuex.Store({
state:{},
modules: {cart,goods}
}
)
如果要访问goods中的name:
(组件中)
<h2>{

   {$store.state.user.name}}</h2>
模块会自动绑定到state中