前言小文章
《不辜负现在的人生 才是对自己最大的尊重》
经常听见这样的感叹:要是当初我不这么选择 而是去走另外一条路 也许我会不一样。不管是事业有成的 还是看起来生活安逸的 好像大家都不太满意自己的状态。
如果每个人在出发时都能清楚知道现在走的这条路不适合自己 我相信很多人会放弃这条路 去尝试另外那条未知的路。
但当我们在另外一条路上开始过上了另一种生活 又发现那不是自己喜欢或是想要的 甚至觉得比以前更加糟糕 不知道我们会不会更加后悔?
很多人都不容易满足 自己拥有的 总是觉得还不够好 自己得到的 总是觉得还不够多 自己没有的 看见别人拥有了 很嫉妒 自己没得到的 看见别人得到了 很在乎。
曾看过这样一句话:人们总是从自己选择的人生 看向自己没有选择的另一种人生 感到羡慕 感到后悔 人性的不满足 让很多人无法真正享受他们所选择的幸福!
文件管理之:文件查找
> 查看命令所属文件
[root@localhost ~]# which ip
/usr/sbin/ipps: 一些命令的路径都被配置到了环境变量PATH里
echo $PATH> 查找文件
find [options] [path...] [expression]
按文件名:
[root@localhost ~]# find /etc -name "ifcfg-eth0"
[root@localhost ~]# find /etc -iname "ifcfg-eth0" # -i忽略大小写
[root@localhost ~]# find /etc -iname "ifcfg-eth*"按文件大小:
[root@localhost ~]# find /etc -size +3M # 大于3M
[root@localhost ~]# find /etc -size 3M
[root@localhost ~]# find /etc -size -3M
[root@localhost ~]# find /etc -size +3M -ls # -ls找到的处理动作指定查找的目录深度:
-maxdepth levels
[root@localhost ~]# find / -maxdepth 5 -a -name "ifcfg-eth0" # -a并且,-o或者,不加-a,默认就是-a按时间找(atime,mtime,ctime):
[root@localhost ~]# find /etc -mtime +3 # 修改时间超过3天
[root@localhost ~]# find /etc -mtime 3 # 修改时间等于3天
[root@localhost ~]# find /etc -mtime -3 # 修改时间3天以内按文件属主、属组找:
[root@localhost ~]# find /home -user egon # 属主是egon的文件
[root@localhost ~]# find /home -group it # 属组是it组的文件
[root@localhost ~]# find /home -user egon -group it
[root@localhost ~]# find /home -user egon -a -group it # 同上意思一样
[root@localhost ~]# find /home -user egon -o -group it
[root@localhost ~]# find /home -nouser # 用户还存在,在/etc/passwd中删除了记录
[root@localhost ~]# find /home -nogroup # 用户还存在,在/etc/group中删除了记录
[root@localhost ~]# find /home -nouser -o -nogroup按文件类型:
[root@localhost ~]# find /dev -type f # f普通
[root@localhost ~]# find /dev -type d # d目录
[root@localhost ~]# find /dev -type l # l链接
[root@localhost ~]# find /dev -type b # b块设备
[root@localhost ~]# find /dev -type c # c字符设备
[root@localhost ~]# find /dev -type s # s套接字
[root@localhost ~]# find /dev -type p # p管道文件根据inode号查找:-inum n
[root@localhost ~]# find / -inum 1811
按文件权限:
[root@localhost ~]# find . -perm 644 -ls
[root@localhost ~]# find . -perm -644 -ls
[root@localhost ~]# find . -perm -600 -ls
[root@localhost ~]# find /sbin -perm -4000 -ls # 包含set uid
[root@localhost ~]# find /sbin -perm -2000 -ls # 包含set gid
[root@localhost ~]# find /sbin -perm -1000 -ls # 包含sticky找到后处理的动作:
-ls
-delete
-exec
-ok
[root@localhost ~]# find /etc -name "ifcfg" -print # 必须加引号
[root@localhost ~]# find /etc -name "ifcfg" -ls
[root@localhost ~]# find /etc -name "ifcfg" -exec cp -rvf {} /tmp \; # 非交互
[root@localhost ~]# find /etc -name "ifcfg" -ok cp -rvf {} /tmp \; # 交互
[root@localhost ~]# find /etc -name "ifcfg" -exec rm -rf {} \;
[root@localhost ~]# find /etc -name "ifcfg" -delete # 同上扩展知识:find结合xargs
[root@localhost ~]# find . -name "egon.txt" |xargs rm -rf
[root@localhost ~]# find /etc -name "ifcfg-eth0" |xargs -I {} cp -rf {} /var/tmp
[root@localhost ~]# find /test -name "ifcfg-ens33" |xargs -I {} mv {} /ttt
[root@localhost ~]# find /ttt/ -name "ifcfg" |xargs -I {} chmod 666 {}
文件管理之:上传与下载
> 下载wget命令
wget -O 本地路径 远程包链接地址 # 将远程包下载到本地,-O指定下载到哪里,可以生路-O 本地路径
ps:如果wget下载提示无法建立SSL连接,则加上选项--no-check-certificate
wget --no-check-certificate -O 本地路径 远程包链接地址curl命令
curl命令是一个利用URL规则在命令行下工作的文件传输工具。它支持文件的上传和下载,所以是综合传输工具,但按传统,习惯称curl为下载工具。作为一款强力工具,curl支持包括HTTP、HTTPS、[ftp]等众多协议,还支持POST、cookies、认证、从指定偏移处下载部分文件、用户代理字符串、限速、文件大小、进度条等特征。做网页处理流程和数据检索自动化,curl可以祝一臂之力。
[root@localhost ~]# curl -o 123.png https://www.xxx.com/img/hello.png
ps: 如果遇到下载提示无法简历SSL链接,使用-k选项或者--insecure
curl -k -o 123.png https://www.xxx.com/img/hello.pngsz命令
系统默认没有该命令,需要下载:yum install lrzsz -y
将服务器上选定的文件下载/发送到本机
[root@localhost ~]# sz bak.tar.gz> 上传rz
系统默认没有该命令,需要下载:yum install lrzsz -y
运行该命令会弹出一个文件选择窗口,从本地选择文件上传到服务器
[root@localhost opt]# rz # 如果文件已经存,则上传失败,可以用-E选项解决
[root@localhost opt]# rz -E # -E如果目标文件名已经存在,则重命名传入文件。新文件名将添加一个点和一个数字(0..999)
文件管理之:输出与重定向
输出即把相关对象通过输出设备(显示器等)显示出来,输出又分正确输出和错误输出
一般情况下标准输出设备为显示器,标准输入设备为键盘。
linux中用
0代表标准输入
1代表标准正确输出
2代表标准错误输出
l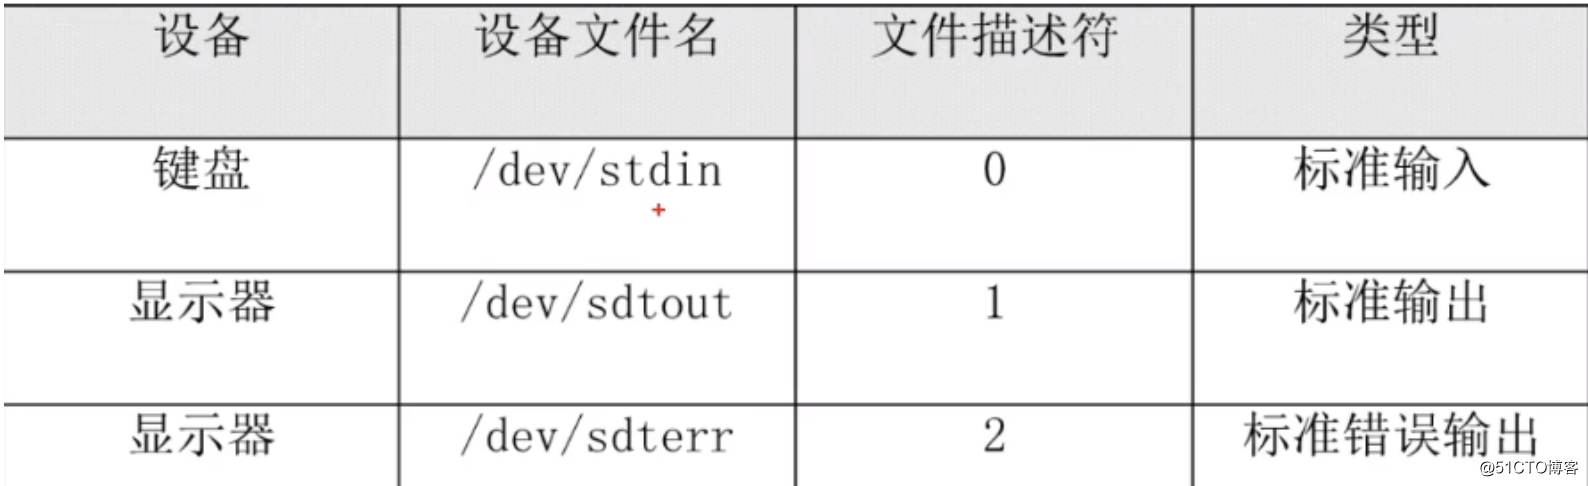
输出重定向:
正常输出是把内容输出到显示器上,而输出重定向是把内容输出到文件中,>代表覆盖,>>代表追加
Ps:标准输出的1可以省略
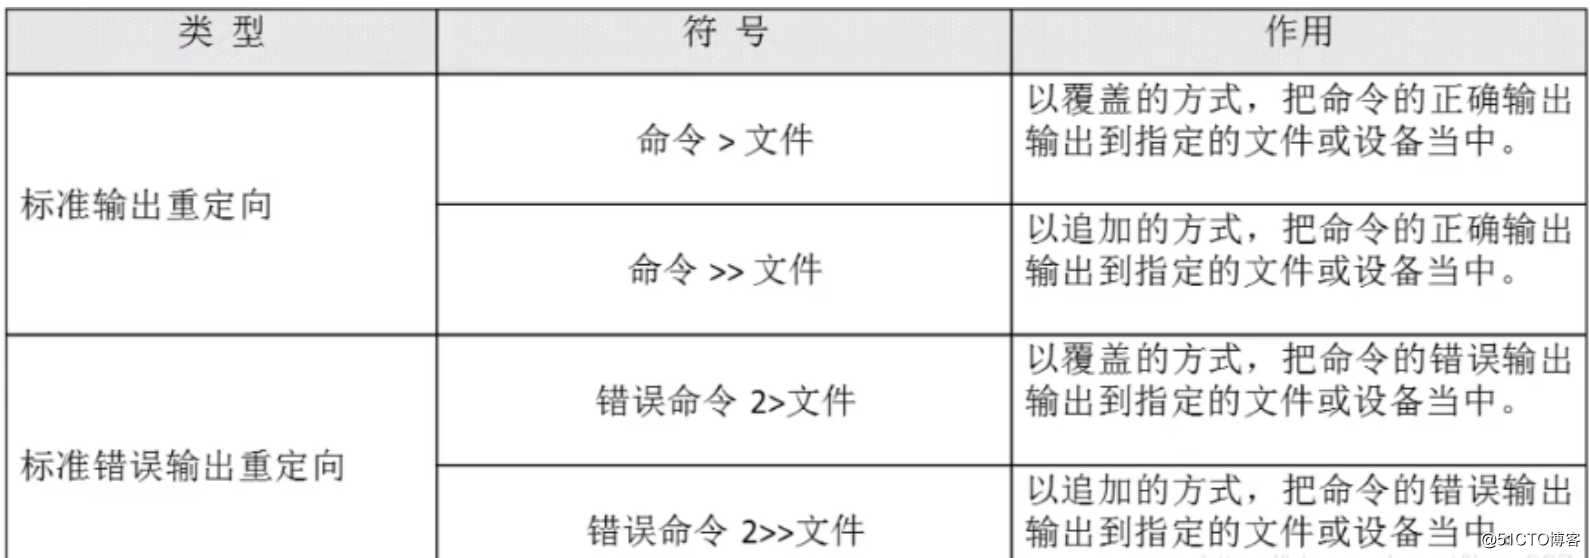
例如:ifconfig > test.log 即把ifconfig执行显示的正确内容写入test.log.当前页面不再显示执行结果。
注意:错误输出重定向>与>>后边不要加空格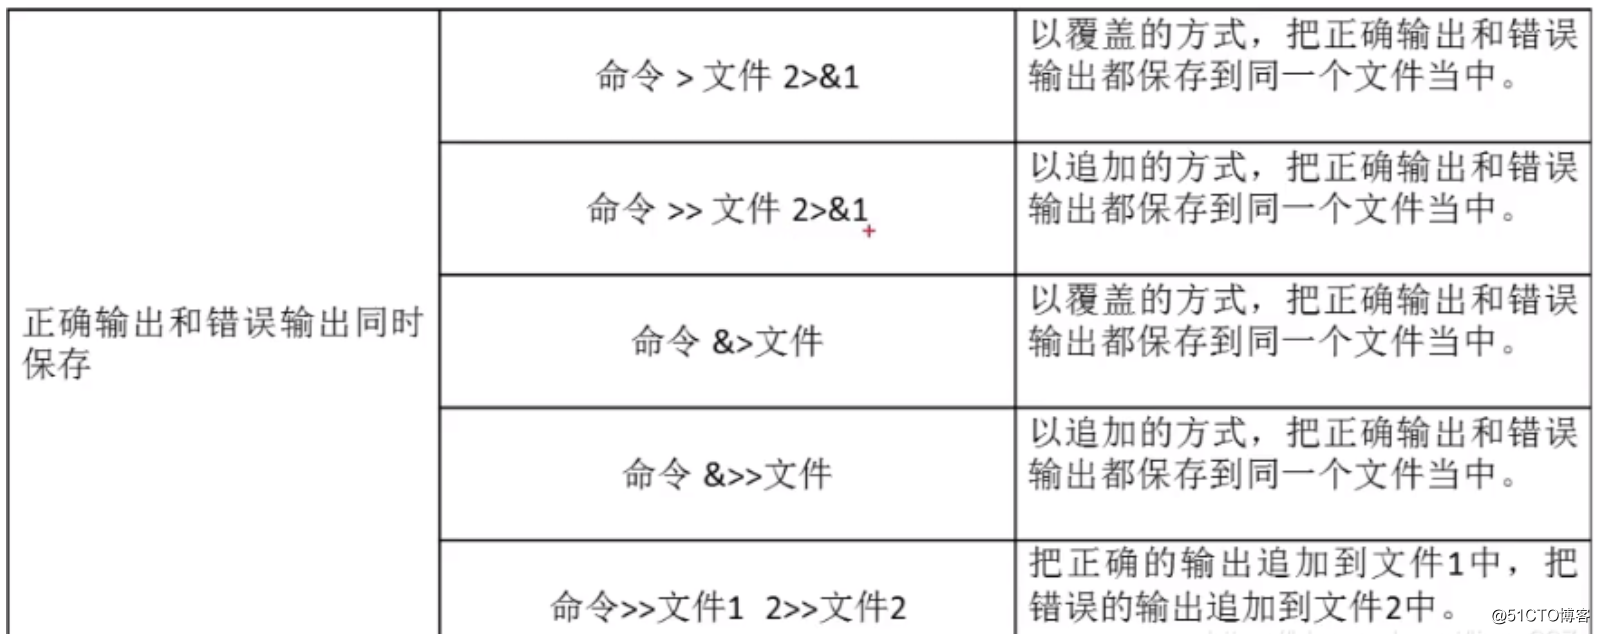
注意:
1、下述两个命令作用相同
命令 >>file.log 2>&1
命令 &>>file.log
2、正确日志和错误日志分开保存
命令 >>file1.log 2>>file2.log
3、系统有个常见用法 ls &>/dev/null 正确输出或错误输出结果都不要。(null可以理解为黑洞或垃圾站)
输入重定向
没有改变输入的方向,默认键盘,此时等待输入
[root@egon ~]# tr 'N' 'n'
No
no
[root@egon ~]# tr 'N' 'n' < file.txt
没有改变输入的方向,默认键盘,此时等待输入
[root@egon ~]# grep 'root'
oldboy
root
root
[root@egon ~]# grep 'root' < /etc/passwd
root:x:0:0:root:/root:/bin/bash
读写块设备
[root@egon ~]# dd if=/dev/zero of=/file1.txt bs=1M count=20
[root@egon ~]# dd </dev/zero >/file2.txt bs=1M count=20
mysql如何恢复备份,了解即可,不用关注。
[root@qls ~]# mysql -uroot -p123 < bbs.sql
文件管理之:字符处理命令
> sort命令
用于将文件内容加以排序
-n # 依照数值的大小排序
-r # 以相反的顺序来排序
-k # 以某列进行排序
-t # 指定分割符,默认是以空格为分隔符
准备文件,写入一段无序的内容
[root@localhost ~]# cat >> file.txt <<EOF
b:3
c:2
a:4
e:5
d:1
f:11
EOF
例1
[root@localhost ~]# sort file.txt
a:4
b:3
c:2
d:1
e:5
f:11
例2
[root@localhost ~]# sort -t ":" -n -k2 file.txt
d:1
c:2
b:3
a:4
e:5
f:11
例3
[root@localhost ~]# sort -t ":" -n -r -k2 file.txt
f:11
e:5
a:4
b:3
c:2
d:1> uniq 命令
用于检查及删除文本文件中重复出现的行列,一般与 sort 命令结合使用
-c # 在每列旁边显示该行重复出现的次数
-d # 仅显示重复出现的行列。
-u # 仅显示出一次的行列
准备文件,写入一段无序的内容
[root@localhost ~]# cat > file.txt <<EOF
hello
123
hello
123
func
EOF
例1
[root@localhost ~]# sort file.txt
123
123
func
hello
hello
例2
[root@localhost ~]# sort file.txt | uniq
123
func
hello
例3
[root@localhost ~]# sort file.txt | uniq -c
2 123
1 func
2 hello
例4
[root@localhost ~]# sort file.txt | uniq -d
123
hello> cut 命令
cut命令用来显示行中的指定部分,删除文件中指定字段
-d # 指定字段的分隔符,默认的字段分隔符为"TAB";
-f # 显示指定字段的内容;
[root@localhost ~]# head -1 /etc/passwd
root:x:0:0:root:/root:/bin/bash
[root@localhost ~]# head -1 /etc/passwd | cut -d ":" -f1,3,4,6
root:0:0:/root> tr命令
替换或删除命令
-d # 删除字符
例1
[root@localhost ~]# head -1 /etc/passwd |tr "root" "ROOT"
ROOT:x:0:0:ROOT:/ROOT:/bin/bash
[root@localhost ~]#
[root@localhost ~]# head -1 /etc/passwd |tr -d "root"
:x:0:0::/:/bin/bash
例2
[root@localhost ~]# echo "hello boke qq:7219924" > a.txt
[root@localhost ~]# tr "boke" "BOKE" < a.txt
hEllO BOKE qq:7219924> wc命令
统计,计算数字
-c # 统计文件的Bytes数;
-l # 统计文件的行数;
-w # 统计文件中单词的个数,默认以空白字符做为分隔符
例1
[root@localhost ~]# ll file.txt
-rw-r--r--. 1 root root 25 8月 12 20:09 file.txt
[root@localhost ~]# wc -c file.txt
25 file.txt
例2
[root@localhost ~]# cat file.txt
hello
123
hello
123
func
[root@localhost ~]# wc -l file.txt
5 file.txt
[root@localhost ~]# grep "hello" file.txt |wc -l
2
例3
[root@localhost ~]# cat file.txt
hello
123
hello
123
func
[root@localhost ~]# wc -w file.txt
5 file.txt
文件管理之:打包压缩
什么是打包压缩
打包指的是将多个文件和目录合并为一个特殊文件
然后将该特殊文件进行压缩
最终得到一个压缩包为什么使用压缩包
1.减少占用的体积
2.加快网络的传输Windows的压缩和Linux的有什么不同
windows: zip rar(linux不支持)
linux: zip tar.gz tar.bz2 .gz
如果希望windows的软件能被linux解压,或者linux的软件包被windows能识别,选择zip.
PS: 压缩包的后缀不重要,但一定要携带Linux下常见的压缩包类型
| 格式 | 压缩工具 |
|---|---|
| .zip | zip压缩工具 |
| .gz | gzip压缩工具,只能压缩文件,会删除源文件(通常配合tar使用) |
| .bz2 | bzip2压缩工具,只能压缩文件,会删除源文件(通常配合tar使用) |
| .tar.gz | 先使用tar命令归档打包,然后使用gzip压缩 |
| .tar.bz2 | 先使用tar命令归档打包,然后使用bzip压缩 |
ps:windows下支持.rar,linux不支持.rar
打包压缩方法
方法一:
1、打包
[root@localhost test]# tar cvf etc_bak.tar /etc/ # c创建 v详细 f打包后文件路径
ps:
打包的目标路径如果是绝对路径,会提示:tar: 从成员名中删除开头的“/”,不影响打包,
添加-P选项便不再提示:tar cvPf ...
可以cd 到 /etc下然后tar cvf etc_bak.tar 打包,这样去掉了一层文件夹
2、压缩
[root@localhost test]# gzip etc_bak.tar # 文件体积变小,并且加上后缀.gz
ps:
gzip -> gunzip
bzip2-> bunzip2
3、上述两步可以合二为一
[root@localhost test]# tar czvf etc1_bak.tar.gz /etc/ # 选项z代表gzip压缩算法
[root@localhost test]# tar cjvf etc1_bak.tar.bz2 /etc/ # 选项j代表bzip2压缩算法
方法二:
zip压缩
选项:
-r #递归压缩 压缩目录
-q #静默输出
示例1
[root@localhost ~]# zip /test/bak.zip a.txt b.txt c.txt # zip后的第一个参数是压缩包路径,其余为被压缩的文件
adding: a.txt (stored 0%)
adding: b.txt (stored 0%)
adding: c.txt (stored 0%)
[root@localhost ~]# ls /test/
bak.zip
[root@localhost ~]# zip -rq etc.zip /etc # 加上-q后压缩过程不再提示解压缩
1、针对xxx.tar.gz 或者 xxx.tar.bz2,统一使用
[root@localhost test]# tar xvf 压缩包 -C 解压到的目录 # 无需指定解压算法,tar会自动判断
2、针对xxx.zip,用unzip
选项:
-l #显示压缩包的列表信息
-q #静默输出
-d #解压到指定的目录
[root@localhost test]# unzip -q xxx.zip -d /opt
文件系统
文件系统filesystem是操作系统内核中负责组织管理磁盘的程序
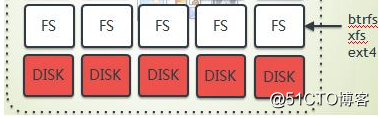
在传统的磁盘与档案系统(又称为文件系统filesystem)的应用中,一个磁盘分割槽/分区只能被格式化成为一个文件系统,所以我们可以说一个filesystem就是一个partition分区。但是由于新技术的利用,例如我们常听到的LVM与软体磁盘阵列(software raid,又称软raid),这些技术可以将一个分区格式化为多个文件系统(例如LVM),也能够将多个分区合成一个文件系统(LVM, RAID)!所以说,目前我们在格式化时已经不再说成针对分区来格式化了,通常我们可以称呼一个可被挂载的资料为一个文件系统而不是一个分区!
linux常见文件系统有xfs、ext4 和 btrfs 文件系统,它们都是日志文件系统(其特点是文件系统将没提交的数据变化保存到日志文件,以便在系统崩溃或者掉电时恢复数据),三者各有优势和劣势
btrfs (B-tree 文件系统) 是个很新的文件系统(Oracel 在2014年8月发布第一个稳定版),它将会支持许多非常高大上的功能,比如 透明压缩( transparent compression)、可写的COW 快照(writable copy-on-write snapshots)、去重(deduplication )和加密(encryption )。因此,Ceph 建议用户在非关键应用上使用该文件系统。
xfs 和 btrfs 相比较ext3/4而言,在高伸缩性数据存储方面具有优势。
Ceph 的这篇文章 明确推荐在生产环境中使用 XFS,在开发、测试、非关键应用上使用 btrfs。
网上有很多的文章比较这几种文件系统,包括:
ext3,ext4,xfs和btrfs文件系统性能对比
固态硬盘上 Ext4 和 xfs 性能比较
哇,让你的DB再快一倍:ext4 vs xfs对比测试
XFS --if it's more robust, why are we using ext4 instead?
ps:windows文件系统格式: FAT32、NTFS
总结
操作系统---------》文件系统 文件系统 文件系统
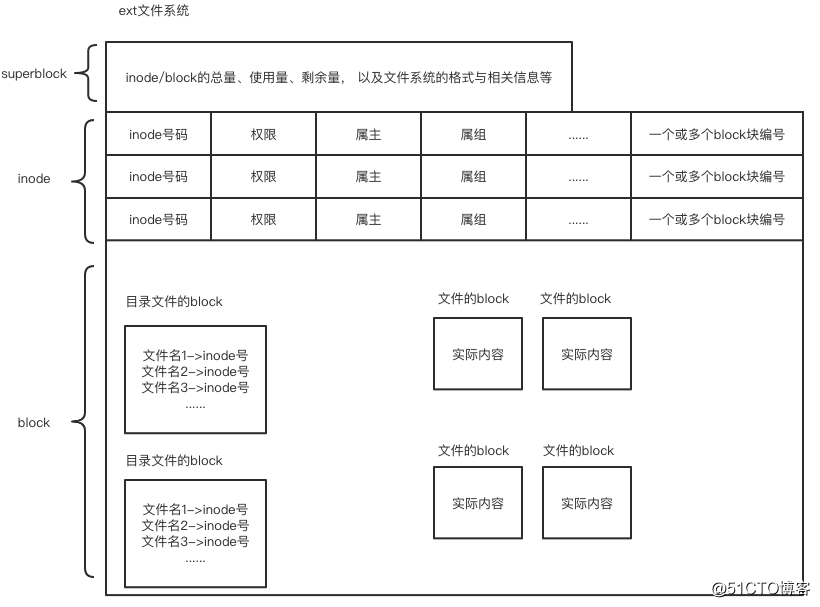
硬盘------------》 分区1 分区2 分区3> 文件系统工作原理
文件系统如何工作的呢?
须知一个文件的由两部分内容组成:
1、文件的元信息,例如权限(rwx)、拥有者、群组、时间参数等。
2、文件的实际内容
文件系统通常会将这两部份的分别存放在不同的区块
1、文件的元信息放置到inode区块中
2、文件的实际内容则放置到data block区块中。
强调:每个inode 与block 都有自己的编号
另外,文件还有一个超级区块(superblock)会记录整个档案系统的整体信息,包括inode与block的总量、使用量、剩余量等。
补充说明:
硬盘的最小存取单位-》扇区
操作系统的最小存取单位-》block块
文件储存在硬盘上,硬盘的最小存储单位叫做"扇区"(Sector),每个扇区储存512字节(相当于0.5KB)。
操作系统读取硬盘的时候,不会一个扇区一个扇区地读取,这样效率太低,于是操作系统中的文件系统负责将磁盘的多扇区组织成一个个的block块,这样操作系统就可以一次性读取一个"块"(block),即一次性连续读取多个扇区。这种由多个扇区组成的"块",是文件存取的最小单位。"块"的大小,最常见的是4KB,即连续八个 sector组成一个 block。
总结文件系统的三种区块inode、block、superblock的意义如下:
1、superblock:
记录此filesystem的整体信息,包括inode/block的总量、使用量、剩余量, 以及文件系统的格式与相关信息等;
2、inode
(1) 记录文件元信息,包括文件对应的一个或多个block块号码
(2) 一个文件被分配唯一一个inode
3、block:
(1) 记录文件实际内容
(2) 一个文件过大时可能会被分配多个block快,即一个文件可能对应多个block块的号码,这些号码都存放在该文件的innode里
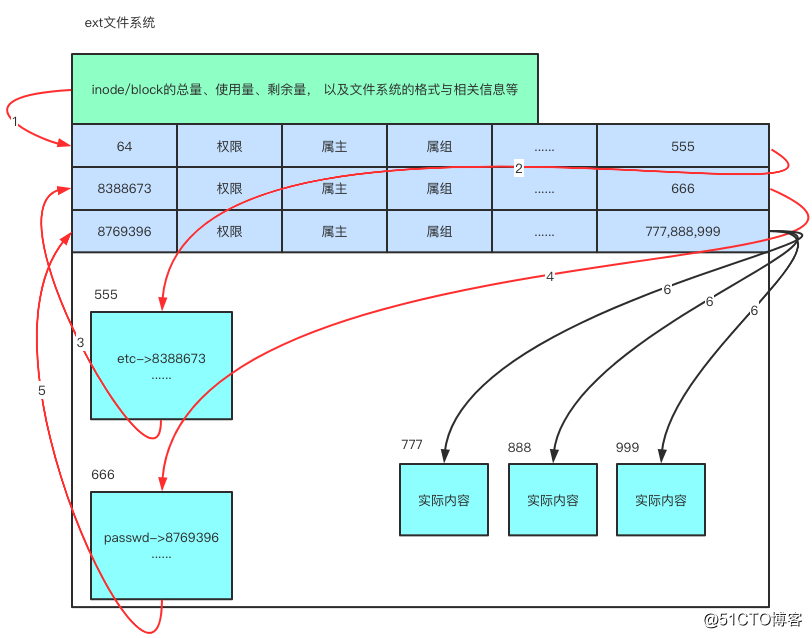
举例
[root@localhost ~]# ls -di /
64 /
[root@localhost ~]# ls -di /etc
8388673 /etc
[root@localhost ~]# ls -i /etc/passwd
8769396 /etc/passwd
[root@localhost ~]#
cat /etc/passwd的整体过程如下
依据上述存取方式的特点,我们通常称ext文件系统为索引式文件系统(indexed allocation)
硬链接和软链接
Linux链接分两种
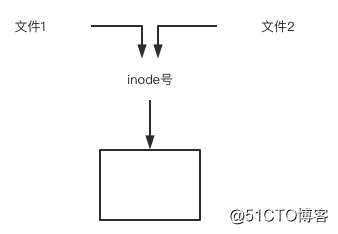
1、一种被称为硬链接(Hard Link)
【硬连接】:硬连接指通过索引节点号来进行连接。inode是可以对应多个文件名的
扩展阅读
inode信息中有一项叫做"链接数",记录指向该inode的文件名总数,这时就会增加1。反过来,删除一个文件名,就会使得inode节点中的"链接数"减1。当这个值减到0,表明没有文件名指向这个inode,系统就会回收这个inode号码,以及其所对应block区域。
这里顺便说一下目录文件的"链接数"。创建目录时,默认会生成两个目录项:"."和".."。前者的inode号码就是当前目录的inode号码,等同于当前目录的"硬链接";后者的inode号码就是当前目录的父目录的inode号码,等同于父目录的"硬链接"。所以,任何一个目录的"硬链接"总数,总是等于2加上它的子目录总数(含隐藏目录),这里的2是父目录对其的“硬链接”和当前目录下的".硬链接“
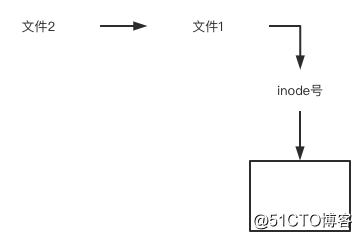
2、另一种被称为软链接,即符号链接(Symbolic Link)
软链接文件有类似于Windows的快捷方式。它实际上是一个特殊的文件。在符号连接中,文件实际上是一个文本文件,其中包含的有另一文件的位置信息。
如下图所示
文件2和文件1的inode号码虽然不一样,但是文件2的内容是文件1的路径。读取文件2时,系统会自动将访问者导向文件1。因此,无论打开哪一个文件,最终读取的都是文件1。这时,文件2就称为文件1的"软链接"(soft link)或者"符号链接(symbolic link)。
这意味着,文件2依赖于文件1而存在,如果删除了文件1,打开文件2就会报错:"No such file or directory"。这是软链接与硬链接最大的不同:文件2指向文件1的路径,而不是文件1的inode号码,文件1的inode"链接数"不会因此发生变化。硬链接知识点提炼
0.对硬链文件内容进行修改,会影响到所有文件名;
1.硬链接文件与源文件具有相同inode的不同文件名:一个文件只能有一个inode号,但多个文件的inode号可以相同
2.删除硬链接或者原文件之一,不影响另一个文件名的访问,除非所有的都删除掉,所以硬连接的作用是允许一个文件拥有多个有效路径名,这样用户就可以建立硬连接到重要文件,以防止“误删”的功能。
3.删除所有硬链接,数据会在被磁盘检查或者新数据写入时候删除回收。
4.通过ln [原文件] [目标文件]设置硬链接
5.通过rm –f 删除硬链接
6.目录不可创建硬链接,并且硬链接无法跨区
示例
[root@localhost ~]# touch small_boke.txt
[root@localhost ~]# ln small_boke.txt big_boke.txt
[root@localhost ~]# ls -i small_boke.txt
7219924 small_boke.txt
[root@localhost ~]# ls -i big_boke.txt
7219924 big_boke.txt
[root@localhost ~]# ll small_boke.txt # 两个硬链接文件的硬链接数均为2
-rw-r--r-- 2 root root 0 12月 16 17:05 small_boke.txt
[root@localhost ~]# ll big_boke.txt # 两个硬链接文件的硬链接数均为2
-rw-r--r-- 2 root root 0 12月 16 17:05 big_boke.txt软链接知识提炼
- 对软链的源文件或目标文件内容进行修改,会影响到所有文件名;
- 软链接文件与源文件具有不同的inode号
- 删除软连接文件的源文件,软链接文件将无法使用,软链接作用
(1.)软件升级
(2.)企业代码发布
(3.)不方便目录移动- 删除源文件后,软连接文件无效,应该也一起删除掉,以便回收
- 执行ln –s [原文件] [目标文件]创建软链接
- rm –f 删除软链接
- 可以对目录创建软链接,并且软连接可以跨分区
[root@localhost ~]# touch 1.txt
[root@localhost ~]# ln -s 1.txt 2.txt
[root@localhost ~]# ls -i 1.txt
17696462 1.txt
[root@localhost ~]# ls -i 2.txt
17696463 2.txt
[root@localhost ~]#
[root@localhost ~]# ll 1.txt # 两个软链接文件的硬链接数均为1
-rw-r--r-- 1 root root 0 12月 16 17:26 1.txt
[root@localhost ~]# ll 2.txt # 两个软链接文件的硬链接数均为1
lrwxrwxrwx 1 root root 5 12月 16 17:26 2.txt -> 1.txt
[root@localhost ~]#
[root@localhost ~]# rm -rf 1.txt # 删掉1.txt,会发现2.txt不可用
[root@localhost ~]# ll 2.txt
lrwxrwxrwx 1 root root 5 12月 16 17:26 2.txt -> 1.txt
[root@localhost ~]#
[root@localhost ~]# mkdir /dir1
[root@localhost ~]# ln /dir1 /dir2
ln: "/dir1": 不允许将硬链接指向目录
[root@localhost ~]#
[root@localhost ~]# ln -s /dir1/ /dir2