安装
yarn add tinymce
yarn add @tinymce/tinymce-vue
设置
static下面建个tinymce目录,下载tinymce完成后在node_modules 中找到 需要的目录复制过来
去https://www.tiny.cloud/get-tiny/language-packages/下载中文语言包
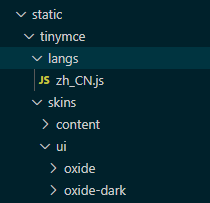
我的static目录如下图
封装成vue组件(参考别人的),
<template>
  <div class="tinymce-editor">
    <editor v-model="myValue"
      :init="init"
      :disabled="disabled"
      @onClick="onClick">
    </editor>
  </div>
</template>
<script>
import tinymce from 'tinymce/tinymce'
import Editor from '@tinymce/tinymce-vue'
import 'tinymce/themes/silver'
// 编辑器插件plugins
// 更多插件参考:https://www.tiny.cloud/docs/plugins/
// import 'tinymce/plugins/image'// 插入上传图片插件
// import 'tinymce/plugins/media'// 插入视频插件
import 'tinymce/plugins/table'// 插入表格插件
import 'tinymce/plugins/lists'// 列表插件
import 'tinymce/plugins/wordcount'// 字数统计插件
import 'tinymce/icons/default/icons'
export default {


  components: {


    Editor
  },
  props: {


    value: {


      type: String,
      default: ''
    },
    // 基本路径,默认为空根目录,如果你的项目发布后的地址为目录形式,
    // 即abc.com/tinymce,baseUrl需要配置成tinymce,不然发布后资源会找不到
    baseUrl: {


      type: String,
      default: ''
    },
    disabled: {


      type: Boolean,
      default: false
    },
    plugins: {


      type: [String, Array],
      default: 'lists table wordcount'
    },
    toolbar: {


      type: [String, Array],
      default: 'undo redo |  formatselect | bold italic forecolor backcolor | alignleft aligncenter alignright alignjustify | bullist numlist outdent indent | lists image media table | removeformat'
    }
  },
  data () {


    return {


      init: {


        language_url: `${

      this.baseUrl}/static/tinymce/langs/zh_CN.js`,
        language: 'zh_CN',
        skin_url: `${

      this.baseUrl}/static/tinymce/skins/ui/oxide`,
        content_css: `${

      this.baseUrl}/static/tinymce/skins/content/default/content.css`,
        // skin_url: `${this.baseUrl}/static/tinymce/skins/ui/oxide-dark`, // 暗色系
        // content_css: `${this.baseUrl}/static/tinymce/skins/content/dark/content.css`, // 暗色系
        height: 300,
        plugins: this.plugins,
        toolbar: this.toolbar,
        branding: false,
        menubar: false,
        // 此处为图片上传处理函数,这个直接用了base64的图片形式上传图片,
        // 如需ajax上传可参考https://www.tiny.cloud/docs/configure/file-image-upload/#images_upload_handler
        // images_upload_handler: (blobInfo, success, failure) => {


        //   const img = 'data:image/jpeg;base64,' + blobInfo.base64()
        //   success(img)
        // }
      },
      myValue: this.value
    }
  },
  mounted () {


    tinymce.init({

    })
  },
  methods: {


    // 添加相关的事件,可用的事件参照文档=> https://github.com/tinymce/tinymce-vue => All available events
    // 需要什么事件可以自己增加
    onClick (e) {


      this.$emit('onClick', e, tinymce)
    },
    // 可以添加一些自己的自定义事件,如清空内容
    clear () {


      this.myValue = ''
    }
  },
  watch: {


    value (newValue) {


      this.myValue = newValue
    },
    myValue (newValue) {


      this.$emit('input', newValue)
    }
  }
}
</script>
<style>
/* 在el-dialog中tinymce z-index 被太小而被遮挡时要加这两句 */
.tox-tinymce-aux{

    z-index:99999 !important;}
.tinymce.ui.FloatPanel{

    z-Index: 99;}
</style>
然后在其它组件中调用,代码如下
<template>
  <div>
    {

    {

     msg }}

    <el-button type="text" @click="dialogVisible = true">点击打开 Dialog</el-button>
    <el-dialog
      title="提示"
      :visible.sync="dialogVisible"
      custom-class="custom-el-dialog"
      :destroy-on-close="true"
      width="30%">
      <!-- 在el-dialog中tinymce z-index 被太小而被遮挡时要加custom-class -->
      <tinymce-editor ref="editor"
        v-model="msg"
        :disabled="disabled"
        :base-url="baseUrl"
        :language="language"
        :skin="skin"
        @onClick="onClick">
      </tinymce-editor>
      <button @click="clear">清空内容</button>
      <button @click="disabled = true">禁用</button>
      <button @click="disabled = false">启用</button>

      <span slot="footer" class="dialog-footer">
        <el-button @click="dialogVisible = false">取 消</el-button>
        <el-button type="primary" @click="dialogVisible = false">确 定</el-button>
      </span>
    </el-dialog>

  </div>
</template>

<script>
import TinymceEditor from './TinymceEditor.vue'
export default {


  components: {


    TinymceEditor
  },
  data () {


    return {


      msg: 'Welcome to Use Tinymce Editor-liubing.me',
      disabled: false,
      // 在NanUI中使用时要设置好路径
      baseUrl: process.env.NODE_ENV === 'production' ? 'http://www.app.local' : '',
      language: 'zh_CN',
      skin: 'oxide',
      dialogVisible: false
    }
  },
  methods: {


    // 鼠标单击的事件
    onClick (e, editor) {


      console.log('Element clicked')
      console.log(e)
      console.log(editor)
    },
    // 清空内容
    clear () {


      this.$refs.editor.clear()
    }
  }
}
</script>
<style scoped>
/* 在el-dialog中tinymce z-index 被太小而被遮挡时要加 */
.custom-el-dialog {


  z-index: 1;
}
</style>
注意事项
- 在el-dialog中tinymce z-index 太小会被遮挡
可设置el-dialog的custom-class,内容是z-index:1。
同时在封装的组件中加两个样式
.tox-tinymce-aux{z-index:99999 !important;}
.tinymce.ui.FloatPanel{z-Index: 99;} - 在el-dialog中下拉选择表格后直接点关闭,会残留
设置e-dialog关闭后销毁其中的元素即可destroy-on-close="true" - 在NanUI的生产环境中使用时要注意路径
baseUrl: process.env.NODE_ENV === 'production' ? 'http://www.app.local' : '',