1、准备debug的代码
准备一个 RestController 用于接收请求,最后可以通过本地断点验证是否成功开启了远程 debug
@RestController
public class TestController {

    @RequestMapping("/test")
    public Integer test(){
        int i=0;
        i++;
        i++;
        i++;
        i++;
        return i;
    }
}
2、使用gradle构建
group 'com.demo'
version '1.0-SNAPSHOT'

buildscript {
    ext {
        springBootVersion = '2.4.3'
    }

    repositories {
        maven { url 'https://maven.aliyun.com/repository/public/' }
    }

    dependencies {
        classpath("org.springframework.boot:spring-boot-gradle-plugin:${springBootVersion}")
    }

}

apply plugin: 'java'
apply plugin: 'idea'
apply plugin: 'application'
apply plugin: 'org.springframework.boot'
apply plugin: 'io.spring.dependency-management'
sourceCompatibility = 1.8


repositories {
    maven { url 'https://maven.aliyun.com/repository/public/' }
    maven { url 'https://maven.aliyun.com/repository/spring/'}
    mavenLocal()
    mavenCentral()
}


dependencies {
    compile 'org.springframework.boot:spring-boot-starter-parent:2.4.3'
    compile 'org.springframework.boot:spring-boot-starter-web:2.4.3'
    testImplementation 'org.junit.jupiter:junit-jupiter-api:5.6.0'
    testRuntimeOnly 'org.junit.jupiter:junit-jupiter-engine'
}
注意引入spring-boot-gradle-plugin 插件,否则最终jar是无法运行的:查看jar包属性,大小只有30k,那么肯定是没有依赖包在这个jar文件中的。
作者:慕侠2389804
链接:https://www.imooc.com/article/275467
来源:慕课网
3、准备启动脚本
java -jar -agentlib:jdwp=transport=dt_socket,server=y,suspend=n,address=64057 remote-debug-1.0-SNAPSHOT.jar
- 使用 java -jar 的方式启动程序,并且添加了一串特殊的参数,这是我们能够开启远程 debug 的关键,以 - 开头的参数是 jvm 的标准启动参数,关于 jvm 启动参数相关的知识可以先去其他博客了解。
- -agentlib:libname[=options], 用于装载本地 lib 包。在这条指令中便是加载了 jdwp(Java Debug Wire Protocol) 这个用于远程调试 java 的扩展包。而 transport=dt_socket,server=y,suspend=n,address=64057 这些便是 jdwp 装载时的定制参数,详细的参数作用可以搜索 jdwp 进行了解。我们需要关心的只有 address=64057 这个参数选项,本地调试程序使用 64057 端口与其通信,从而远程调试。
4、idea配置
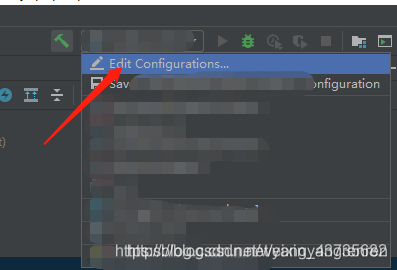

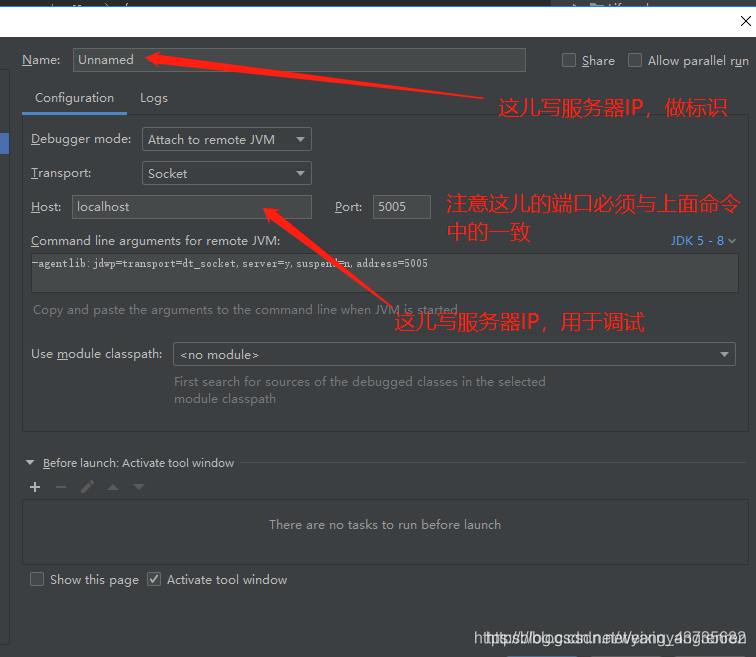
实际填写的以上面的java命令为主。截图是摘抄于网上的。
请务必保证远程 jar 包的代码与本地代码一致!!!
先执行脚本让远程的 jar 包跑起来,再在 IDEA 中运行 remote-debug

在本地打上断点,访问 192.168.1.3:8080/test
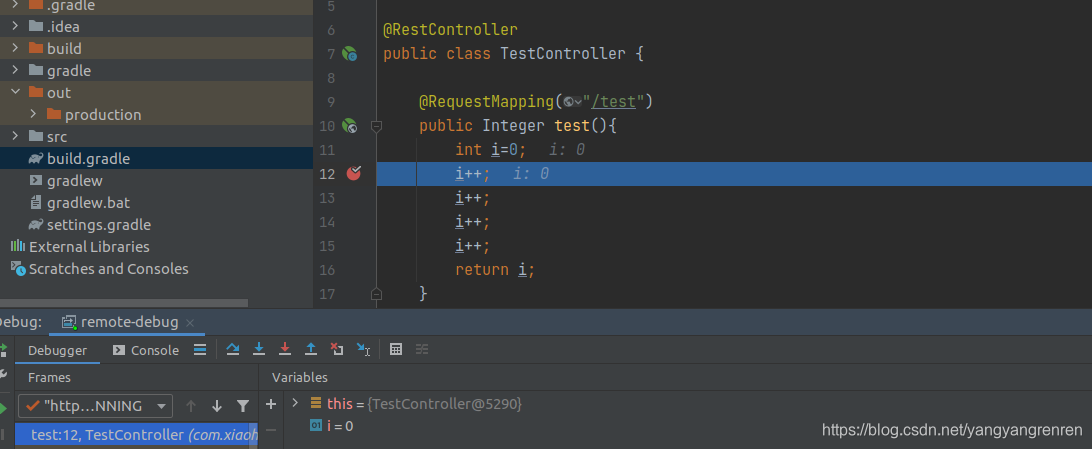
远程 debug 信息展示
可以在本地看到堆栈信息,大功告成。一行指令便完成了远程调试。
参考:
1、https://blog.csdn.net/weixin_43735682/article/details/103380989
2、https://zhuanlan.zhihu.com/p/128033093