maven使用
maven简单介绍
maven是Apache旗下的一款java项目依赖的自动化构建工具,由纯java语言开发,可以帮助我们更方便的管理项目中的jar包依赖。
maven优点:
1、jar包管理
a. 从中央仓库获取标准规范的jar包,避免jar包下载错误。
b、本地仓库统一管理jar包,减轻了项目体积。
2、定义了统一清晰的目录结构
|–src 源码
|–|--main 主程序
|–|--|–java java源文件
扫描二维码关注公众号,回复: 12636336 查看本文章
|–|--|–resources java配置文件和资源目录
|–|--test 存放测试程序
|–|--|–java 存放java测试的源文件
|–|--|–resources 存放测试的配置文件
|–pom.xml maven核心配置文件
|–target 编译后相关class文件,配置文件,存放位置
3、提供命令构建项目,简单方便。
maven的安装
maven官网:https://maven.apache.org/
maven仓库:https://mvnrepository.com/
windows
1、从官网下载 apache-maven-3.6.3-bin.zip,解压。
2、配置解压后的路径到系统变量。以下仅供参考
MAVEN_HOME D:\maven\apache-maven-3.6.0
CLASSPATH %MAVEN_HOME%\bin
3、通过命令 mvn -v ,查看版本信息。用于测试是否安装成功。
maven常识
maven如何获取jar包
以groupId、arttifactId、version为坐标,去中央仓库或本地库中获取项目依赖的jar包。
    <groupId>blog.com</groupId>
    <artifactId>02-spring-IOC</artifactId>
    <version>1.0-SNAPSHOT</version>

    <dependencies>
        <dependency>
            <groupId>org.springframework</groupId>  <!-- 代指公司、组织,一般为公司域名倒叙-->
            <artifactId>spring-context</artifactId><!--项目名称-->
            <version>5.2.2.RELEASE</version><!--这个项目的被使用版本-->
        </dependency>
    </dependencies>
maven仓库概念
-
本地仓库:开发者使用maven从网络的远程仓库上下载jar,下载后jar包存放的位置。调整maven的conf目录下settings.xml中配置来改变本地仓库位置。
<localRepository>D:\maven\repository</localRepository> -
中央仓库:maven官方搭建的仓库,maven默认冲中央仓库下载jar包。
-
私有仓库:公司自己搭建的仓库,也叫Nexus私服。部分公司内部jar包使用时需要上传私服。
默认从中央仓库下载jar包,但是因为国内网络问题,可以配置成阿里云中央仓库镜像地址
    <mirror>
      <id>alimaven</id>
      <name>aliyun maven</name>
      <url>http://maven.aliyun.com/nexus/content/groups/public/</url>
      <mirrorOf>central</mirrorOf>
    </mirror>
maven依赖的传递性
项目A引入了项目B的依赖,那么项目B的引入的依赖会传递给项目A。非compile范围的依赖是不能传递的。
maven依赖原则
官网介绍:http://maven.apache.org/guides/introduction/introduction-to-dependency-mechanism.html
1、路径最短者优先原则
项目A依赖项目B,两个项目同时引入log4j,但是版本不同,那么优先使用项目A依赖的log4j。项目B的log4j对于项目A而言,是间接引入的。A-B-log4j(1.0) , A-log4j(2.0).
2、路径相同,声明优先原则
如果A-B-X(1.0) ,A-C-X(2.0) 这样的路径长度一样怎么办呢?这样的情况下,maven会根据pom文件声明的顺序加载,如果先声明了B,后声明了C,那就最后的依赖就会是X(1.0)。
maven在idea中的使用
1、idea中配置maven

2、在pom.xml使用快捷键 ctrl + shift + alt + U 可以查看到依赖关系图。进入之后右键点击相关依赖,有exclude选项,可以手动排除相关依赖。
3、依赖很多的话,找不到引起报错的包是在哪里引入的,下载idea插件 Maven Helper,下载好插件后,我们打开 pom.xml 文件,在pom.xml 文件的左下方有个 Dependency Analyzer,通过依赖包的包名,可以搜索到相关依赖,然后进行排除。
- Conflicts:展示所有冲突。
- All Dependencies as List:以列表的方式展示所有依赖。
- All Dependencies as Tree:以树形的方式展示所有依赖。
maven安装发布jar包
maven发布包到远程仓库
mvn deploy:deploy-file
 -Dfile=<filePath>
 -DgroupId=<groupId>
 -DartifactId=<artifactId>
 -Dversion=<version>
 -Dpackaging=<packagingType>
 -DrepositoryId=<repositoryId>
 -Durl=<urlOfTheRepositoryToDeploy>
repositoryId表示需要部署到的远程仓库的id,这个远程仓库是定义在settings.xml中的;url表示需要部署到的远程仓库的url。
上传地址和settings.xml中下载地址有一定的区别,下载地址如:http://maven.aliyun.com/nexus/content/groups/public/,那么上传地址可能是:http://maven.aliyun.com/nexus/content/repositories/releases/
默认情况下,使用deploy:deploy-file部署的第三方jar包将会生成一个通用的pom。如果在部署的过程中不需要生成这个pom,我们可以在使用该指令的时候加上参数“-DgeneratePom=false”。
默认生成的pom是不包含相关依赖的,所以上传jar包是需要带上**-DpomFile=** 命令,将项目的pom.xml一同上传。
-Dpackaging= 命令上传源码jar时为java-source,上传class文件的jar时,为jar。而且generatePom应该指定为false。
maven安装第三方jar包到本地
mvn install:install-file -Dfile=<filePath> -DgroupId=<groupId> -DartifactId=<artifactId> -Dversion=<version> -Dpackaging=<packagingType>
Maven 构建生命周期
Maven 构建生命周期定义了一个项目构建跟发布的过程。
一个典型的 Maven 构建(build)生命周期是由以下几个阶段的序列组成的:
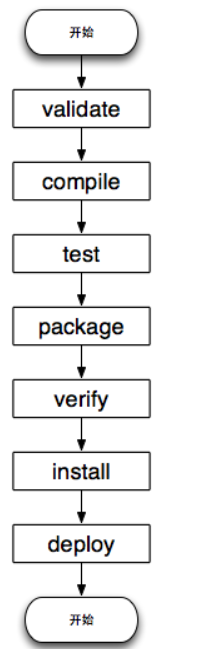
| 阶段 | 处理 | 描述 |
|---|---|---|
| 验证 validate | 验证项目 | 验证项目是否正确且所有必须信息是可用的 |
| 编译 compile | 执行编译 | 源代码编译在此阶段完成 |
| 测试 Test | 测试 | 使用适当的单元测试框架(例如JUnit)运行测试。 |
| 包装 package | 打包 | 创建JAR/WAR包如在 pom.xml 中定义提及的包 |
| 检查 verify | 检查 | 对集成测试的结果进行检查,以保证质量达标 |
| 安装 install | 安装 | 安装打包的项目到本地仓库,以供其他项目使用,包含compile和install两步 |
| 部署 deploy | 部署 | 拷贝最终的工程包到远程仓库中,以共享给其他开发人员和工程 |
| 清理 clean | 清理 | 清楚上一次构建项目产生的目录。 |
非IDE工具,进入项目pom.xml目录后方可执行,如:mvn clean
mvn archetype:genate :生成项目目录结构
maven构建的配置文件
pom.xml配置文件
pom.xml中需要引入的jar对应的坐标可以从maven官方仓库获取。部分为介绍的配置从官网查看。
地址:https://maven.apache.org/pom.html
1、部分配置直接通过注释介绍
<?xml version="1.0" encoding="UTF-8"?>
<project xmlns="http://maven.apache.org/POM/4.0.0"
xmlns:xsi="http://www.w3.org/2001/XMLSchema-instance"
xsi:schemaLocation="http://maven.apache.org/POM/4.0.0 http://maven.apache.org/xsd/maven-4.0.0.xsd">
<modelVersion>4.0.0</modelVersion><!--此元素指示此POM使用的对象模型的版本。模型本身的版本变化非常少,但如果Maven开发人员认为有必要更改模型,为了确保使用的稳定性,这是必须的-->
<!-- 如果有a和b两个相互依赖的项目,那么定义一个父级pom,用于配置一些公共配置,这样a和b两个项目不用重复定义-->
<!-- relativePath配置父项目pom文件位置,查找顺序,relativePath指定地址-》本地仓库-》远程仓库,默认为../pom.xml -->
<parent>
<groupId>org.springframework.boot</groupId>
<artifactId>spring-boot-dependencies</artifactId>
<version>2.2.2.RELEASE</version>
<relativePath>../pom.xml</relativePath>
</parent>
<groupId>blog.com</groupId>
<artifactId>02-spring-IOC</artifactId>
<version>1.0-SNAPSHOT</version>
<!--表名这个项目打包后生成何种后缀的文件,默认为jar-->
<packaging>jar</packaging>
<!--从name到developers都为描述类标签,可忽略,有项目名称,项目地址,项目许可证,项目开发者信息等-->
<name>Spring Boot Dependencies</name>
<description>Spring Boot Dependencies</description>
<url>https://projects.spring.io/spring-boot/#</url>
<licenses>
<license>
<name>Apache License, Version 2.0</name>
<url>https://www.apache.org/licenses/LICENSE-2.0</url>
</license>
</licenses>
<developers>
<developer>
<name>cloudinwinter</name>
<email>[email protected]</email>
<organization>personal</organization>
<organizationUrl>https://www.cloudinwinter.com</organizationUrl>
</developer>
</developers>
<dependencies>
<dependency>
<groupId>org.springframework</groupId> <!-- 代指公司、组织,一般为公司域名倒叙-->
<artifactId>spring-context</artifactId><!--项目名称-->
<version>5.2.2.RELEASE</version><!--使用这个项目的版本-->
<scope>compile</scope><!--compile 默认的配置,会被使用在项目的所有生命周期,编译,测试,运行。如果为test,那么打包后不会出现在jar中-->
<optional>true</optional><!--默认false;为ture时依赖不传递,项目a引入了依赖项目b,项目b依赖于项目c,但是引入c时此属性设置为真,那么项目a就不会依赖项目c -->
<type>jar</type><!--描述引入依赖的类型,默认为jar-->
</dependency>
<!-- scope如果为system,那么会去systemPath配置的路径寻找jar,而不是本地仓库-->
<dependency>
<groupId>org.hamcrest</groupId>
<artifactId>hamcrest-core</artifactId>
<version>1.3</version>
<scope>system</scope>
<!– ${basedir} 表示项目根路径–>
<systemPath>${basedir}/lib/hamcrest-core-1.3.jar</systemPath>
</dependency>
<dependency>
<groupId>junit</groupId>
<artifactId>junit</artifactId>
<version>4.11</version>
<scope>test</scope>
<!--将冲途的依赖从项目依赖树中排除-->
<exclusions>
<exclusion>
<artifactId>hamcrest-core</artifactId>
<groupId>org.hamcrest</groupId>
</exclusion>
</exclusions>
</dependency>
</dependencies>
</project>
2、scope参数介绍
- compile
默认的scope,表示 dependency 都可以在生命周期中使用。而且,这些dependencies 会传递到依赖的项目中。适用于所有阶段,会随着项目一起发布
- provided
跟compile相似,但是表明了dependency 由JDK或者容器提供,例如Servlet AP和一些Java EE APIs。这个scope 只能作用在编译和测试时,同时没有传递性。
- runtime
表示dependency不作用在编译时,但会作用在运行和测试时,如JDBC驱动,适用运行和测试阶段。
- test
表示dependency作用在测试时,不作用在运行时。 只在测试时使用,用于编译和运行测试代码。不会随项目发布。
- system
跟provided 相似,但是在系统中要以外部JAR包的形式提供,maven不会在repository查找它。
3、scm标签
maven配置项目的版本控制。支持SVN。
https://www.cnblogs.com/skiwdhwhssh/p/10295558.html
4、classifer标签
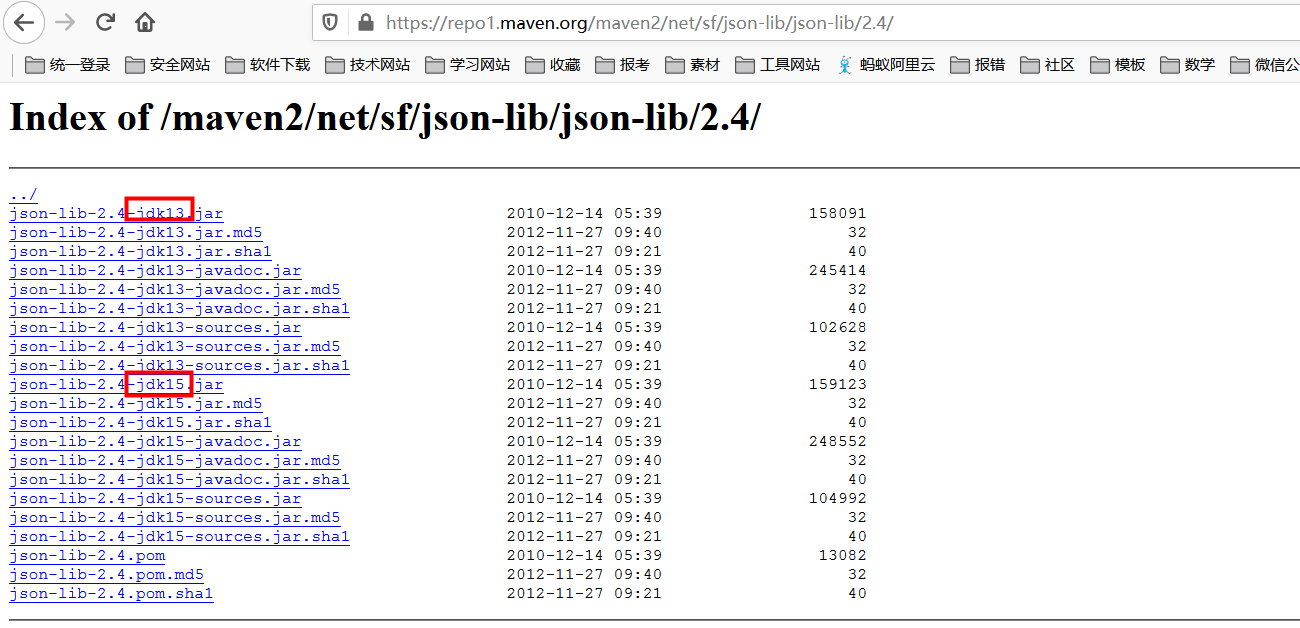
当统一个版本有多个包时,需要添加额外的附属标签进行定位。
        <dependency>
            <groupId>net.sf.json-lib</groupId>
            <artifactId>json-lib</artifactId>
            <version>2.4</version>
            <classifier>JDK15</classifier>
        </dependency>
5、repositories标签
在中央仓库中获取不到的,使用一下配置,Maven 将从远程仓库(repositories配置的地址)中下载该 pom.xml 中声明的所依赖的文件。
<repositories>
        <repository>
            <id>alimaven</id>
            <name>aliyun maven</name>
            <url>http://maven.aliyun.com/nexus/content/groups/public/</url>
            <!-- 只从当前仓库下载发行版,不下载快照版本-->
            <releases>
                <enabled>true</enabled>
            </releases>
            <snapshots>
                <enabled>false</enabled>
            </snapshots>
        </repository>
</repositories>
6、properties
用于实现全局的依赖版本号管理
    <properties>
        <!--以下四项配置maven是可以识别的-->
        <!--设置项目编译的jdk版本号,这里只是推荐,并非强制性,可能设置1.8之后编译版本还是1.7-->
        <maven.compiler.source>1.8</maven.compiler.source>
        <maven.compiler.target>1.8</maven.compiler.target>
        <!--设置资源文件编码格式-->
        <project.build.sourceEncoding>UTF-8</project.build.sourceEncoding>
        <!--定义maven各个插件输出报告的编码格式-->
        <project.reporting.outputEncoding>UTF-8</project.reporting.outputEncoding>

        <!--自定义的属性,通过${}在下文中引用,可以实现全局的依赖版本号管理位置-->
        <json-lib.version>2.4</json-lib.version>
    </properties>
		<!-- 使用示例 -->
        <dependency>
            <groupId>net.sf.json-lib</groupId>
            <artifactId>json-lib</artifactId>
            <version>${json-lib.version}</version>
            <classifier>JDK15</classifier>
        </dependency>
7、dependencyManagement标签和依赖继承问题
父项目使用示例
官方示例:http://maven.apache.org/guides/introduction/introduction-to-dependency-mechanism.html
maven是单继承的,通过设置parent标签来实现子项目继承父项目的依赖。
新建父类的maven项目,只有pom.xml,引入所有子项目中共有的依赖,方便版本控制。
<!--父项目pom示例-->

<groupId>org.example</groupId>
<artifactId>03-maven-super</artifactId>
<version>1.0-SNAPSHOT</version>
<!--父类项目打包为pom形式,方便子项目引入-->
<packaging>pom</packaging>

<!--定义在此标签中的依赖只是做了一个声明的操作,不是直接引入,子项目需要 <dependencies>中再次定义才可以引入依赖-->
<!-- 如果父类项目和子项目同时使用此标签,并且定义了相同的依赖,但是版本不同,子项目会优先使用本项目标签中的声明-->
<dependencyManagement>
    <dependencies>
        <dependency>
            <groupId>org.springframework.boot</groupId>
            <artifactId>spring-boot-starter</artifactId>
            <version>2.2.2.RELEASE</version>
        </dependency>
    </dependencies>
</dependencyManagement>
	<!-- 定义在此标签中,子项目会直接引入此标签中的依赖-->
    <dependencies>
		----
    </dependencies>
<!--子项目pom示例,使用父项目坐标时,父项目先执行mvn install-->

<parent>
    <groupId>org.example</groupId>
    <artifactId>03-maven-super</artifactId>
    <version>1.0-SNAPSHOT</version>
</parent>
<!--子项目使用父项目声明的依赖示例,不定义版本号,使用父项目声明的版本号,定义版本号则由子项目直接引入-->
<dependencies>
    <dependency>
        <groupId>org.springframework.boot</groupId>
        <artifactId>spring-boot-starter</artifactId>
    </dependency>
</dependencies>
子项目实现多继承的方式
在当前项目dependencyManagement标签中声明依赖时(且声明的依赖的pom.xml中定义了pom 时,)必须使用pomimport,才可以在下方标签中被使用。
<!-- 继承自该项目的所有子项目的默认依赖信息。这部分的依赖信息不会被立即解析,而是当子项目声明一个依赖(必须描述group ID和 artifact
        ID信息),如果group ID和artifact ID以外的一些信息没有描述,则通过group ID和artifact ID 匹配到这里的依赖,并使用这里的依赖信息。 -->
<dependencyManagement>
        <dependencies>
            <!-- 坐标对应的pom.xml包含<packaging>jar</packaging>的声明方式 -->
              <dependency>
                <groupId>org.springframework.boot</groupId>
                <artifactId>spring-boot-starter</artifactId>
                <version>2.2.2.RELEASE</version>
            </dependency>

            <!-- SpringCloud的jar包依赖 -->
             <!-- 坐标对应的pom.xml包含<packaging>pom</packaging>的声明方式,此种声明方式也可以作为项目的父项目进行引入 -->
            <!-- 相当于多继承了一个父项目-->
            <dependency>
                <groupId>org.springframework.cloud</groupId>
                <artifactId>spring-cloud-dependencies</artifactId>
                <version>Dalston.SR1</version>
                <!--import仅用于dependencyManagement标签。-->
                <type>pom</type>
                <scope>import</scope>
            </dependency>
            <!-- SpringBoot的jar包依赖 -->
            <dependency>
                <groupId>org.springframework.boot</groupId>
                <artifactId>spring-boot-dependencies</artifactId>
                <version>1.5.9.RELEASE</version>
                <type>pom</type>
                <scope>import</scope>
            </dependency>
        </dependencies>
    </dependencyManagement>
		<!-- <type>pom</type><scope>import</scope> -->
        <dependency>
            <groupId>org.springframework.boot</groupId>
            <artifactId>spring-boot-starter</artifactId>
        </dependency>

        <dependency>
            <groupId>org.springframework.boot</groupId>
            <artifactId>spring-boot-test</artifactId>
        </dependency>
    </dependencies>
使用场景:多个项目,找出共同使用的jar包定义在父项目中,比如common-lang3。这样一下公共的包版本就会保持一致。如果多个项目要使用springboot或springCloud等一系列技术相关的包,此时子项目中已经有了父项目的定义,为了保持多个项目中使用的包的版本是一致的,可以在子项目的dependencyManagement标签中引入相关的依赖声明对应的pom.向上方示例一样,只要所有子项目dependencyManagement中引入依赖的版本是一致的,那么就可以避免子项目之间依赖版本的错乱。
8、profiles标签配置多个环境的配置文件
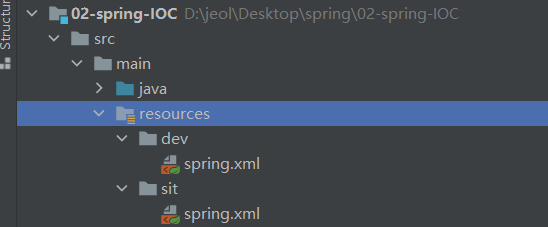
pom配置
如果下文中activation标签没有配置,执行mvn install 时需要带上 -P 参数,后接profile的id属性指定使用的配置文件夹
示例:maven install -P dev
<profiles>
    <profile>
        <id>dev</id>
        <properties>
            <profiles.active>dev</profiles.active>
        </properties>
        <!-- 标记默认使用的配置文件夹 -->
        <activation>
            <activeByDefault>true</activeByDefault>
        </activation>
    </profile>
    <profile>
        <id>sit</id>
        <properties>
            <profiles.active>sit</profiles.active>
        </properties>
    </profile>
</profiles>

<!-- 结合resouces标签指定配置文件位置示例 -->
        <profile>
            <id>sit</id>
            <properties>
                <activeByDefault>sit</activeByDefault>
            </properties>
           <build>
                <resources>
                    <resource>
                        <directory>src/profile/dev</directory>
                    </resource>
                    <resource>
                        <directory>src/main/resources</directory>
                    </resource>
                </resources>
            </build>
        </profile>
9、distributionManagement配置发布的仓库地址
没试验,请自行试验
<distributionManagement>
        <repository>
            <id>nexus-releases</id>
            <name>corp nexus-releases</name>
            <url>http://你的nexusIP:8081/nexus/content/repositories/releases/</url>
        </repository>
        <snapshotRepository>
            <id>nexus-snapshot</id>
            <name>corp nexus-snapshot</name>
            <url>http://你的nexusIP:8081/nexus/content/repositories/snapshots/</url>
        </snapshotRepository>
    </distributionManagement>

在setting.xml中添加配置:

<servers>
    <!-- 发布Releases版的账号,ID要与distributionManagement中的Releases ID一致 -->
    <server>
      <id>nexus-releases</id>
      <username>admin</username>
      <password>******</password>
    </server>
    <!-- 发布snapshot版的账号,ID要与distributionManagement中的snapshot ID一致 -->
    <server>
      <id>nexus-snapshot</id>
      <username>admin</username>
      <password>******</password>
    </server>
</servers>
9、pluginRepositories
    <!--发现插件的远程仓库列表,这些插件用于构建和报表 -->
    <pluginRepositories>
        <!--包含需要连接到远程插件仓库的信息.参见repositories/repository元素 -->
        <pluginRepository>
            ......
        </pluginRepository>
    </pluginRepositories>
10、resources
介绍:
    <build>
       <!-- 资源目录 -->
        <resources>
            <resource>
                <!-- 设定主资源目录  -->
                <directory>src/main/java</directory>

                <!-- maven default生命周期,process-resources阶段执行maven-resources-plugin插件的resources目标处理主资源目下的资源文件时,只处理如下配置中包含的资源类型 -->
				 <includes>
					  <include>**/*.xml</include>
				 </includes>

                <!-- maven default生命周期,process-resources阶段执行maven-resources-plugin插件的resources目标处理主资源目下的资源文件时,不处理如下配置中包含的资源类型(剔除下如下配置中包含的资源类型)-->
				<excludes>
					<exclude>**/*.yaml</exclude>
				</excludes>

                <!-- maven default生命周期,process-resources阶段执行maven-resources-plugin插件的resources目标处理主资源目下的资源文件时,指定处理后的资源文件输出目录,默认是${build.outputDirectory}指定的目录-->
                <!--<targetPath>${build.outputDirectory}</targetPath> -->

                <!-- maven default生命周期,process-resources阶段执行maven-resources-plugin插件的resources目标处理主资源目下的资源文件时,是否对主资源目录开启资源过滤 -->
                <filtering>true</filtering>
            </resource>
        </resources>
  </build>
true开启后处理配置文件时会将${}之类的引用替换成pom中实际的属性值
参考:https://blog.csdn.net/luckyzhoustar/article/details/50411962
作用:
<build>
    <resources>
        <!--复制特定的文件 -->
        <resource>
            <directory>${project.basedir}/libs</directory>
            <targetPath>BOOT-INF/lib/</targetPath>
                    <includes>
                       <include>**/*.jar</include>
                    </includes>
        </resource>
        <!--指定额外的资源加载路径 -->
        <resource>
            <directory>src/main/java</directory>
            <includes>
                <include>com/changfu/business/tpp/util/templates/**.html</include>
            </includes>
            <filter>true</filter>
        </resource>
        <!--指定resources文件目录(一旦增加了resources节点,默认的resource目录就失效了,需要重新指定) -->
        <resource>
            <directory>src/main/resources</directory>
        </resource>
    </resources>
</build>
11、plugins
<plugins>
    <!--maven编译插件设置-->
    <plugin>
        <groupId>org.apache.maven.plugins</groupId>
        <artifactId>maven-compiler-plugin</artifactId>
        <version>3.8.1</version>
        <configuration>
            <!--设置使用的jdk版本和编码-->
            <source>1.8</source>
            <target>1.8</target>
            <encoding>UTF-8</encoding>
        </configuration>
    </plugin>
    <!--maven资源插件-->
    <plugin>
        <groupId>org.apache.maven.plugins</groupId>
        <artifactId>maven-resources-plugin</artifactId>
        <version>3.1.0</version>
        <configuration>
            <encoding>UTF-8</encoding>
        </configuration>
    </plugin>
</plugins>

<!-- 复杂配置示例 -->
<plugin>
    <groupId>org.apache.maven.plugins</groupId>
    <artifactId>maven-resources-plugin</artifactId>
    <executions>
        <execution>
            <id>copy-resources</id>
            <!-- 在default生命周期的 compile阶段就执行resources插件的copy-resources目标 -->
            <phase>compile</phase>
            <goals>
                <goal>copy-resources</goal>
            </goals>
            <configuration>
                <!-- 指定resources插件处理资源文件到哪个目录下 -->
                <outputDirectory>target/classes/static</outputDirectory>
                <!-- 待处理的资源定义 -->
                <resources>
                    <resource>
                        <!-- 指定resources插件处理哪个目录下的资源文件 -->
                        <directory>WebContent</directory>
                        <!-- 指定不需要处理的资源 -->
                        <excludes>
                            <exclude>WEB-INF/classes/**</exclude>
                            <exclude>WEB-INF/lib/**</exclude>
                            <exclude>WEB-INF/web.xml</exclude>
                        </excludes>
                        <filtering>true</filtering>
                    </resource>
                </resources>
            </configuration>
        </execution>
    </executions>
</plugin>
settings.xml配置文件
一般用不到,用到的只有设置本地仓库地址,和下载依赖的仓库改成阿里云。
1、ActiveProfiles
作用:手动激活profiles的列表,按照profile被应用的顺序定义activeProfile。
该元素包含了一组activeProfile元素,每个activeProfile都含有一个profile id。任何在activeProfile中定义的profile id,不论环境设置如何,其对应的 profile都会被激活。如果没有匹配的profile,则什么都不会发生。
例如,env-test是一个activeProfile,则在pom.xml(或者profile.xml)中对应id的profile会被激活。如果运行过程中找不到这样一个profile,Maven则会像往常一样运行。
<settings xmlns="http://maven.apache.org/SETTINGS/1.0.0" xmlns:xsi="http://www.w3.org/2001/XMLSchema-instance"
  xsi:schemaLocation="http://maven.apache.org/SETTINGS/1.0.0
                      https://maven.apache.org/xsd/settings-1.0.0.xsd">
  ...
  <activeProfiles>
    <!-- 要激活的profile id -->
    <activeProfile>env-test</activeProfile>
  </activeProfiles>
  ...
</settings>
2、profiles
作用:根据环境参数来调整构建配置的列表。
看一下实际配置你大概就明白了,一个是甲方的仓库地址,一个是乙方的仓库地址,还有阿里云的sofa框架的仓库地址。如果配置多个,确定你配置的仓库地址都可以连通,否则maven install 执行会卡很久。
<profiles>

    <profile>
	    <id>jdk1.8</id>
	     <activation>
	         <activeByDefault>true</activeByDefault>
	         <jdk>1.8</jdk>
	     </activation>
	     <properties>
	         <maven.compiler.source>1.8</maven.compiler.source>
	         <maven.compiler.target>1.8</maven.compiler.target>
	         <maven.compiler.compilerVersion>1.8</maven.compiler.compilerVersion>
	     </properties>
    </profile>

     <profile>
        <id>sofa</id>
        <repositories>
            <repository>
                <id>nexus-server@public</id>
                <url>http://mvn.cloud.alipay.com/nexus/content/repositories/releases</url>
                <snapshots>
                    <enabled>true</enabled>
                </snapshots>
            </repository>
            <repository>
               <id>nexus-server@public-snapshots</id>
                <url>http://mvn.cloud.alipay.com/nexus/content/repositories/snapshots</url>
                <snapshots>
                    <enabled>true</enabled>
               </snapshots>
            </repository>
        </repositories>
        <pluginRepositories>
            <pluginRepository>
                <id>nexus-server@public</id>
                <url>http://mvn.cloud.alipay.com/nexus/content/repositories/releases</url>
                <snapshots>
                    <enabled>false</enabled>
                    <updatePolicy>never</updatePolicy>
                </snapshots>
            </pluginRepository>
        </pluginRepositories>
    </profile>

     <profile>
     	<id>ifp.git</id>
		<repositories>
			<repository>
				<id>aliyun.maven</id>
				<name>Aliyun Maven Repository Group</name>
				<url>http://maven.aliyun.com/nexus/content/groups/public/</url>
			</repository>
		<repository>
				<id>ynet.maven</id>
				<name>ynet Repository Group</name>
				<url>http://127.0.0.1:8081/repository/ynet/</url>
			</repository>
			<repository>
				<id>ifp.git</id>
				<name>ifp github Nexus Repositories</name>
				<url>https://raw.githubusercontent.com/ynet-ifp/maven-repos/master/repository</url>
			</repository>
		</repositories>
		<pluginRepositories>
			<pluginRepository>
				<id>aliyun.maven</id>
				<name>Aliyun Maven Repository Group</name>
				<url>http://maven.aliyun.com/nexus/content/groups/public/</url>
			</pluginRepository>
			<pluginRepository>
			    <id>spring-plugin.maven</id>
				<name>Spring Plugin Repository Group</name>
			    <url>http://central.maven.org/maven2/</url>
			</pluginRepository>
			<pluginRepository>
				<id>ifp.git</id>
				<name>ifp github Nexus Repository</name>
				<url>https://raw.githubusercontent.com/ynet-ifp/maven-repos/master/repository</url>
			</pluginRepository>
		</pluginRepositories>
	</profile>
	<profile>
    <id>test.git</id>
		<repositories>
			<repository>
				<id>csxbank.repository</id>
				<name>csxbank Repository Group</name>
				<url>http://127.0.0.1:8082/nexus/content/groups/public/</url>
				<releases>
					 <enabled>true</enabled>
				</releases>
				<snapshots>
					 <enabled>false</enabled>
				</snapshots>
			</repository>
		</repositories>
		<pluginRepositories>
			<pluginRepository>
			    <id>spring-plugin.maven</id>
				  <name>Spring Plugin Repository Group</name>
			    <url>http://central.maven.org/maven2/</url>
			</pluginRepository>
			<pluginRepository>
				<id>csxbank.repository</id>
				<name>csxbank Repository Group</name>
			  <url>http://127.0.0.1:8082/nexus/content/groups/public/</url>
			</pluginRepository>
		</pluginRepositories>
	</profile>
  </profiles>