整合SSM框架的配置文件
涉及内容
1、MySQL数据库
2、mybatis
3、spring
4、springMVC
5、maven
配置文件一:pom.xml
引入相关的依赖,主要分为:mybatis、spring、servlet和数据库驱动以及数据库连接池依赖,如果用到单元的测试也可以导入单元测试依赖,在实体类编写的过程中如果想更加简洁也可以导入lombok依赖(要想使用此依赖需安装插件),这里jar包的版本仅供参考。
mybatis依赖
<dependency>
       <groupId>org.mybatis</groupId>
       <artifactId>mybatis</artifactId>
       <version>3.5.2</version>
   </dependency>
   <dependency>
       <groupId>org.mybatis</groupId>
       <artifactId>mybatis-spring</artifactId>
       <version>2.0.2</version>
   </dependency>
spring依赖
 <dependency>
       <groupId>org.springframework</groupId>
       <artifactId>spring-webmvc</artifactId>
       <version>5.1.9.RELEASE</version>
   </dependency>
   <dependency>
       <groupId>org.springframework</groupId>
       <artifactId>spring-jdbc</artifactId>
       <version>5.1.9.RELEASE</version>
   </dependency>
servlet依赖
   <dependency>
       <groupId>javax.servlet</groupId>
       <artifactId>servlet-api</artifactId>
       <version>2.5</version>
   </dependency>
   <dependency>
       <groupId>javax.servlet</groupId>
       <artifactId>jstl</artifactId>
       <version>1.2</version>
   </dependency>
   <dependency>
       <groupId>javax.servlet.jsp</groupId>
       <artifactId>jsp-api</artifactId>
       <version>2.2</version>
   </dependency>
数据库驱动
<dependency>
    <groupId>mysql</groupId>
    <artifactId>mysql-connector-java</artifactId>
    <version>5.1.48</version>
</dependency>
数据库连接池
<dependency>
    <groupId>com.alibaba</groupId>
    <artifactId>druid</artifactId>
    <version>1.2.5</version>
</dependency>
Junit单元测试
<dependency>
    <groupId>junit</groupId>
    <artifactId>junit</artifactId>
    <version>4.12</version>
    <scope>test</scope>
</dependency>
lombok
<dependency>
    <groupId>org.projectlombok</groupId>
    <artifactId>lombok</artifactId>
    <version>1.18.16</version>
</dependency>
Maven资源过滤设置
我们使用maven资源过滤来防止某些资源找不到的情况。
<build>
   <resources>
       <resource>
           <directory>src/main/java</directory>
           <includes>
               <include>**/*.properties</include>
               <include>**/*.xml</include>
           </includes>
           <filtering>false</filtering>
       </resource>
       <resource>
           <directory>src/main/resources</directory>
           <includes>
               <include>**/*.properties</include>
               <include>**/*.xml</include>
           </includes>
           <filtering>false</filtering>
       </resource>
   </resources>
</build>
配置文件二:database.properties
jdbc.driver=com.mysql.jdbc.Driver
jdbc.url=jdbc:mysql://localhost:3306/ssmbuild?useSSL=true&useUnicode=true&characterEncoding=utf8
jdbc.username=root
jdbc.password=123456
配置文件三:mybatis-config.xml
在这个mybatis核心配置文件中,我们给所有的实体类取别名,映射到指定的文件BookMapper.xml,可以写多个,也可以通过<package name="com.monster.dao/*Mapper.xml"/>映射到指定包下的所有以 Mapper.xml结尾的所有文件
<?xml version="1.0" encoding="UTF-8" ?>
<!DOCTYPE configuration
        PUBLIC "-//mybatis.org//DTD Config 3.0//EN"
        "http://mybatis.org/dtd/mybatis-3-config.dtd">
<configuration>

    <typeAliases>
        <package name="com.monster.pojo"/>
    </typeAliases>


    <mappers>
        <mapper resource="com/monster/dao/BookMapper.xml"/>
    </mappers>

</configuration>
配置文件四:spring-dao.xml
在这个配置文件中我们主要整合了mybatis,做了一下四件事情:
1、关联数据库文件
2、配置数据库连接池及其属性,这里使用了Alibaba的druid数据库连接池
3、配置SqlSessionFactoryBean对象,使用引用的方式注入数据库连接池配置mybatis-config.xml配置文件
4、配置扫描Dao接口的包,动态实现dao接口注入到spring容器中(主要做了两件事情:注入sqlSessionFactoryBean,扫描dao接口包)
<?xml version="1.0" encoding="UTF-8"?>
<beans xmlns="http://www.springframework.org/schema/beans"
       xmlns:xsi="http://www.w3.org/2001/XMLSchema-instance"
       xmlns:context="http://www.springframework.org/schema/context"
       xsi:schemaLocation="http://www.springframework.org/schema/beans
       http://www.springframework.org/schema/beans/spring-beans.xsd
       http://www.springframework.org/schema/context
       https://www.springframework.org/schema/context/spring-context.xsd">

    <context:property-placeholder location="classpath:database.properties"/>

    <bean id="dataSource" class="com.alibaba.druid.pool.DruidDataSource">
        <property name="driverClassName" value="${jdbc.driver}"/>
        <property name="url" value="${jdbc.url}"/>
        <property name="username" value="${jdbc.username}"/>
        <property name="password" value="${jdbc.password}"/>
    </bean>

    <bean id="sqlSessionFactoryBean" class="org.mybatis.spring.SqlSessionFactoryBean">
        <property name="dataSource" ref="dataSource"/>
        <property name="configLocation" value="classpath:mybatis-config.xml"/>
    </bean>

    <bean class="org.mybatis.spring.mapper.MapperScannerConfigurer">
        <property name="sqlSessionFactoryBeanName" value="sqlSessionFactoryBean"/>
        <property name="basePackage" value="com.monster.dao"/>
    </bean>

</beans>
配置文件五:spring-service.xml
在这个配置文件中,我们整合了service层
1、自动扫描与service包下的相关实体类
2、创建bookServiceImpl对象,注入bookMapper
3、配置事务管理器,注入数据库连接池
<?xml version="1.0" encoding="UTF-8"?>
<beans xmlns="http://www.springframework.org/schema/beans"
       xmlns:xsi="http://www.w3.org/2001/XMLSchema-instance"
       xmlns:context="http://www.springframework.org/schema/context"
       xsi:schemaLocation="http://www.springframework.org/schema/beans
       http://www.springframework.org/schema/beans/spring-beans.xsd
       http://www.springframework.org/schema/context
       https://www.springframework.org/schema/context/spring-context.xsd">

    <context:component-scan base-package="com.monster.service"/>

    <bean id="bookServiceImpl" class="com.monster.service.BookServiceImpl">
        <property name="bookMapper" ref="bookMapper"/>
    </bean>

    <bean id="transactionManager" class="org.springframework.jdbc.datasource.DataSourceTransactionManager">
        <property name="dataSource" ref="dataSource"/>
    </bean>
</beans>
配置文件六:spring-mvc.xml
1、扫描web相关的bean
2、开启springMVC注解驱动
3、静态资源默认servlet配置
4、配置jsp显示ViewResolver视图解析器
<?xml version="1.0" encoding="UTF-8"?>
<beans xmlns="http://www.springframework.org/schema/beans"
       xmlns:xsi="http://www.w3.org/2001/XMLSchema-instance"
       xmlns:context="http://www.springframework.org/schema/context"
       xmlns:mvc="http://www.springframework.org/schema/mvc"
       xsi:schemaLocation="http://www.springframework.org/schema/beans
       http://www.springframework.org/schema/beans/spring-beans.xsd
       http://www.springframework.org/schema/context
       https://www.springframework.org/schema/context/spring-context.xsd http://www.springframework.org/schema/mvc https://www.springframework.org/schema/mvc/spring-mvc.xsd">


    <context:component-scan base-package="com.monster.controller"/>

    <mvc:default-servlet-handler/>
    <mvc:annotation-driven/>

    <bean class="org.springframework.web.servlet.view.InternalResourceViewResolver">
        <property name="prefix" value="/WEB-INF/jsp/"/>
        <property name="suffix" value=".jsp"/>
    </bean>

</beans>
配置文件七:web.xml
<?xml version="1.0" encoding="UTF-8"?>
<web-app xmlns="http://xmlns.jcp.org/xml/ns/javaee"
         xmlns:xsi="http://www.w3.org/2001/XMLSchema-instance"
         xsi:schemaLocation="http://xmlns.jcp.org/xml/ns/javaee http://xmlns.jcp.org/xml/ns/javaee/web-app_4_0.xsd"
         version="4.0">

    <!--DispatcherServlet-->
    <servlet>
        <servlet-name>springmvc</servlet-name>
        <servlet-class>org.springframework.web.servlet.DispatcherServlet</servlet-class>

        <init-param>
            <param-name>contextConfigLocation</param-name>
            <param-value>classpath:applicationContext.xml</param-value>
        </init-param>

        <load-on-startup>1</load-on-startup>
    </servlet>

    <servlet-mapping>
        <servlet-name>springmvc</servlet-name>
        <url-pattern>/</url-pattern>
    </servlet-mapping>


    <!--乱码过滤-->
    <filter>
        <filter-name>encoding</filter-name>
        <filter-class>org.springframework.web.filter.CharacterEncodingFilter</filter-class>

        <init-param>
            <param-name>encoding</param-name>
            <param-value>utf-8</param-value>
        </init-param>
    </filter>

    <filter-mapping>
        <filter-name>encoding</filter-name>
        <url-pattern>/*</url-pattern>
    </filter-mapping>

    <!--超时时长15min-->
    <session-config>
        <session-timeout>15</session-timeout>
    </session-config>
</web-app>
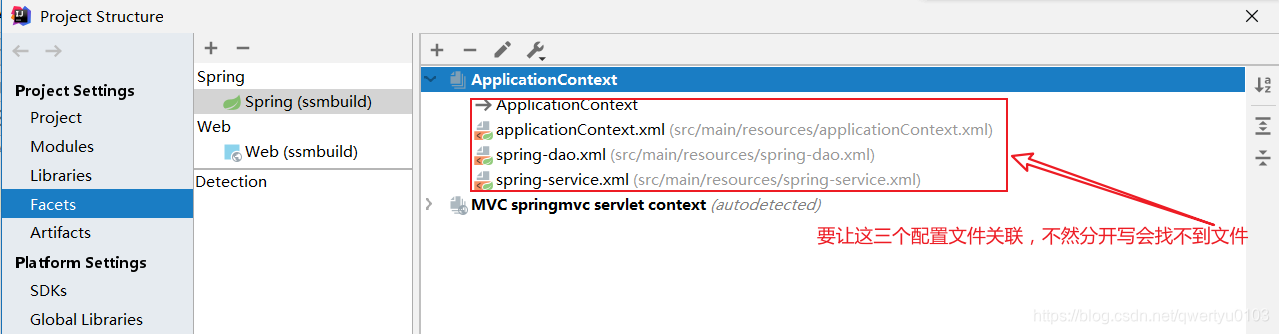
配置文件八:applicationContext.xml
在这个文件中,我们将以下三个配置文件进行整合,当然,我们也可以将这三个配置文件都写在applicationContext.xml,但分开写三层架构更加清晰
spring-dao.xml
spring-service.xml
spring-mvc.xml
<?xml version="1.0" encoding="UTF-8"?>
<beans xmlns="http://www.springframework.org/schema/beans"
       xmlns:xsi="http://www.w3.org/2001/XMLSchema-instance"
       xmlns:context="http://www.springframework.org/schema/context"
       xsi:schemaLocation="http://www.springframework.org/schema/beans
       http://www.springframework.org/schema/beans/spring-beans.xsd http://www.springframework.org/schema/context https://www.springframework.org/schema/context/spring-context.xsd">

    <import resource="spring-dao.xml"/>
    <import resource="spring-service.xml"/>
    <import resource="spring-mvc.xml"/>
</beans>
配置文件九:BookMapper.xml
这个配置文件这里就不再过多的写了,主要是实现对数据库的CRUD操作
<?xml version="1.0" encoding="UTF-8" ?>
<!DOCTYPE mapper
        PUBLIC "-//mybatis.org//DTD Config 3.0//EN"
        "http://mybatis.org/dtd/mybatis-3-mapper.dtd">
<mapper namespace="com.monster.dao.BookMapper">

</mapper>
注意
要让这三个配置文件相关联,不然会报错
 可以直接点加号加入,也可以点下面的位置进行加入

最后要注意的是web.xml配置文件中别写错了
