阿里云服务器 liunx系统docker安装部署fastdfs,和springboot整合fastdfs,我是以CentOS7系统为例
- 如果你没有安装docker,执行以下命令安装
yum install docker
- 启动、设置开启开机启动docker
       sudo systemctl start docker
    sudo systemctl enable docker
-
验证安装是否成功(有client和service两部分表示docker安装启动都成功了):docker version
-
镜像拉取fastdfs,可能拉取比较慢,请耐心等待
docker pull delron/fastdfs
- 创建tracker容器
docker run -d --network=host --name tracker -v /var/fdfs/tracker:/var/fdfs delron/fastdfs tracker
执行如下命令查看tracker是否运行起来
docker container ls
如果想停止tracker服务,可以执行如下命令
docker container stop tracker
停止后,重新运行tracker,可以执行如下命令
docker container start tracker
- 创建storage容器
docker run -d --network=host --name storage -e TRACKER_SERVER=服务器公网ip:22122 -v /var/fdfs/storage:/var/fdfs -e GROUP_NAME=group1 delron/fastdfs storage
执行如下命令查看storage是否运行起来
docker container ls
如果想停止storage服务,可以执行如下命令
docker container stop storage
停止后,重新运行storage,可以执行如下命令
docker container start storage
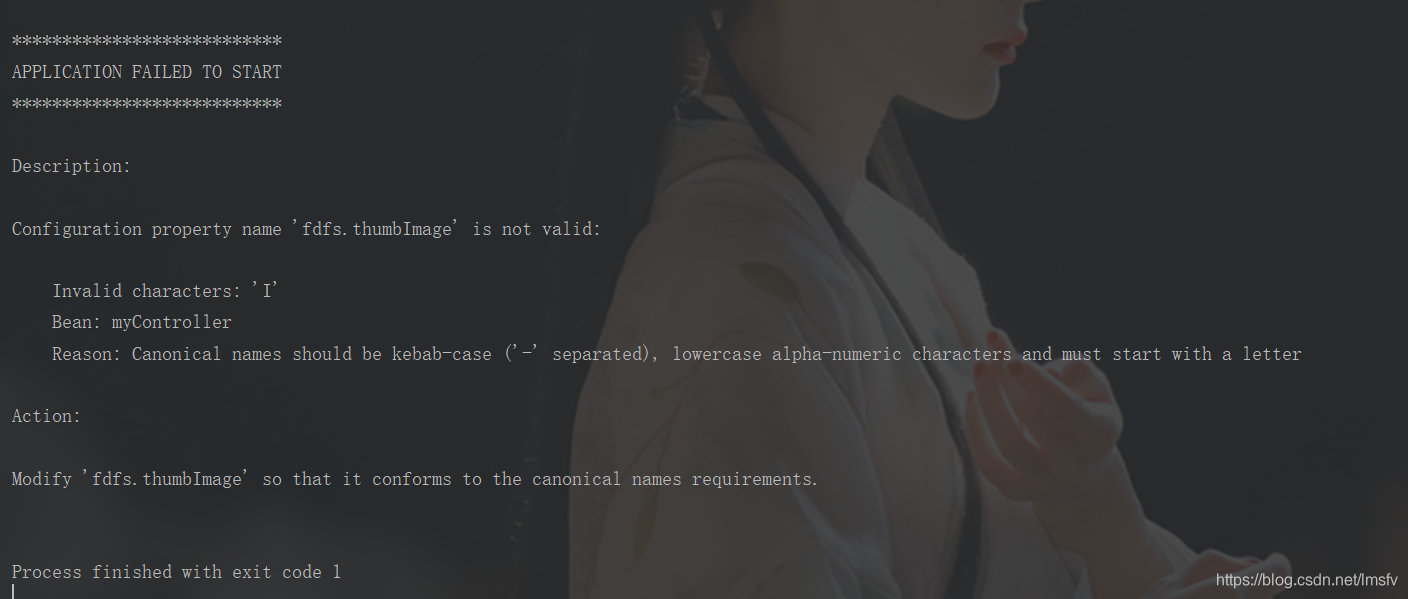
- 创建springboot项目,在这里我用的是springboot1.5的版本,因为使用springboot2.x的版本会报以下错误,如果找解决方案,会第一时间和大家的分享
- pom.xml
<?xml version="1.0" encoding="UTF-8"?>
<project xmlns="http://maven.apache.org/POM/4.0.0" xmlns:xsi="http://www.w3.org/2001/XMLSchema-instance"
         xsi:schemaLocation="http://maven.apache.org/POM/4.0.0 https://maven.apache.org/xsd/maven-4.0.0.xsd">
    <modelVersion>4.0.0</modelVersion>
    <parent>
        <groupId>org.springframework.boot</groupId>
        <artifactId>spring-boot-starter-parent</artifactId>
        <version>1.5.13.RELEASE</version>
        <relativePath/> <!-- lookup parent from repository -->
    </parent>
    <groupId>com</groupId>
    <artifactId>springboot-fastdfs</artifactId>
    <version>0.0.1-SNAPSHOT</version>
    <name>springboot-fastdfs</name>
    <description>Demo project for Spring Boot</description>

    <properties>
        <java.version>1.8</java.version>
    </properties>

    <dependencies>

        <dependency>
            <groupId>com.github.tobato</groupId>
            <artifactId>fastdfs-client</artifactId>
            <version>1.25.2-RELEASE</version>
        </dependency>
        <dependency>
            <groupId>org.springframework.boot</groupId>
            <artifactId>spring-boot-starter-web</artifactId>
        </dependency>
        <dependency>
            <groupId>org.springframework.boot</groupId>
            <artifactId>spring-boot-starter-thymeleaf</artifactId>
        </dependency>
    </dependencies>

    <build>
        <plugins>
            <plugin>
                <groupId>org.springframework.boot</groupId>
                <artifactId>spring-boot-maven-plugin</artifactId>
            </plugin>
        </plugins>
    </build>

</project>
- application.yml
fdfs:
  so-timeout: 1501
  connect-timeout: 601
  thumb-image:             #缩略图生成参数
    width: 150
    height: 150
  tracker-list:            #TrackerList参数,支持多个
    - 服务公网ip:22122
- config
package com.springboot.fastdfs.config;

import com.github.tobato.fastdfs.domain.StorePath;
import com.github.tobato.fastdfs.service.FastFileStorageClient;
import org.apache.commons.io.FilenameUtils;
import org.springframework.beans.factory.annotation.Autowired;
import org.springframework.stereotype.Component;
import org.springframework.web.multipart.MultipartFile;

import java.io.IOException;

/**
 * @author zhaochengyang
 * @version 1.0
 * @date 2020/4/14 12:06
 */
@Component
public class FastDFSClientWrapper {


    @Autowired
    private FastFileStorageClient storageClient;

    public String uploadFile(MultipartFile file) throws IOException {


        StorePath storePath = storageClient.uploadFile(file.getInputStream(),file.getSize(), FilenameUtils.getExtension(file.getOriginalFilename()),null);
        return getResAccessUrl(storePath);
    }

    // 封装文件完整URL地址
    private String getResAccessUrl(StorePath storePath) {


        String fileUrl = "http://ip:8888" + "/" + storePath.getFullPath();
        return fileUrl;
    }
}
- Controller
package com.springboot.fastdfs.Controller;

import com.springboot.fastdfs.config.FastDFSClientWrapper;
import org.springframework.beans.factory.annotation.Autowired;
import org.springframework.stereotype.Controller;
import org.springframework.web.bind.annotation.*;
import org.springframework.web.multipart.MultipartFile;

import javax.servlet.http.HttpServletRequest;
import javax.servlet.http.HttpServletResponse;

/**
 * @author zhaochengyang
 * @version 1.0
 * @date 2020/4/14 12:08
 */
@Controller
public class MyController {


    @Autowired
    private FastDFSClientWrapper dfsClient;

    @GetMapping("/file")
    public String file() {


        return "file";
    }
    // 上传文件
    @RequestMapping(value = "/upload", method = RequestMethod.POST)
    @ResponseBody
    public String upload(@RequestParam("fileName") MultipartFile file) throws Exception {


        String fileUrl= dfsClient.uploadFile(file);
        return fileUrl;
    }
}
- Application
package com.springboot.fastdfs;

import com.github.tobato.fastdfs.FdfsClientConfig;
import org.springframework.boot.SpringApplication;
import org.springframework.boot.autoconfigure.SpringBootApplication;
import org.springframework.context.annotation.EnableMBeanExport;
import org.springframework.context.annotation.Import;
import org.springframework.jmx.support.RegistrationPolicy;

//解决jmx重复注册bean的问题
@EnableMBeanExport(registration = RegistrationPolicy.IGNORE_EXISTING)
@Import(FdfsClientConfig.class)//只需要一行注解 @Import(FdfsClientConfig.class)就可以拥有带有连接池的FastDFS Java客户端了
@SpringBootApplication
public class SpringbootFastdfsApplication {


    public static void main(String[] args) {


        SpringApplication.run(SpringbootFastdfsApplication.class, args);
    }

}
- html
<!DOCTYPE html>
      <html xmlns="http://www.w3.org/1999/xhtml" xmlns:th="http://www.thymeleaf.org" xmlns:sec="http://www.thymeleaf.org/thymeleaf-extras-springsecurity3">
      <head>
            <meta charset="UTF-8" />
            <title>Insert title here</title>
      </head>
 <body>
       <h1 th:inlines="text">文件上传</h1>
       <form action="upload" method="post" enctype="multipart/form-data">
         <p>选择文件: <input type="file" name="fileName"/></p>
          <p><input type="submit" value="提交"/></p>
      </form>
</body>
</html>
- 当然,你同样需要配置阿里云服务器安全组
 上传成功图片地址:http://47.94.146.86:8888/group1/M00/00/00/rBFkAl6WidKAUK0yAAe97VJjib4223.jpg