In this recipe, we'll be covering how to leverage pieces of Dojo and the Dijit framework to create your own custom widgets, specifically covering use of dijit/_WidgetBase and dijit/_TemplatedMixin to quickly and easily set up your widget.
在这个菜谱中,我们将介绍如何利用Dojo和Dijit框架创建您自己的自定义小部件,特别是使用dijit/_WidgetBase和dijit/_TemplatedMixin来快速轻松地设置小部件。
Introduction简介
The Dojo Toolkit ships with the Dijit framework, which is a set of graphical controls called widgets. We can build graphical user interfaces with these widgets.
Dojo工具箱是与Dijit框架一同运行的,Dijit框架是一套称为widget的图形控件。我们可以使用这些小部件创建用户界面。
You may require a specific widget that is not provided by Dojo. In this case, you can use Dijit's core in order to build this widget with more ease.
您可能需要Dojo没有提供的特定小部件。在这种情况下,您可以使用Dijit的核心来更轻松地构建这个小部件。
Setup
For our scenario, let's say that we have a data source somewhere, in JSON format, listing a series of authors, such as those who've penned a tutorial for Dojo. We happen to have that, and it looks something like this:
对于我们的场景,假如我们有一个数据源,以JSON格式,列出了一系列的作者,例如Dojo作者。它看着像下面这样:
[
{
"name": "Brian Arnold",
"avatar": "/includes/authors/brian_arnold/avatar.jpg",
"bio": "Brian Arnold is a software engineer at SitePen, Inc., ..."
},
/* More authors here... */
]
We also know that we want our end result to live in a page, somewhere like this:
我们也知道我们希望我们的最终结果是活在一个页面上,就像这样:
<body>
<!-- Headers and whatnot -->
<h2>Authors</h2>
<div id="authorContainer">
<!-- Authors go here! -->
</div>
</body>
We'll also say that we want it to be a little fancy—perhaps we get a background color to fade in as we mouse over it. Eventually, we want it to look something like this:
我们也会说,我们希望它有点小花哨——当我们鼠标从上面移开时也许我们得到一个背景色淡入。最终,我们希望它看起来像这样:

Solution解决办法
We can create our own widget by following a simple series of steps.
我们可以通过以下一系列简单的步骤创建我们自己的widget。
- Create some file structure for our custom widget为我们自定义小部件创建一些文件结构
- Create markup that will represent an individual author创建标签表示一个单独的作者
- Augment our author markup to make it a Dijit template增强我们的作者标签使之成为一个Dijit模板
- Create our widget class using
declare使用declare创建我们的小部件类 - Style as appropriate添加适当的样式
Step 1: Create a file structure for our custom widget
第一步:为我们自定义小部件创建一个文件结构
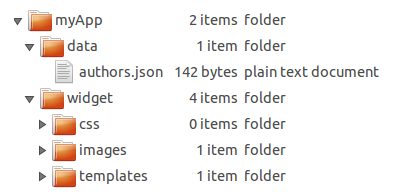
While this step is arguably optional, it's generally considered a good practice to have a proper file structure for your custom Dijit work (or custom code in general). In this case "myApp" is the folder that will house all of our "custom" code — by "custom" we mean code written specifically for this app. General-purpose and 3rd-party libraries (like dojo, dijit, etc.) would be in folders that are siblings of "myApp". This name is completely up to you, but use something meaningful, like the name of your organization, or the application that this widget will be a part of. We like to group our widgets together, so we'll create a folder named "widget" directly under "myApp". We'll call our new widget AuthorWidget — it's module id will be myApp/widget/AuthorWidget. Widgets often use external resources, so we'll add some folders under the "widget" folder to organize them — css, images, and templates. Our eventual structure looks like this:
虽然说这一步可以说是可选的,但通常认为为自定义Dijit工作(或通常的自定义代码)提供适当的文件结构是一种好的做法。在本例中,“myApp”是一个文件夹,它将存放我们所有的“自定义”代码,所谓“自定义”是指专门为此应用程序编写的代码。通用目的和第三方库(如dojo、dijit等)将位于“myApp”的同级文件夹中。这个名称完全由您决定,但是请使用一些有意义的名称,比如您的组织的名称,或者这个小部件将成为其中一部分的应用程序。我们喜欢将我们的小部件分组在一起,因此我们将在“myApp”下直接创建一个名为“widget”的文件夹。我们将命名新的小部件为AuthorWidget—它的模块id将是myApp/widget/AuthorWidget。小部件通常使用外部资源,因此我们将在“小部件”文件夹下添加一些文件夹来组织它们—css、图像和模板。我们最终的结构如下:
We haven't actually created any files yet in our custom space - just some hierarchy.
实际上,我们还没有在自定义空间中创建任何文件-只是一些层次结构。
Step 2: Create markup that will represent an individual author
步骤2:创建表示单个作者的标记
Now that we have some structure to store our pieces, let's create some simple markup that represents an individual author. For your first widget, it's likely going to be simplest to just set up a basic page where you directly put in some sample values.
现在我们已经有了一些结构来存储我们的作品,让我们创建一些表示单个作者的简单标记。对于您的第一个小部件,只需设置一个基本页面,直接在其中输入一些示例值可能是最简单的。
When you're working out a template, you should always create one parent wrapping element that contains all of the other elements. This element can be whatever you want, but it's important to have just one root element. For our data, we'll use a div as our wrapping element. We'll put in our author's name using an H3 element, the image using an img element, and then our bio inside of a p element.
在计算模板时,应该始终创建一个包含所有其他元素的父包装元素。这个元素可以是您想要的任何元素,但是只有一个根元素很重要。对于我们的数据,我们将使用div作为包装元素。我们将使用H3元素输入作者的名字,使用img元素输入图像,然后在p元素中输入我们的bio。
<div>
    <h3>Brian Arnold</h3>
    <img src="/includes/authors/brian_arnold/avatar.jpg">
    <p>Brian Arnold is a software engineer at SitePen, Inc., ...</p>
</div>
Step 3: Augment our author markup to make it a Dijit template
第3步:扩充author标记,使其成为Dijit模板
When using dijit/_TemplatedMixin, you can adjust your markup in a variety of ways:
使用dijit/_TemplatedMixin时,可以通过多种方式调整标记:
- You can have values from your widget automatically inserted可以自动插入小部件中的值
- You can designate elements in your template as Attach Points, giving you a programmatic reference to that node in the widget您可以将模板中的元素指定为附加点,从而提供对小部件中该节点的编程引用
- You can set up methods to be called on DOM events related to specific nodes您可以设置在与特定节点相关的DOM事件上调用的方法
For our purposes, we're not worried about events right now — but we definitely want to take advantage of some of the automatic insertion. We're going to create a file in our hierarchy, under myApp/widget/templates/ named AuthorWidget.html. It's basically the markup defined above, but with some simple additions.
就我们的目的而言,我们现在并不担心事件,但我们肯定想利用一些自动插入的优势。我们将在层次结构中的myApp/widget/templates/下创建一个名为AuthorWidget.html的文件. 它基本上是上面定义的标记,但是有一些简单的添加。
<div>
    <h3 data-dojo-attach-point="nameNode">${name}</h3>
    <img class="${baseClass}Avatar" src="" data-dojo-attach-point="avatarNode">
    <p data-dojo-attach-point="bioNode">${!bio}</p>
</div>
There are a few things to note as to what's going on here:
关于这里发生的事情,有几点需要注意:
- We can use a
${attribute}syntax to directly insert some values, like our name.我们可以使用${attribute}语法直接插入一些值,比如我们的名字。 - We can use a
${!attribute}syntax to directly insert some values from our widget as well, like we're doing with bio. The major distinction between${attribute}and${!attribute}in this case is that our bio contains HTML, and we want to avoid havingdijit/_TemplatedMixinperform automatic escaping on the inserted content.我们可以用${!attribute}语法直接从我们的小部件中插入一些值,就像我们对bio所做的那样。${attribute}和${!attribute}之间的主要区别在本例中,我们的bio包含HTML,我们希望避免dijit/_TemplatedMixin对插入的内容执行自动转义。 - All
dijit/_WidgetBase-based widgets have abaseClassproperty by default, and by leaning on that, we can provide a custom class to our avatar.默认情况下,所有基于dijit/_widgetbase的小部件都有一个基类属性,通过使用这个属性,我们可以为我们的化身提供一个自定义类。 - We've given all nodes an attach point, meaning that in our widget code, we can use that name to reference that node directly. Think of it kind of like doing some
getElementByIdtype work without needing IDs, where we set up references in advance — so with an instance of AuthorWidget, we could usemyAuthor.nameNodeto directly reference the H3 DOM node for that widget.我们给了所有节点一个附加点,这意味着在我们的小部件代码中,我们可以使用该名称直接引用该节点。想象一下,这有点像在不需要ID的情况下执行一些getElementById类型的工作,在这里我们预先设置了引用—因此对于AuthorWidget的实例,我们可以使用myAuthor.nameNode直接引用该小部件的h3dom节点。
You might have noticed that we haven't set the avatar's source directly. What happens if we have an author that doesn't have an avatar specified? We don't want to show a broken image. We'll handle the default value for that when we create our widget, which we'll do now!
你可能已经注意到我们没有直接设置化身的来源。如果我们有一个没有指定头像的作者会怎么样?我们不想显示损坏的图像。当我们创建小部件时,我们将处理它的默认值,我们现在就做!
Step 4: Create our widget class using dojo/_base/declare
步骤4:使用dojo/_base/declare创建小部件类
At this point, in our file structure above, we're going to create a file named AuthorWidget.js in the widget folder. We'll also add a default avatar image. Our file structure is starting to fill out a little! After this step, it'll be much more filled out. We'll be doing the bulk of our work at this point.
此时,在上面的文件结构中,我们将在widget文件中创建一个名为AuthorWidget.js文件。我们还将添加一个默认的头像图像。我们的文件结构开始有点满了!在这一步之后,它将被填写得更多。我们现在要做大部分的工作。
Now we can simply build our widget! The following code would go in your AuthorWidget.js file.
现在我们可以简单地构建我们的小部件了!以下代码将进入您的AuthorWidget.js文件文件。
// myApp/widget/AuthorWidget.js
define(["dojo/_base/declare","dijit/_WidgetBase", "dijit/_TemplatedMixin"],
    function(declare, _WidgetBase, _TemplatedMixin){
        return declare([_WidgetBase, _TemplatedMixin], {
        });
}); // and that's it!
Using declare we easily create our custom AuthorWidget from dijit/_WidgetBase and dijit/_TemplatedMixin. Now, if we stopped here, this wouldn't work. We need to add a few custom properties for our widget, as well as set up some default values for properties left unspecified in the options passed when the widget is instantiated. Here's the setup for our declaration, now with properties.
使用declare,我们可以轻松地从dijit/_WidgetBase和dijit/_TemplatedMixin创建自定义AuthorWidget。现在,如果我们停在这里,这就行不通了。我们需要为我们的小部件添加一些自定义属性,以及为小部件实例化时传递的选项中未指定的属性设置一些默认值。下面是我们声明的设置,现在是属性。
define([
    "dojo/_base/declare",
    "dojo/_base/fx",
    "dojo/_base/lang",
    "dojo/dom-style",
    "dojo/mouse",
    "dojo/on",
    "dijit/_WidgetBase",
    "dijit/_TemplatedMixin",
    "dojo/text!./templates/AuthorWidget.html"
], function(declare, baseFx, lang, domStyle, mouse, on, _WidgetBase, _TemplatedMixin, template){
    return declare([_WidgetBase, _TemplatedMixin], {
        // Some default values for our author
        // These typically map to whatever you're passing to the constructor
        name: "No Name",
        // Using require.toUrl, we can get a path to our AuthorWidget's space
        // and we want to have a default avatar, just in case
        avatar: require.toUrl("./images/defaultAvatar.png"),
        bio: "",

        // Our template - important!
        templateString: template,

        // A class to be applied to the root node in our template
        baseClass: "authorWidget",

        // A reference to our background animation
        mouseAnim: null,

        // Colors for our background animation
        baseBackgroundColor: "#fff",
        mouseBackgroundColor: "#def"
    });
});
We have several things going on here, so let's break it down.
我们这里有好几件事,所以我们把它分解一下。
- We start off with some properties relevant to our author -
name,bio,avatar- setting default values. By usingrequire.toUrl, we can get a path to where our AuthorWidget is located, and tap into the images folder under there.
我们从一些与作者相关的属性开始——姓名、简历、头像——设置默认值。通过使用需要.toUrl,我们可以找到AuthorWidget所在的路径,然后点击下面的images文件夹。
- Using the
templateStringproperty anddojo/text, we specify our template's contents.
使用templateString属性和dojo/text,我们指定模板的内容。
- We set our
baseClass. This will be applied to our root node, which in our case is thedivin our template.
我们设定了我们的基类baseClass。这将应用于我们的根节点,在我们的例子中是模板中的div。
- We set up a reference for our animation, to be worked with in a moment, as well as a couple of colors for the animation.
我们为我们的动画设置了一个参考,一会儿就可以使用,同时也为动画设置了一些颜色。
This is all well and good, and if we stopped here, it would actually work as a very basic widget that displayed information. However, we can add in a couple of methods to make things a bit safer. We're going to add:
这一切都很好,如果我们停在这里,它实际上是一个显示信息的非常基本的小部件。但是,我们可以添加一些方法,使事情更安全一些。我们要补充:
- some logic in
postCreate(the most commonly extended lifecycle method from_WidgetBase)
postreate中的一些逻辑(WidgetBase中最常用的扩展生命周期方法)
- a custom property setter for the
avatarproperty
将所有项目重置为其默认值
- a utility function to make it easy to change background color.
一个实用的功能,使其易于改变背景颜色。
Let's visit each one of those.
让我们访问其中的一个。
The postCreate method is where we want to put the bulk of our work. It's called once our widget's DOM structure is ready, but before it's been inserted into the page. It's typically the best place to put any sort of initialization code.
postCreate方法是我们希望将大部分工作放在其中的地方。一旦小部件的DOM结构准备好了,在它被插入页面之前,就会调用它。它通常是放置任何类型的初始化代码的最佳位置。
postCreate: function(){
    // Get a DOM node reference for the root of our widget
    var domNode = this.domNode;

    // Run any parent postCreate processes - can be done at any point
    this.inherited(arguments);

    // Set our DOM node's background color to white -
    // smoothes out the mouseenter/leave event animations
    domStyle.set(domNode, "backgroundColor", this.baseBackgroundColor);
    // Set up our mouseenter/leave events
    // Using dijit/Destroyable's "own" method ensures that event handlers are unregistered when the widget is destroyed
    // Using dojo/mouse normalizes the non-standard mouseenter/leave events across browsers
    // Passing a third parameter to lang.hitch allows us to specify not only the context,
    // but also the first parameter passed to _changeBackground
    this.own(
        on(domNode, mouse.enter, lang.hitch(this, "_changeBackground", this.mouseBackgroundColor)),
        on(domNode, mouse.leave, lang.hitch(this, "_changeBackground", this.baseBackgroundColor))
    );
}
Here, we're setting some style based on our baseBackgroundColor property, and then setting up some onmouseenter/onmouseleave events, so that as people mouse over the DOM node, our custom _changeBackground function is called. Let's take a look at that:
在这里,我们将基于baseBackgroundColor属性设置一些样式,然后设置一些onmouseenter/onmouseleave事件,这样当人们将鼠标移到DOM节点上时,就会调用我们的定制的_changeBackground函数。我们来看看:
_changeBackground: function(newColor) {
    // If we have an animation, stop it
    if (this.mouseAnim) {
        this.mouseAnim.stop();
    }

    // Set up the new animation
    this.mouseAnim = baseFx.animateProperty({
        node: this.domNode,
        properties: {
            backgroundColor: newColor
        },
        onEnd: lang.hitch(this, function() {
            // Clean up our mouseAnim property
            this.mouseAnim = null;
        })
    }).play();
}
Why is this method called
_changeBackgroundand not justchangeBackground? It is named with a leading underscore to indicate that users of this widget should treat the method as though it were private, and not something to be used directly. It's a common Dojo pattern to prefix methods or objects with an underscore in order to indicate that they shouldn't be used directly. It doesn't actively stop users from using those methods, but is a useful implicit indication of sorts that "Hey, this isn't meant for general use".为什么这个方法被称为\u changebackup而不仅仅是changebackup?它用一个前导下划线命名,以指示此小部件的用户应将该方法视为私有方法,而不是直接使用的方法。一种常见的Dojo模式是在方法或对象前面加下划线,以指示它们不应直接使用。它不会主动阻止用户使用这些方法,但它是一个有用的隐式指示,“嘿,这不是一般用途”。
We're checking our mouseAnim property to see if there's an animation there, and if we have something there, we're calling stop to stop it, as a means of being safe. Then, we simply set up the new animation and save it back into mouseAnim, then start it playing. This example is very similar to an effect as demonstrated in the Animation tutorial, though with some different colors.
我们正在检查mouseAnim属性,看看那里是否有动画,如果那里有什么东西,我们会叫stop来阻止它,作为一种安全的手段。然后,我们只需设置新动画并将其保存回mouseAnim,然后开始播放。此示例与动画教程中演示的效果非常相似,不过有一些不同的颜色。
Finally, remember how we had concerns earlier that a user might not have an avatar, and we set up a default one? We can set up a custom setter function for attributes, which will automatically be called any time that value is set, either when the widget is being created or if someone calls myWidget.set("avatar", somePath). The name of the method is special, and maps to the name of the property—in this case, for avatar, our name will be _setAvatarAttr.
最后,还记得我们之前是如何担心用户可能没有头像的,我们设置了一个默认的头像吗?我们可以为属性设置一个自定义的setter函数,在设置该值时,无论是在创建小部件时还是在有人调用时,都会自动调用该函数myWidget.set文件(“阿凡达”,somePath)。方法的名称是特殊的,并且映射到属性的名称在本例中,对于avatar,我们的名称将是\u setavatar。
_setAvatarAttr: function(imagePath) {
    // We only want to set it if it's a non-empty string
    if (imagePath != "") {
        // Save it on our widget instance - note that
        // we're using _set, to support anyone using
        // our widget's Watch functionality, to watch values change
        this._set("avatar", imagePath);

        // Using our avatarNode attach point, set its src value
        this.avatarNode.src = imagePath;
    }
}
Starting with Dojo 1.6, all dijit/_WidgetBase widgets include dojo/Stateful in their inheritance chain, which means that users can actively watch for value changes. We use _set within our setter to ensure that all watch calls are properly fired, and then we use our avatarNode attach point to set the image's src attribute to the value being set. By wrapping it in a check for the string not being empty, we're trying to avoid cases where the avatar property may be there, but with nothing but an empty string. This way, we get our default image if we have no value, with a bit of a safety check.
从dojo1.6开始,所有dijit/_WidgetBase小部件的继承链中都包含dojo/Stateful,这意味着用户可以主动监视值的变化。我们在setter中使用_set来确保所有的监视调用都被正确触发,然后我们使用avatarNode连接点来将图像的src属性设置为所设置的值。通过在检查字符串是否不为空时包装它,我们试图避免avatar属性可能在那里,但只有一个空字符串。这样,如果没有值,我们就得到默认图像,并进行一点安全检查。
To use the widget, we do the following:
要使用小部件,我们需要执行以下操作:
<div id="authorContainer"></div>
require(["dojo/request", "dojo/dom", "dojo/_base/array", "myApp/widget/AuthorWidget", "dojo/domReady!"],
    function(request, dom, arrayUtil, AuthorWidget){
    // Load up our authors
    request("myApp/data/authors.json", {
        handleAs: "json"
    }).then(function(authors){
        // Get a reference to our container
        var authorContainer = dom.byId("authorContainer");

        arrayUtil.forEach(authors, function(author){
            // Create our widget and place it
            var widget = new AuthorWidget(author).placeAt(authorContainer);
        });
    });
});
With all of these items in place, we have a working widget! However, as you can see, it's not exactly pretty yet.
有了所有这些项目的地方,我们有一个工作的小部件!然而,正如你所看到的,它还不是很漂亮。
实践:

文件目录:

为了避免跨域,我把编写的程序和dojo放在同一个文件夹下,使用http://localhost:8080/MyApp/1.html访问。当然。。需要使用Apache或者LiveServer先启动服务器。(防止本机调试也跨域)