对于嵌入式开发来说,嵌入式开发板经常需要使用 gdb 进行源码级调试,或者对于安全测试人员来说,也需要使用 gdb 进行二进制程序的调试。gdb 交叉调试提供了这样的环境,可以在目标单板上启动 gdbserver 进程,本地主机使用 gdb 作为客户端连接。
1 gdb/gdbserver 移植
为了更好的调试程序,远程单板和本地主机的 gdb 最好统一版本。这里使用源码编译的方式,编译出客户端程序 arm-linux-gdb 和服务端程序 gdbserver。常见的配置选项有以下几种
- --host:指定了编译后的程序需要在哪里运行
- --
target:设置交叉编译器的前缀 - --prefix:设置安装目录,也就是如果编译后,还运行
make进行安装,则安装到此目录
host 表示编译好的程序要在哪个平台上运行,因为本地主机就是 gdb 默认的 x86 平台,因此可以不用设置;gdbserver 是在 arm 单板上跑的,因此 arm-linux-gdb(gdb 客户端)和 gdbserver 都需要配置相同的 target。
1.1 前期准备
安装交叉编译器
sudo apt-get install gcc-arm-linux-gnueabi
sudo apt-get install g++-arm-linux-gnueabi
下载 gdb 源码 (本篇博文使用的 gdb 版本为 9.1),这里为了区别 gdb 和 gdbserver,将客户端的 gdb 称之为 arm-linux-gdb,目标程序即为 gdbserver。
1.2 编译 arm-linux-gdb
配置
mkdir build
cd build
../configure --target=arm-linux --prefix=/opt/arm-linux-gdb
编译
make -j4	# 源码目录下的 gdb 目录中,包含可运行的 gdb 二进制文件
make 		# 可运行可不运行,运行后,将在 --prefix 设置的目录下,生成 gdb 程序
错误一
配置时,低版本 gdb 如果不设置 --disable-werror:忽略错误,编译时,可能会出现以下错误
opncls.c: In function ‘bfd_fopen’:
bfd.h:529:65: error: right-hand operand of comma expression has no effect [-Werror=unused-value]
 #define bfd_set_cacheable(abfd,bool) (((abfd)->cacheable = bool), TRUE)
错误二
/home/lys/Downloads/gdb-9.1/missing: 81: makeinfo: not found
/home/lys/Downloads/gdb-9.1/missing: 81: makeinfo: not found
/home/lys/Downloads/gdb-9.1/missing: 81: makeinfo: not found
WARNING: 'makeinfo' is missing on your system.
         You should only need it if you modified a '.texi' file, or
         any other file indirectly affecting the aspect of the manual.
         You might want to install the Texinfo package:
         <http://www.gnu.org/software/texinfo/>
         The spurious makeinfo call might also be the consequence of
         using a buggy 'make' (AIX, DU, IRIX), in which case you might
         want to install GNU make:
         <http://www.gnu.org/software/make/>
make[4]: *** [Makefile:490: gdb.info] Error 127
make[4]: *** Waiting for unfinished jobs....
WARNING: 'makeinfo' is missing on your system.
解决方案

sudo apt-get install texinfo
1.3 编译 gdbserver
切换到源码的 gdb/server 目录下,配置
./configure --target=arm-linux --host=arm-linux-gnueabi CFLAGS=-static
备注:这里不使用创建 build 目录保存编译生成的文件,因为实际测试中,发现,在 build 目录下配置的 Makefile 有些源码依赖于绝对路径,导致无法编译成功

编译
make -j4
错误一
这里居然是源码报错,说是没有找到 __NR_sigreturn,这里明明有定义,这是为什么呢?

找到 Makefile 文件,发现 linux-arm-low.o 是用 CXX 编译的,而我们使用 host 配置,只能改变 CC 为交叉编译器,CXX 仍然是 g++,如下图
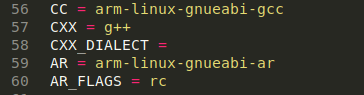
那么修改方法也很简单了,修改 Makefile 文件中的 CXX,或者编译的时候加上相应的选项即可
错误二
重新编译,发现是动态链接,还是不符合我们的需求

再次查看 Makefile 文件,发现还需要进行修改,139 行也增加 -static 选项即可

2 调试单板程序
将编译好的静态 gdbserver 上传到目标单板
ftpget pwn/gdbserver gdbserver 192.168.1.100
gdbserver 挂载需要调试的程序:
1 调试远程程序
gpbserver 开发板ip地址:通信端口(随意取) 要调试的程序 【程序的命令行参数】
# /tmp/gdbserver 192.168.3.1:8888 ./busybox
Process ./busybox created; pid = 455
Listening on port 8888
Remote debugging from host 192.168.1.9, port 45380 # 如果连接成功打印此语句
2 调试远程进程
gpbserver 开发板ip地址:通信端口(随意取) --attach 要调试进程的PID
# /tmp/gdbserver 192.168.1.1:6666 --attach 1905
Attached; pid = 1905
Listening on port 6666
Remote debugging from host 192.168.1.9, port 51680  # 如果连接成功打印此语句
2.1 arm-linux-gdb + gdbserver 调试
本地主机使用编译好的 gdb 连接
lys@kali:~/Downloads/gdb-9.1/build/gdb$ ./gdb
GNU gdb (GDB) 9.1
Copyright (C) 2020 Free Software Foundation, Inc.
License GPLv3+: GNU GPL version 3 or later <http://gnu.org/licenses/gpl.html>
This is free software: you are free to change and redistribute it.
There is NO WARRANTY, to the extent permitted by law.
Type "show copying" and "show warranty" for details.
This GDB was configured as "--host=x86_64-pc-linux-gnu --target=arm-linux".
Type "show configuration" for configuration details.
For bug reporting instructions, please see:
<http://www.gnu.org/software/gdb/bugs/>.
Find the GDB manual and other documentation resources online at:
    <http://www.gnu.org/software/gdb/documentation/>.

For help, type "help".
Type "apropos word" to search for commands related to "word".
(gdb) target remote 192.168.1.1:8888
Remote debugging using 192.168.1.1:8888
Reading /bin/busybox from remote target...
warning: File transfers from remote targets can be slow. Use "set sysroot" to access files locally instead.
Reading /bin/busybox from remote target...
Reading symbols from target:/bin/busybox...
(No debugging symbols found in target:/bin/busybox)
Reading /lib/ld-musl-arm.so.1 from remote target...
Reading /lib/ld-musl-arm.so.1 from remote target...
Reading symbols from target:/lib/ld-musl-arm.so.1...
(No debugging symbols found in target:/lib/ld-musl-arm.so.1)
0xb6f5a8f4 in _dlstart () from target:/lib/ld-musl-arm.so.1
(gdb)
2.2 gdb-multiarch + gef + gdbserver 调试
gdb-multiarch 是一种支持调试多种架构程序的 gdb,安装也很简单,直接使用 apt 命令
sudo apt-get install gdb-multiarch
配合 gef 插件,可实时查看寄存器以及内存状态
git clone https://github.com/hugsy/gef.git
echo "source ~/GdbPlugins/gdbinit/gdbinit" > ~/.gdbinit
# gdb 启动时,会自动加载 用户主目录下的 .gdbinit 文件
启动 gdb-multiarch,并连接到 gdbserver
gef➤ set architecture arm
The target architecture is assumed to be arm
gef➤ target remote 192.168.1.1:7777
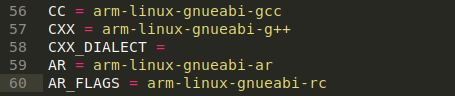
# 如果 gdbserver 是qemu,则需要使用 gef-remote 命令!
如下图所示

3 总结
无论是开发人员还是测试人员,使用 gdb 调试程序都是必不可少的一环,嵌入式设备不同于我们经常使用的 x86 架构的 PC,往往需要移植 gdb,使用交叉编译器可以编译出符合不同单板要求的 gdb,配合各种插件,能够搭建一个较为方便的调试环境。