第 4 章 Spring
1、Spring Aop 顺序
1.1、Aop 常用注解
Spring 中的 5 个通知
@Before前置通知: 目标方法之前执行@After后置通知: 目标方法之后执行(始终执行)@AfterReturning返回后通知: 执行方法结束前执行(异常不执行)@AfterThrowing异常通知: 出现异常时候执行@Around环绕通知: 环绕目标方法执行
1.2、Spring Aop 面试题
面试官对线环节
- 你肯定知道 Spring,那说说 Aop 的全部通知顺序 Springboot 或 Springboot2 对 Aop 的执行顺序影响?
- 说说你使用 Aop 中碰到的坑
1.3、测试前的准备工作
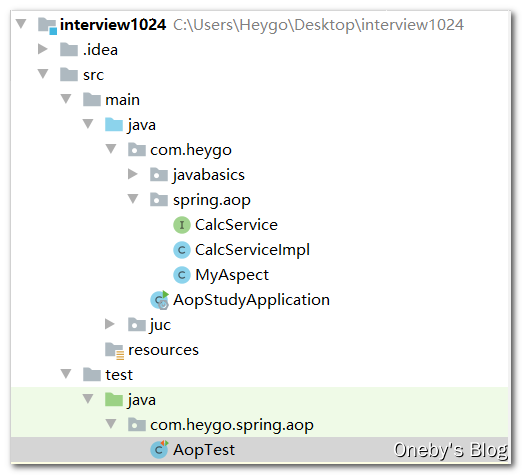
1.3.1、业务类
创建业务接口类:
CalcService
/**
 * @InterfaceName CalService
 * @Description TODO
 * @Author Oneby
 * @Date 2021/1/22 11:20
 * @Version 1.0
 */
public interface CalcService {


    public int div(int x, int y);
}
创建业务接口的实现类:
CalcServiceImpl
/**
 * @ClassName CalcServiceImpl
 * @Description TODO
 * @Author Oneby
 * @Date 2021/1/22 11:15
 * @Version 1.0
 */
@Service
public class CalcServiceImpl implements CalcService {


    @Override
    public int div(int x, int y) {


        int result = x / y;
        System.out.println("=========>CalcServiceImpl被调用了,我们的计算结果:" + result);
        return result;
    }
}
1.3.2、切面类
想在除法方法前后各种通知,引入切面编程
@Aspect:指定一个类为切面类@Component:纳入 Spring 容器管理
创建切面类
MyAspect
/**
 * @ClassName MyAspect
 * @Description TODO
 * @Author Oneby
 * @Date 2021/1/22 11:27
 * @Version 1.0
 */
@Aspect
@Component
public class MyAspect {


    @Before("execution(public int com.heygo.spring.aop.CalcServiceImpl.*(..))")
    public void beforeNotify() {


        System.out.println("******** @Before我是前置通知MyAspect");
    }

    @After("execution(public int com.heygo.spring.aop.CalcServiceImpl.*(..))")
    public void afterNotify() {


        System.out.println("******** @After我是后置通知");
    }

    @AfterReturning("execution(public int com.heygo.spring.aop.CalcServiceImpl.*(..))")
    public void afterReturningNotify() {


        System.out.println("********@AfterReturning我是返回后通知");
    }

    @AfterThrowing("execution(public int com.heygo.spring.aop.CalcServiceImpl.*(..))")
    public void afterThrowingNotify() {


        System.out.println("********@AfterThrowing我是异常通知");
    }

    @Around("execution(public int com.heygo.spring.aop.CalcServiceImpl.*(..))")
    public Object around(ProceedingJoinPoint proceedingJoinPoint) throws Throwable {


        Object retValue = null;
        System.out.println("我是环绕通知之前AAA");
        retValue = proceedingJoinPoint.proceed();
        System.out.println("我是环绕通知之后BBB");
        return retValue;
    }
}
1.4、Spring4 下的测试
1.4.1、POM 文件
在 POM 文件中导入 SpringBoot 1.5.9.RELEASE 版本
SpringBoot 1.5.9.RELEASE 版本的对应的 Spring 版本为 4.3.13 Release
<?xml version="1.0" encoding="UTF-8"?>
<project xmlns="http://maven.apache.org/POM/4.0.0"
         xmlns:xsi="http://www.w3.org/2001/XMLSchema-instance"
         xsi:schemaLocation="http://maven.apache.org/POM/4.0.0 http://maven.apache.org/xsd/maven-4.0.0.xsd">

    <parent>
        <groupId>org.springframework.boot</groupId>
        <artifactId>spring-boot-starter-parent</artifactId>
        <!-- <version>2.3.3.RELEASE</version> -->
        <version>1.5.9.RELEASE</version>
        <relativePath/>
    </parent>
    <modelVersion>4.0.0</modelVersion>

    <groupId>com.heygo</groupId>
    <artifactId>interview1024</artifactId>
    <version>0.0.1-SNAPSHOT</version>

    <properties>
        <java.version>1.8</java.version>
    </properties>

    <dependencies>
        <!-- <version>1.5.9.RELEASE</version>
               ch/qos/logback/core/joran/spi/JoranException解决方案-->
        <dependency>
            <groupId>ch.qos.logback</groupId>
            <artifactId>logback-core</artifactId>
            <version>1.1.3</version>
        </dependency>
        <dependency>
            <groupId>ch.qos.logback</groupId>
            <artifactId>logback-access</artifactId>
            <version>1.1.3</version>
        </dependency>
        <dependency>
            <groupId>ch.qos.logback</groupId>
            <artifactId>logback-classic</artifactId>
            <version>1.1.3</version>
        </dependency>
        <dependency>
            <groupId>org.springframework.boot</groupId>
            <artifactId>spring-boot-starter-web</artifactId>
        </dependency>
        <!-- springboot-jdbc 技术 -->
        <dependency>
            <groupId>org.springframework.boot</groupId>
            <artifactId>spring-boot-starter-jdbc</artifactId>
        </dependency>
        <!-- springboot-aop 技术 -->
        <dependency>
            <groupId>org.springframework.boot</groupId>
            <artifactId>spring-boot-starter-aop</artifactId>
        </dependency>
        <!--hutool-->
        <dependency>
            <groupId>cn.hutool</groupId>
            <artifactId>hutool-captcha</artifactId>
            <version>4.6.8</version>
        </dependency>
        <dependency>
            <groupId>org.springframework.boot</groupId>
            <artifactId>spring-boot-devtools</artifactId>
            <scope>runtime</scope>
            <optional>true</optional>
        </dependency>
        <dependency>
            <groupId>org.projectlombok</groupId>
            <artifactId>lombok</artifactId>
            <optional>true</optional>
        </dependency>
        <dependency>
            <groupId>org.springframework.boot</groupId>
            <artifactId>spring-boot-starter-test</artifactId>
            <scope>test</scope>
            <exclusions>
                <exclusion>
                    <groupId>org.junit.vintage</groupId>
                    <artifactId>junit-vintage-engine</artifactId>
                </exclusion>
            </exclusions>
        </dependency>
    </dependencies>

    <build>
        <plugins>
            <plugin>
                <groupId>org.springframework.boot</groupId>
                <artifactId>spring-boot-maven-plugin</artifactId>
            </plugin>
        </plugins>
    </build>

</project>
1.4.2、创建主启动类
在主包名下创建启动类
为何要在主包名下创建启动类?其他子包均在主包下面,这样我们就不用使用 @ComponentScan 扫扫描包啦~
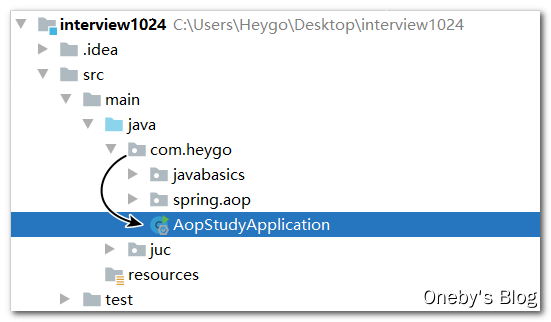
Springboot 启动类带上 @SpringBootApplication(exclude = {DataSourceAutoConfiguration.class}),至于为啥,等到我复习 SpringBoot 的时候再说吧~
/**
 * @ClassName AopStudyApplication
 * @Description TODO
 * @Author Oneby
 * @Date 2021/1/22 11:53
 * @Version 1.0
 */
@SpringBootApplication(exclude = {

    DataSourceAutoConfiguration.class})
public class AopStudyApplication {


    public static void main(String[] args) {


        SpringApplication.run(AopStudyApplication.class, args);
    }
}
1.4.3、创建测试类
在主启动类所在包下创建子包与测试类
注意:SpringBoot 1.5.9 版本在测试类上需要加上 @RunWith(SpringRunner.class) 注解,单元测试需要导入的包名为 import org.junit.Test;
@SpringBootTest
@RunWith(SpringRunner.class) //1.5.9
public class AopTest {
@Autowired
private CalcService calcService;
@Test
public void testAop4() {
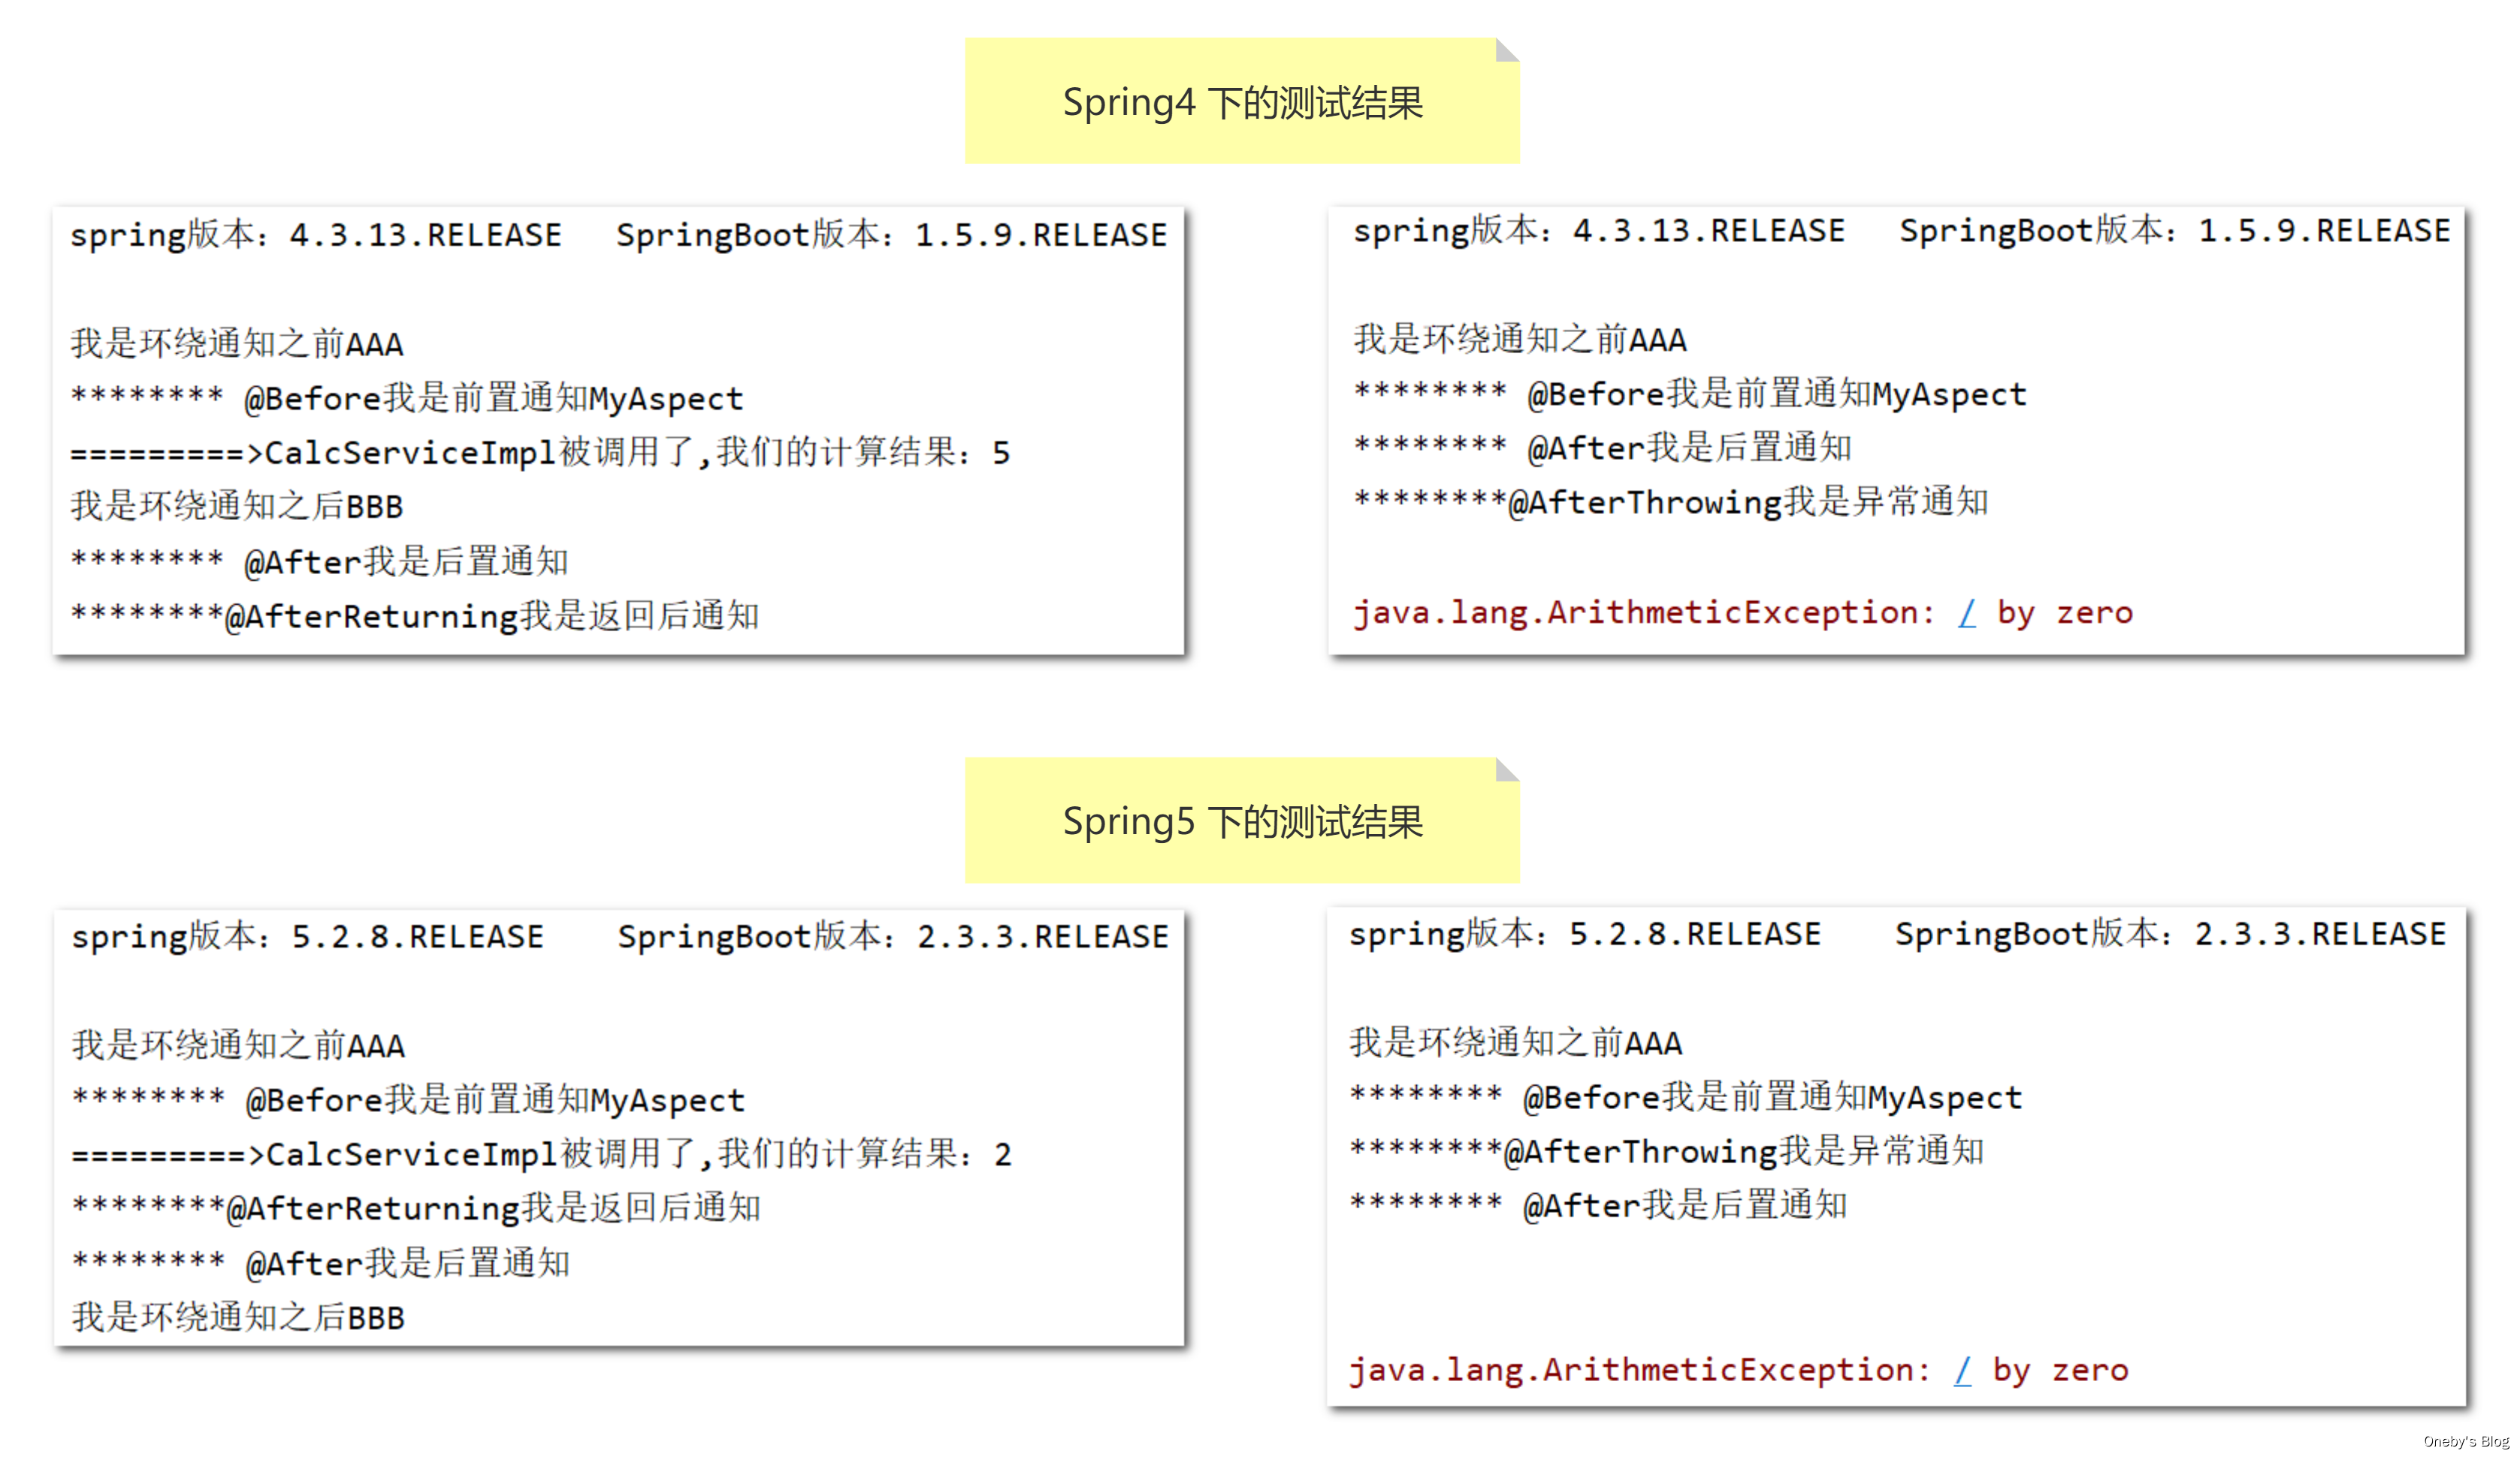
System.out.println("spring版本:" + SpringVersion.getVersion() + "\t" + "SpringBoot版本:" + SpringBootVersion.getVersion());
System.out.println();
calcService.div(10, 2);
// calcService.div(10, 0);
}
}
1.4.4、Aop 测试结果
正常执行的结果
环绕通知将前置通知与目标方法包裹住,执行完 @After 才执行 @AfterReturning

异常执行的结果
由于抛出了异常,因此环绕通知后半部分没有执行,执行完 @After 才执行 @AfterThrowing
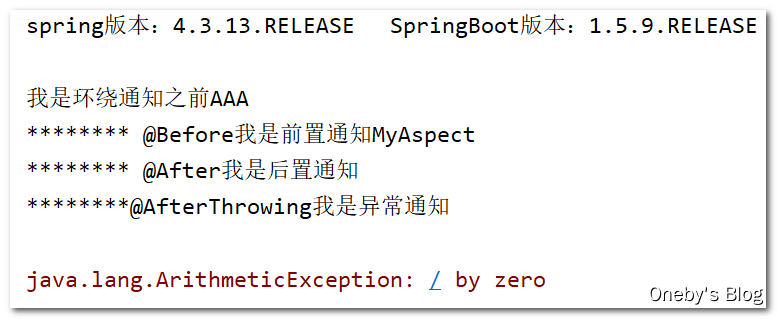
注:Spring4 默认用的是 JDK 的动态代理
1.5、Spring 5 下的测试
1.5.1、POM 文件
在 POM 文件中导入 SpringBoot 1.5.9.RELEASE 版本
SpringBoot 2.3.3.RELEASE 版本的对应的 Spring 版本为 5.2.8 Release
<?xml version="1.0" encoding="UTF-8"?>
<project xmlns="http://maven.apache.org/POM/4.0.0"
         xmlns:xsi="http://www.w3.org/2001/XMLSchema-instance"
         xsi:schemaLocation="http://maven.apache.org/POM/4.0.0 http://maven.apache.org/xsd/maven-4.0.0.xsd">

    <parent>
        <groupId>org.springframework.boot</groupId>
        <artifactId>spring-boot-starter-parent</artifactId>
        <version>2.3.3.RELEASE</version>
        <!-- <version>1.5.9.RELEASE</version> -->
        <relativePath/>
    </parent>
    <modelVersion>4.0.0</modelVersion>

    <groupId>com.heygo</groupId>
    <artifactId>interview1024</artifactId>
    <version>0.0.1-SNAPSHOT</version>

    <properties>
        <java.version>1.8</java.version>
    </properties>

    <dependencies>
        <dependency>
            <groupId>org.springframework.boot</groupId>
            <artifactId>spring-boot-starter-web</artifactId>
        </dependency>
        <!-- springboot-jdbc 技术 -->
        <dependency>
            <groupId>org.springframework.boot</groupId>
            <artifactId>spring-boot-starter-jdbc</artifactId>
        </dependency>
        <!-- springboot-aop 技术 -->
        <dependency>
            <groupId>org.springframework.boot</groupId>
            <artifactId>spring-boot-starter-aop</artifactId>
        </dependency>
        <!--hutool-->
        <dependency>
            <groupId>cn.hutool</groupId>
            <artifactId>hutool-captcha</artifactId>
            <version>4.6.8</version>
        </dependency>
        <dependency>
            <groupId>org.springframework.boot</groupId>
            <artifactId>spring-boot-devtools</artifactId>
            <scope>runtime</scope>
            <optional>true</optional>
        </dependency>
        <dependency>
            <groupId>org.projectlombok</groupId>
            <artifactId>lombok</artifactId>
            <optional>true</optional>
        </dependency>
        <dependency>
            <groupId>org.springframework.boot</groupId>
            <artifactId>spring-boot-starter-test</artifactId>
            <scope>test</scope>
            <exclusions>
                <exclusion>
                    <groupId>org.junit.vintage</groupId>
                    <artifactId>junit-vintage-engine</artifactId>
                </exclusion>
            </exclusions>
        </dependency>
    </dependencies>

    <build>
        <plugins>
            <plugin>
                <groupId>org.springframework.boot</groupId>
                <artifactId>spring-boot-maven-plugin</artifactId>
            </plugin>
        </plugins>
    </build>

</project>
1.5.2、创建主启动类
沿用 Spring4 的主启动类
同样也需要在主启动类上添加 @SpringBootApplication(exclude = {DataSourceAutoConfiguration.class}) 注解
1.5.3、创建测试类
在 Spring4 的测试类下修改代码
注意:SpringBoot 2.3.3 版本下,不需要在测试类上面添加 @RunWith(SpringRunner.class) 直接,单元测试需要导入的包名为 import org.junit.jupiter.api.Test;,不再使用 import org.junit.Test;
@SpringBootTest
public class AopTest {


    @Autowired
    private CalcService calcService;

    @Test
    public void testAop4() {


        System.out.println("spring版本:" + SpringVersion.getVersion() + "\t" + "SpringBoot版本:" + SpringBootVersion.getVersion());
        System.out.println();
        calcService.div(10, 0);
    }

    @Test
    public void testAop5() {


        System.out.println("spring版本:" + SpringVersion.getVersion() + "\t" + "SpringBoot版本:" + SpringBootVersion.getVersion());
        System.out.println();
        calcService.div(10, 5);
    }
}
1.5.4、Aop 测试结果
正常执行的结果
感觉 Spring5 的环绕通知才是真正意义上的华绕通知,它将其他通知和方法都包裹起来了,而且 @AfterReturning 和 @After 之前,合乎逻辑!
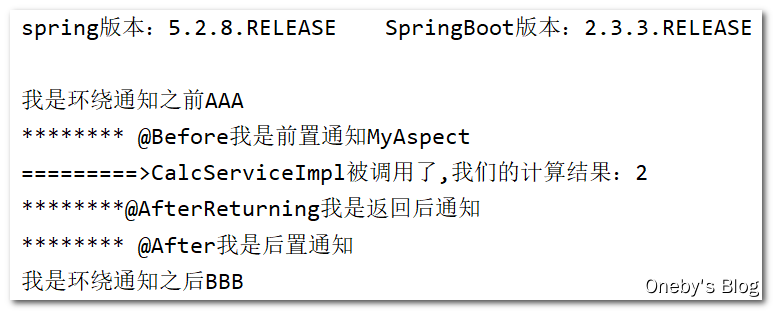
异常执行的结果
由于方法抛出了异常,因此环绕通知后半部分没有执行,并且 @AfterThrowing 和 @After 之前

1.6、Aop 执行顺序总结
呐呐呐~~~
2、Spring 循环依赖
2.1、恶心的大厂面试题
被面试官暴打
- 你解释下spring中的三级缓存?
- 三级缓存分别是什么?三个Map有什么异同?
- 什么是循环依赖?请你谈谈?看过 Spring源码吗?一般我们说的 Spring容器是什么?
- 如何检测是否存在循环依赖?实际开发中见过循环依赖的异常吗?
- 多例的情况下,循环依赖问题为什么无法解决?
- 。。。。。。
2.2、什么是循环依赖?
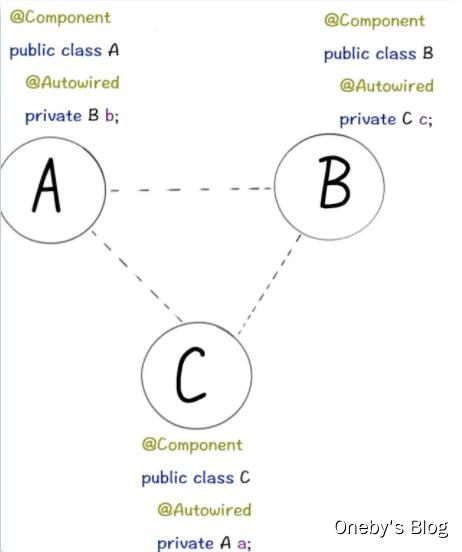
多个 bean 之间相互依赖,形成了一个闭环
比如:A 依赖于 B、B 依赖于 C、C 依赖于 A
public class CircularDependency {


    class A {


        B b;
    }

    class B {


        C c;
    }

    class C {


        A a;
    }
}
通常来说,如果问 Spring 容器内部如何解决循环依赖, 一定是指默认的单例 Bean 中,属性互相引用的场景。也就是说,Spring 的循环依赖,是 Spring 容器注入时候出现的问题
2.3、两种注入方式对循环依赖的影响
两种注入方式对循环依赖的影响
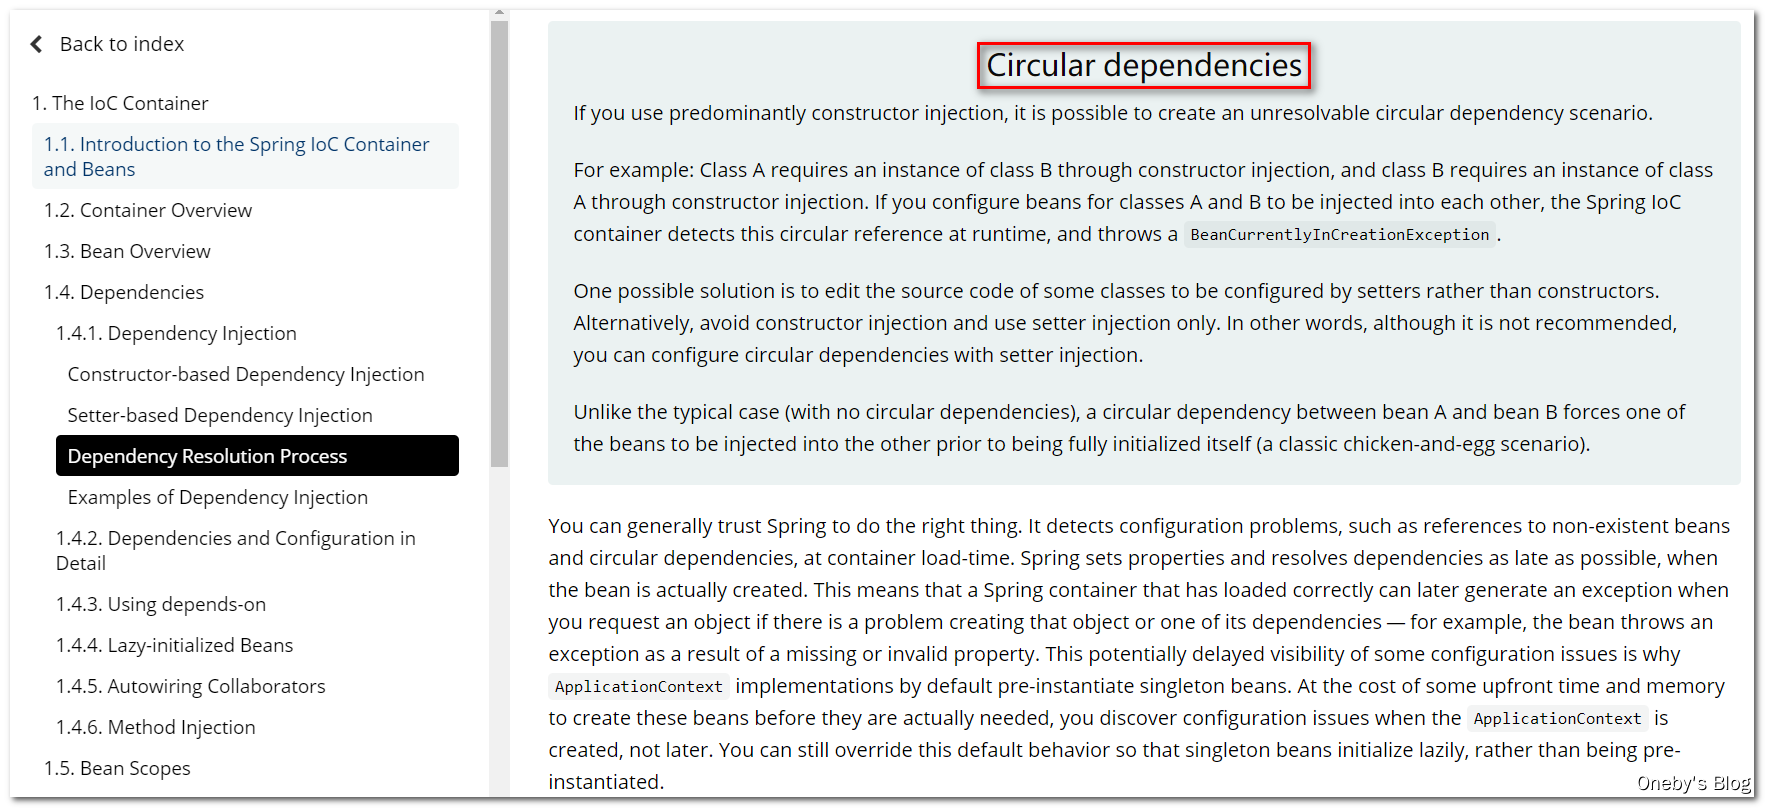
构造器注入:容易造成无法解决的循环依赖,不推荐使用(If you use predominantly constructor injection, it is possible to create an unresolvable circular dependency scenario.)
Setter 注入:推荐使用 setter 方式注入单例 bean
结论:我们 AB 循环依赖问题只要 A 的注入方式是 setter 且 singleton,就不会有循环依赖问题
2.4、Spring容器循环依赖异常
2.4.1、通过代码理解循环依赖
循环依赖现象在 Spring 容器中 注入依赖的对象,有 2 种情况
构造器方式注入依赖
代码
1、ServiceA
@Component
public class ServiceA {


    private ServiceB serviceB;

    public ServiceA(ServiceB serviceB) {


        this.serviceB = serviceB;
    }
}
2、ServiceB
@Component
public class ServiceB {


    private ServiceA serviceA;

    public ServiceB(ServiceA serviceA) {


        this.serviceA = serviceA;
    }
}
3、ClientConstructor
/**
 * 通过构造器的方式注入依赖,构造器的方式注入依赖的bean,下面两个bean循环依赖
 *
 * 测试后发现,构造器循环依赖是无法解决的
 */
public class ClientConstructor {


    public static void main(String[] args) {


        new ServiceA(new ServiceB(new ServiceA(new ServiceB()))); ....
    }
}
结论:构造器注入没有办法解决循环依赖, 你想让构造器注入支持循环依赖,是不存在的。如果构造器能够解决循环依赖问题,那么我就可以无限套娃~
形象理解:各自实例化时都需要对方实例,这就类似于死锁,如果不采取一种办法解决,那么它们将永远互相等待下去
Setter 方式注入
代码
1、ServiceA
@Component
public class ServiceA {


    private ServiceB serviceB;

    public void setServiceB(ServiceB serviceB) {


        this.serviceB = serviceB;
        System.out.println("A 里面设置了B");
    }
}
2、ServiceB
@Component
public class ServiceB {


    private ServiceA serviceA;

    public void setServiceA(ServiceA serviceA) {


        this.serviceA = serviceA;
        System.out.println("B 里面设置了A");
    }
}
3、ClientConstructor
public class ClientSet {


    public static void main(String[] args) {


        //创建serviceA
        ServiceA serviceA = new ServiceA();

        //创建serviceB
        ServiceB serviceB = new ServiceB();

        //将serviceA注入到serviceB中
        serviceB.setServiceA(serviceA);

        //将serviceB注入到serviceA中
        serviceA.setServiceB(serviceB);

    }
}
结论:setter 方式可以解决循环依赖问题
2.4.2、演示循环依赖异常
环境搭建
-
A类/** * @ClassName A * @Description TODO * @Author Oneby * @Date 2021/1/22 18:44 * @Version 1.0 */ public class A { private B b; public B getB() { return b; } public void setB(B b) { this.b = b; } public A() { System.out.println("---A created success"); } } -
B类/** * @ClassName B * @Description TODO * @Author Oneby * @Date 2021/1/22 18:44 * @Version 1.0 */ public class B { private A a; public A getA() { return a; } public void setA(A a) { this.a = a; } public B() { System.out.println("---B created success"); } } -
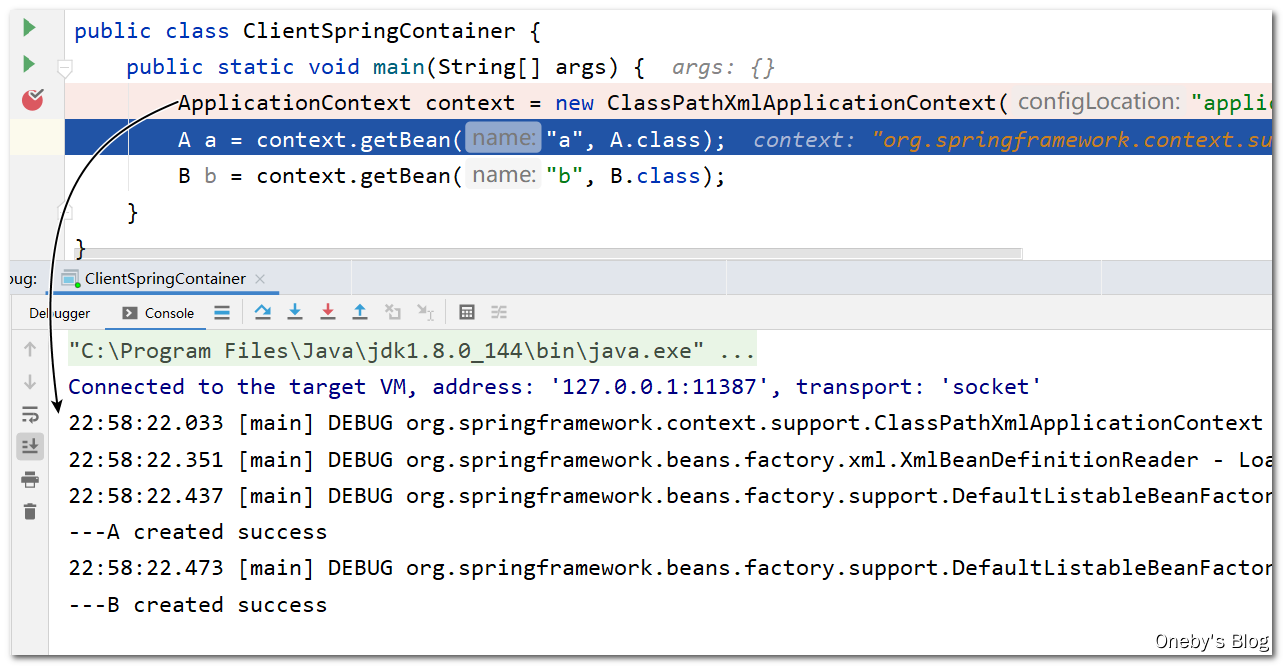
ClientSpringContainer类/** * @ClassName ClientSpringContainer * @Description 只有单例的bean会通过三级缓存提前暴露来解决循环依赖的问题,因为单例的时候只有一份,随时复用,那么就放到缓存里面 * 而多例的bean,每次从容器中荻取都是—个新的对象,都会重B新创建,所以非单例的bean是没有缓存的,不会将其放到三级缓存中。 * @Author Oneby * @Date 2021/1/22 18:44 * @Version 1.0 */ public class ClientSpringContainer { public static void main(String[] args) { ApplicationContext context = new ClassPathXmlApplicationContext("applicationContext.xml"); A a = context.getBean("a", A.class); B b = context.getBean("b", B.class); } } -
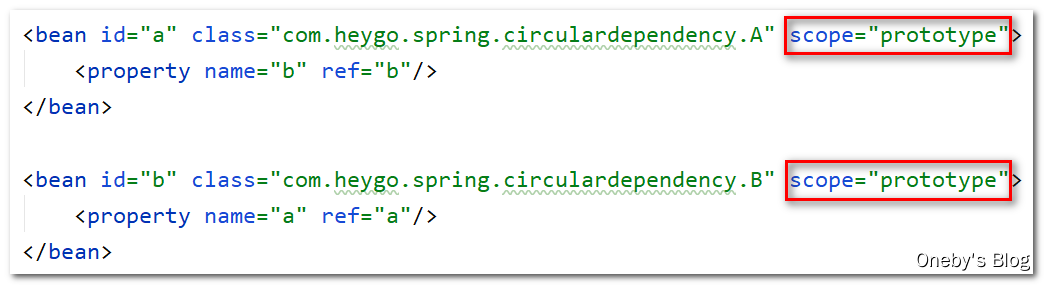
在 resources 文件夹下创建 applicationContext.xml 文件,对 bean 中的属性进行注入
<?xml version="1.0" encoding="UTF-8"?>
<beans xmlns="http://www.springframework.org/schema/beans"
       xmlns:xsi="http://www.w3.org/2001/XMLSchema-instance"
       xsi:schemaLocation="http://www.springframework.org/schema/beans
       http://www.springframework.org/schema/beans/spring-beans.xsd
        http://www.springframework.org/schema/context
        http://www.springframework.org/schema/context/spring-context.xsd
        http://www.springframework.org/schema/aop
        http://www.springframework.org/schema/aop/spring-aop.xsd
        http://www.springframework.org/schema/tx
        http://www.springframework.org/schema/tx/spring-tx.xsd">

    <!--
        1.spring容器默认的单例模式可以解决循环引用,单例默认支持
        2.spring容器原型依赖模式scope="prototype"多例模式下不能解决循环引用
    -->

    <!--depends-on 的意思就是当前这个bean如果要完成,先看depends-on指定的bean是否已经完成了初始化-->
    <!--scope="prototype"代表每次都要新建一次对象-->

    <bean id="a" class="com.heygo.spring.circulardependency.A">
        <property name="b" ref="b"/>
    </bean>

    <bean id="b" class="com.heygo.spring.circulardependency.B">
        <property name="a" ref="a"/>
    </bean>

</beans>
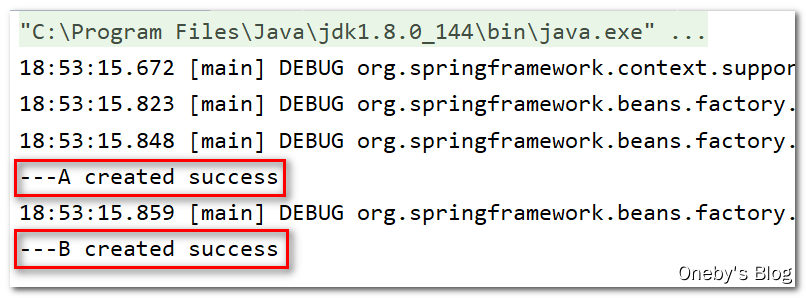
scope = “singleton”,默认的单例(Singleton)的场景是支持循环依赖的,不报错
每个 bean 的 scope 实行默认不写就是 singleton,
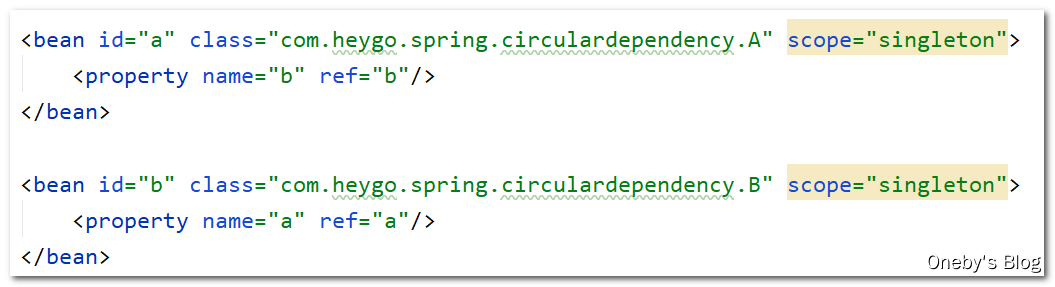
beanA 和 beanB 都创建成功了,程序没有抛异常
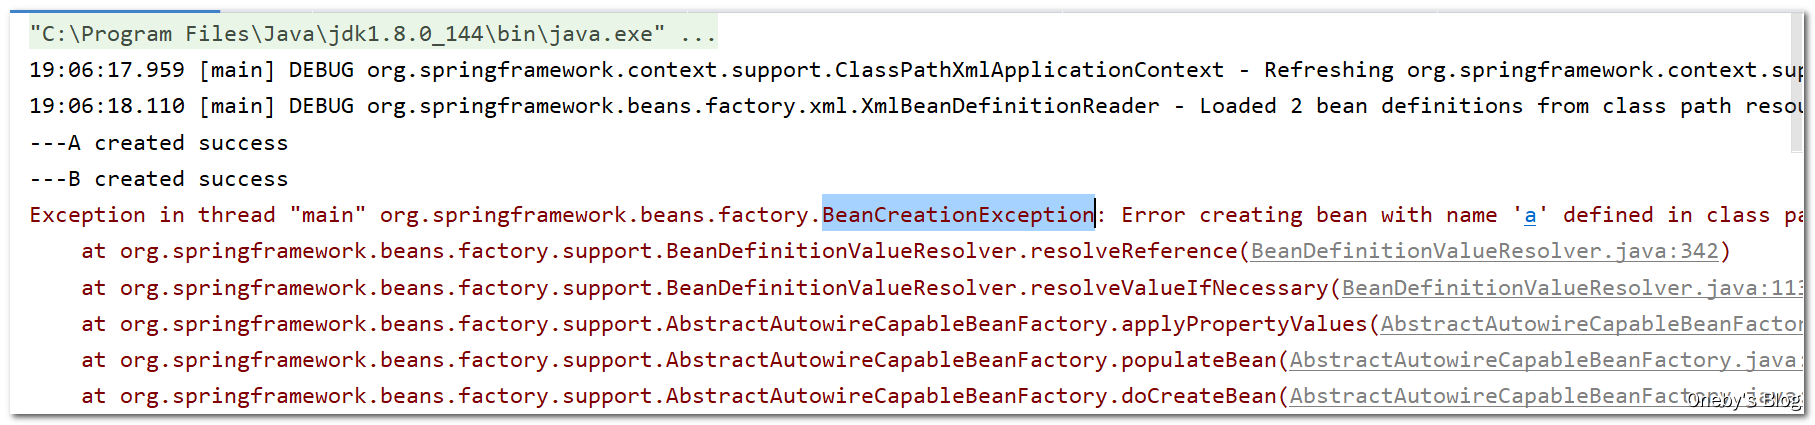
scope = “prototype”,原型(Prototype)的场景是不支持循环依赖的,报错
将 bean 的生命周期改为 prototype
啊哦,抛异常了:Exception in thread "main" org.springframework.beans.factory.BeanCreationException: Error creating bean with name 'a' defined in class path resource [applicationContext.xml]: Cannot resolve reference to bean 'b' while setting bean property 'b'; nested exception is org.springframework.beans.factory.BeanCreationException: Error creating bean with name 'b' defined in class path resource [applicationContext.xml]: Cannot resolve reference to bean 'a' while setting bean property 'a'; nested exception is org.springframework.beans.factory.BeanCurrentlyInCreationException: Error creating bean with name 'a': Requested bean is currently in creation: Is there an unresolvable circular reference?
2.4.3、循环依赖的解决办法
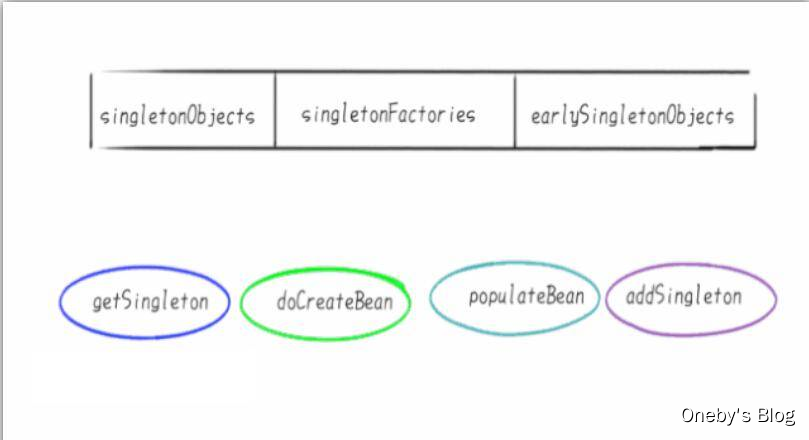
重要结论:Spring 内部通过 3 级缓存来解决循环依赖
所谓的三级缓存其实就是 Spring 容器内部用来解决循环依赖问题的三个 Map,这三个 Map 在 DefaultSingletonBeanRegistry 类中
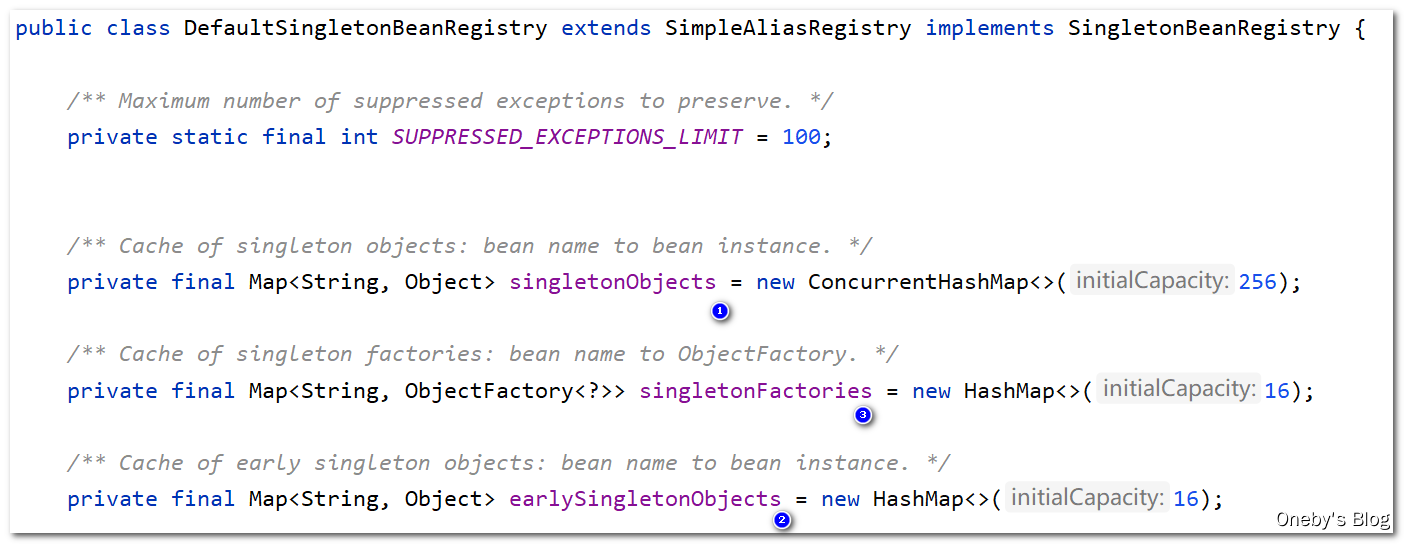
第一级缓存:Map<String, Object> singletonObjects,我愿称之为成品单例池,常说的 Spring 容器就是指它,我们获取单例 bean 就是在这里面获取的,存放已经经历了完整生命周期的Bean对象
第二级缓存:Map<String, Object> earlySingletonObjects,存放早期暴露出来的Bean对象,Bean的生命周期未结束(属性还未填充完整,可以认为是半成品的 bean)
第三级缓存:Map<String, ObiectFactory<?>> singletonFactories,存放可以生成Bean的工厂,用于生产(创建)对象
2.5、源码 Deug 前置知识
2.5.1、实例化 & 初始化
实例化和初始化的区别
-
实例化:堆内存中申请一块内存空间

-
初始化:完成属性的填充

2.5.2、3个Map & 4个方法
三级缓存 + 四大方法
三级缓存
第一级缓存:存放的是已经初始化好了的Bean,bean名称与bean实例相对应,即所谓的单例池。表示已经经历了完整生命周期的Bean对象
第一级缓存:存放的是实例化了,但是未初始化的Bean,bean名称与bean实例相对应。表示Bean的生命周期还没走完(Bean的属性还未填充)就把这个Bean存入该缓存中。也就是实例化但未初始化的bean放入该缓存里
第三级缓存:表示存放生成bean的工厂,存放的是FactoryBean,bean名称与bean工厂对应。假如A类实现了FactoryBean,那么依赖注入的时候不是A类,而是A类产生的Bean
四大方法
getSingleton():从容器里面获得单例的bean,没有的话则会创建 beandoCreateBean():执行创建 bean 的操作(在 Spring 中以 do 开头的方法都是干实事的方法)populateBean():创建完 bean 之后,对 bean 的属性进行填充addSingleton():bean 初始化完成之后,添加到单例容器池中,下次执行getSingleton()方法时就能获取到
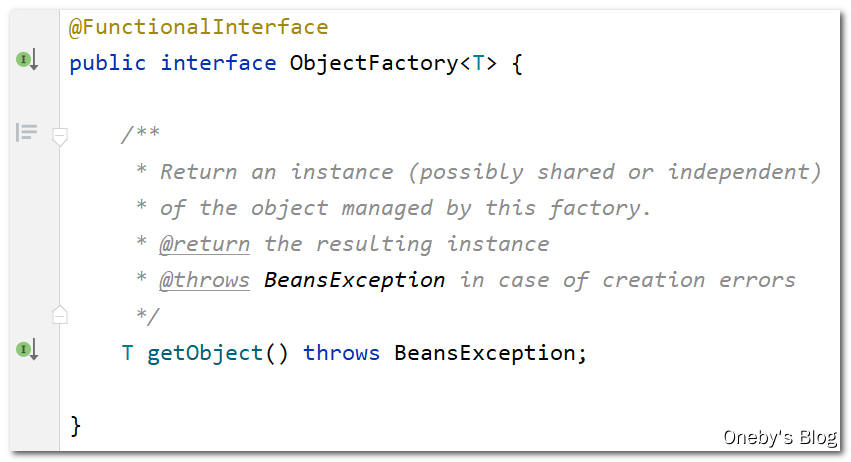
注:关于三级缓存 Map<String, ObjectFactory<?>> singletonFactories的说明,singletonFactories 的 value 为 ObjectFactory 接口实现类的实例。ObjectFactory 为函数式接口,在该接口中定义了一个 getObject() 方法用于获取 bean,这也正是工厂思想的体现(工厂设计模式)
2.5.3、 对象在三级缓存中的迁移
A/B 两对象在三级缓存中的迁移说明
-
A创建过程中需要B,于是A将自己放到三级缓存里面,去实例化B
-
B实例化的时候发现需要A,于是B先查一级缓存,没有,再查二级缓存,还是没有,再查三级缓存,找到了A,然后把三级缓存里面的这个A放到二级缓存里面,并删除三级缓存里面的A
-
B顺利初始化完毕,将自己放到一级缓存里面(此时B里面的A依然是创建中状态),然后回来接着创建A,此时B已经创建结束,直接从一级缓存里面拿到B,然后完成创建,并将A自己放到一级缓存里面。
2.6、详细 Debug 流程
2.6.1、beanA 的实例化
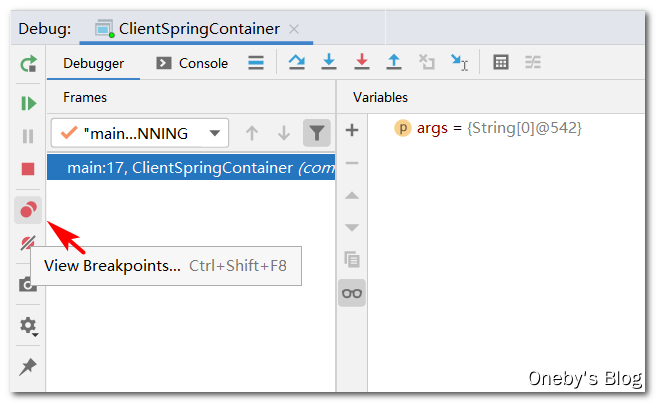
技巧:如何阅读框架源码?答:打断点 + 看日志
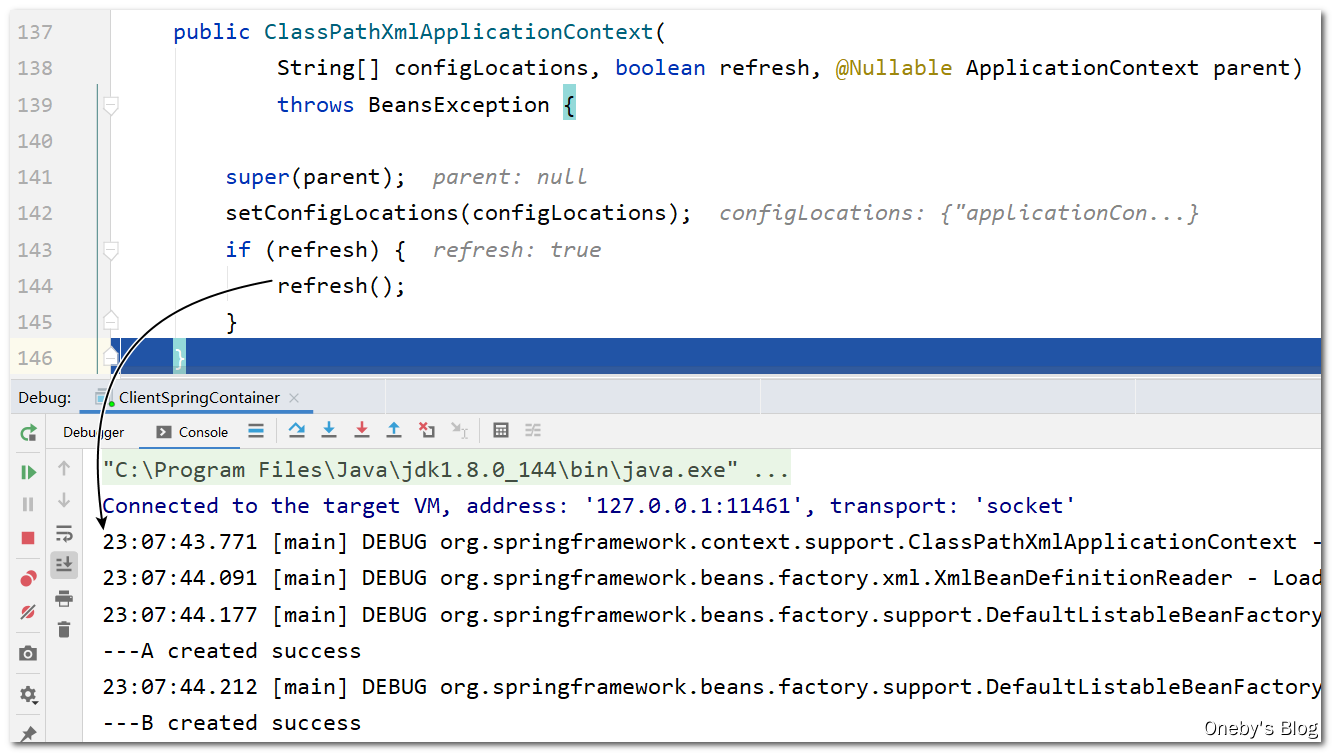
在 ApplicationContext context = new ClassPathXmlApplicationContext("applicationContext.xml"); 代码处打上断点,逐步执行(Step Over),发现执行 new ClassPathXmlApplicationContext("applicationContext.xml") 操作时,beanA 和 beanB 都已经被创建好了,因此我们需要进入 new ClassPathXmlApplicationContext("applicationContext.xml") 中
进入
new ClassPathXmlApplicationContext("applicationContext.xml")中
点击 Step Into,首先进入了静态代码块中,不管我们的事,使用 Step Out 退出此方法

再次 Step Into,进入 ClassPathXmlApplicationContext 类的构造函数,该构造函数使用 this 调用了另一个重载构造函数

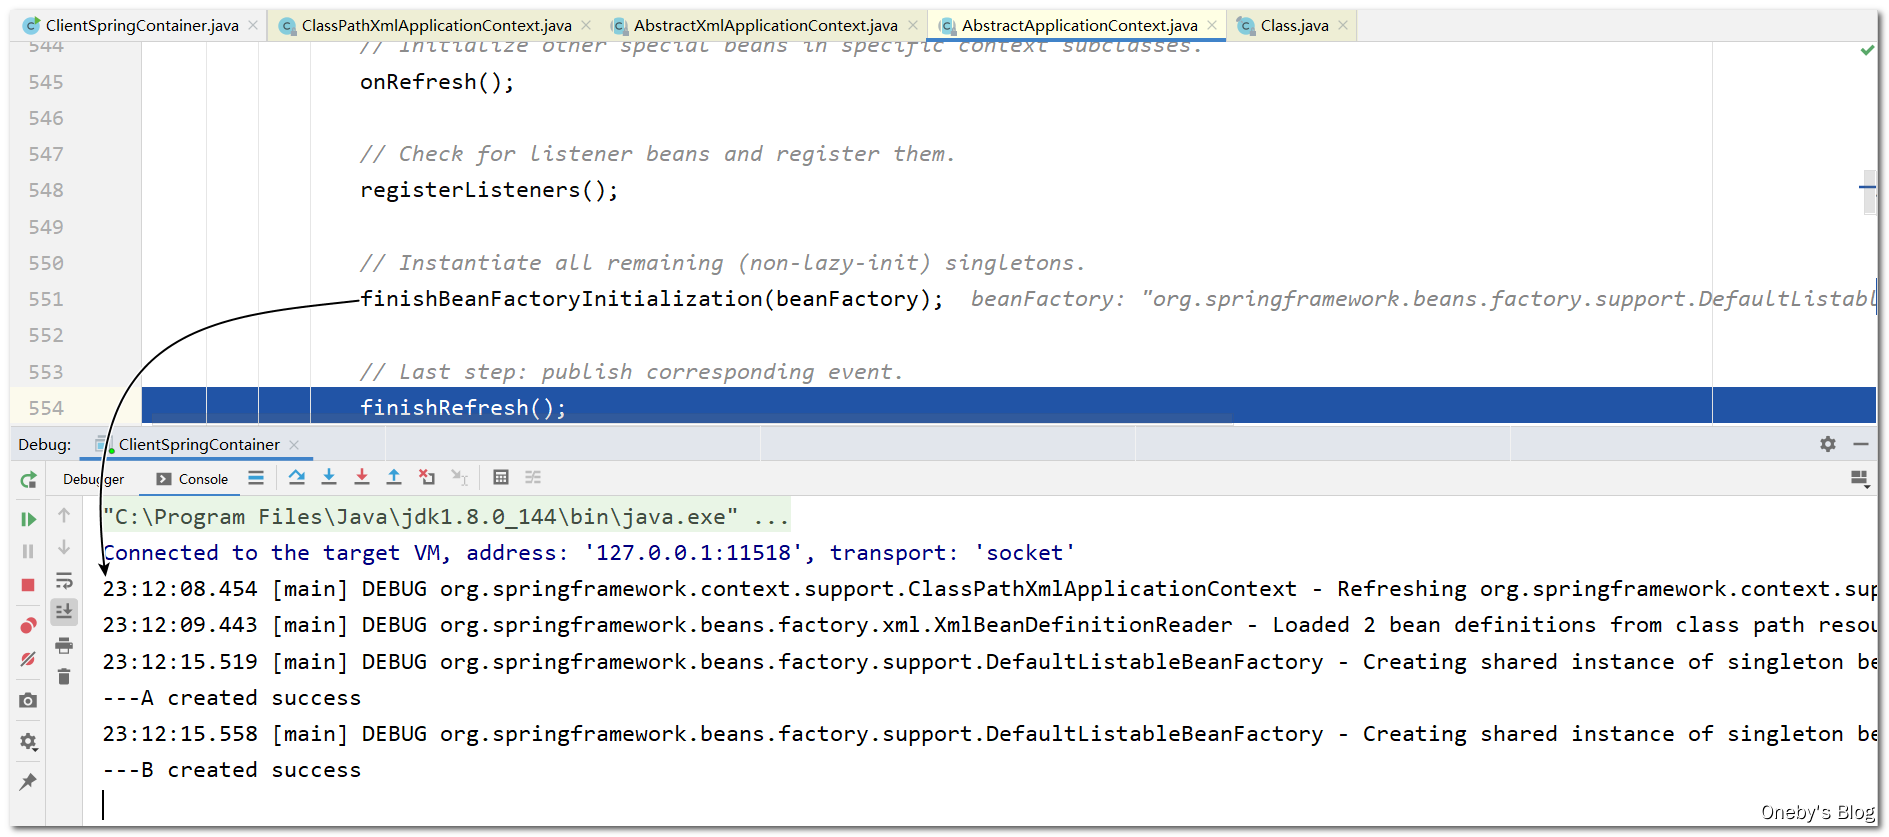
继续 Step Into,进入重载构造函数后单步 Step Over,发现执行完 refresh() 方法后输出如下日志,于是我们将断点打在 refresh() 那一行
进入
refresh()方法
Step Into 进入 refresh() 方法,发现执行完 finishBeanFactoryInitialization(beanFactory) 方法后输出日志,于是我们将断点打在 finishBeanFactoryInitialization(beanFactory) 那一行
从注释也可以看出本方法完成了非懒加载单例 bean的初始化(Instantiate all remaining (non-lazy-init) singletons.)
进入
finishBeanFactoryInitialization(beanFactory)方法
Step Into 进入 finishBeanFactoryInitialization(beanFactory) 方法,发现执行完 beanFactory.preInstantiateSingletons() 方法后输出日志,于是我们将断点打在 beanFactory.preInstantiateSingletons() 那一行
从注释也可以看出本方法完成了非懒加载单例 bean的初始化(Instantiate all remaining (non-lazy-init) singletons.)
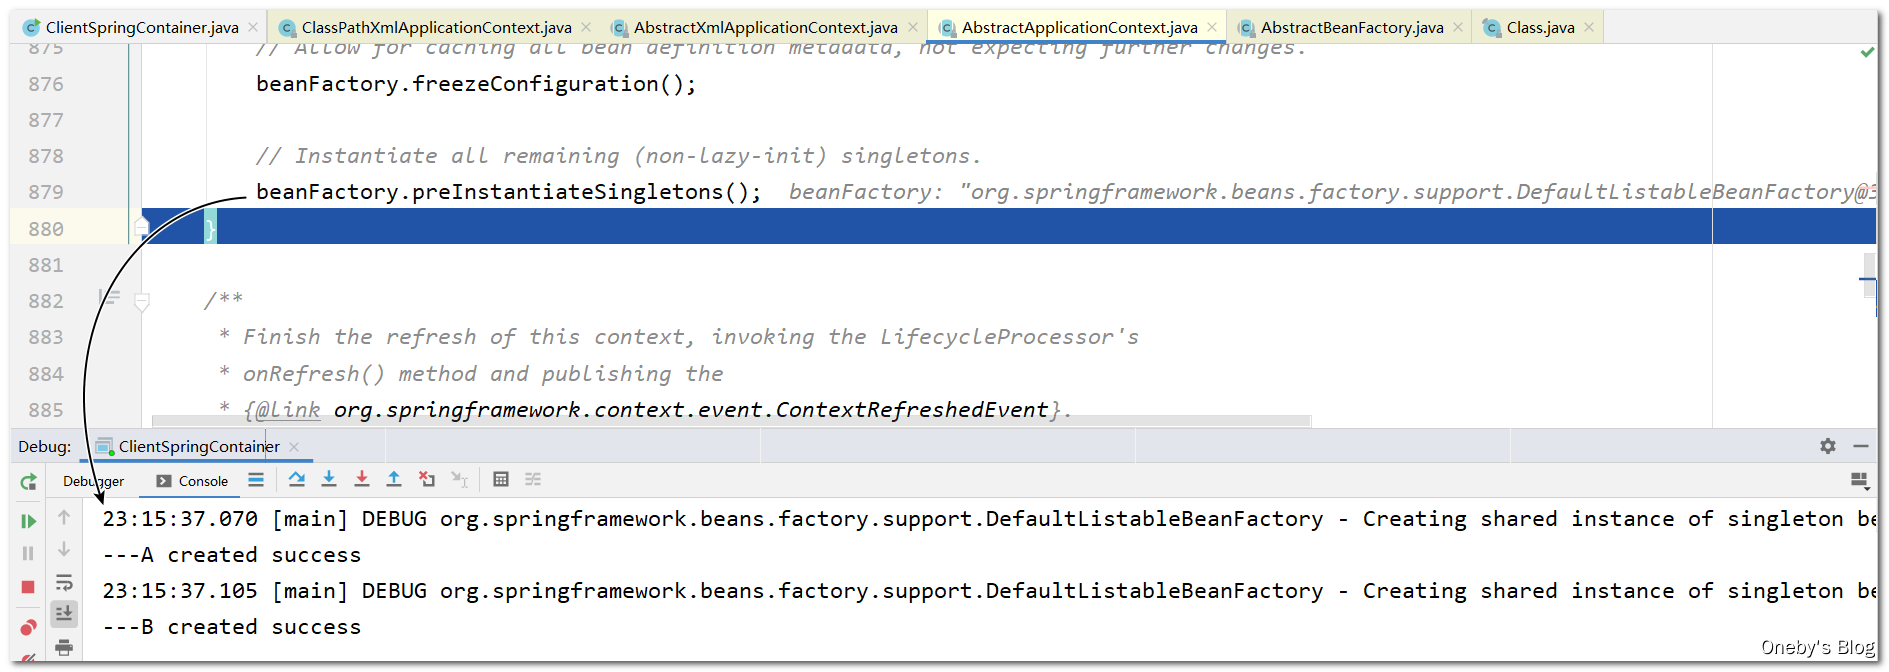
进入
beanFactory.preInstantiateSingletons()方法
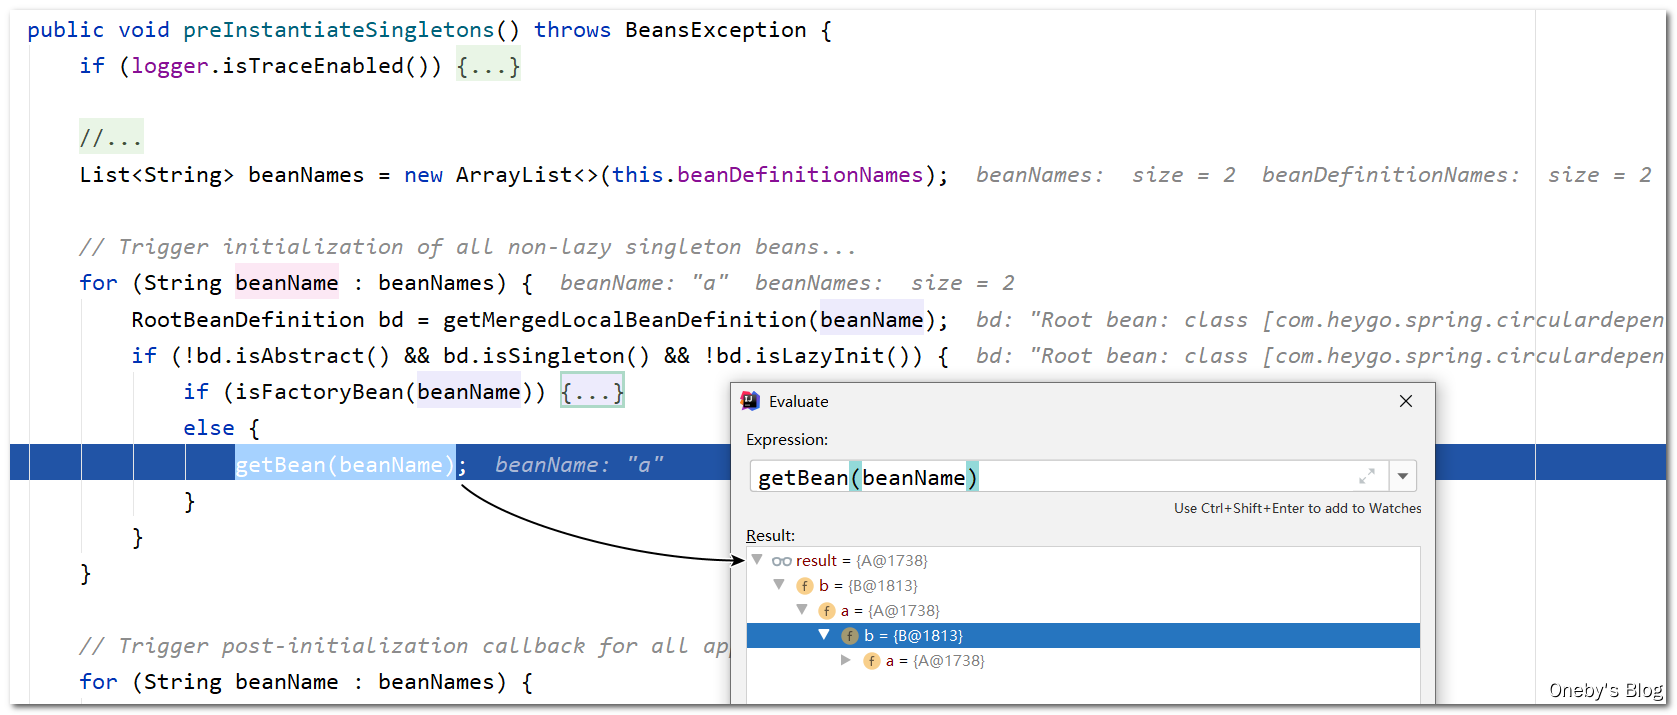
Step Into 进入 beanFactory.preInstantiateSingletons() 方法,发现执行完 getBean(beanName) 方法后输出日志,于是我们将断点打在 getBean(beanName) 那一行
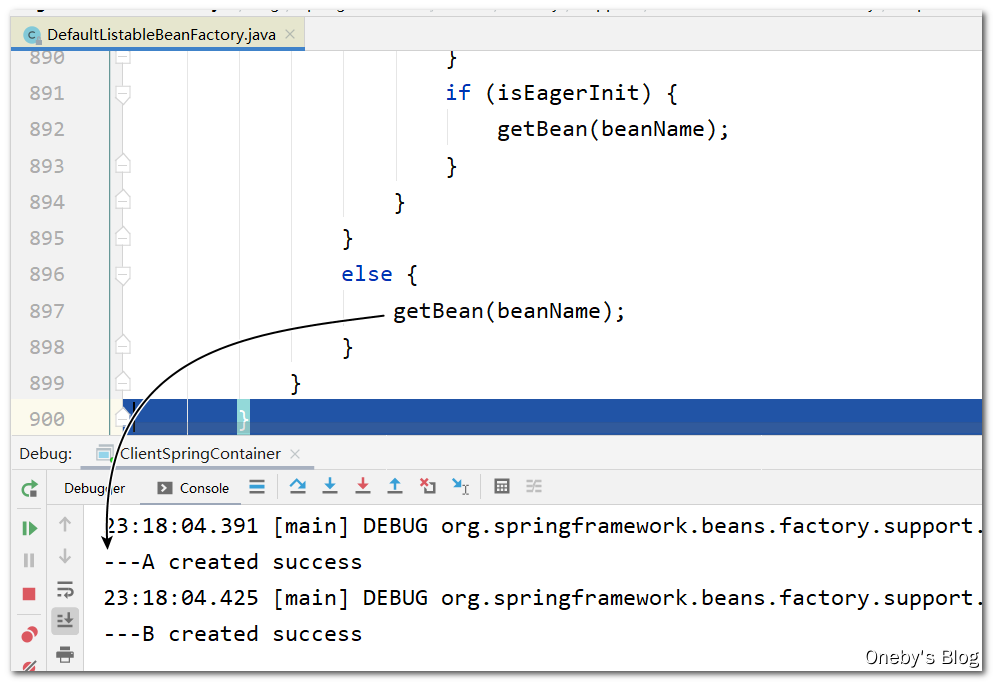
进入
getBean(beanName)方法
getBean(beanName) 调用了 doGetBean(name, null, null, false) 方法,也就是前面说过的:在 Spring 里面,以do 开头的方法都是干实事的方法

进入
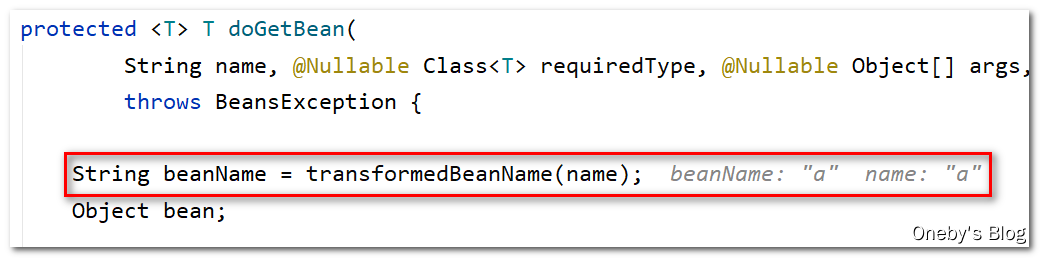
doGetBean(name, null, null, false)方法
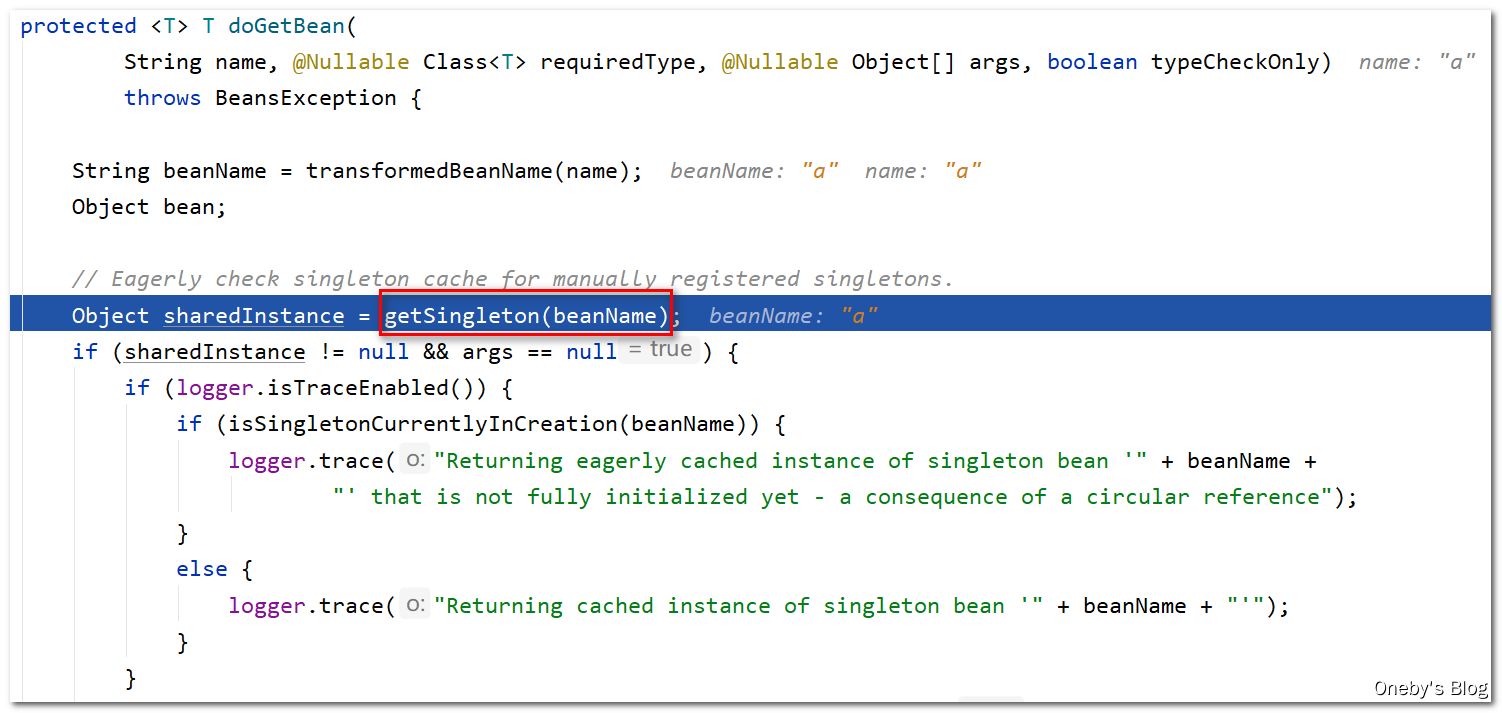
我们可以给 bean 配置别名,这里的 transformedBeanName(name) 方法就是将用户别名转换为 bean 的真实名称
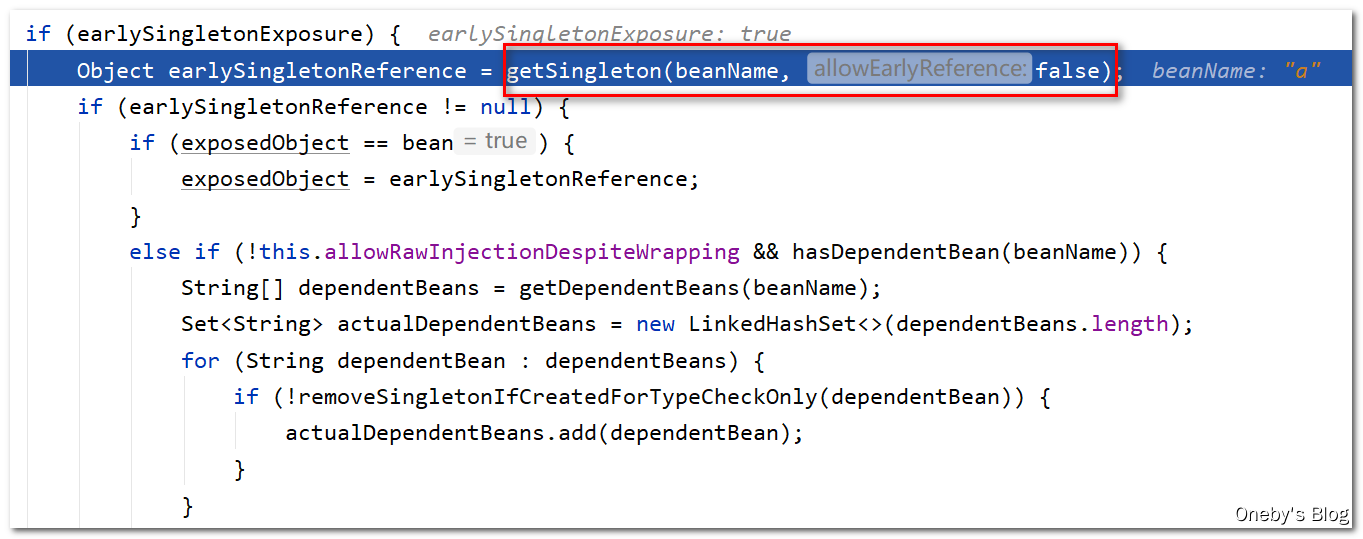
进入
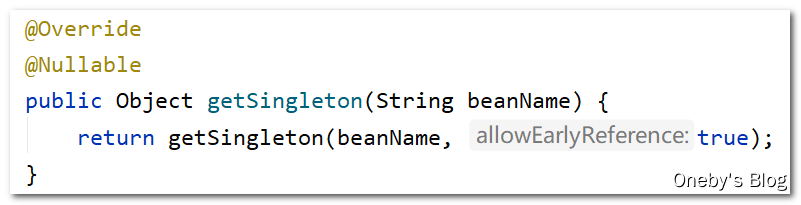
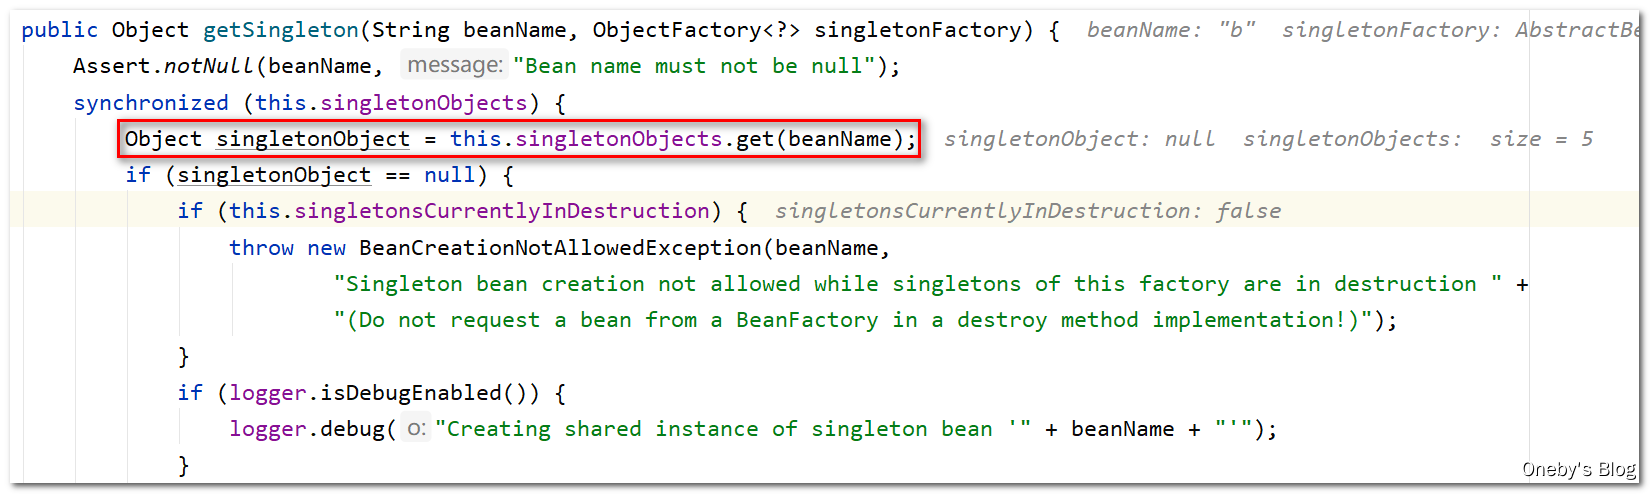
getSingleton(beanName)方法
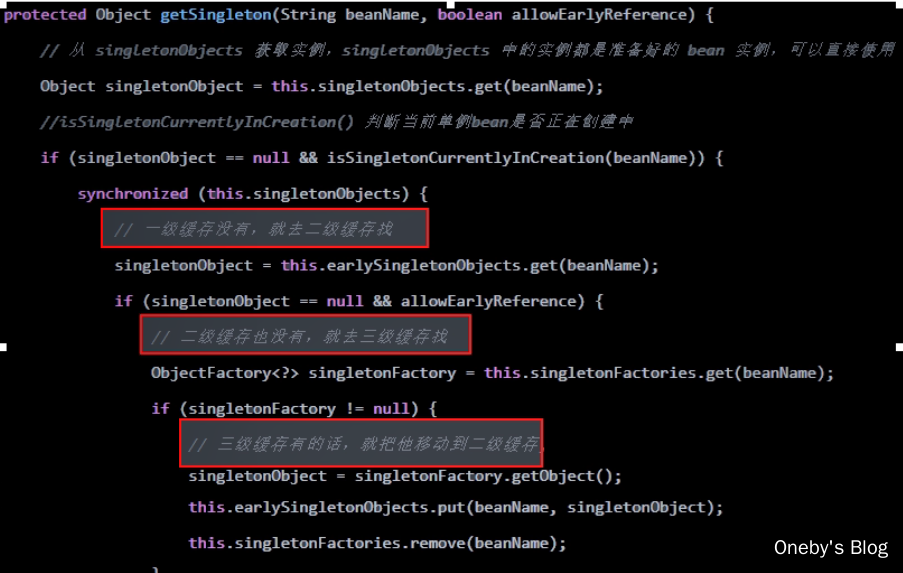
有必要讲一下 getSingleton(beanName) 方法
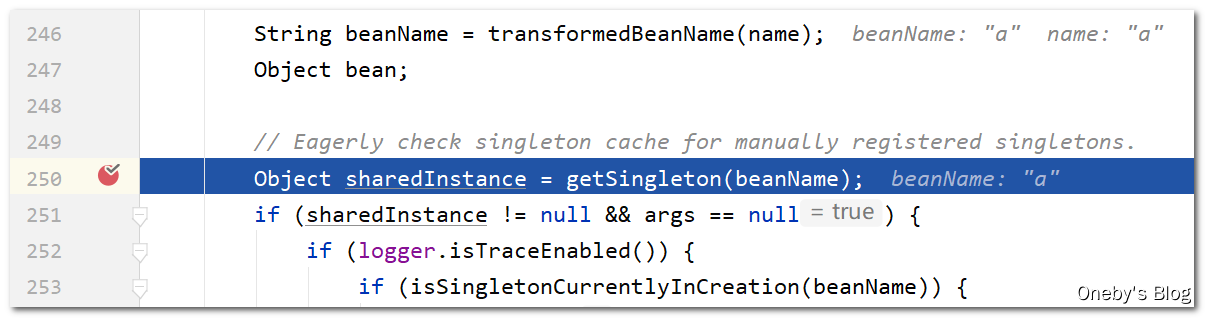
调用了其重载的方法,allowEarlyReference == true 表示可以从三级缓存 earlySingletonObjects 中获取 bean,allowEarlyReference == false 表示不可以从三级缓存 earlySingletonObjects 中获取 bean,
getSingleton(beanName, true) 方法尝试从一级缓存 singletonObjects 中获取 beanA,beanA 现在还没有开始造呢(isSingletonCurrentlyInCreation(beanName) 返回 false),获取不到返回 null
回到
doGetBean(name, null, null, false)方法中
getSingleton(beanName) 方法返回 null
我们所说的 bean 对于 Spring 来说就是一个个的 RootBeanDefinition 实例
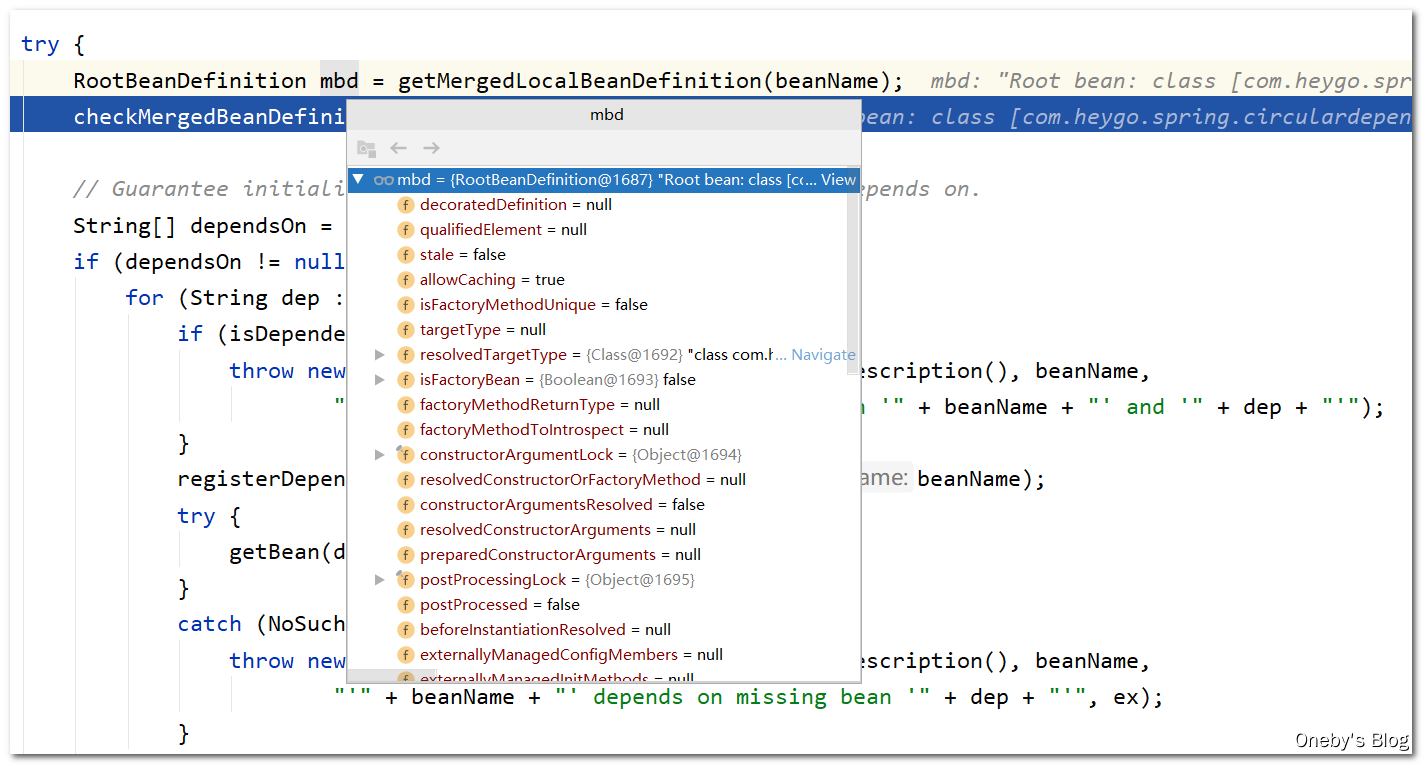
这个 dependsOn 变量对应于 bean 的 depends-on="" 属性,我们没有配置过,因此为 null
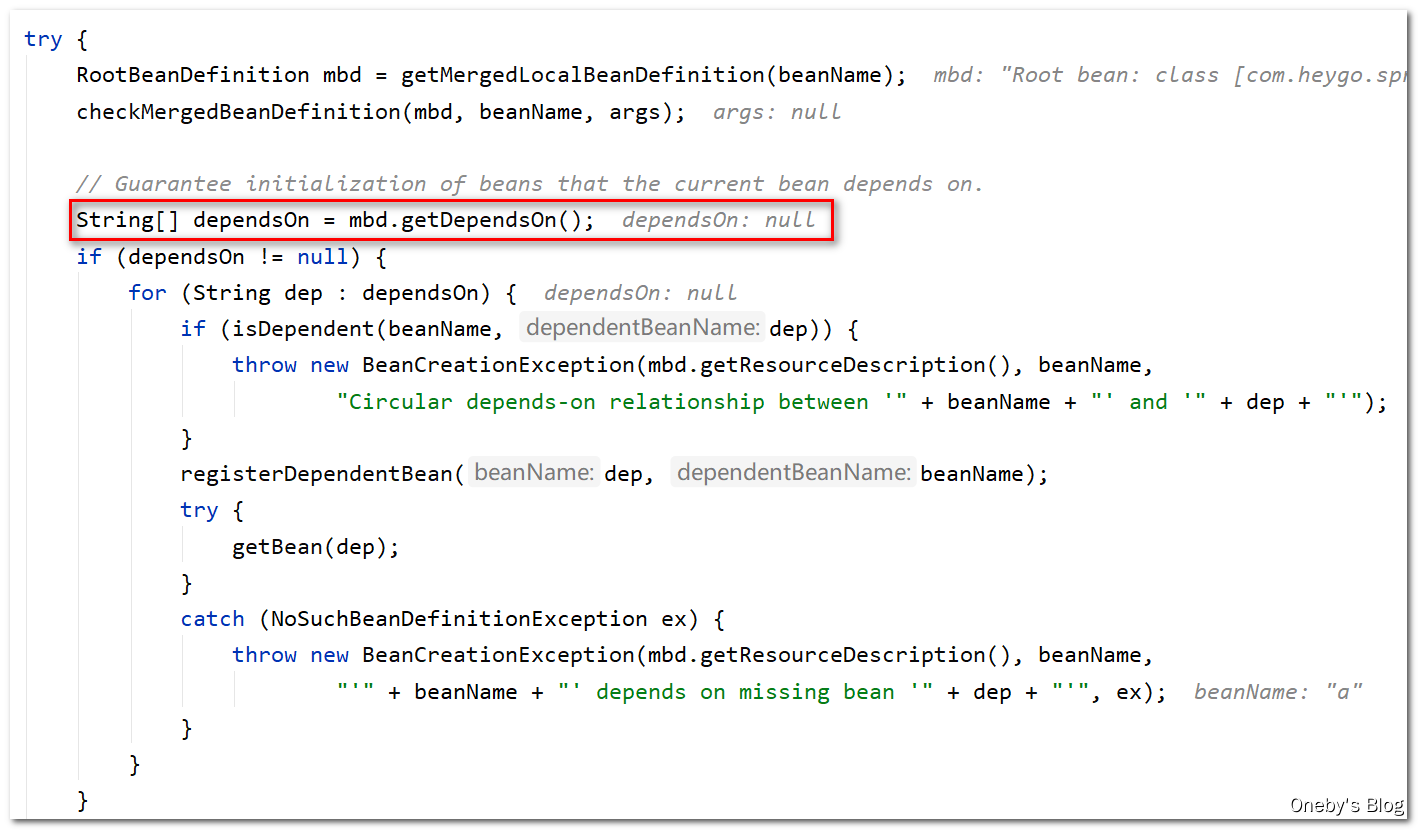
转了一圈发现并没有 beanA,终于要开始准备创建 beanA 啦
进入
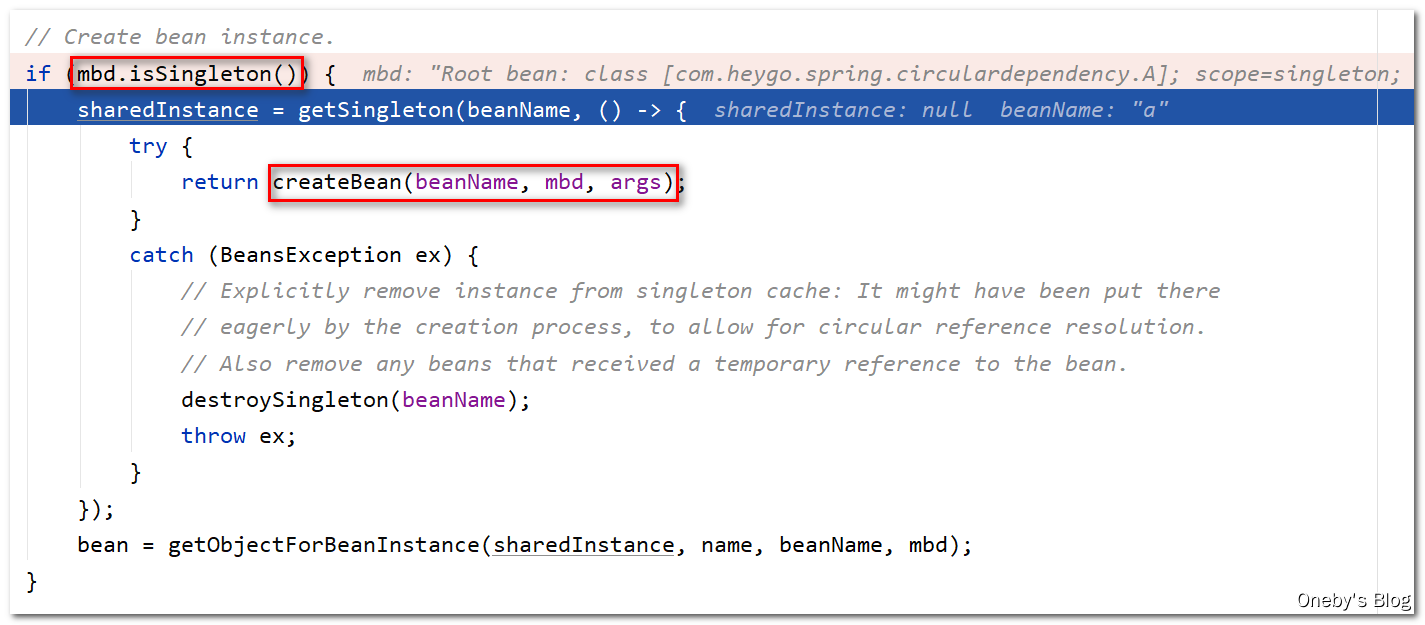
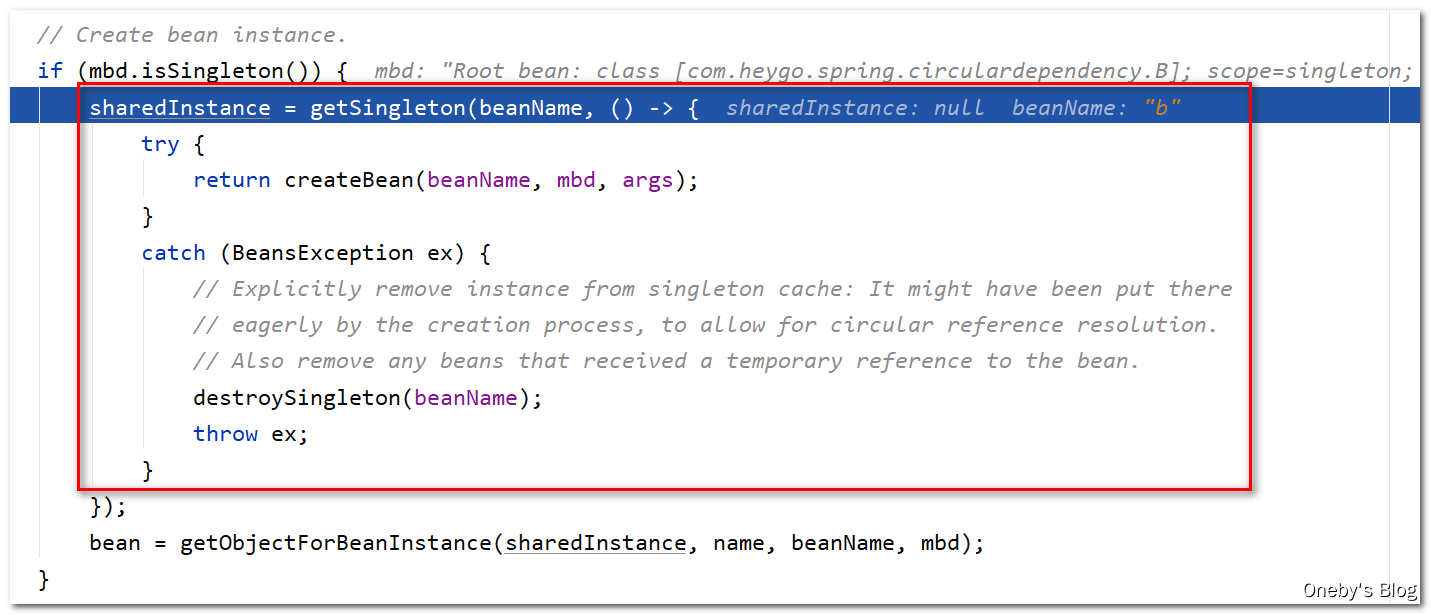
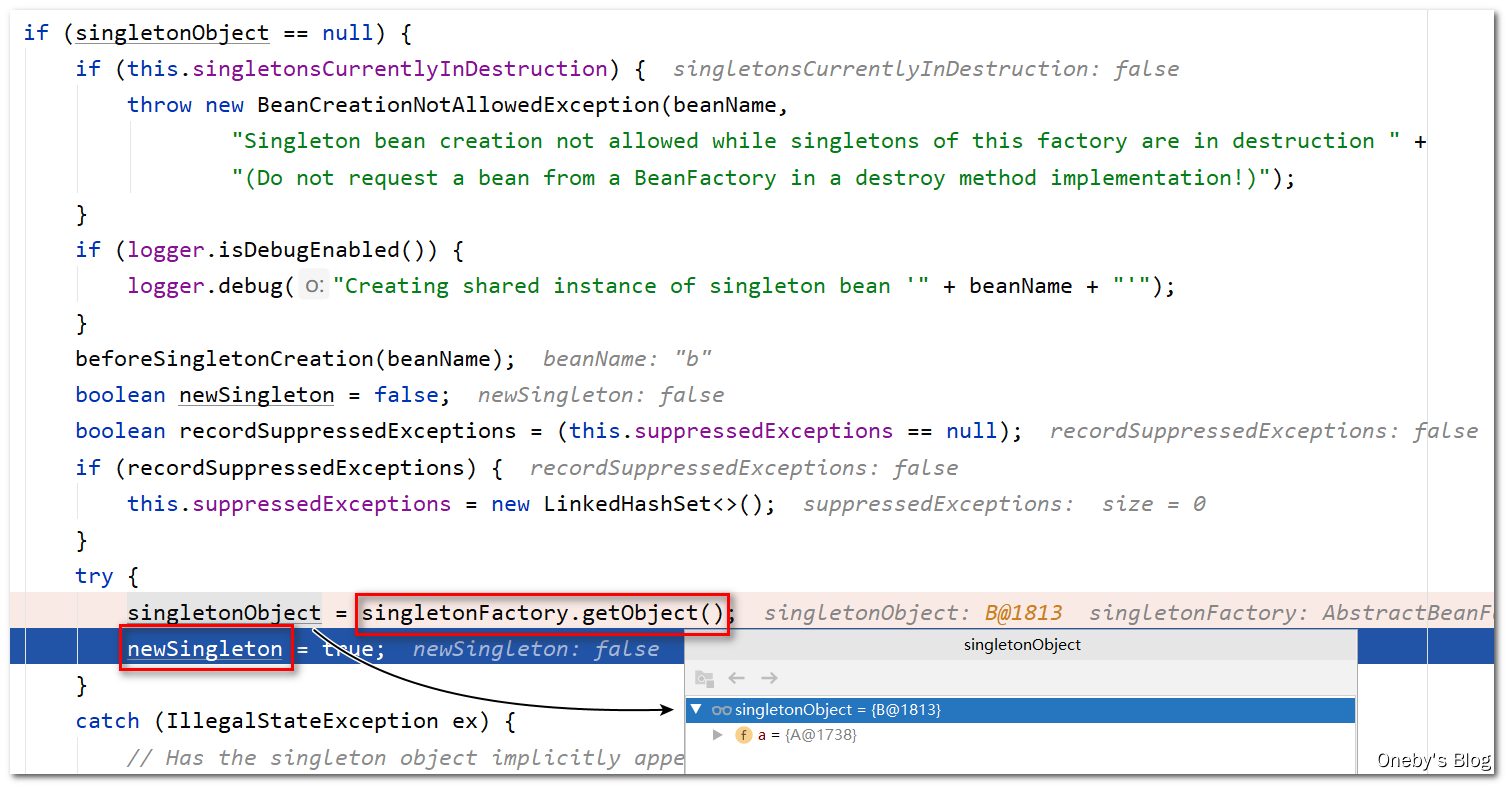
getSingleton(beanName, () -> {... }方法
在 IDEA 2020 中,点击 Step Into 可以手动选择要进入的方法,因此我们需要使用鼠标左键点击 getSingleton() 方法
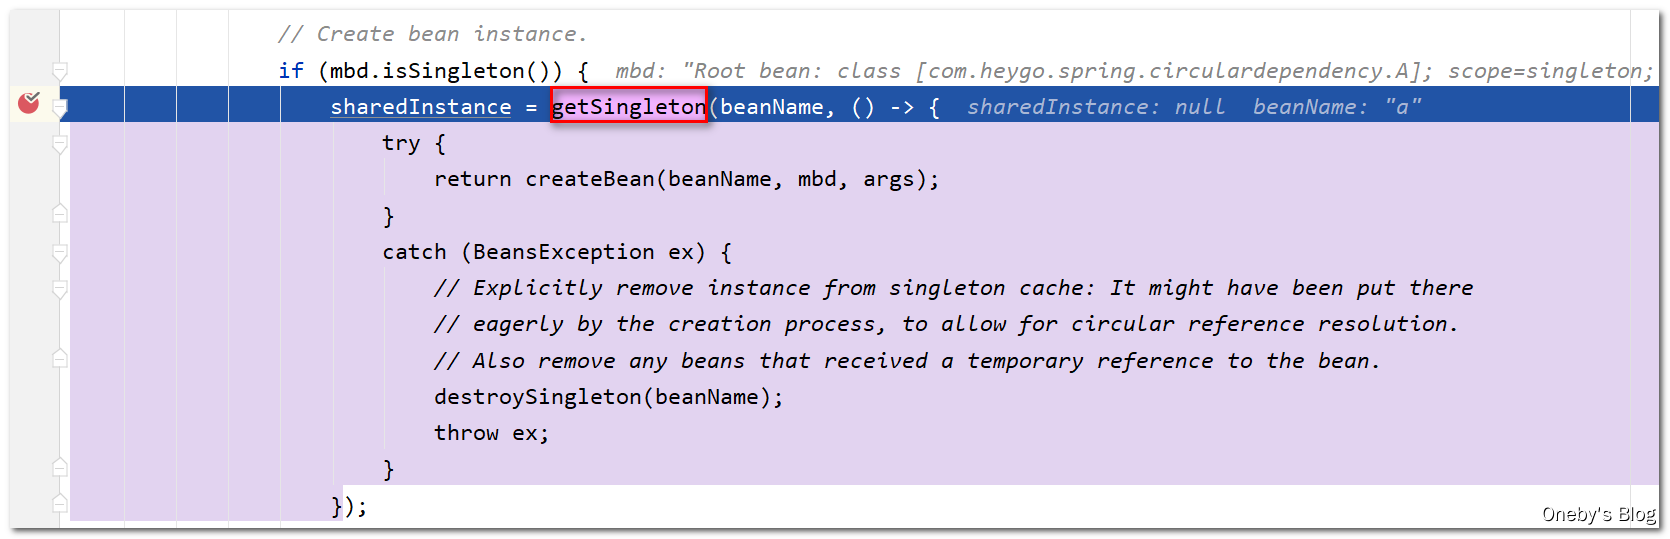
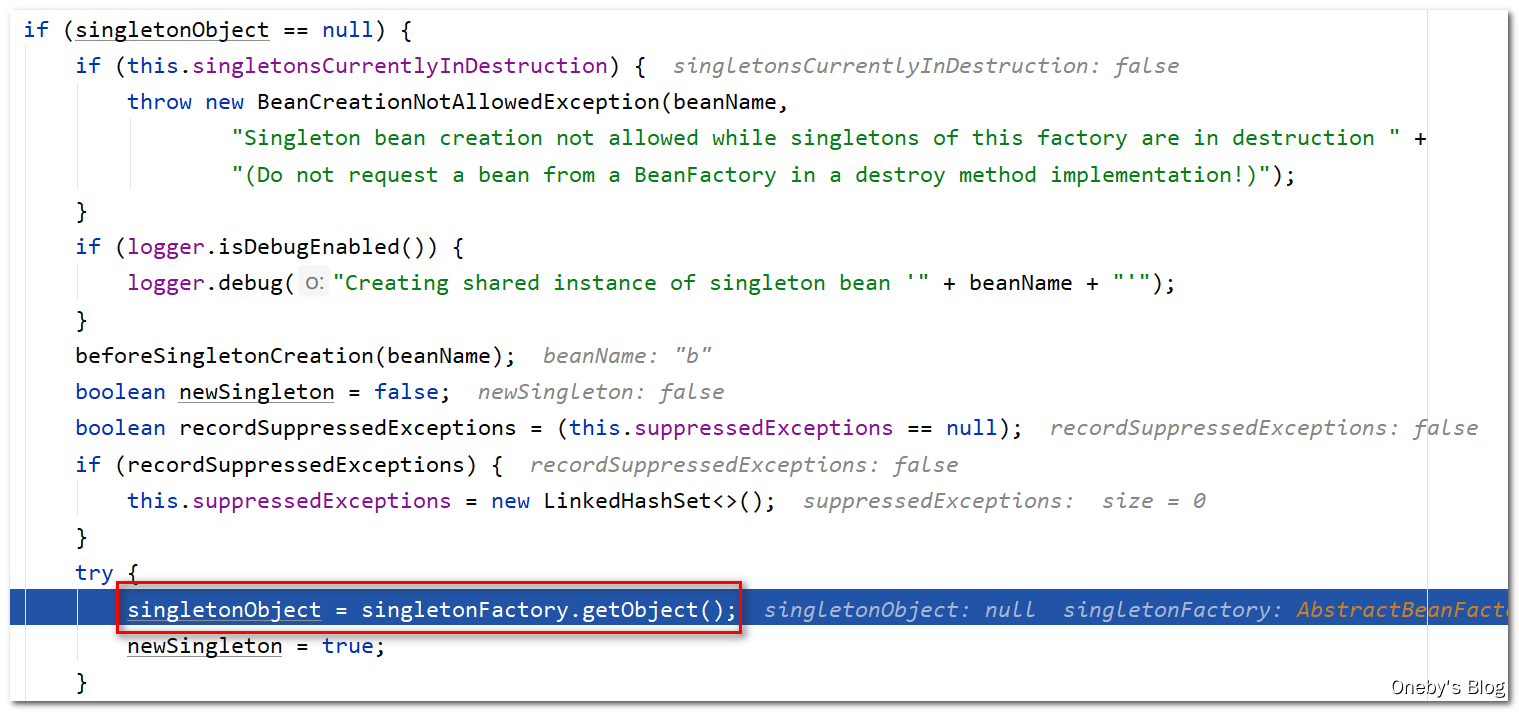
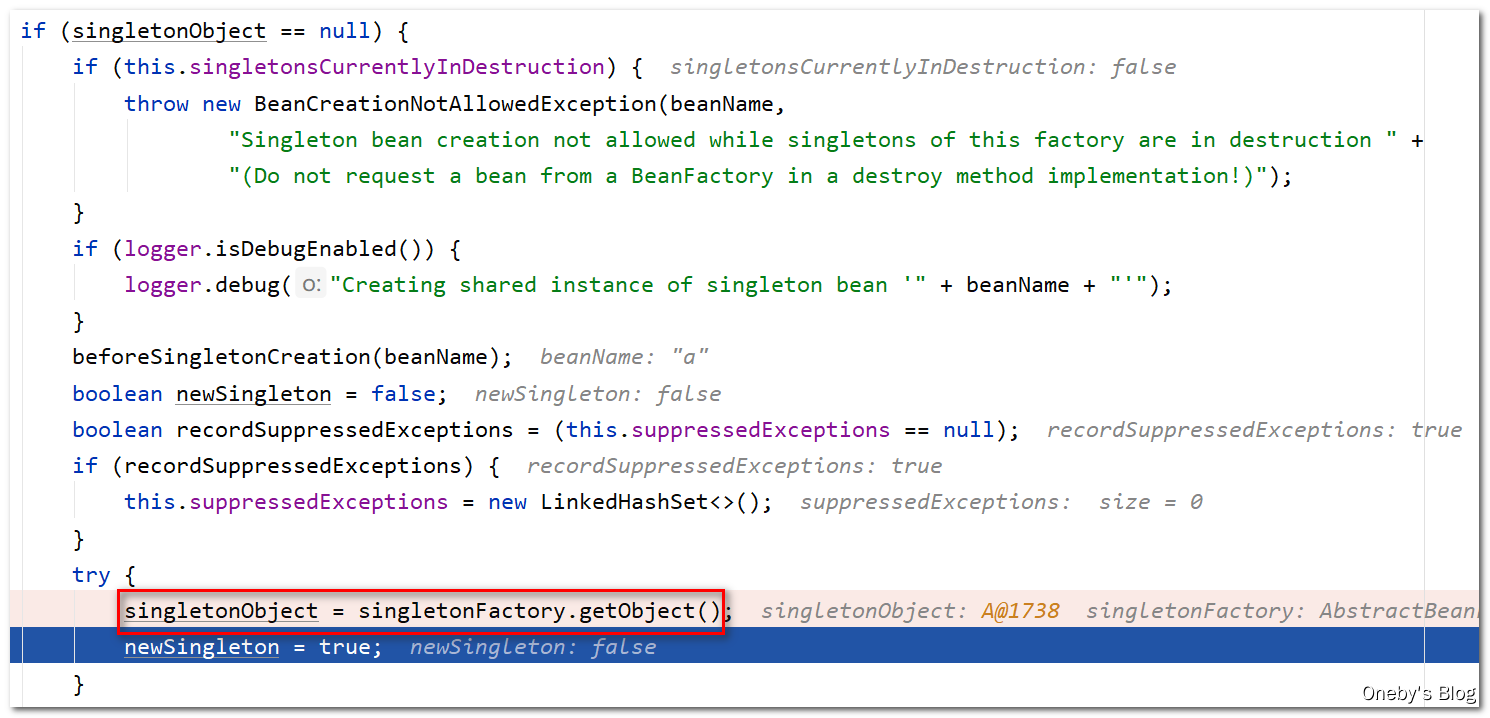
首先尝试从一级缓存 singletonObjects 获取 beanA,那肯定是获取不到的啦,因此 singletonObject == null,那么就需要创建 beanA,此时日志会输出:【Creating shared instance of singleton bean ‘a’】
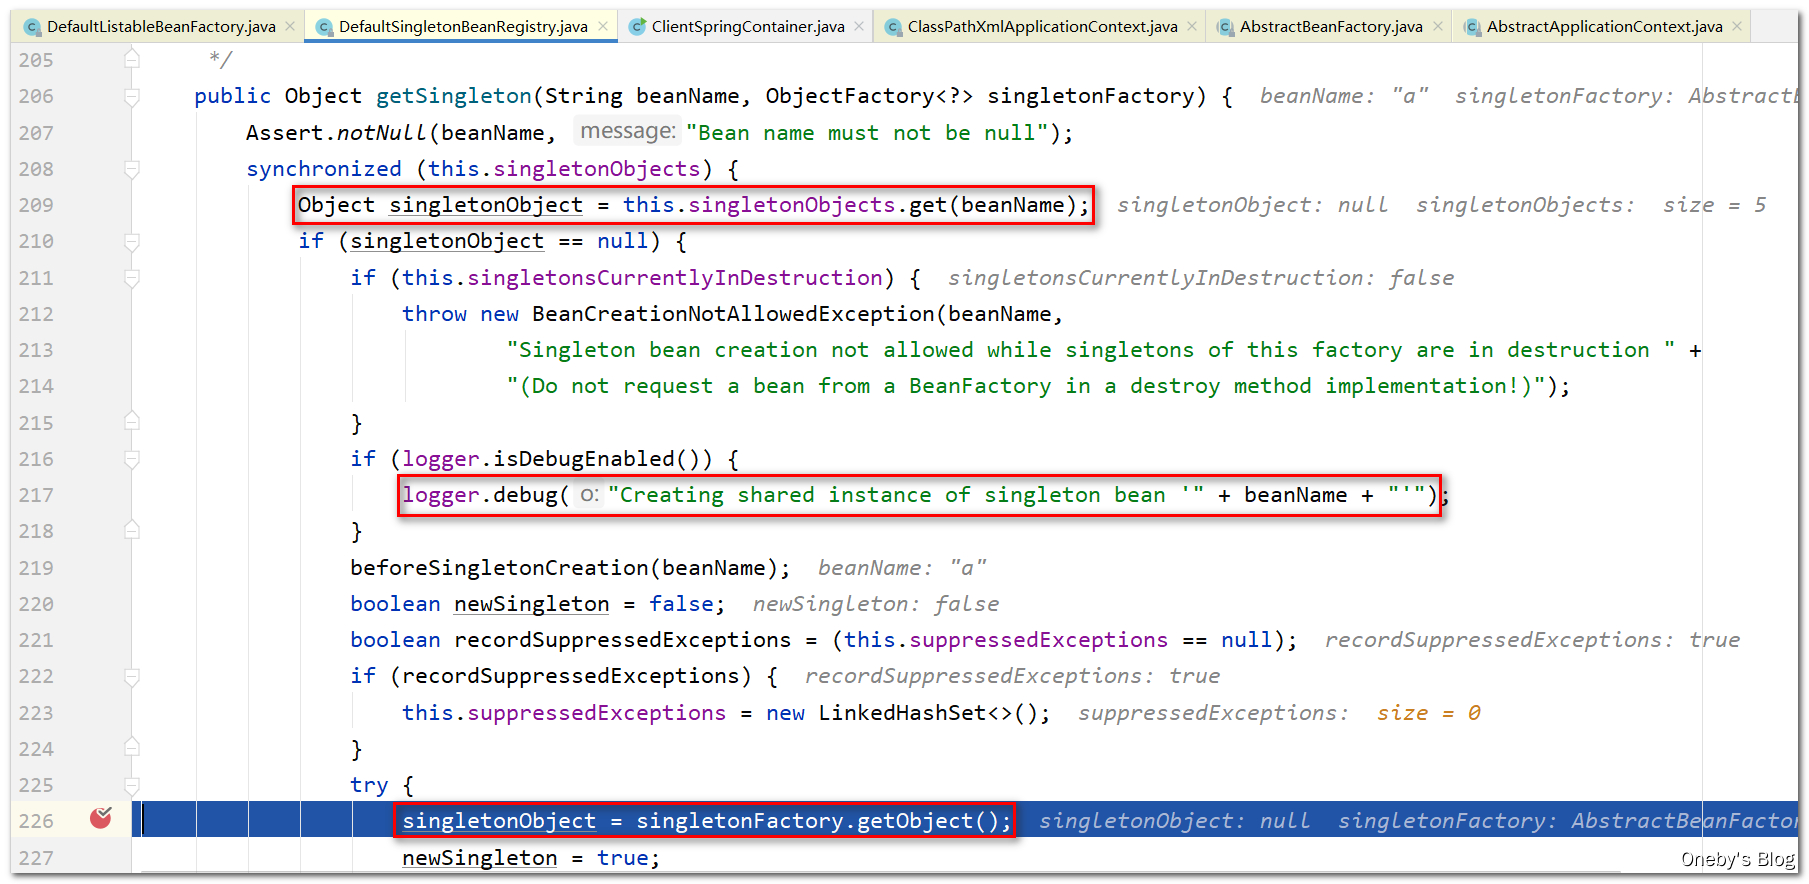
当执行完 singletonObject = singletonFactory.getObject(); 时,会输出【—A created success】,这说明执行 singletonFactory.getObject() 方法时将会实例化 beanA,并且根据代码变量名可得知单例工厂创建的,这个单例工厂就是我们传入的 Lambda 表达式
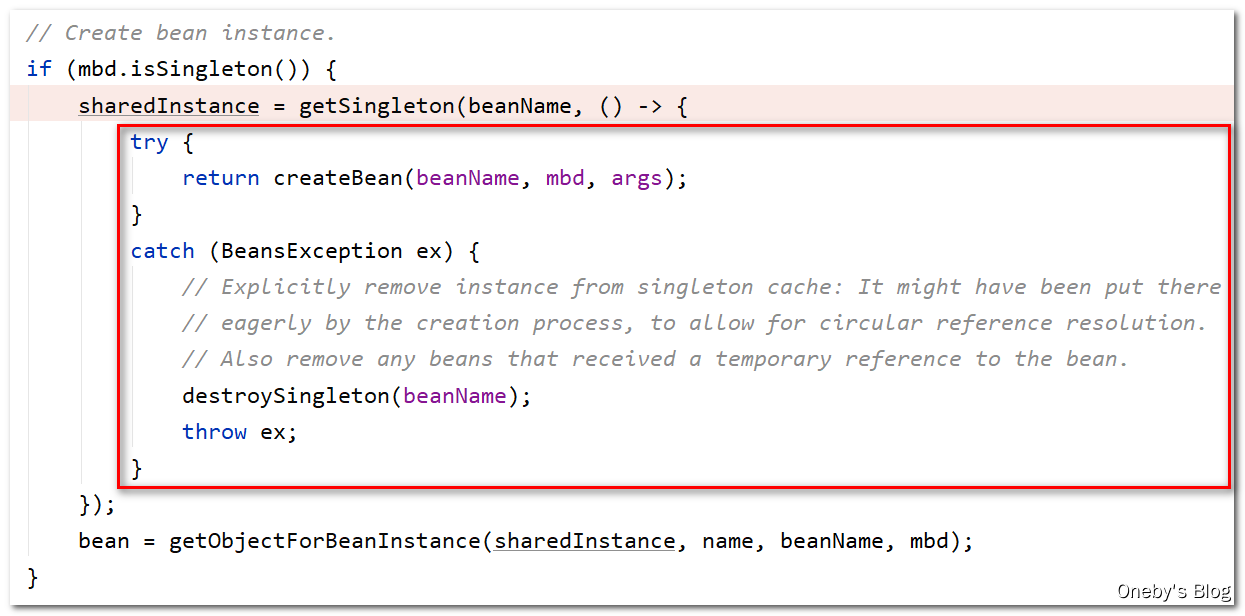
进入
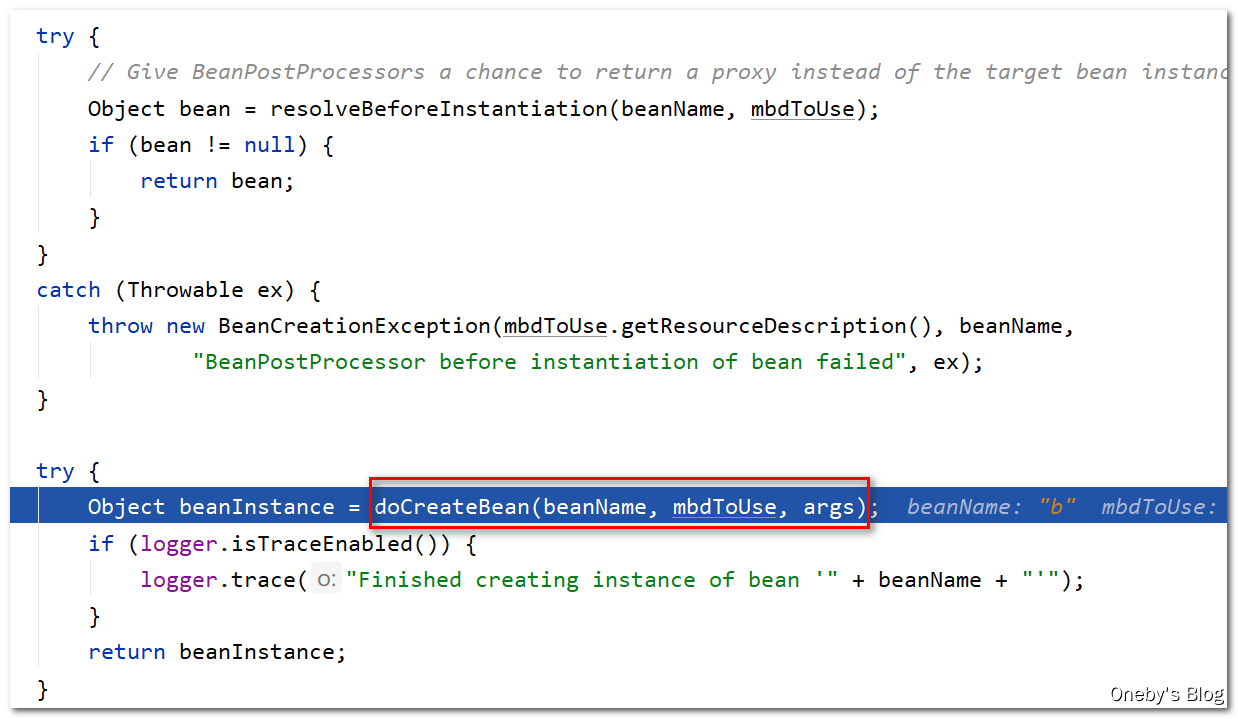
createBean(beanName, mbd, args)方法
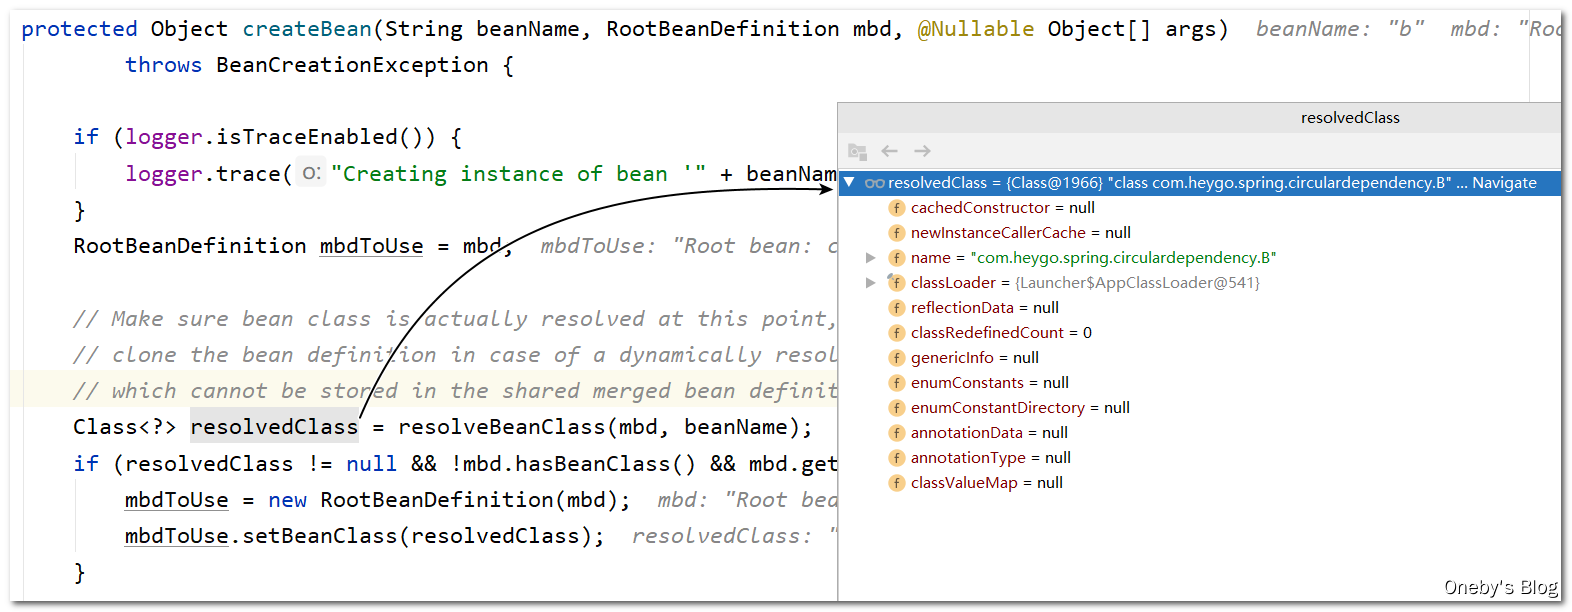
我们 Step Into 进入 createBean(beanName, mbd, args) 方法中,mbdToUse 将用于创建 beanA
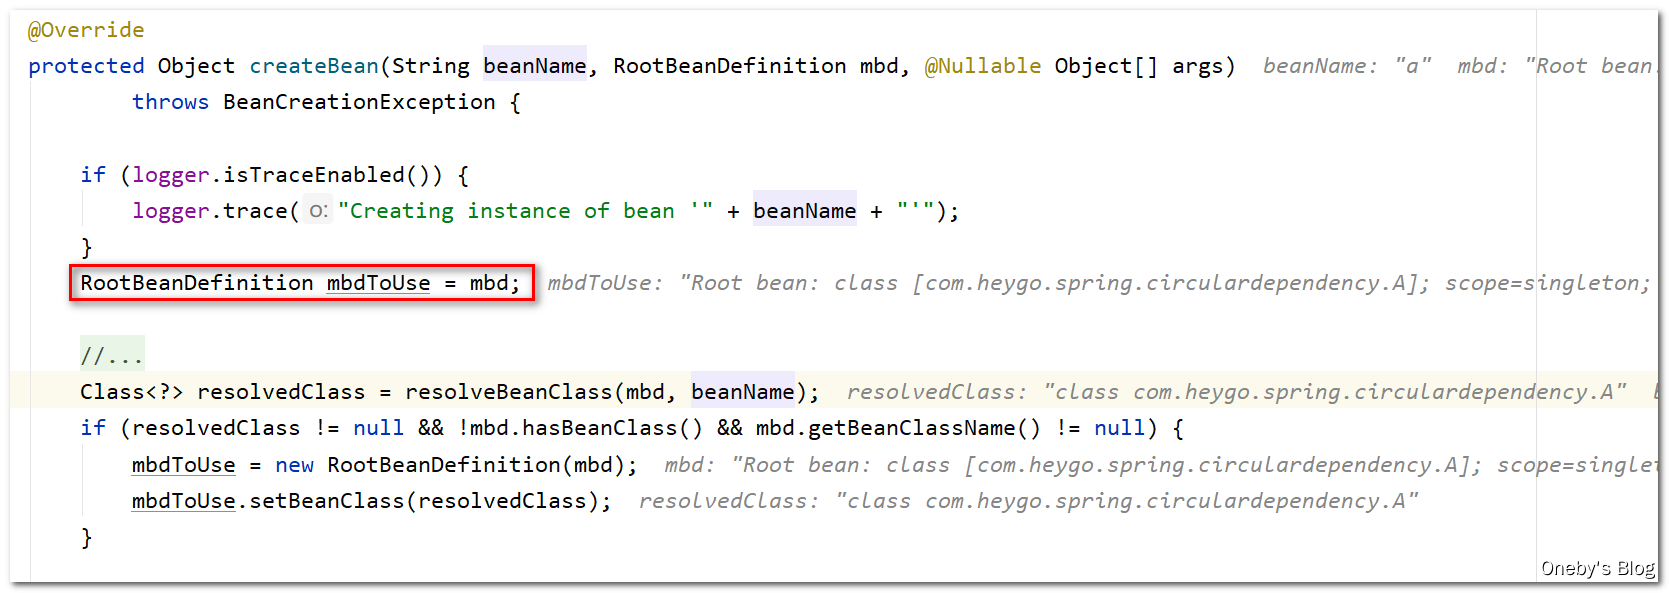
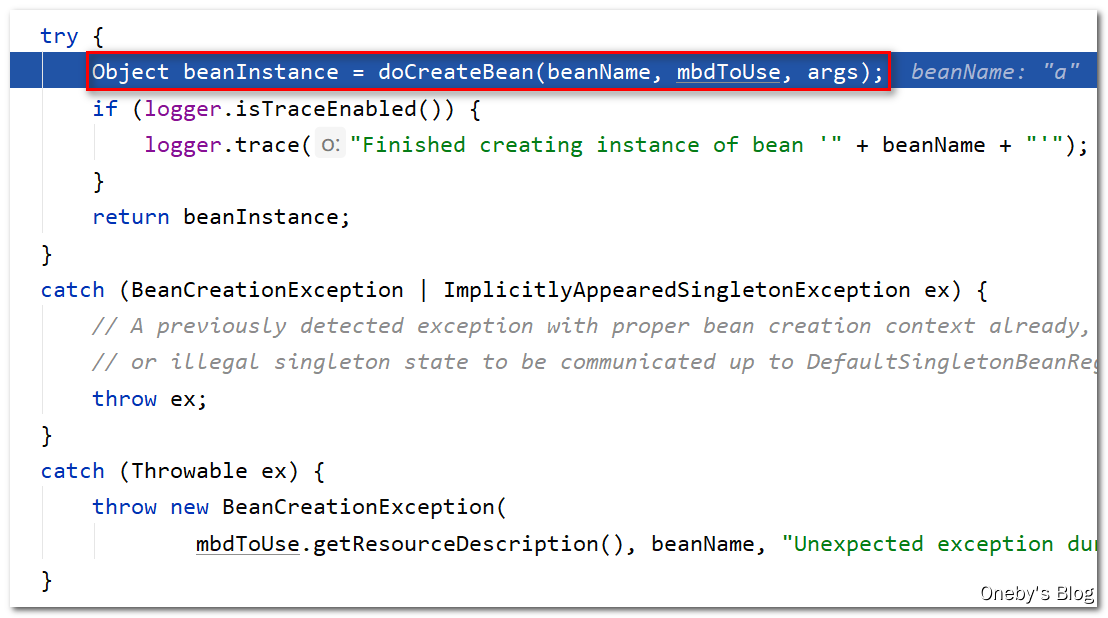
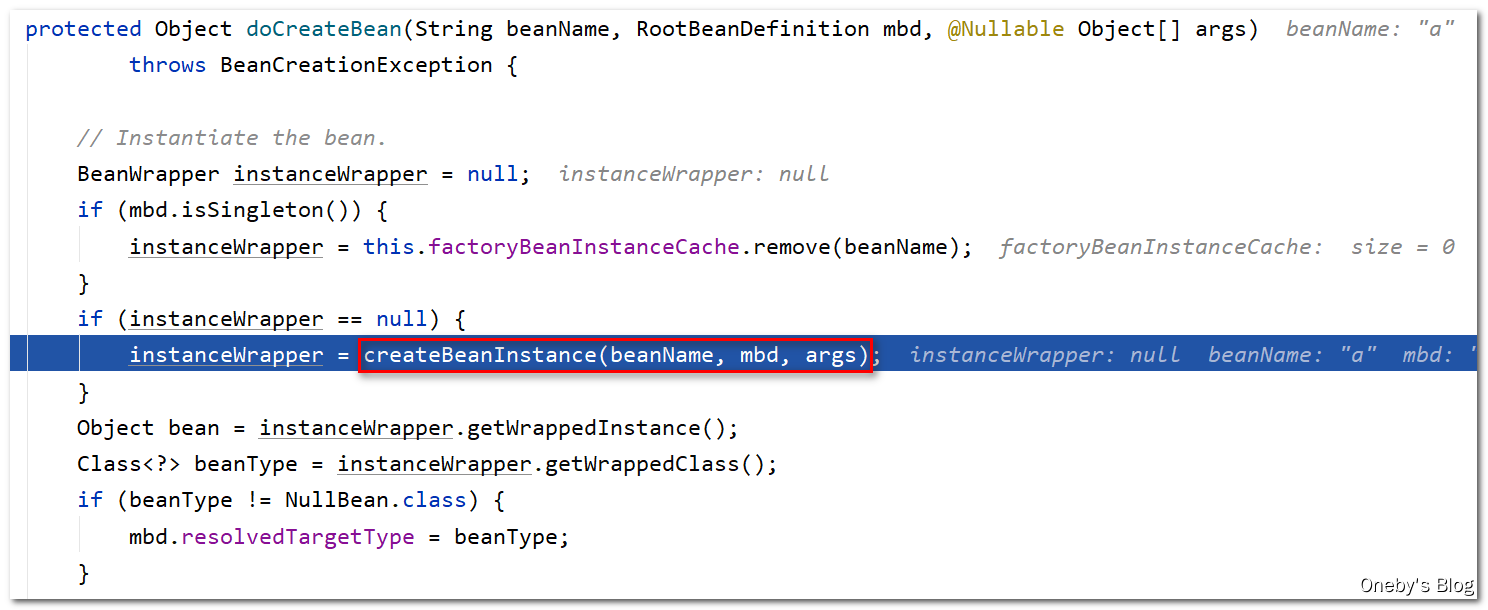
来了,终于要执行 doCreateBean(beanName, mbdToUse, args) 实例化 beanA 啦
进入
doCreateBean(beanName, mbdToUse, args)方法
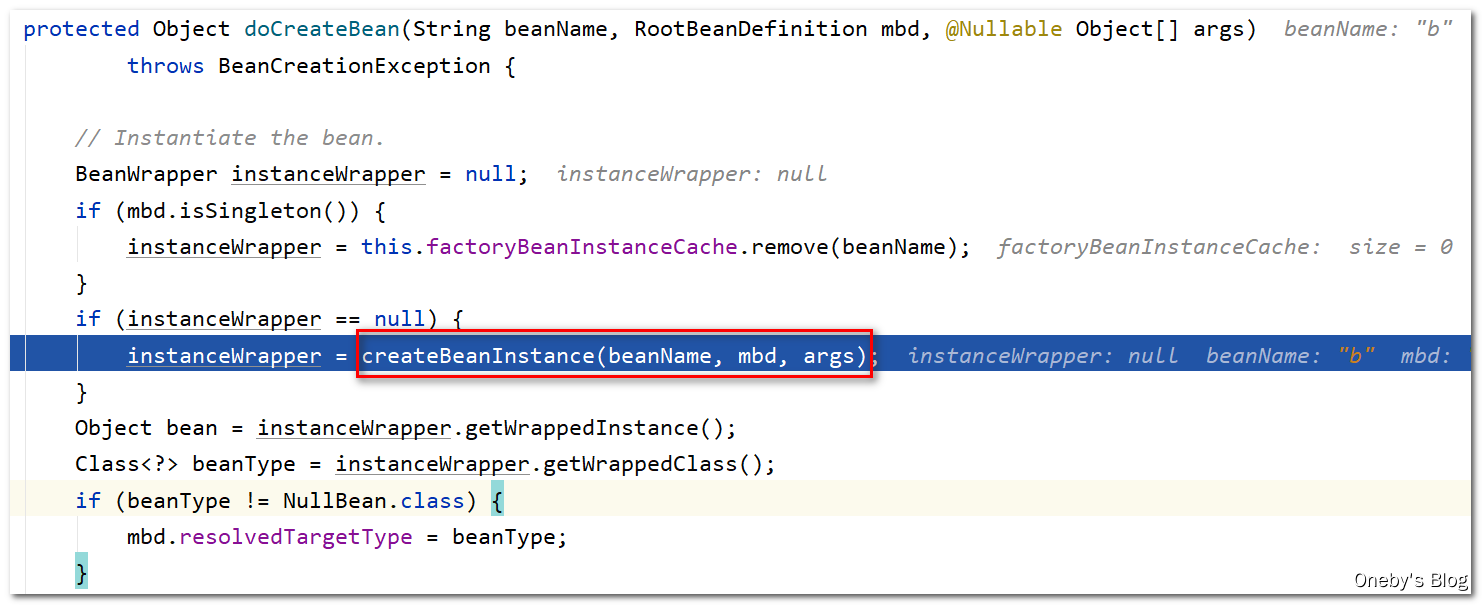
Step Into 进入 doCreateBean(beanName, mbdToUse, args) 方法,在 factoryBeanInstanceCache 中并不存在 beanA 对应的 Wrapper 缓存,instanceWrapper == null,因此我们要去创建 beanA 对应的 instanceWrapper,Wrapper 由包裹之意思,instanceWrapper 翻译过来为实例包裹器的意思,形象理解为:beanA 实例化需要经过 instanceWrapper 之手,beanA 实例被 instanceWrapper 包裹在其中
进入
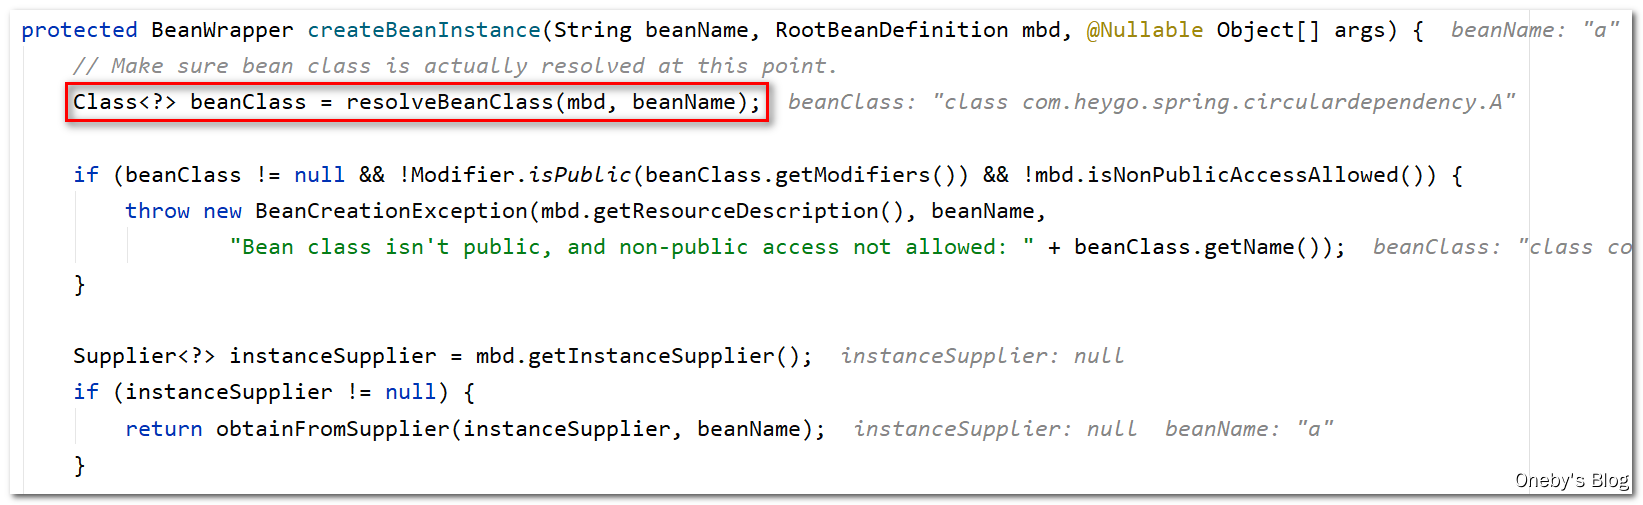
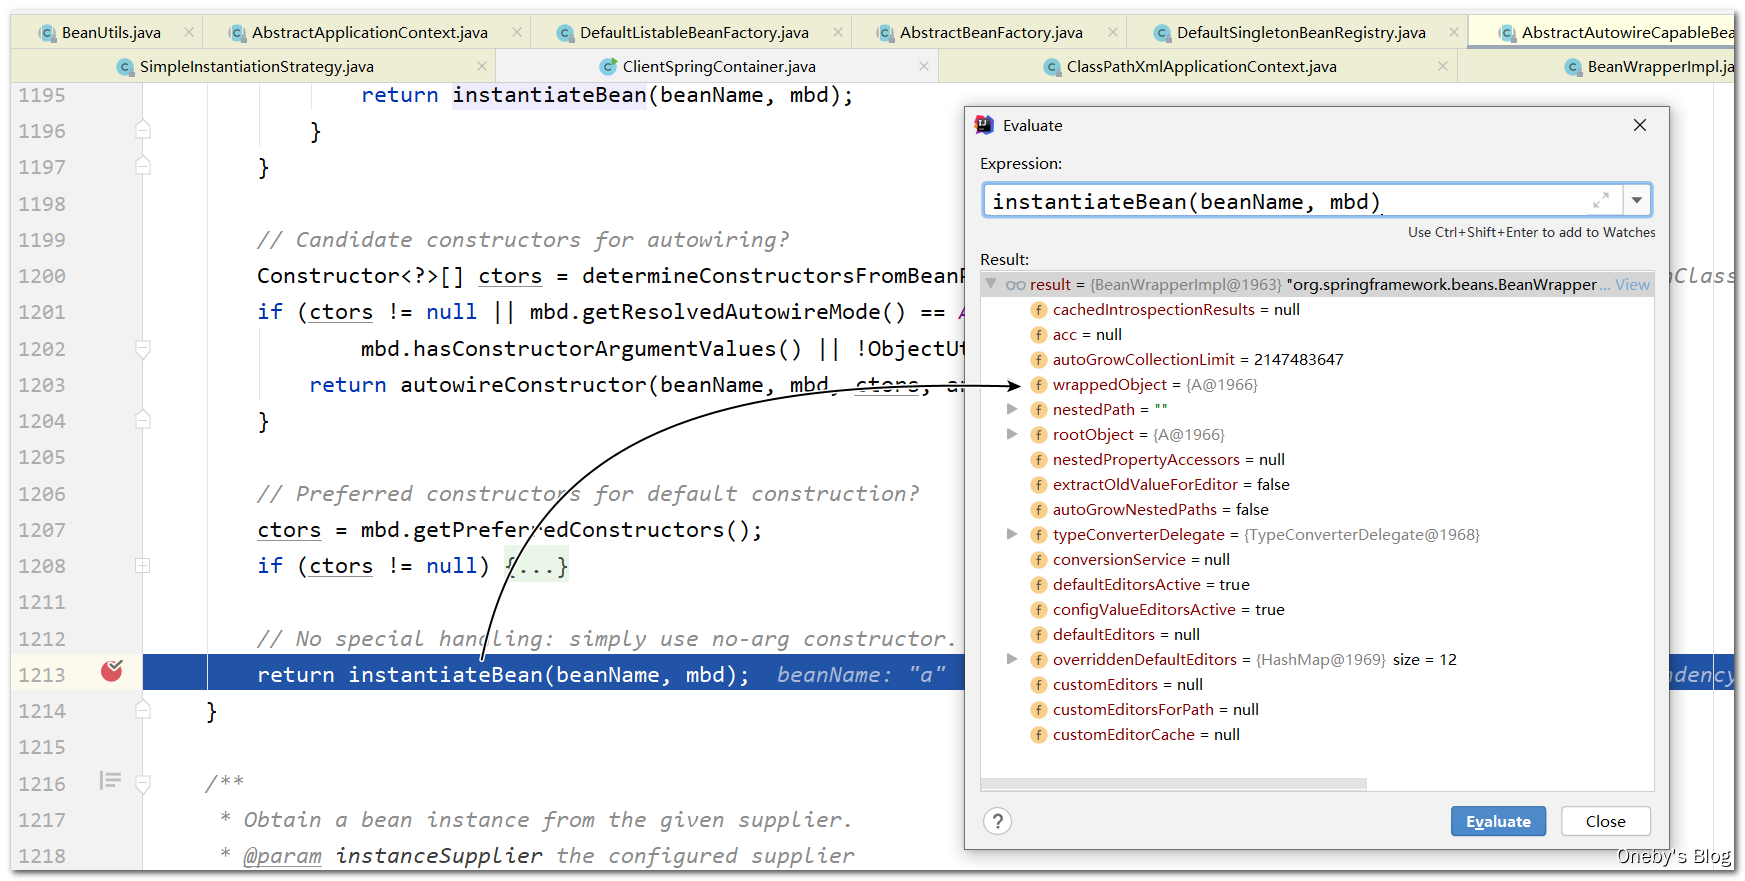
createBeanInstance(beanName, mbd, args)方法
这一看就是反射的操作啊
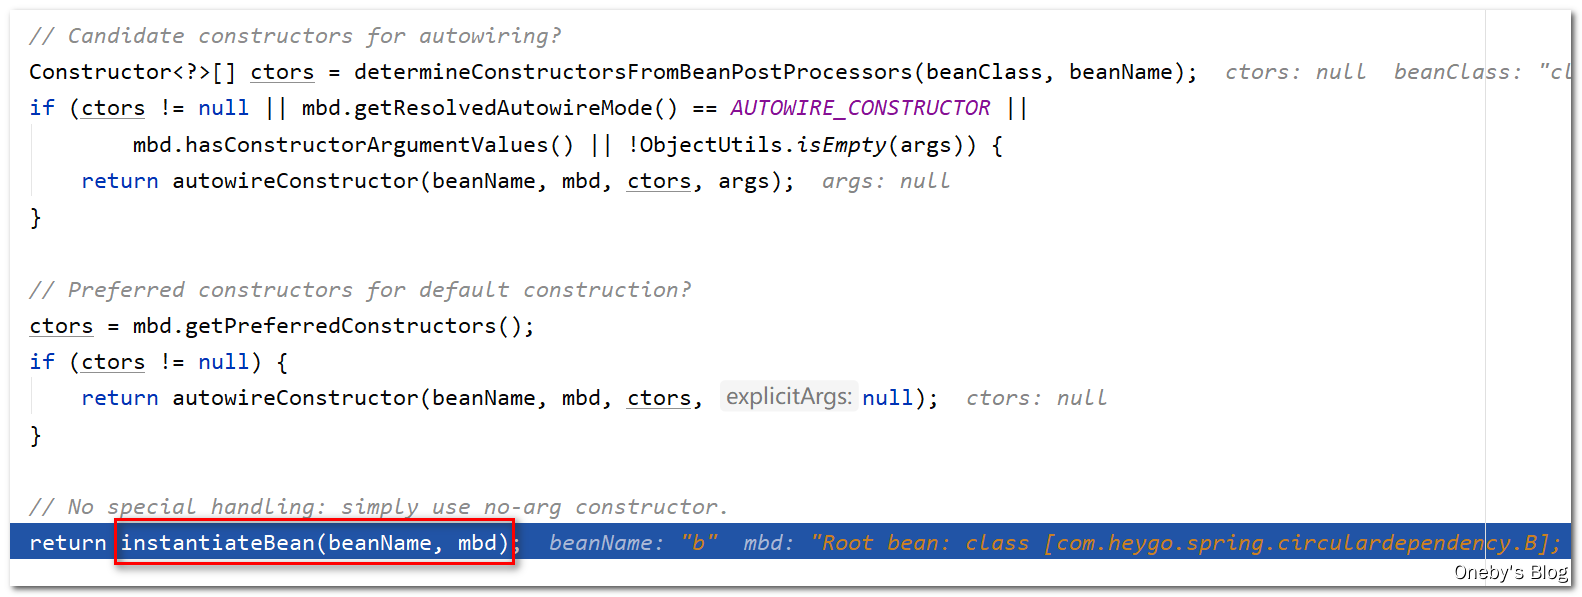
这里有个 resolved 变量,写着注释:Shortcut when re-creating the same bean…,我个人理解是 resolved 标志该 bean 是否已经被实例化了,如果已经被实例化了,那么 resolved == true,这样就不用重复创建同一个 bean 了
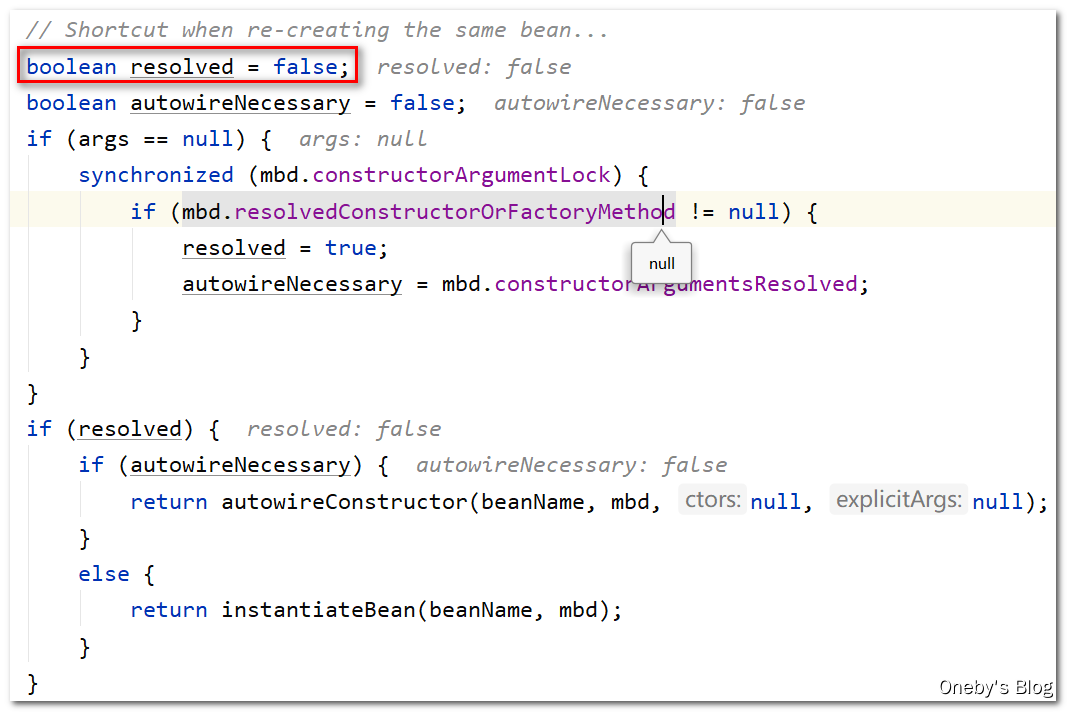
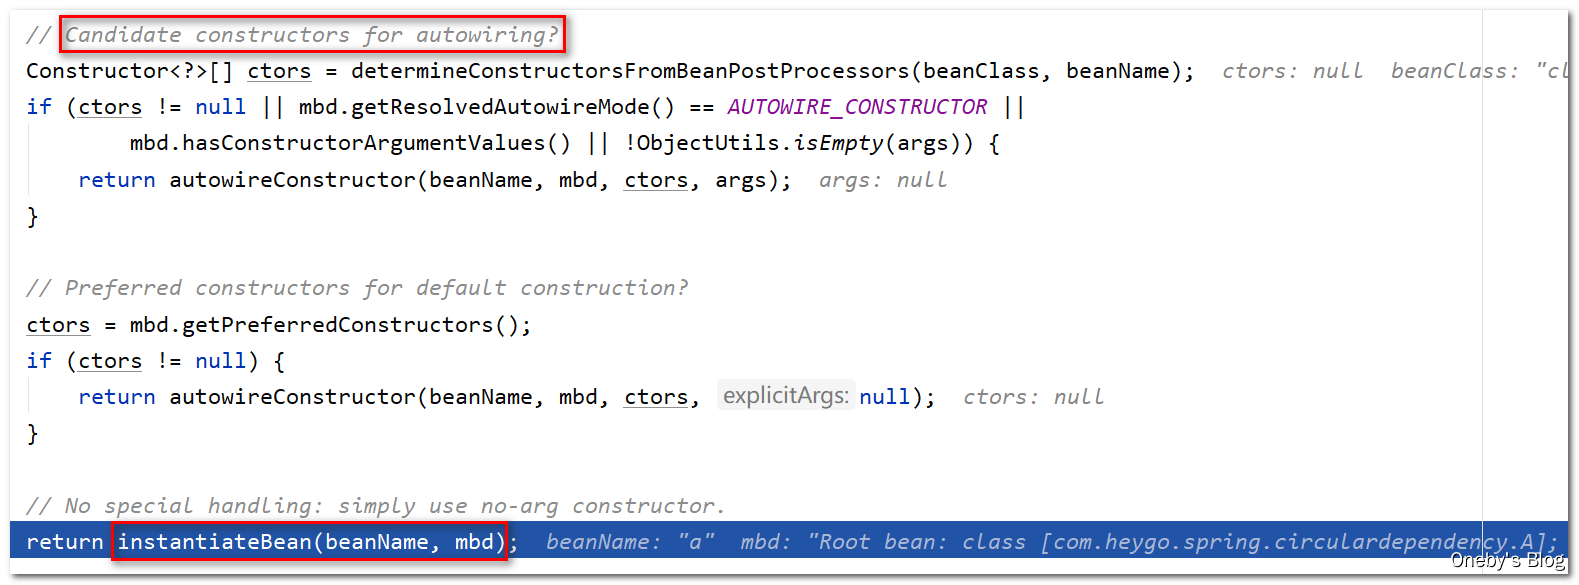
Candidate constructors for autowiring? 难道是构造器自动注入?在 return 的时候调用 instantiateBean(beanName, mbd) 方法实例化 beanA,并将其返回
进入
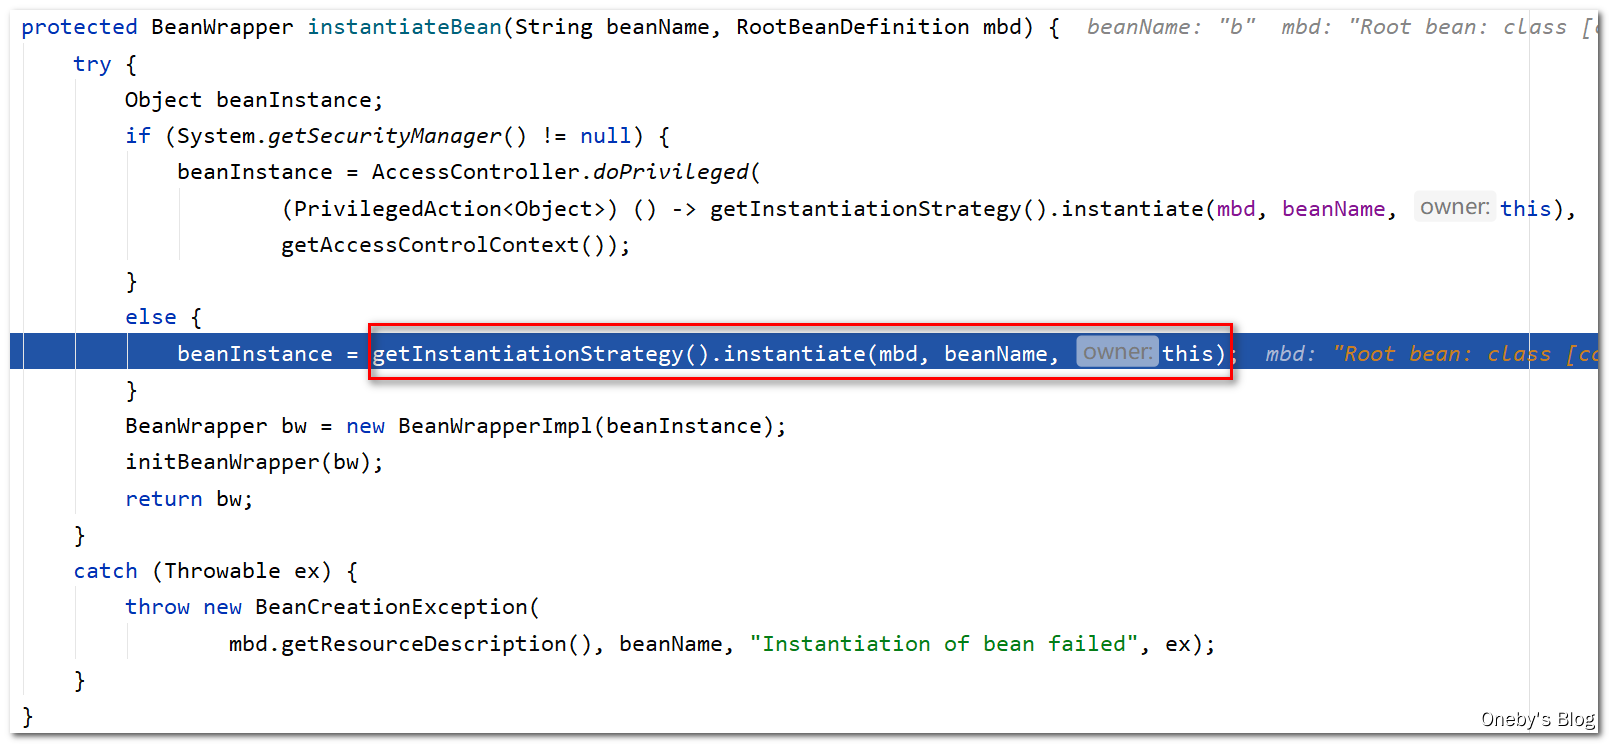
instantiateBean(beanName, mbd)方法
getInstantiationStrategy().instantiate(mbd, beanName, this) 方法完成了 beanA 的实例化
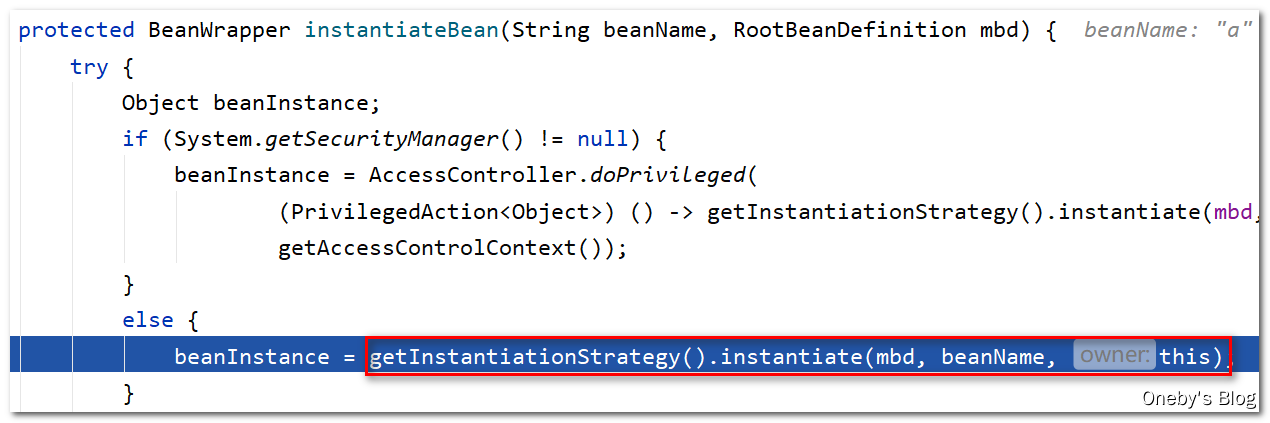
进入
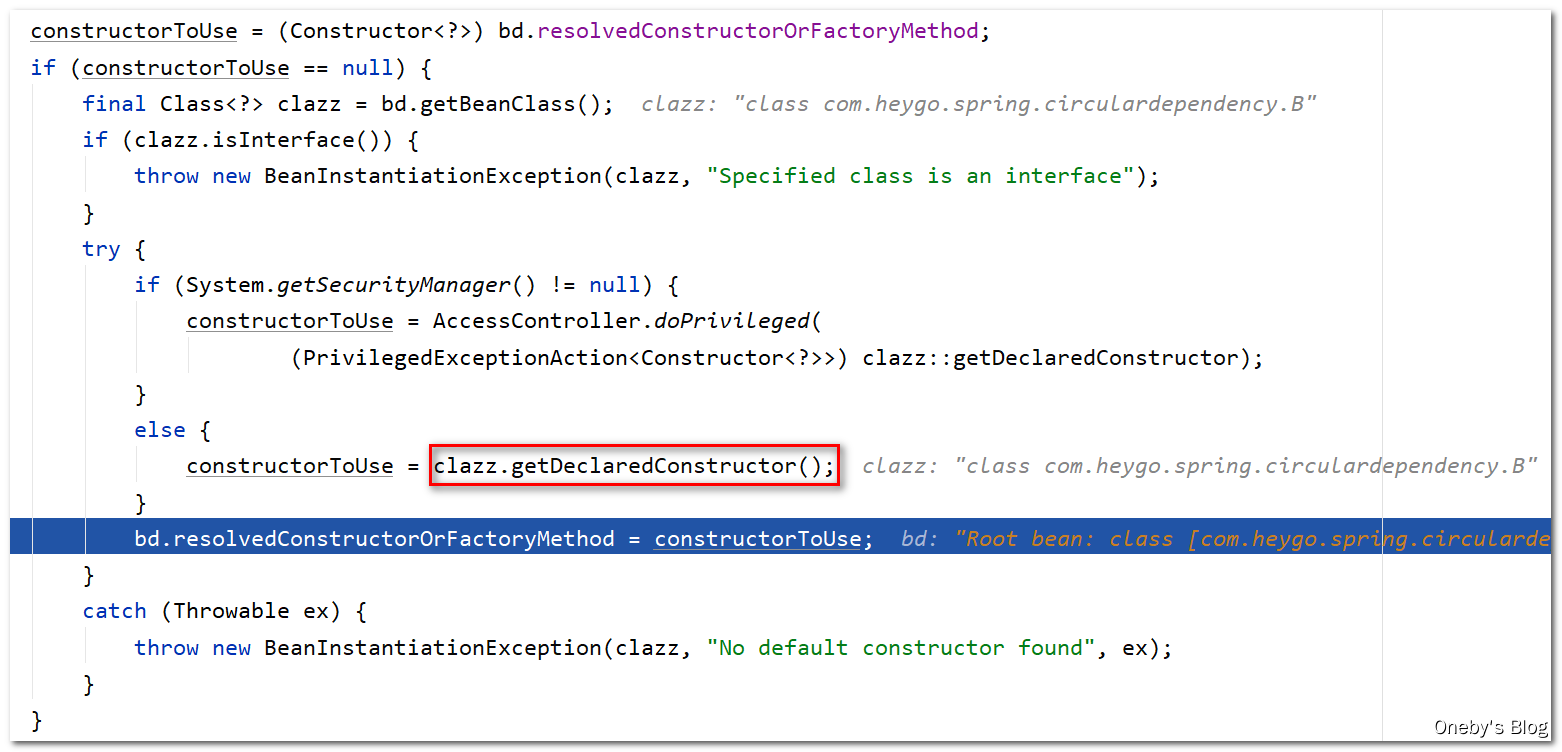
getInstantiationStrategy().instantiate(mbd, beanName, this)方法
首先获取已经解析好的构造器 bd.resolvedConstructorOrFactoryMethod,这是第一次创建,当然还没有啦,因此 constructorToUse == null。然后获取 A 的类型,如果发现是接口则直接抛异常。最后获取 A 的公开构造器,并将其赋值给 bd.resolvedConstructorOrFactoryMethod
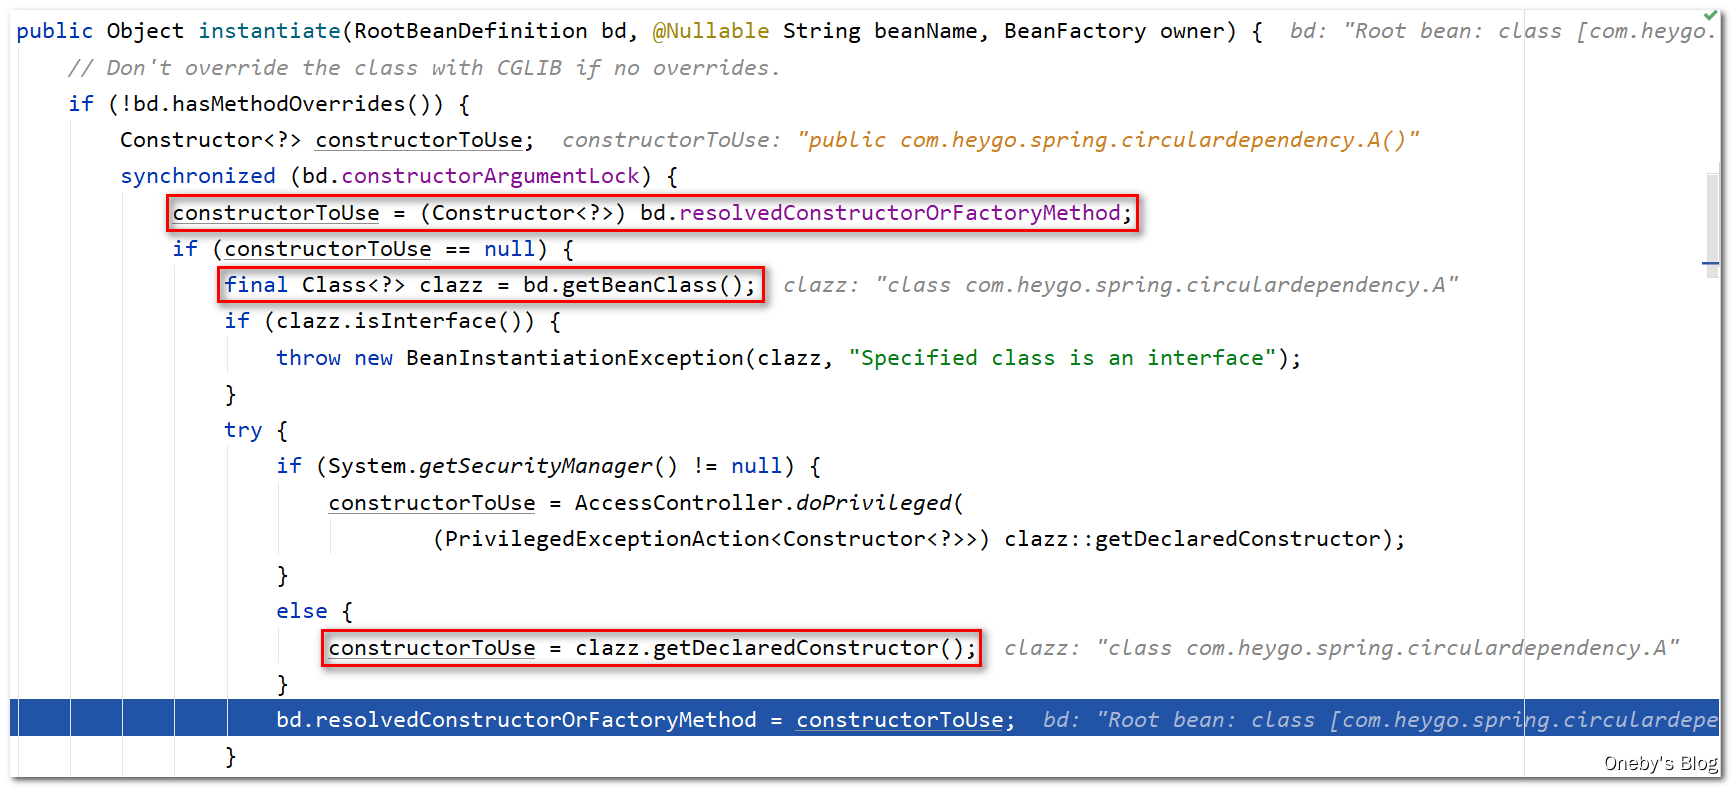
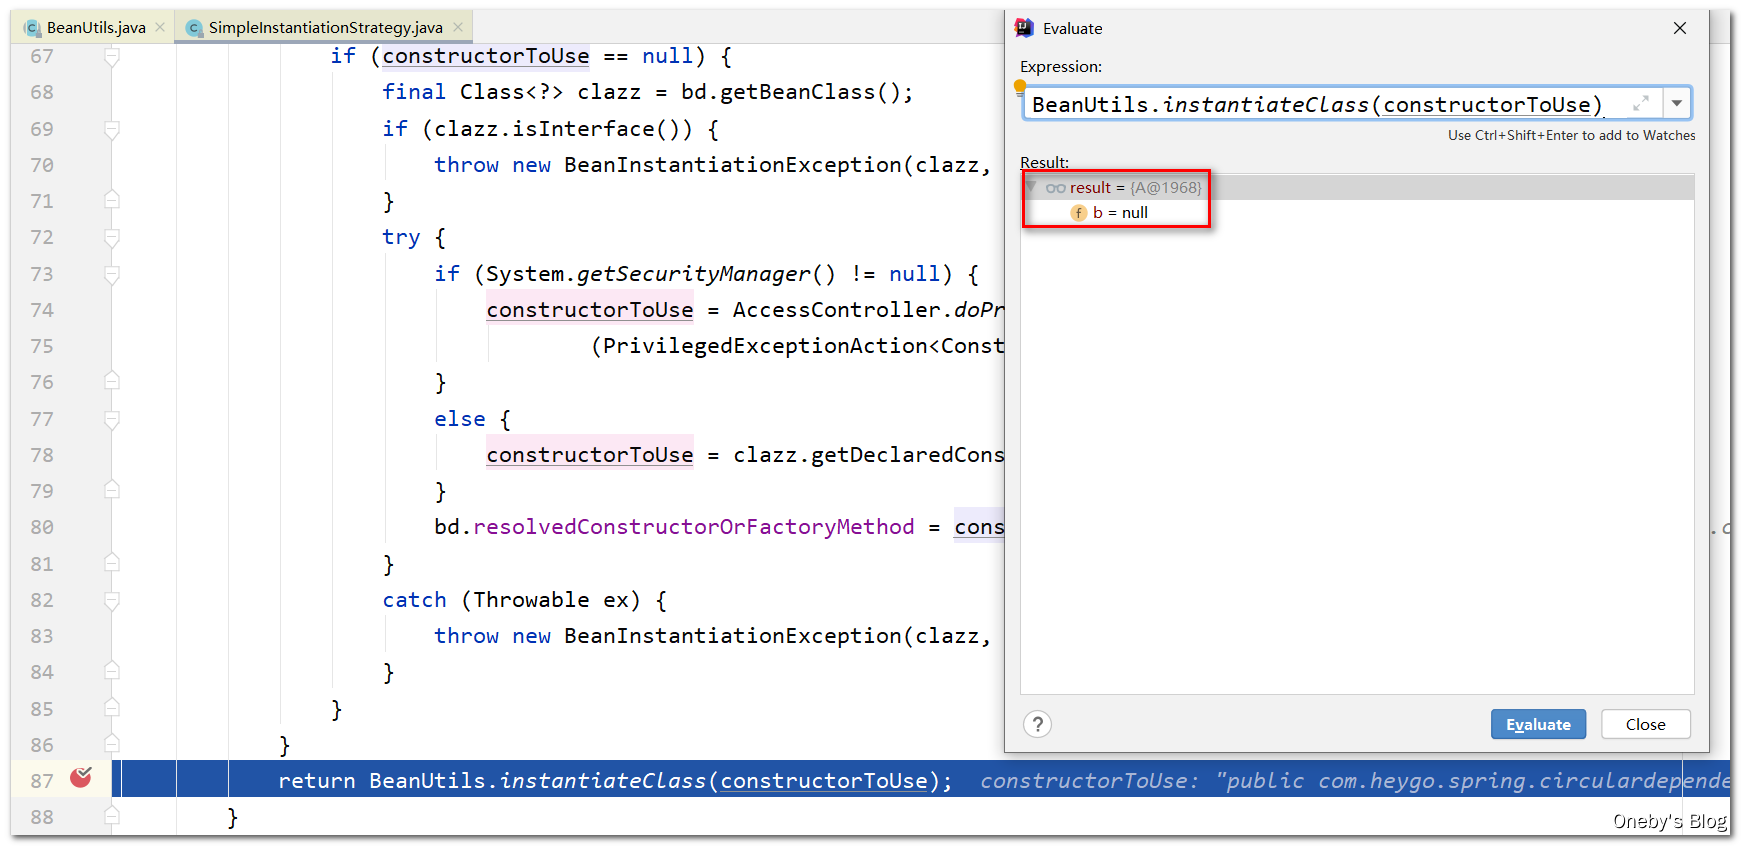
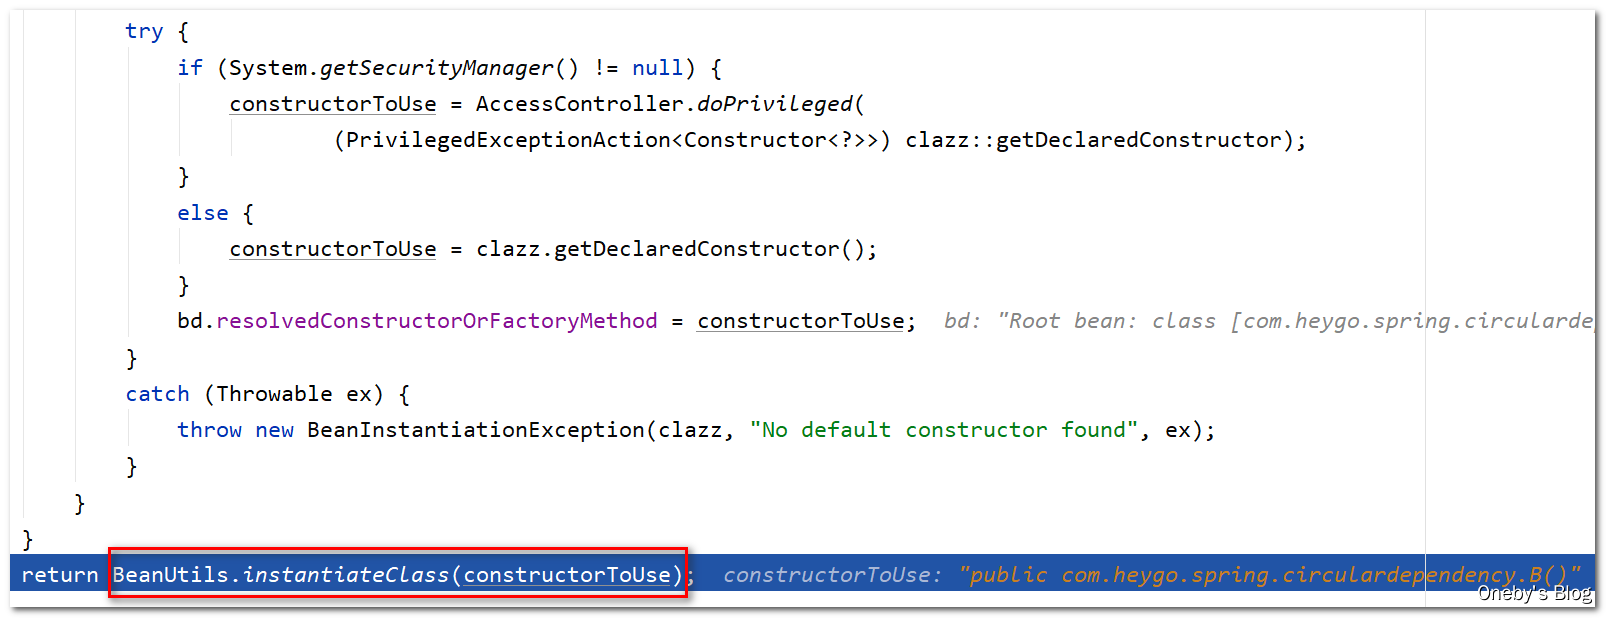
获取构造器的目的当然是为了实例化 beanA 啦
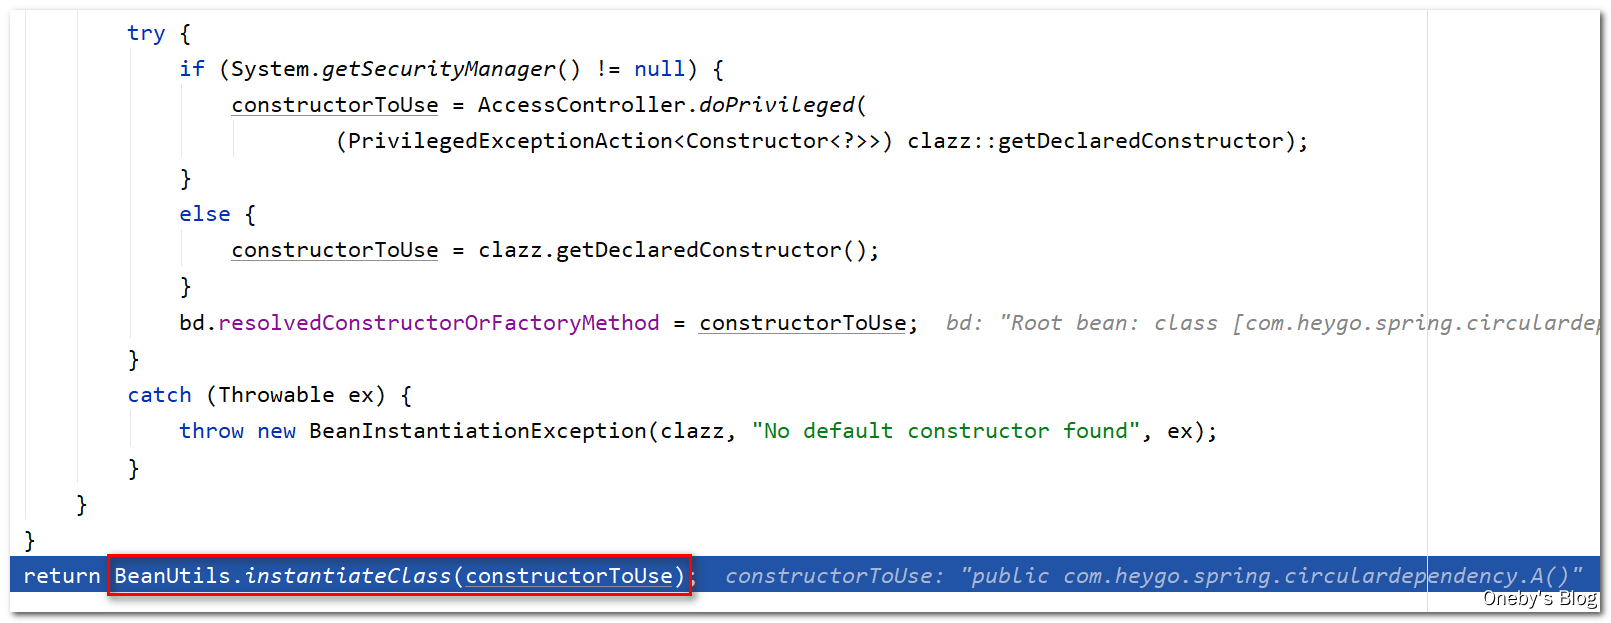
进入
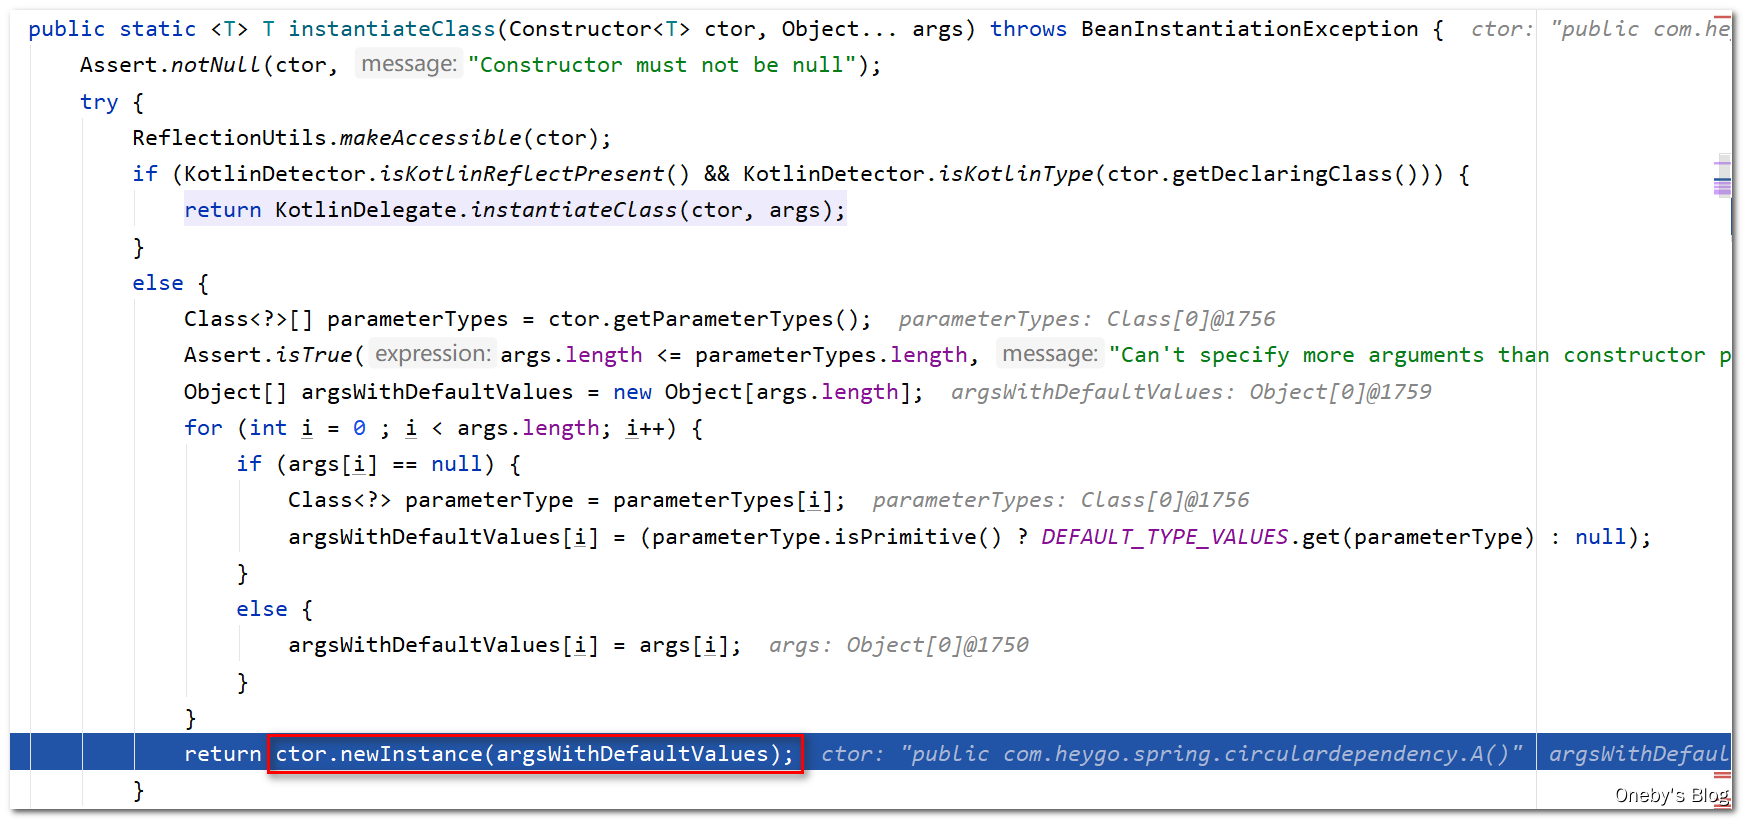
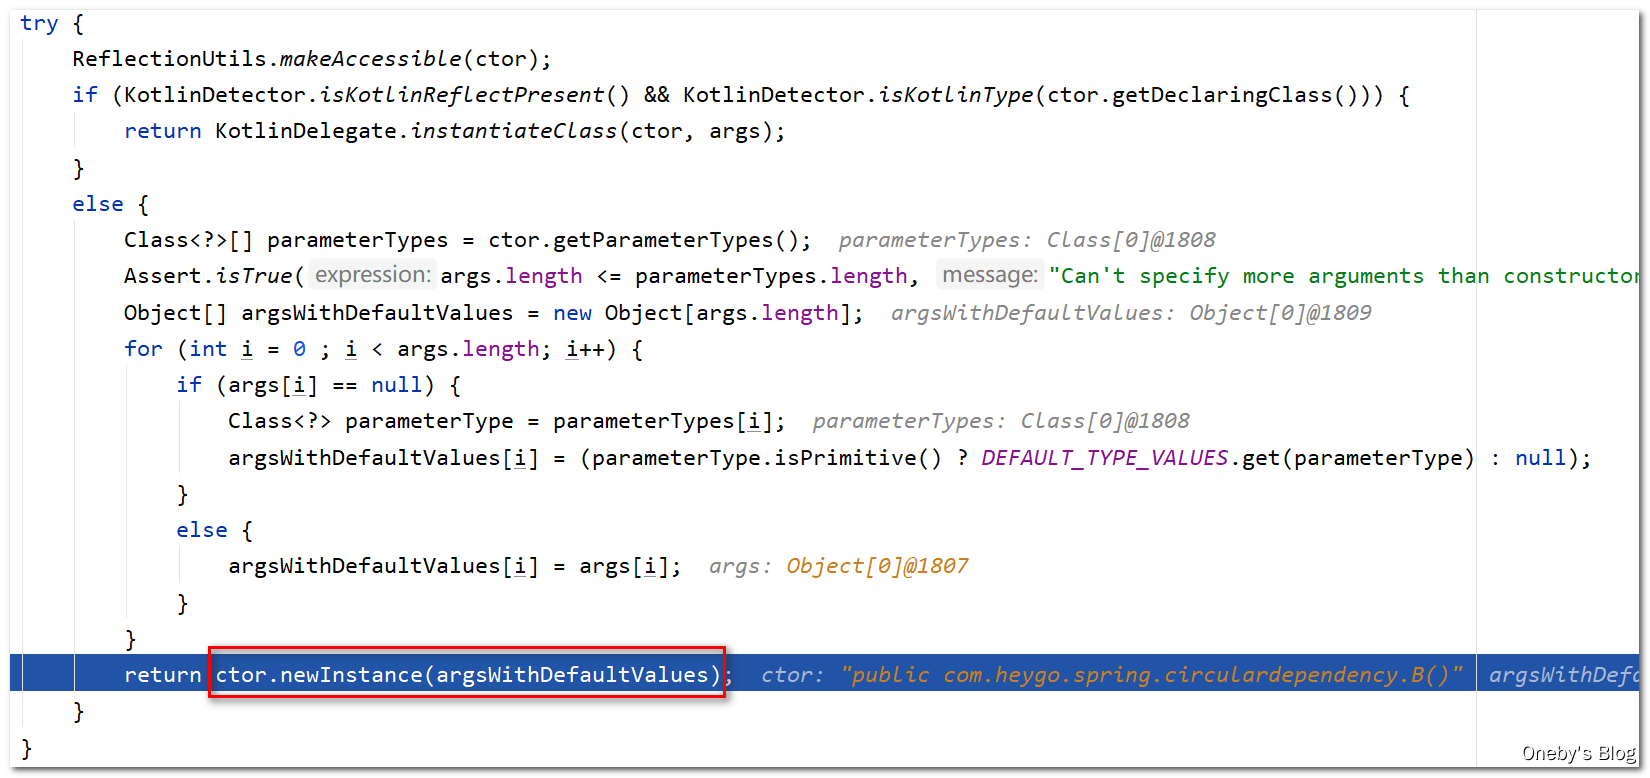
BeanUtils.instantiateClass(constructorToUse)方法
通过构造器创建 beanA 实例,Step Over 后会输出:【—A created success】,并且会回到 getInstantiationStrategy().instantiate(mbd, beanName, this) 方法中
回到
getInstantiationStrategy().instantiate(mbd, beanName, this)方法中
在 BeanUtils.instantiateClass(constructorToUse) 方法中创建好了 beanA 实例,不过还没有进行初始化,可以看到属性 b = null,Step Over 后会回到 instantiateBean(beanName, mbd) 方法中
回到
instantiateBean(beanName, mbd)方法中
得到刚才创建的 beanA 实例,但其属性并未被初始化

将实例化的 beanA 装进 BeanWrapper 中并返回 bw
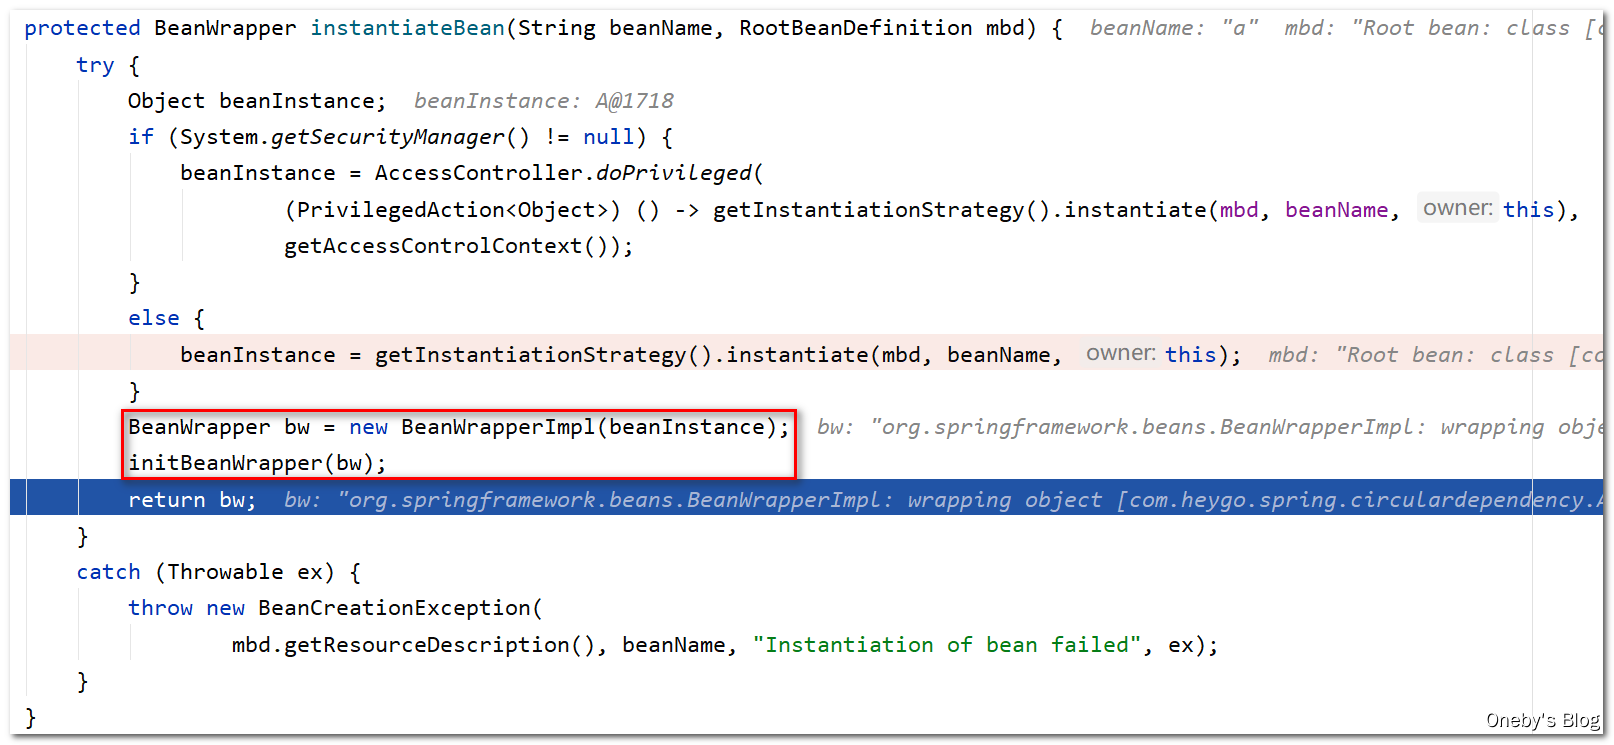
回到
createBeanInstance(beanName, mbd, args)方法中
得到刚才创建的 beanWrapper 实例,该 beanWrapper 包裹(封装)了刚才创建的 beanA 实例
回到
doCreateBean(beanName, mbdToUse, args)方法中
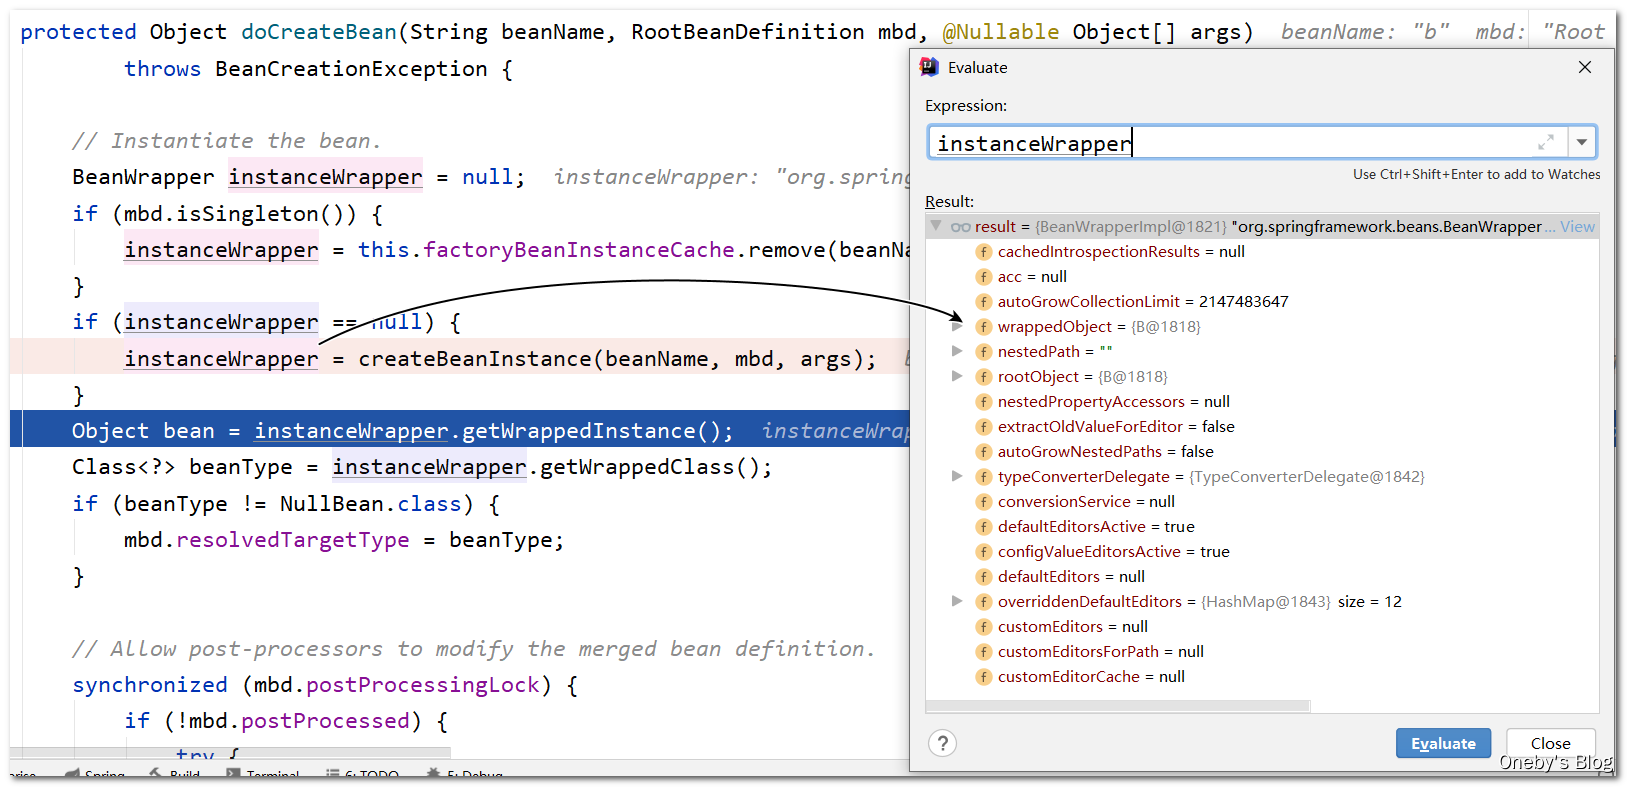
在 doCreateBean(beanName, mbdToUse, args) 方法获得 BeanWrapper instanceWrapper,用于封装 beanA 实例
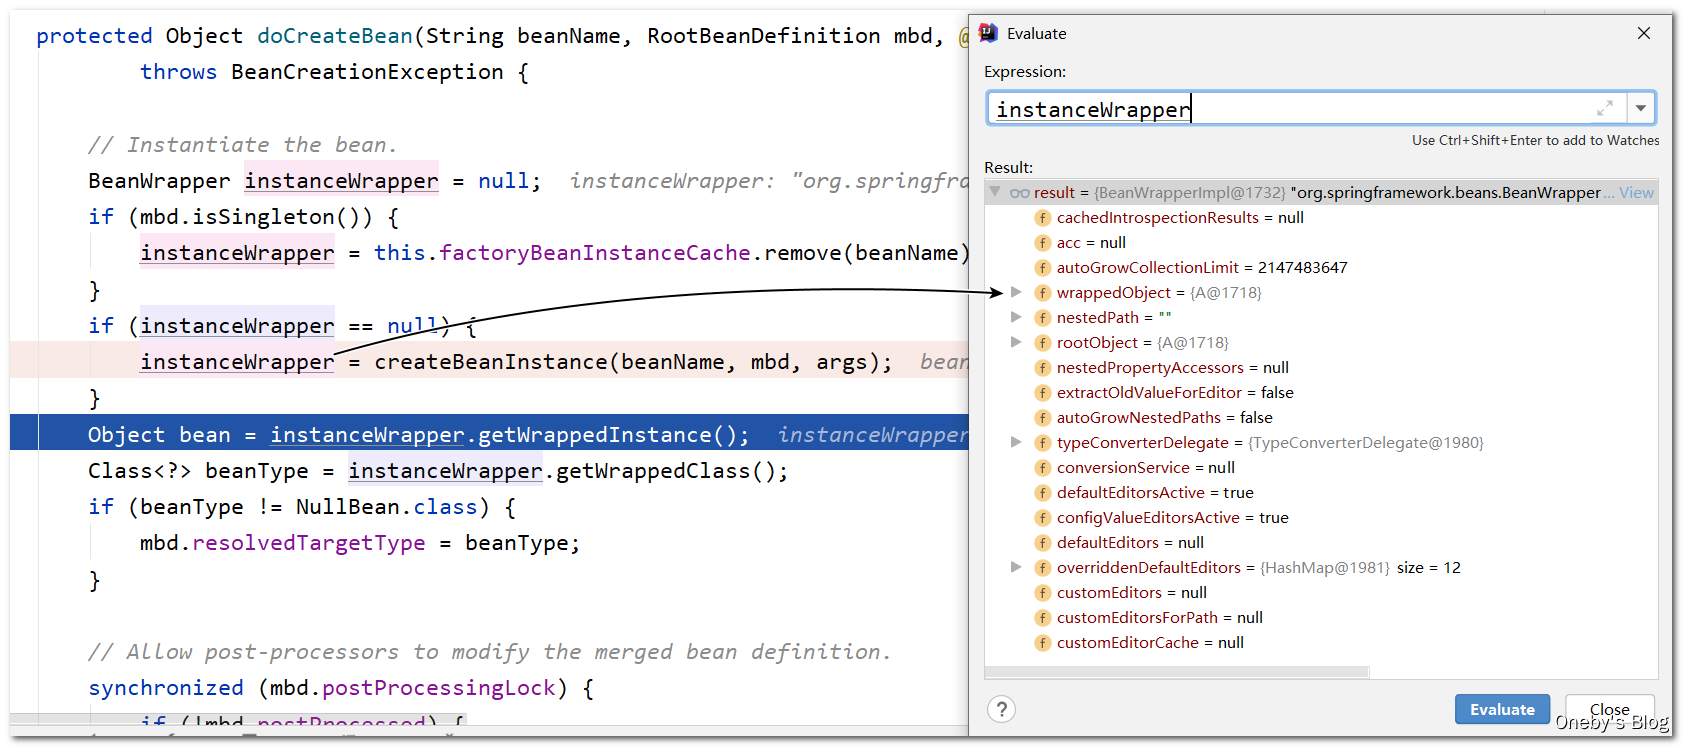
获取并记录 A 的全类名
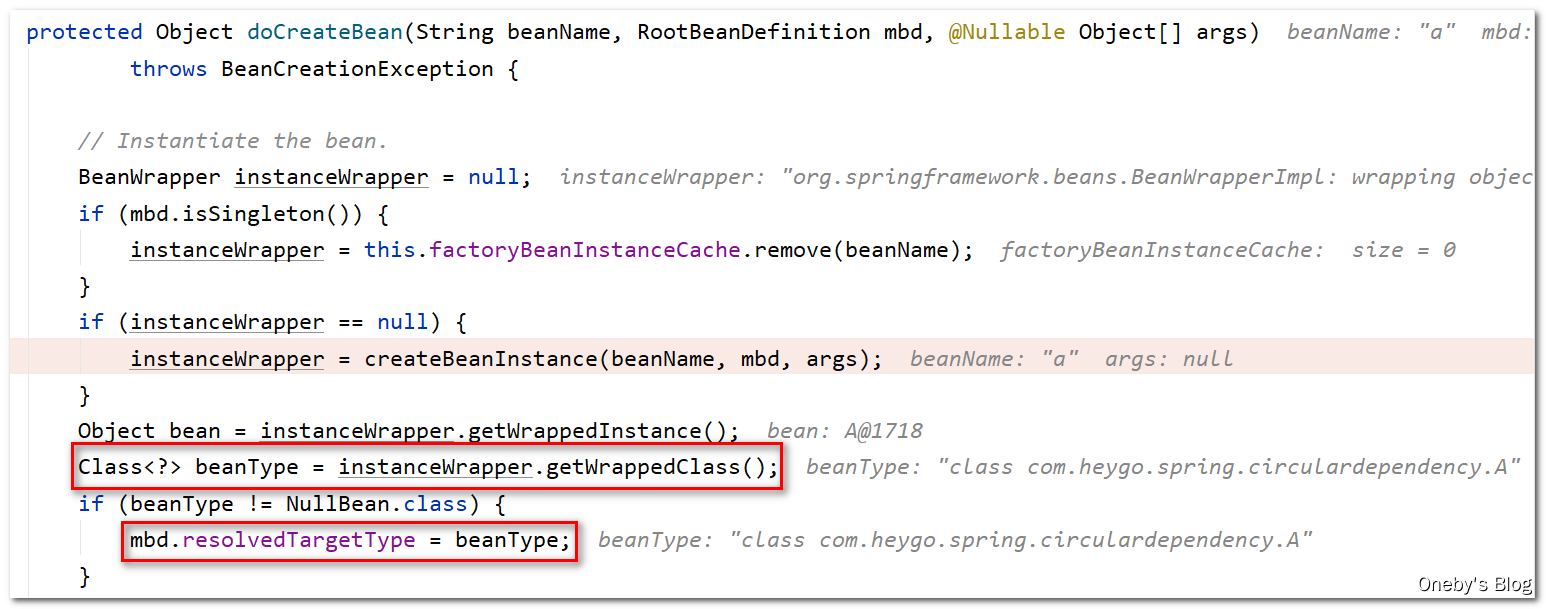
执行 BeanPostProcessor
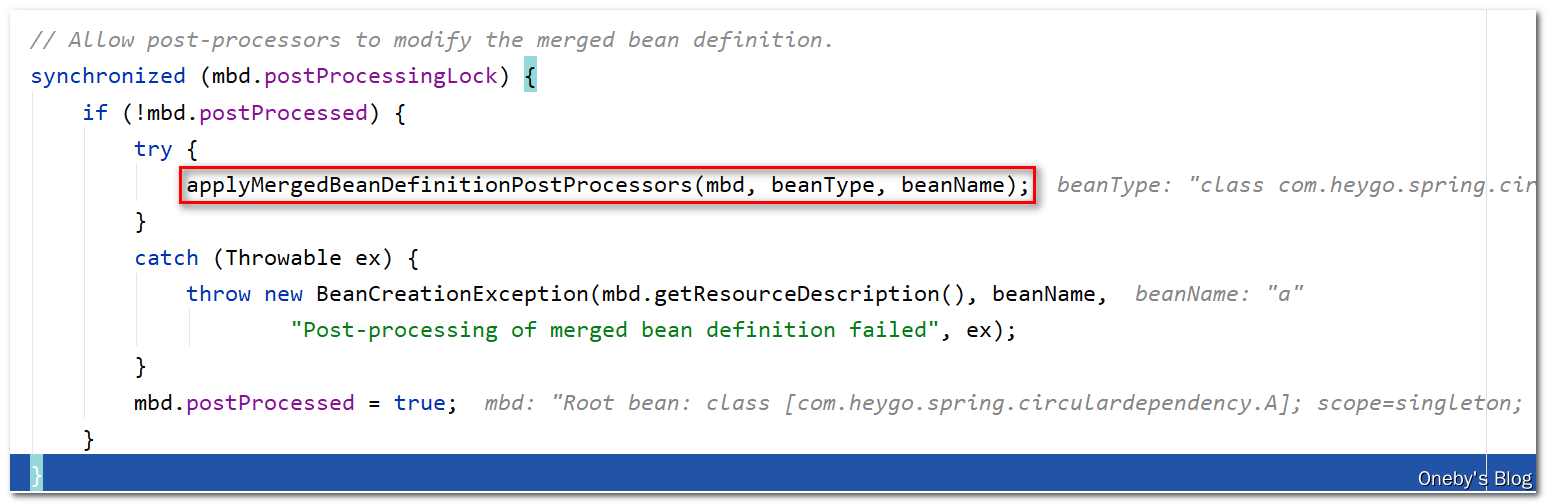
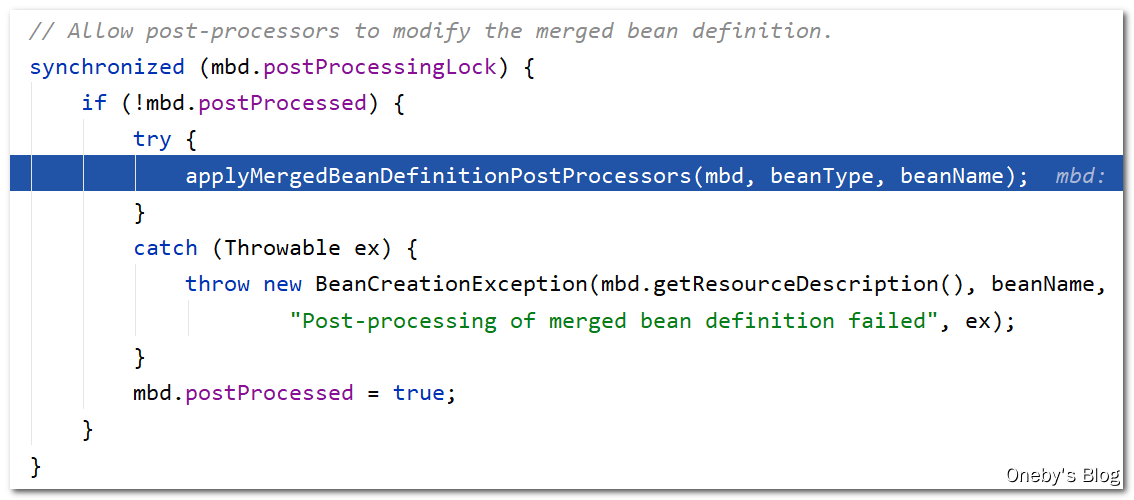
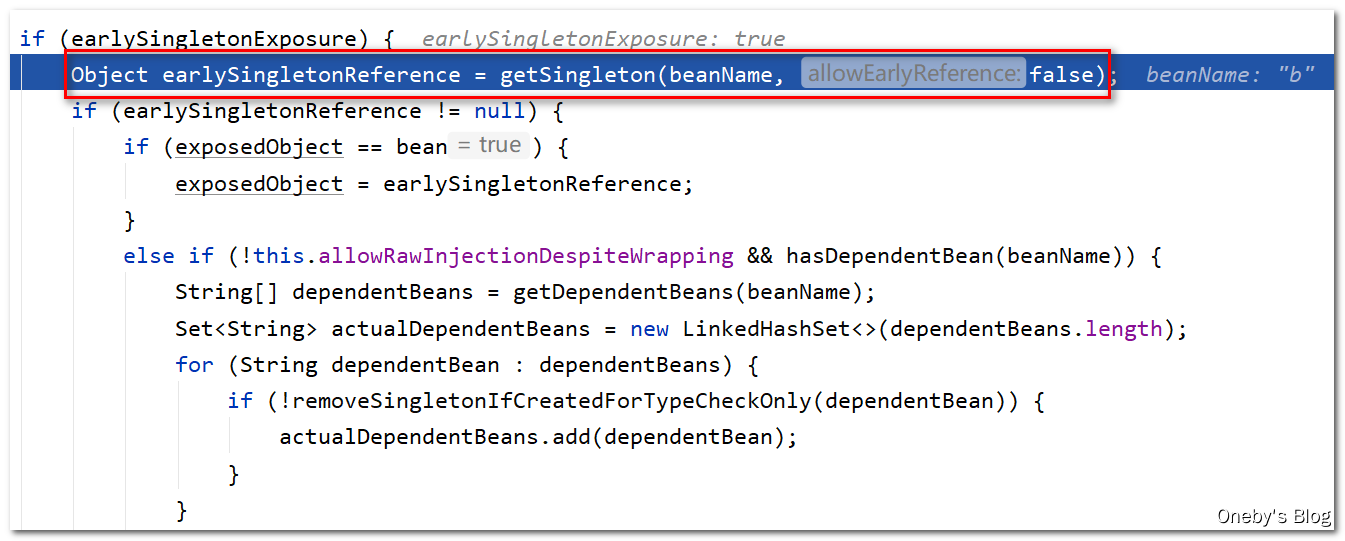
如果该 bean 是单例 bean(mbd.isSingleton()),并且允许循环依赖(this.allowCircularReferences),并且当前 bean 正在创建过程中(isSingletonCurrentlyInCreation(beanName)),那么就就允许提前暴露该单例 bean(earlySingletonExposure = true),则会执行 addSingletonFactory(beanName, () -> getEarlyBeanReference(beanName, mbd, bean)) 方法将该 bean 放到三级缓存 singletonFactories 中

进入
addSingletonFactory(beanName, () -> getEarlyBeanReference(beanName, mbd, bean))方法
首先去一级缓存 singletonObjects 中找一下有没有 beanA,肯定没有啦~然后将 beanA 添加到三级缓存 singletonFactories 中,并将 beanA 从二级缓存 earlySingletonObjects 中移除,最后将 beanName 添加至 registeredSingletons 中,表示该 bean 实例已经被注册

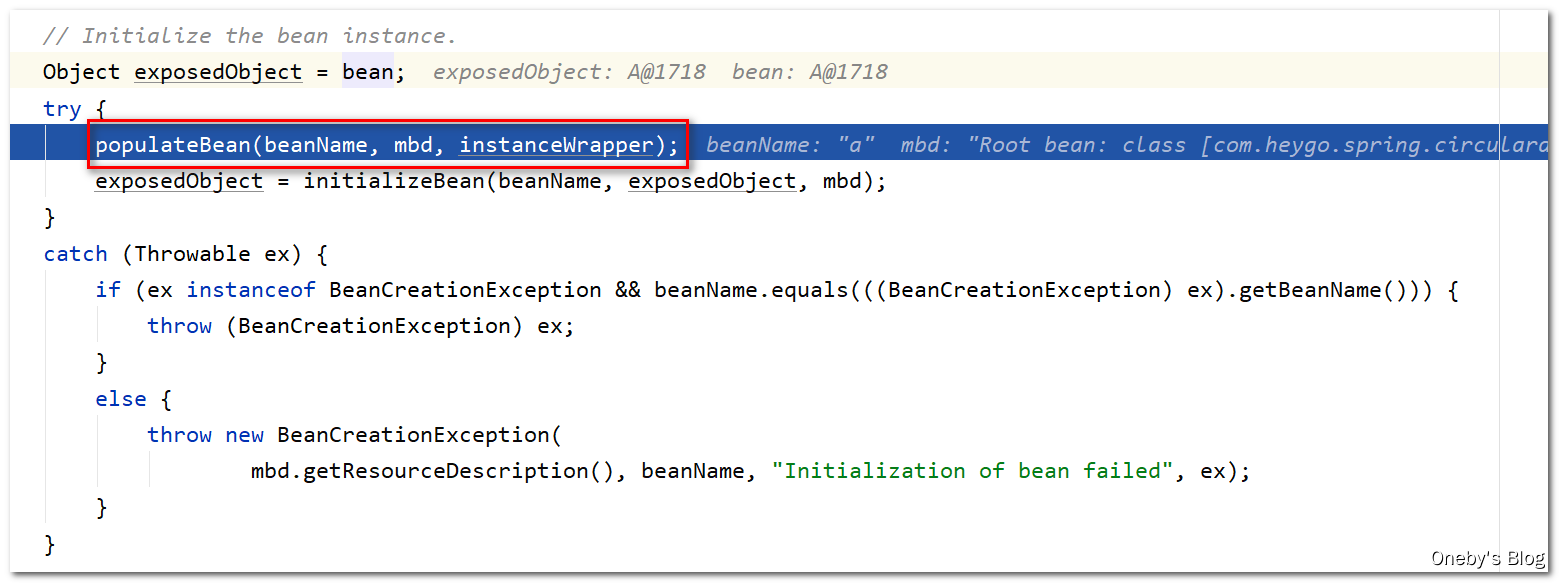
2.6.2、beanA 的属性填充
回到
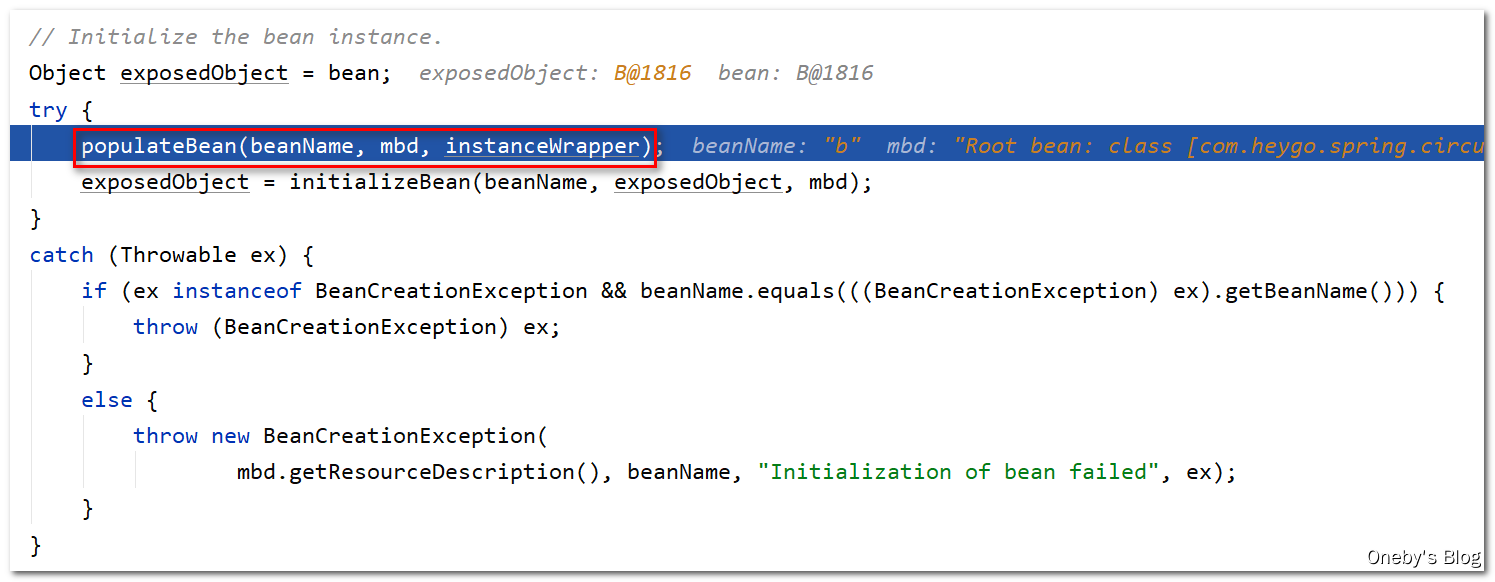
doCreateBean(beanName, mbdToUse, args)方法中
接着回到 doCreateBean(beanName, mbdToUse, args) 方法中,需要执行 populateBean(beanName, mbd, instanceWrapper) 方法对 beanA 中的属性进行填充
进入
populateBean(beanName, mbd, instanceWrapper)方法
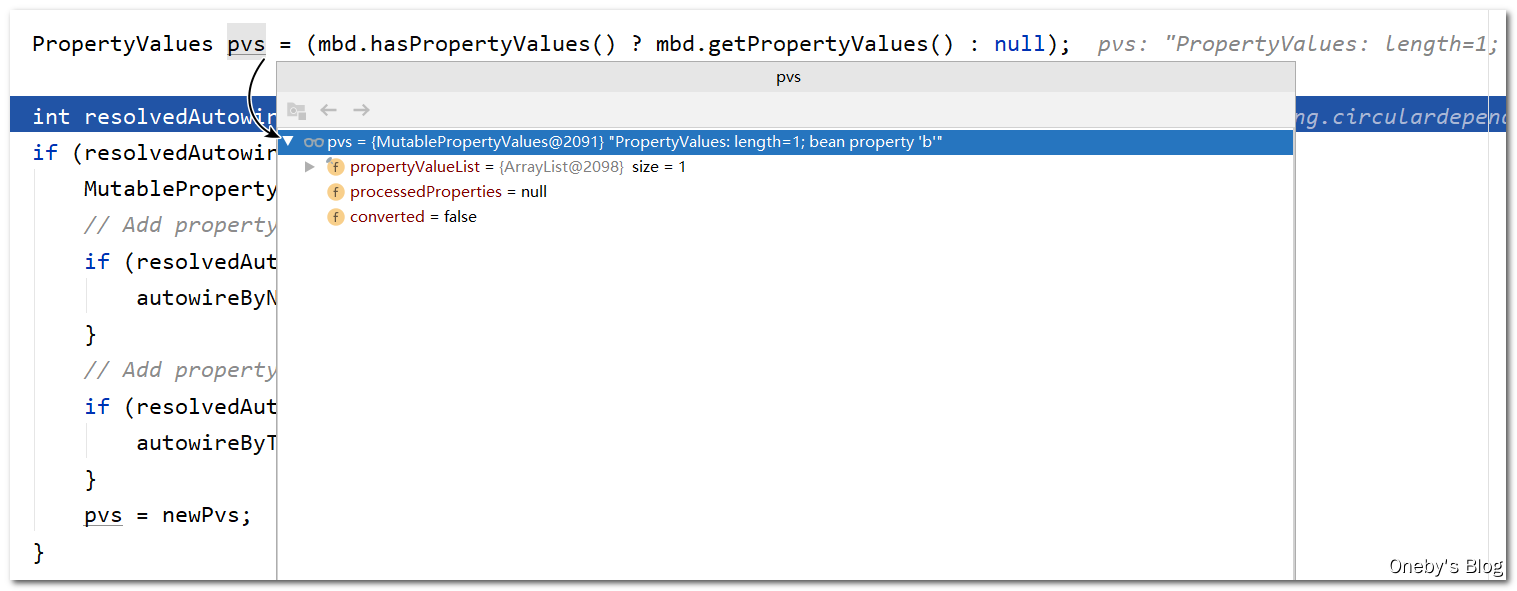
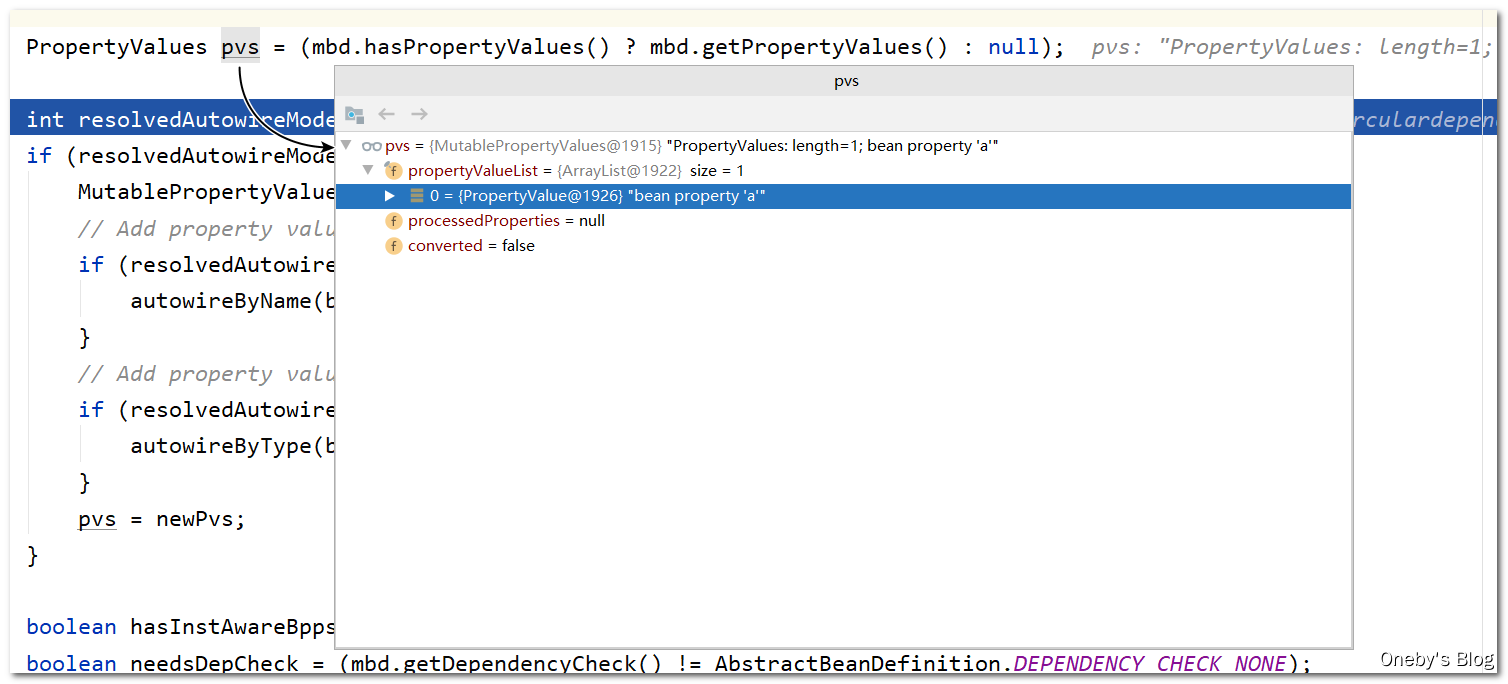
获取 beanA 的属性列表
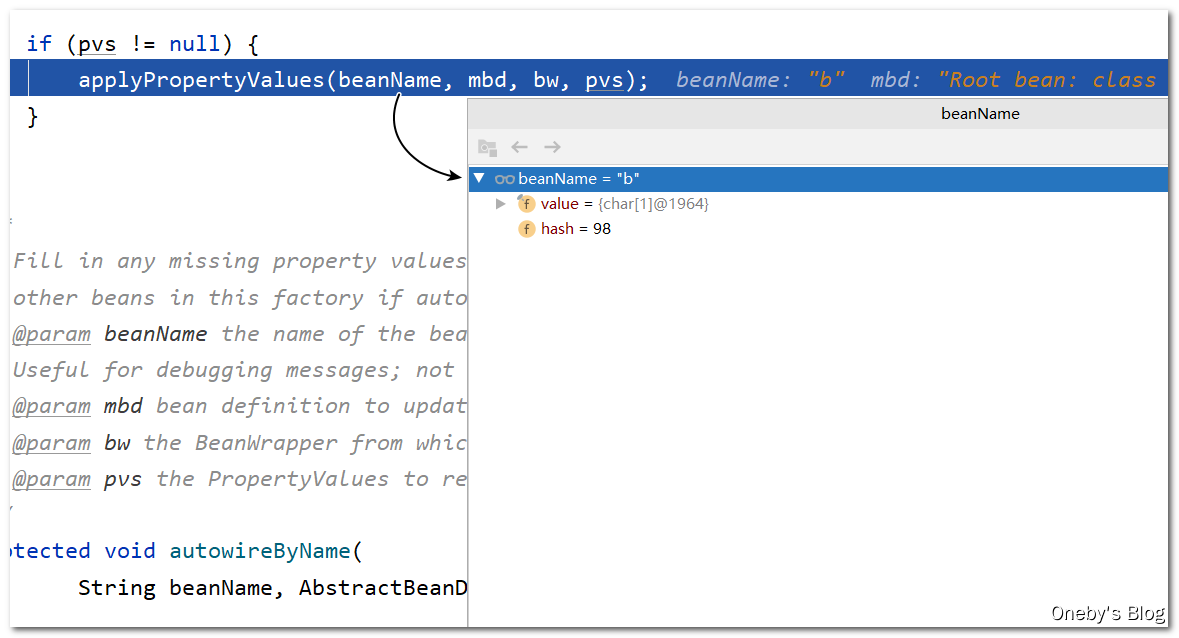
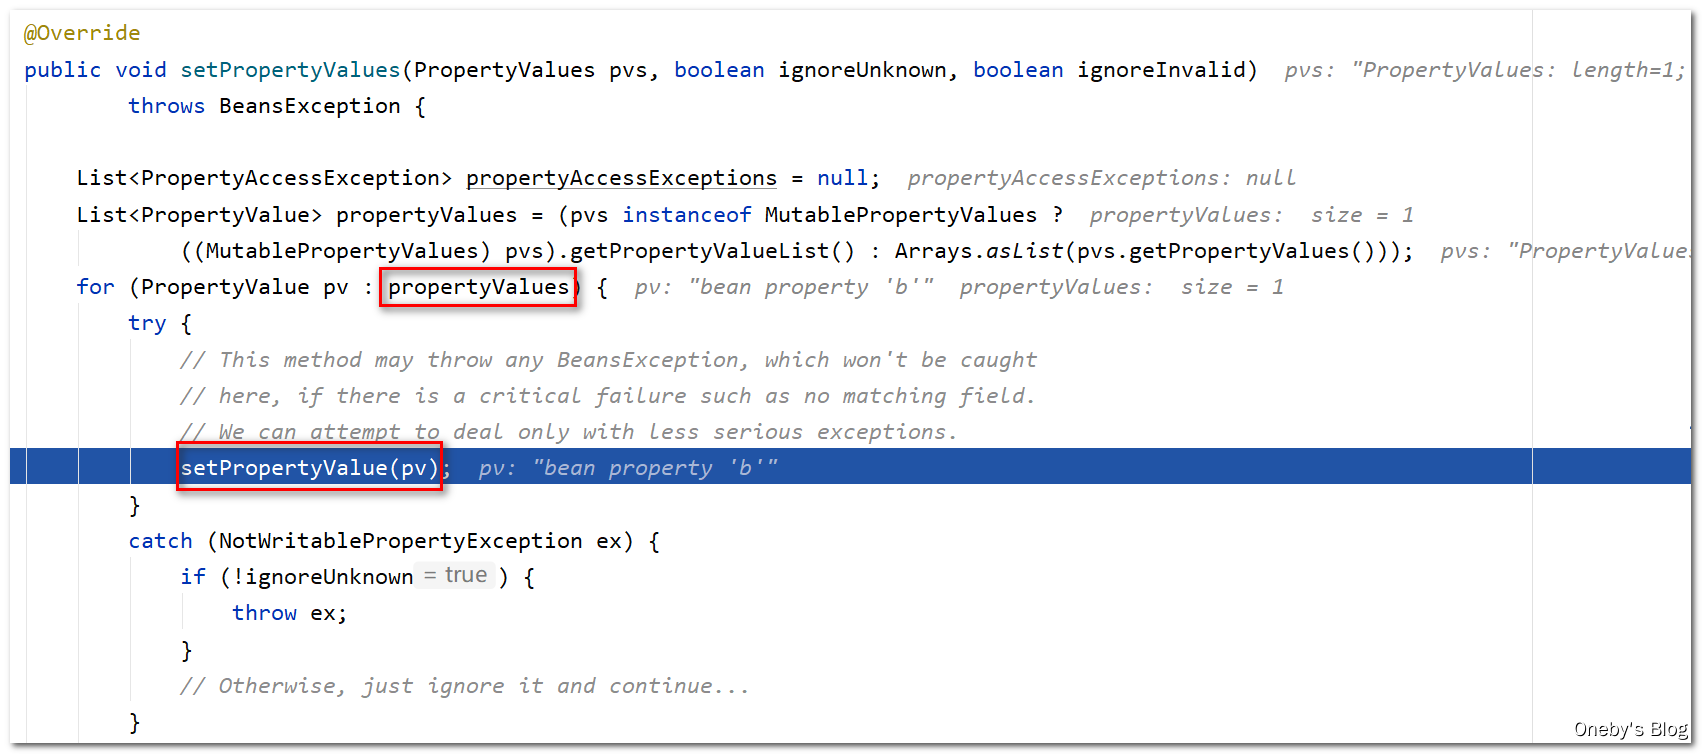
执行 applyPropertyValues(beanName, mbd, bw, pvs) 方法完成 beanA 属性的填充
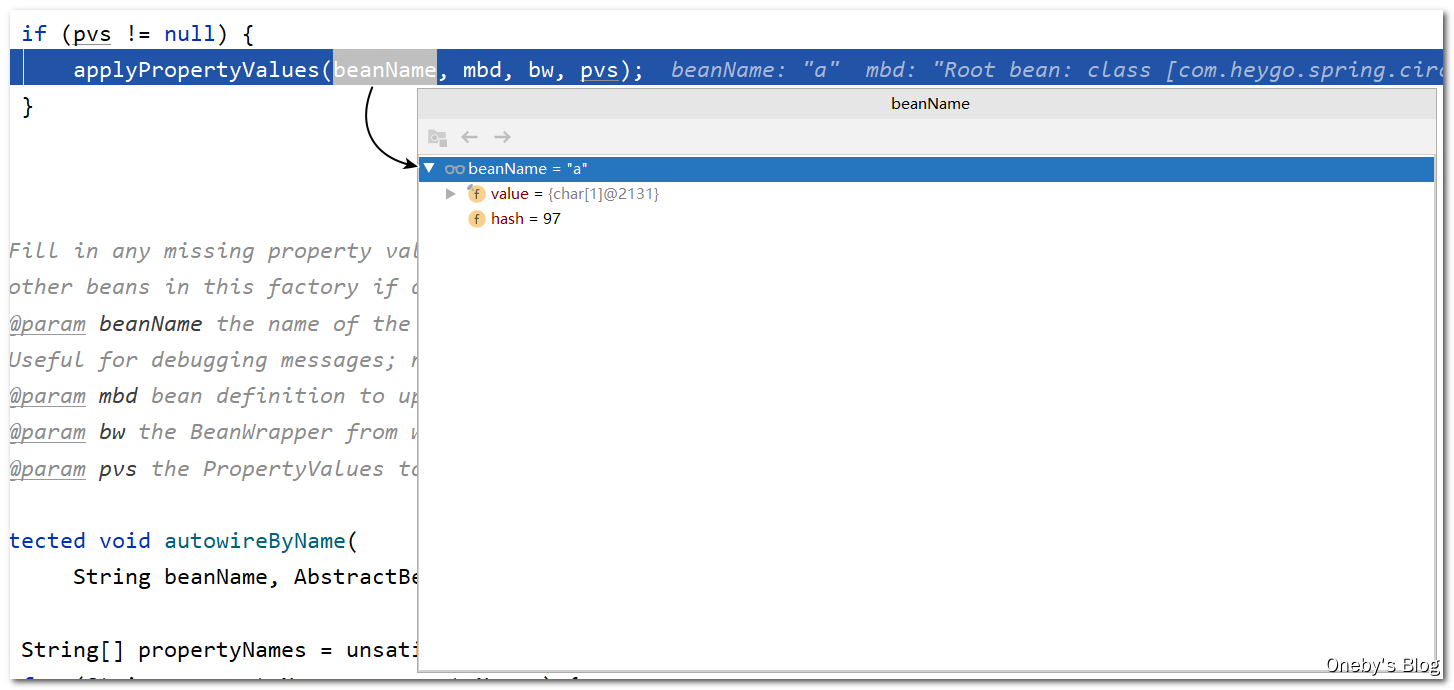
进入
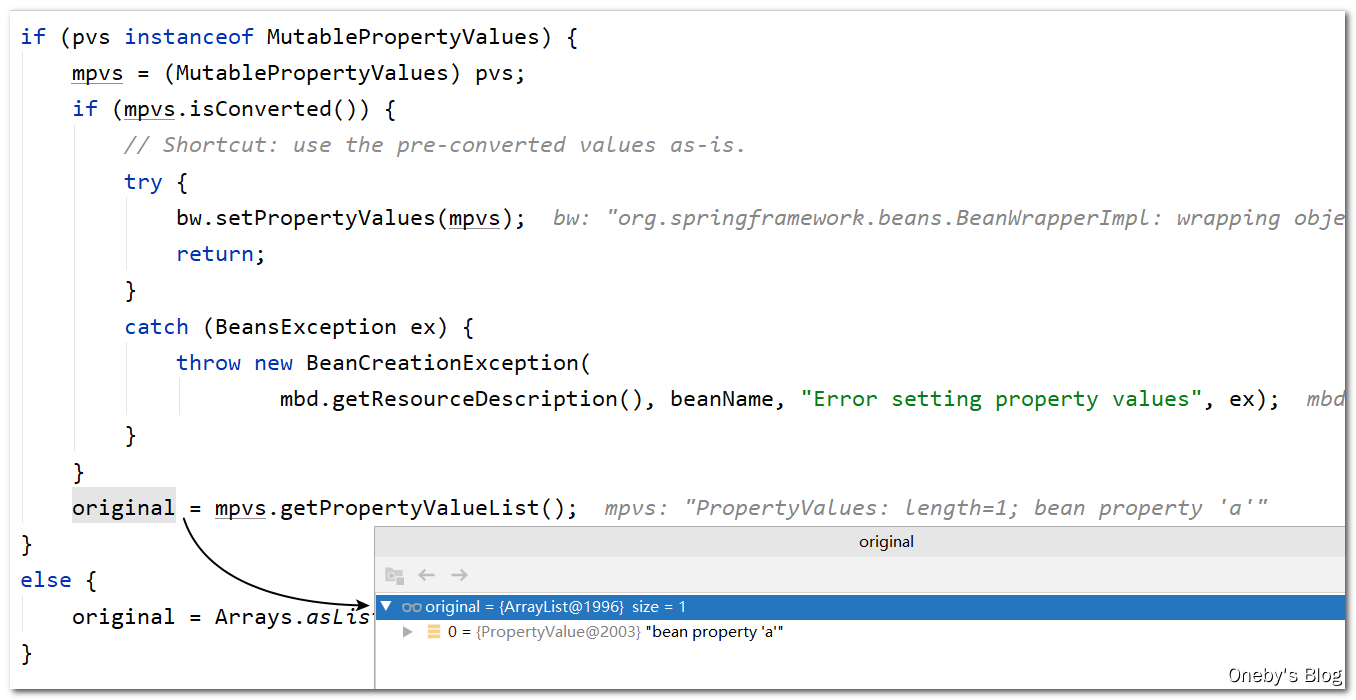
applyPropertyValues(beanName, mbd, bw, pvs)方法
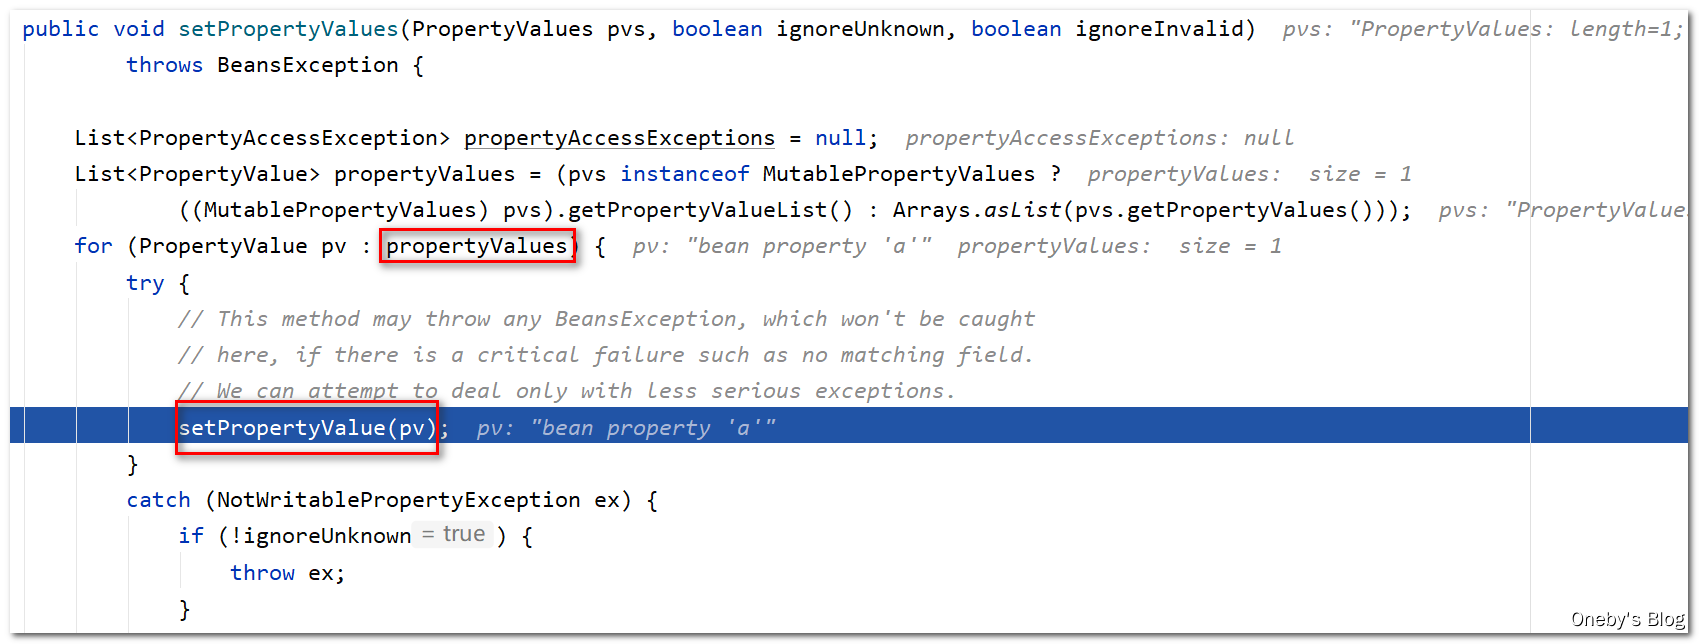
获取到 beanA 的属性列表,发现有个属性为 b

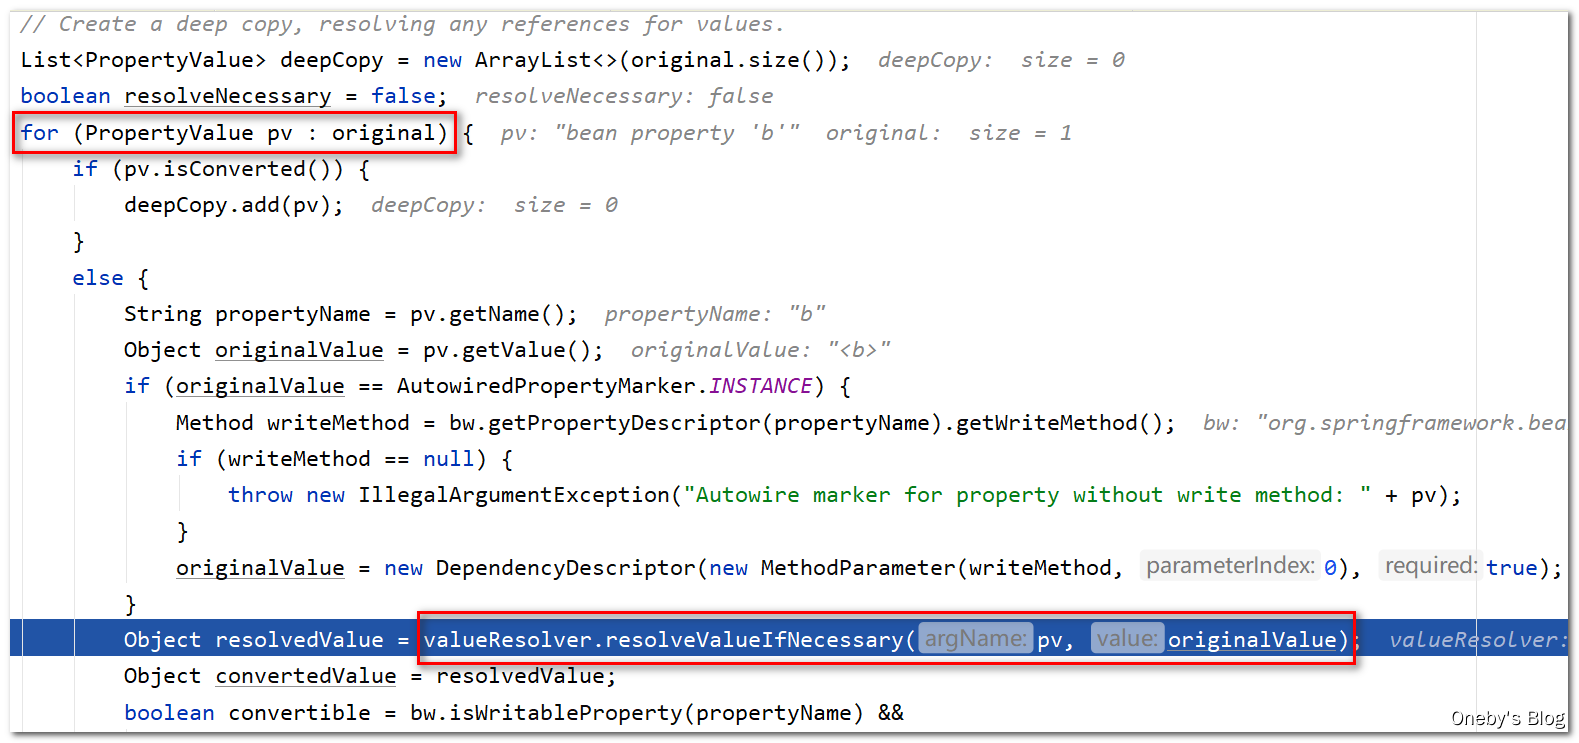
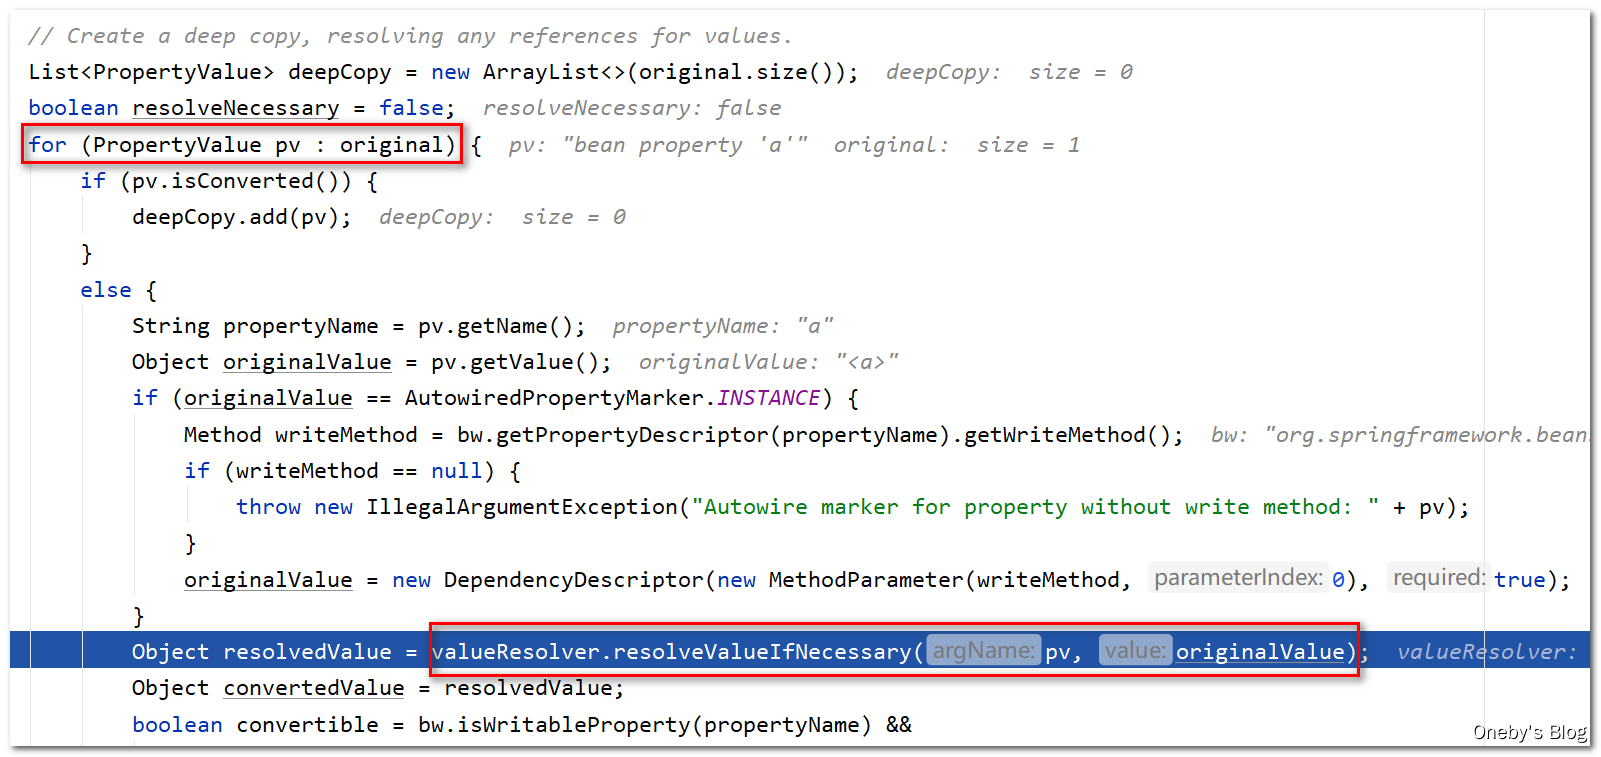
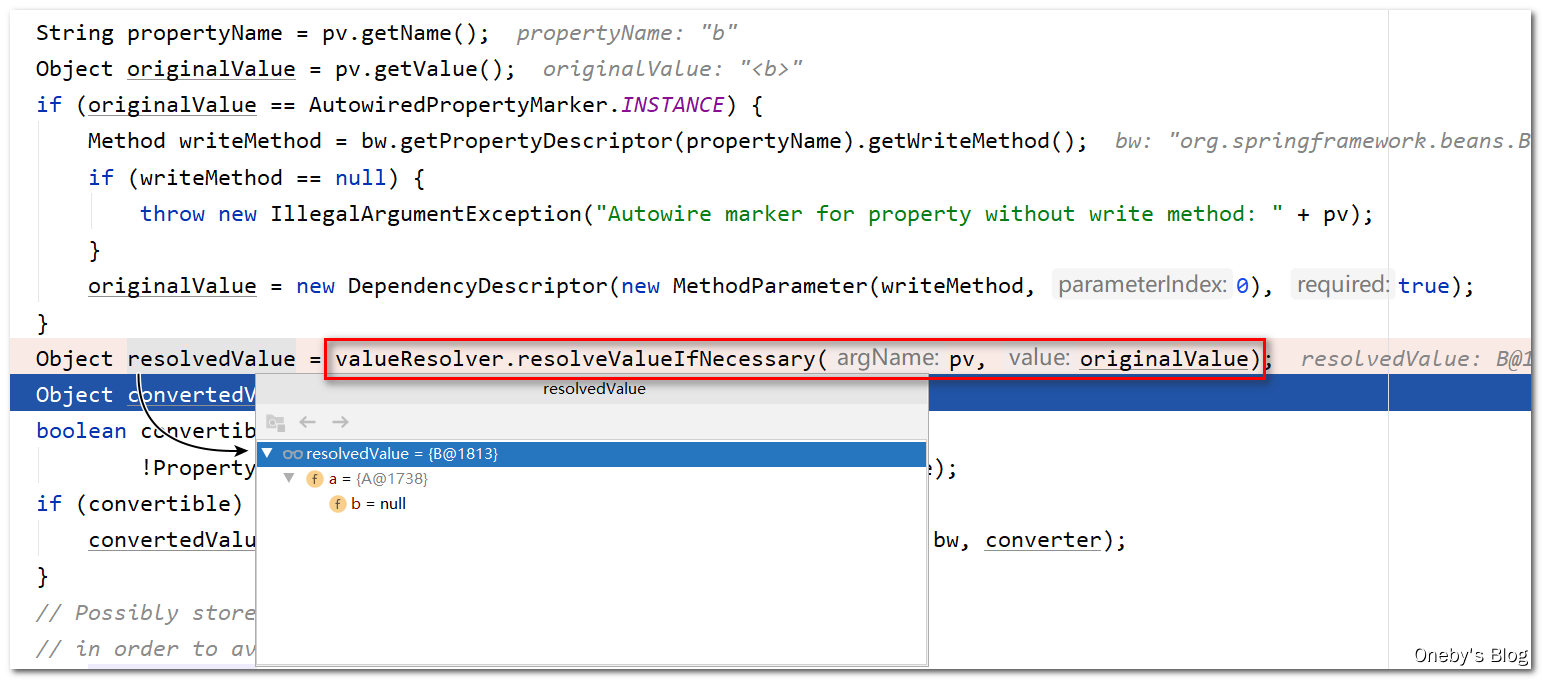
遍历每一个属性,并对每一个属性进行注入,valueResolver.resolveValueIfNecessary(pv, originalValue) 的作用:Given a PropertyValue, return a value, resolving any references to other beans in the factory if necessary.
进入
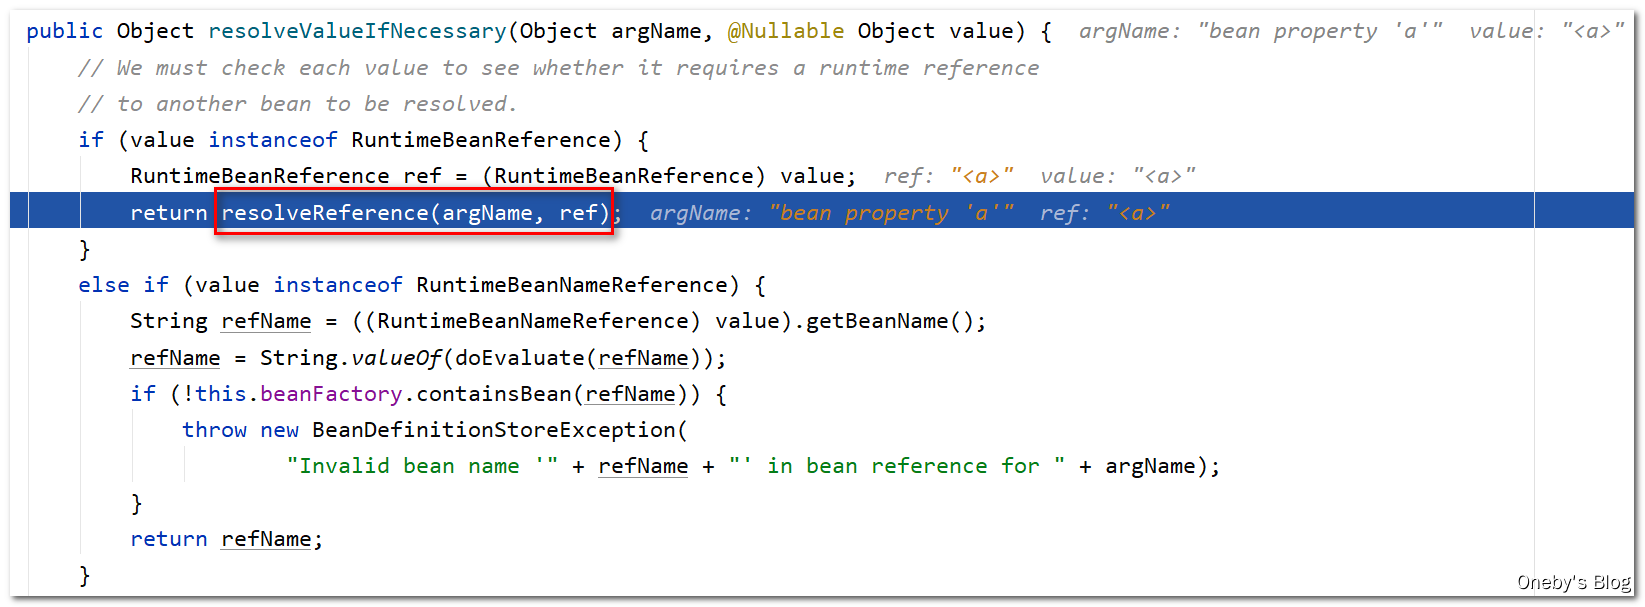
valueResolver.resolveValueIfNecessary(pv, originalValue)方法
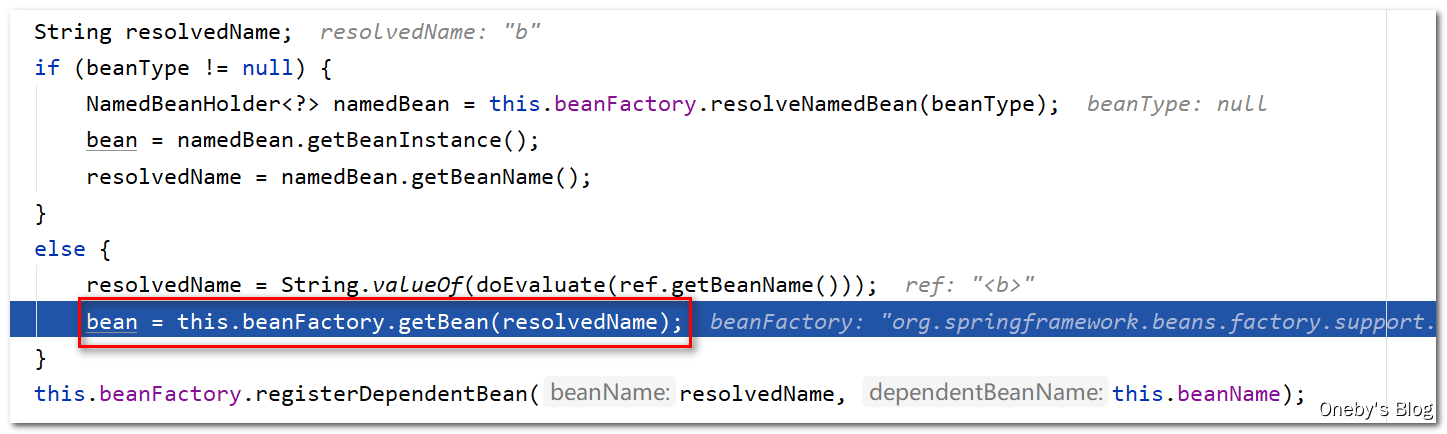
通过 resolveReference(argName, ref) 解决依赖注入的问题

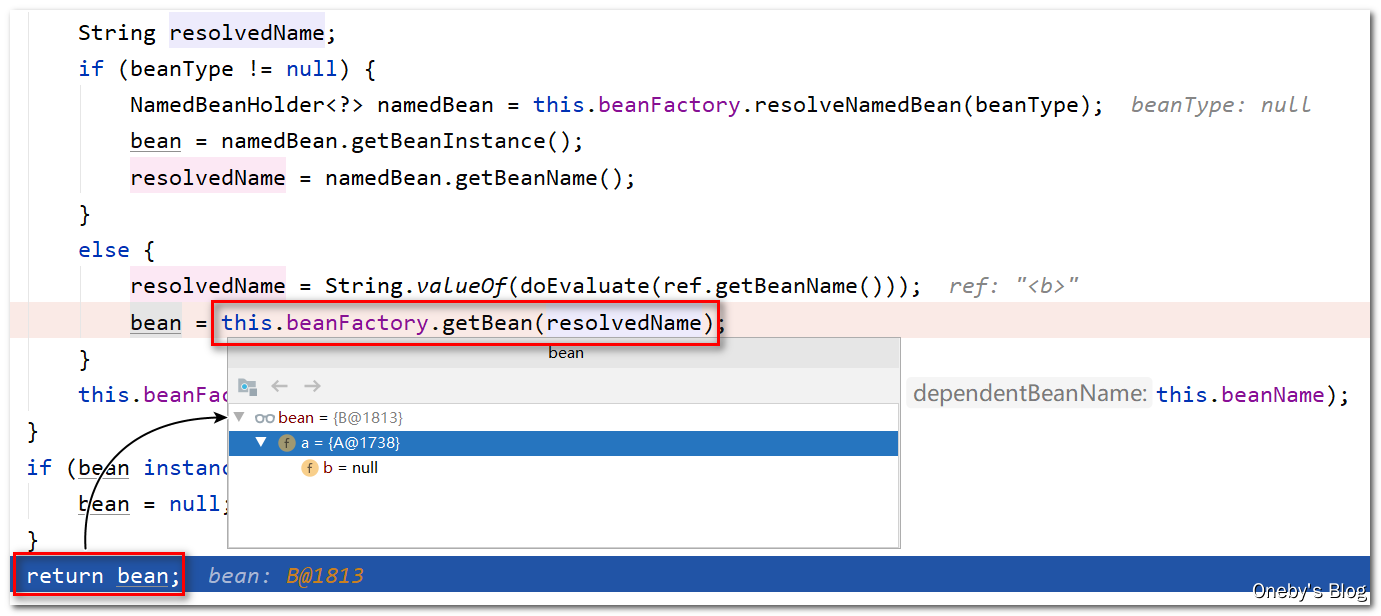
进入
resolveReference(argName, ref)方法
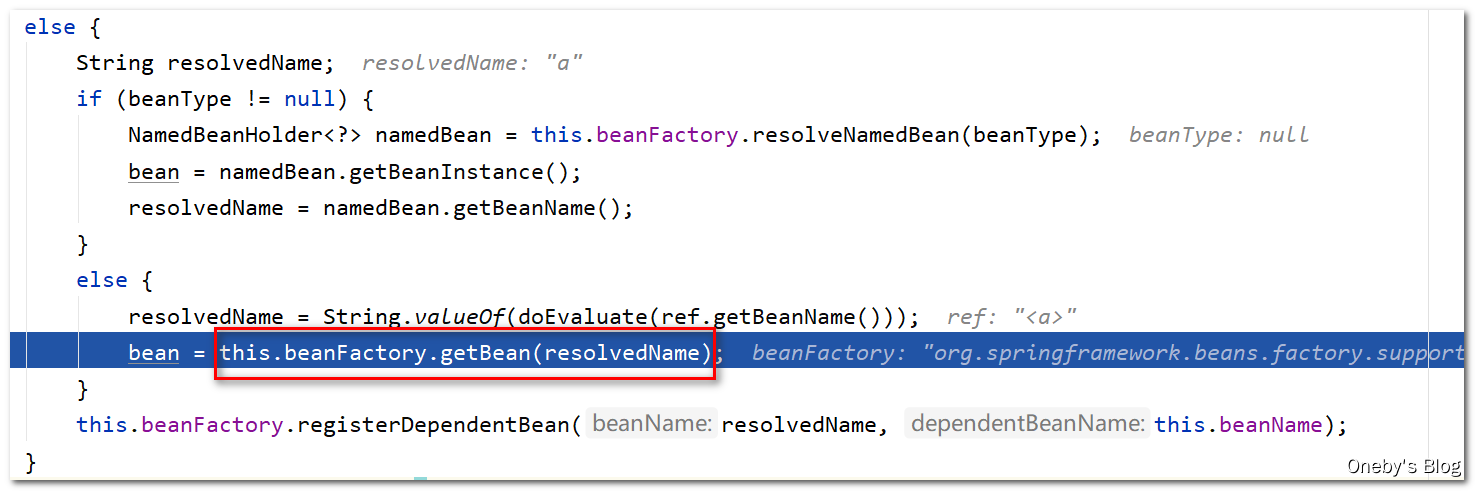
先获得属性 b 的名称,再通过 this.beanFactory.getBean(resolvedName) 方法获取 beanB 的实例
2.6.3、beanB 的实例化
进入
this.beanFactory.getBean(resolvedName)方法
哦,这熟悉的 doGetBean(name, null, null, false) 方法,这就开始递归了呀

再次执行
doGetBean(name, null, null, false)方法
beanB 还没有实例化,因此 getSingleton(beanName) 方法返回 null
呐,又来到了这个熟悉的地方,先尝试获取 beanB 实例,获取不到就执行 createBean() 的操作
进入
getSingleton(beanName, () -> {... }方法
首先尝试从一级缓存 singletonObjects 中获取 beanB,那肯定是获取不到的呀
然后就调用 singletonFactory.getObject() 创建 beanB
进入
createBean(beanName, mbd, args)方法
获取到 beanB 的类型为 com.heygo.spring.circulardependency.B
之前创建 beanA 的时候没有看到,现在看到挺有趣的:Give BeanPostProcessors a chance to return a proxy instead of the target bean instance. 也就是说我们可以通过 BeanPostProcessors 返回 bean 的代理,而非 bean 本身。然后喜闻乐见,又来到了 doCreateBean(beanName, mbdToUse, args) 环节
进入
doCreateBean(beanName, mbdToUse, args)方法
老样子,创建 beanB 对应的 BeanWrapper instanceWrapper
进入
createBeanInstance(beanName, mbd, args)方法
调用 instantiateBean(beanName, mbd) 创建 beanWrapper
进入
instantiateBean(beanName, mbd)方法
调用 getInstantiationStrategy().instantiate(mbd, beanName, this) 创建 beanWrapper
进入
getInstantiationStrategy().instantiate(mbd, beanName, this)方法
获取 com.heygo.spring.circulardependency.B 的构造器,并将构造器信息记录在 bd.resolvedConstructorOrFactoryMethod 字段中
调用 BeanUtils.instantiateClass(constructorToUse) 方法创建 beanB 实例
进入
BeanUtils.instantiateClass(constructorToUse)方法
通过调用 B 类的构造器创建 beanB 实例,此时控制台会输出:【—B created success】
回到
instantiateBean(beanName, mbd)方法中
在 instantiateBean(beanName, mbd) 方法中得到创建好的 beanB 实例,并将其丢进 beanWrapper 中,封装为 BeanWrapper bw 对象

回到
doCreateBean(beanName, mbdToUse, args)方法中
createBeanInstance(beanName, mbd, args) 方法将返回包装着 beanB 的 beanWrapper
执行 BeanPostProcessor 的处理过程
beanB 由于满足单例并且正在被创建,因此 beanB 可以被提前暴露出去(在属性还未初始化的时候可以提前暴露出去),于是执行 addSingletonFactory(beanName, () -> getEarlyBeanReference(beanName, mbd, bean)) 方法将其添加至三级缓存 singletonFactory 中

进入
addSingletonFactory(beanName, () -> getEarlyBeanReference(beanName, mbd, bean))方法
将 beanB 实例添加至三级缓存 singletonFactory 中,从二级缓存 earlySingletonObjects 中移除,并注册其 beanName

回到
doCreateBean(beanName, mbdToUse, args)方法中
执行 populateBean(beanName,mbd,instancewrapper) 方法填充 beanB 的属性
2.6.4、beanB 的属性填充
进入
populateBean(beanName, mbd, instanceWrapper)方法
执行 mbd.getPropertyValues() 方法获取 beanB 的属性列表
执行 applyPropertyValues(beanName, mbd, bw, pvs) 方法完成 beanB 属性的填充
进入
applyPropertyValues(beanName, mbd, bw, pvs)方法
执行 mpvs.getPropertyValuelist() 方法获取 beanB 的属性列表
遍历每一个属性,并对每一个属性进行注入,valueResolver.resolveValueIfNecessary(pv, originalValue) 的作用:Given a PropertyValue, return a value, resolving any references to other beans in the factory if necessary.
进入
valueResolver.resolveValueIfNecessary(pv, originalValue)方法
执行 resolveReference(argName, ref) 方法为 beanB 注入名为 a 属性
进入
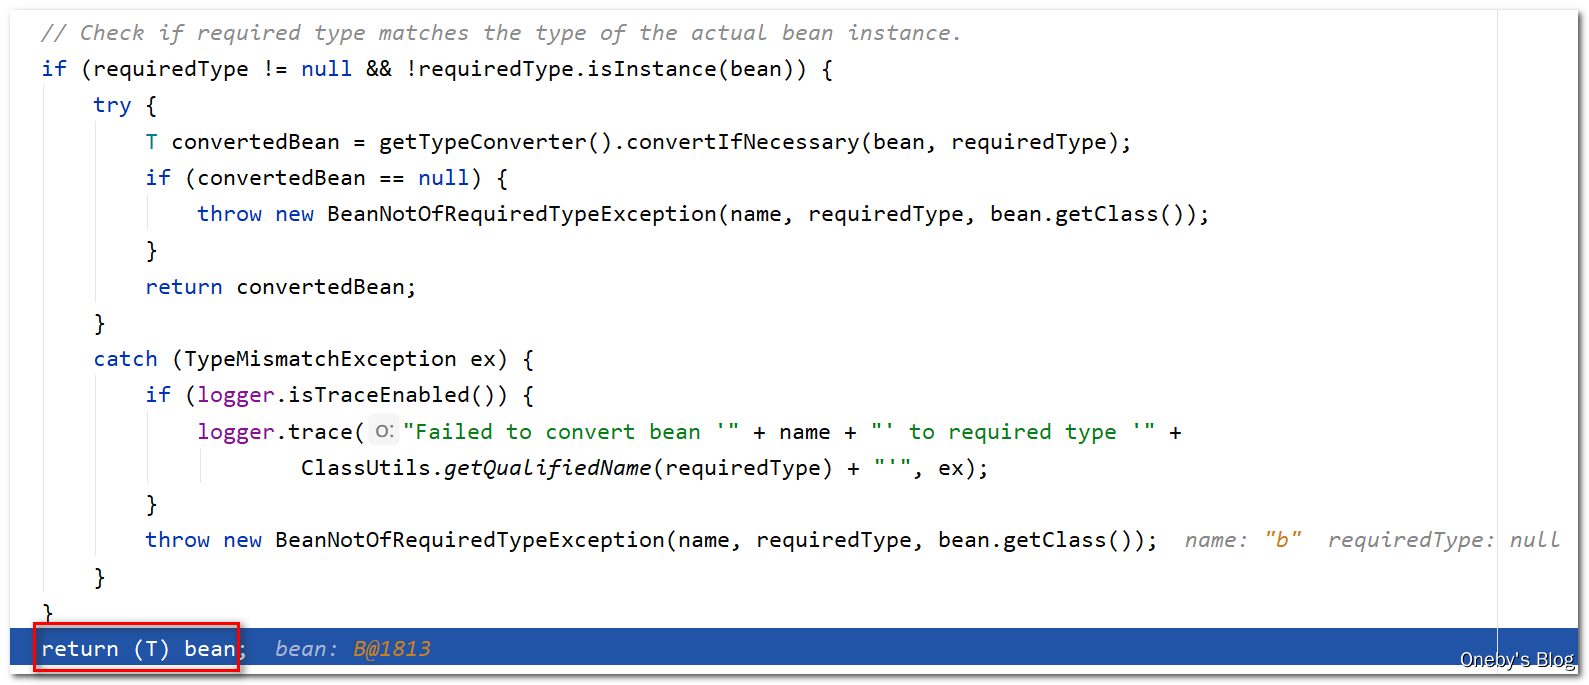
resolveReference(argName, ref)方法
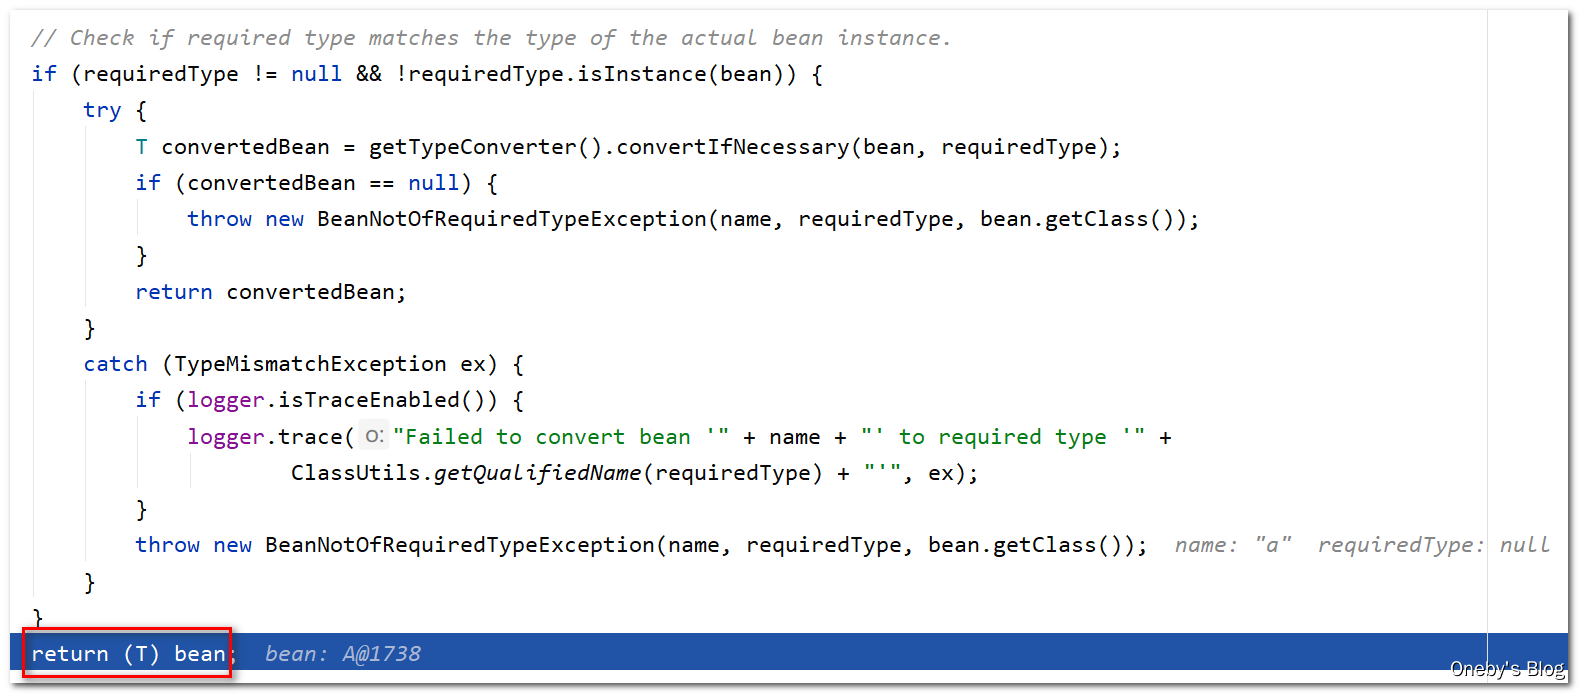
执行 this.beanFactory.getBean(resolvedName) 方法获取 beanA 实例,其实就是执行 doGetBean(name, null, null, false) 方法
进入
doGetBean(name, null, null, false)方法
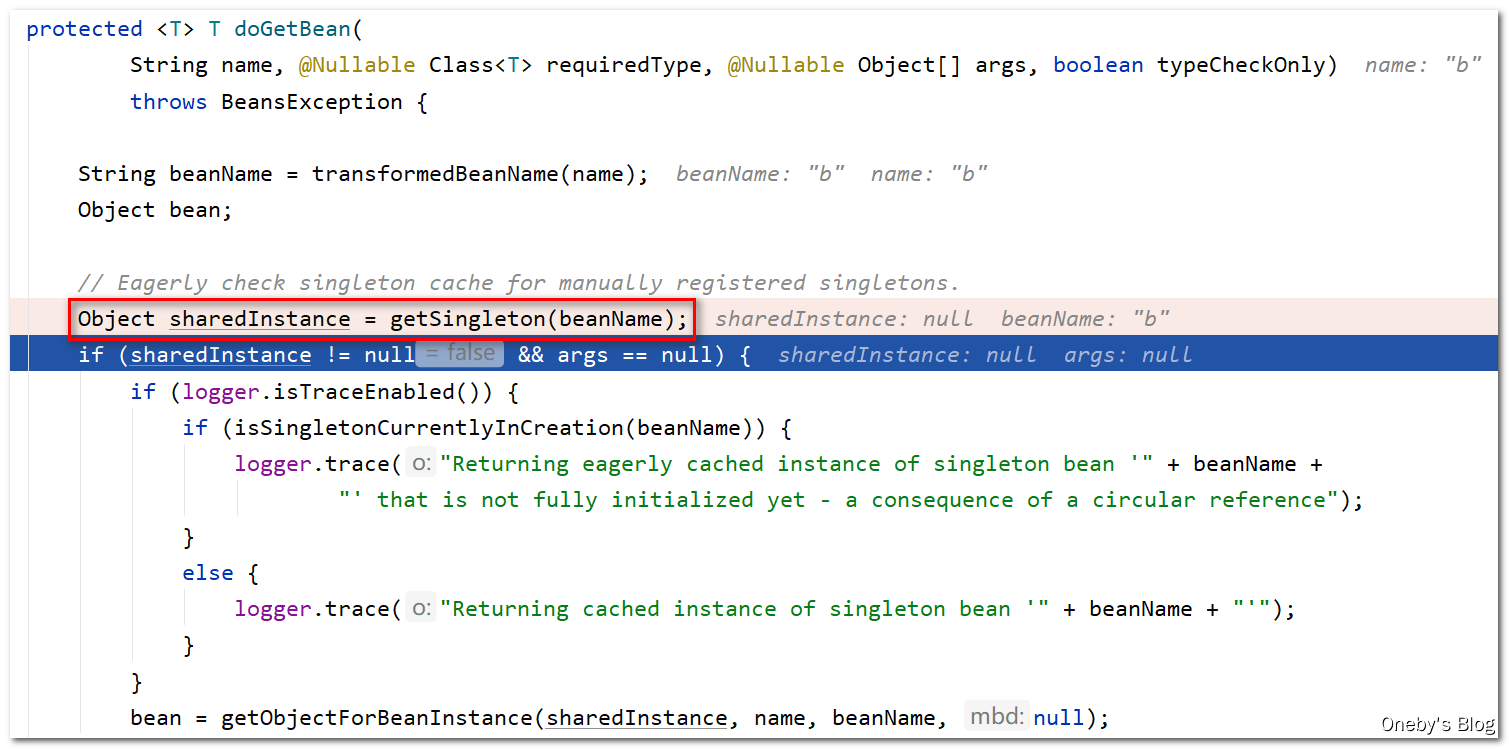
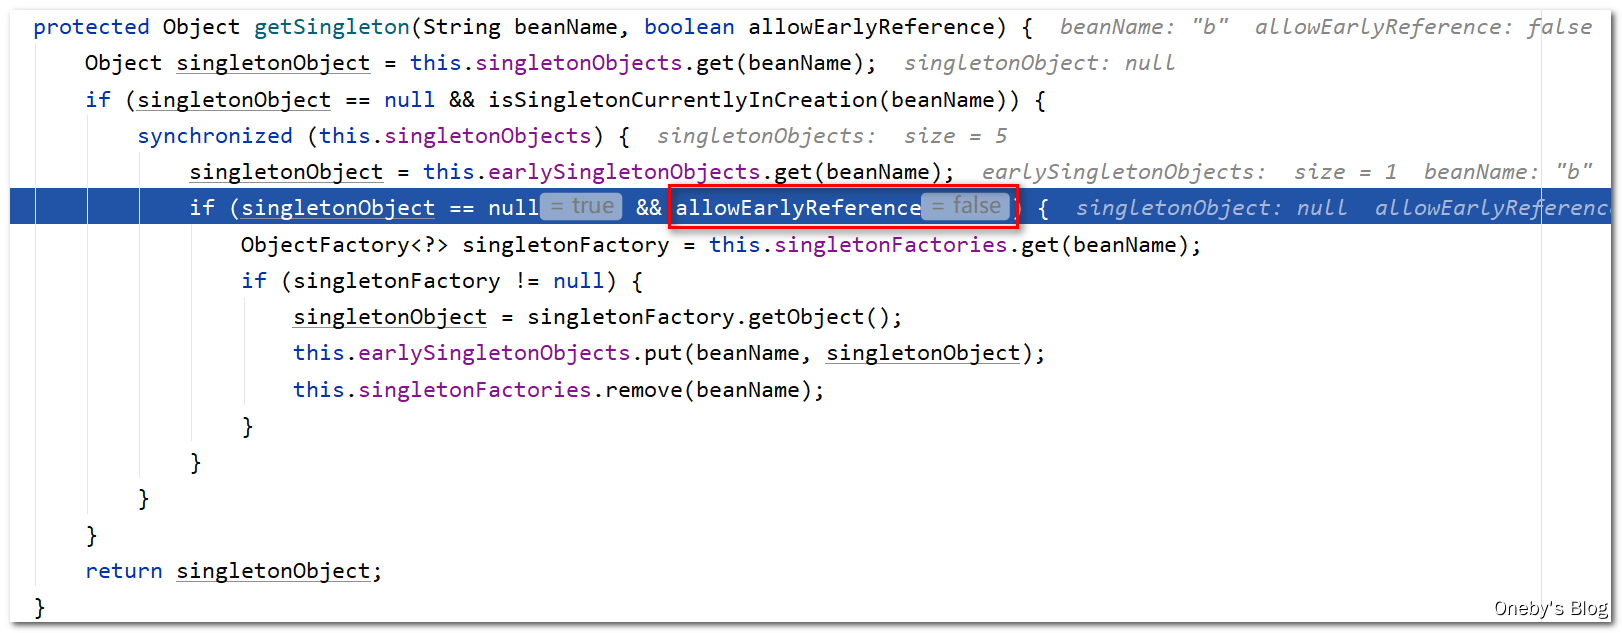
关键来了,这里执行 getSingleton(beanName) 是够能够获取到 beanA 实例呢?答案是可以
进入
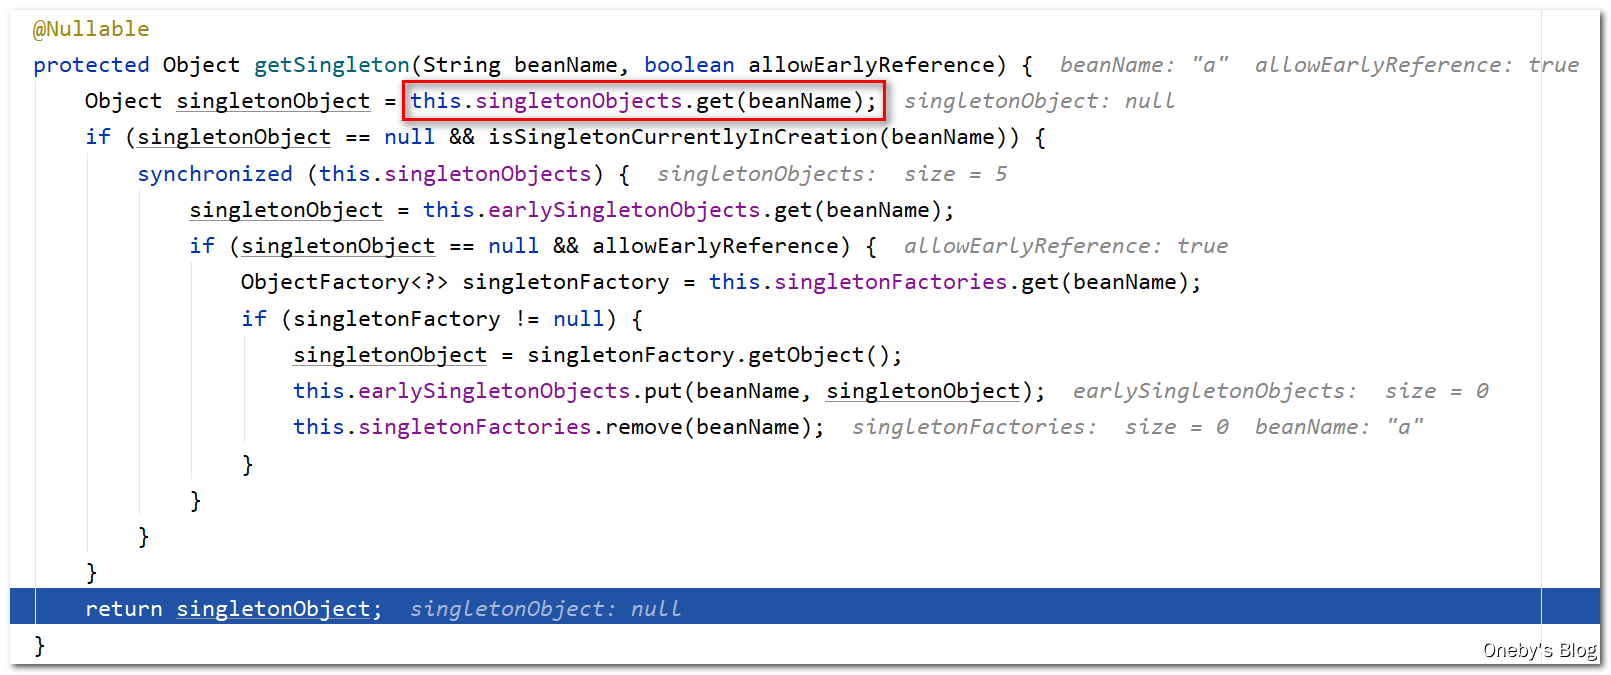
getSingleton(beanName, true)方法
getSingleton(beanName) 调用了其重载方法 getSingleton(beanName, true),接下来的逻辑很重要,让我们来唠嗑唠嗑
-
beanA 并没有存放在一级缓存
singletonObjects中,因此执行Object singletonObject = this.singletonObjects.get(beanName)后,singletonObject == null,再加上 beanA 正在满足创建的条件(isSingletonCurrentlyInCreation(beanName) == true),因此可以进入第一层if判断
-
beanA 被存放在三级缓存
singletonFactories中,从二级缓存earlySingletonObjects中获取也是null,因此可以进入第二层if判断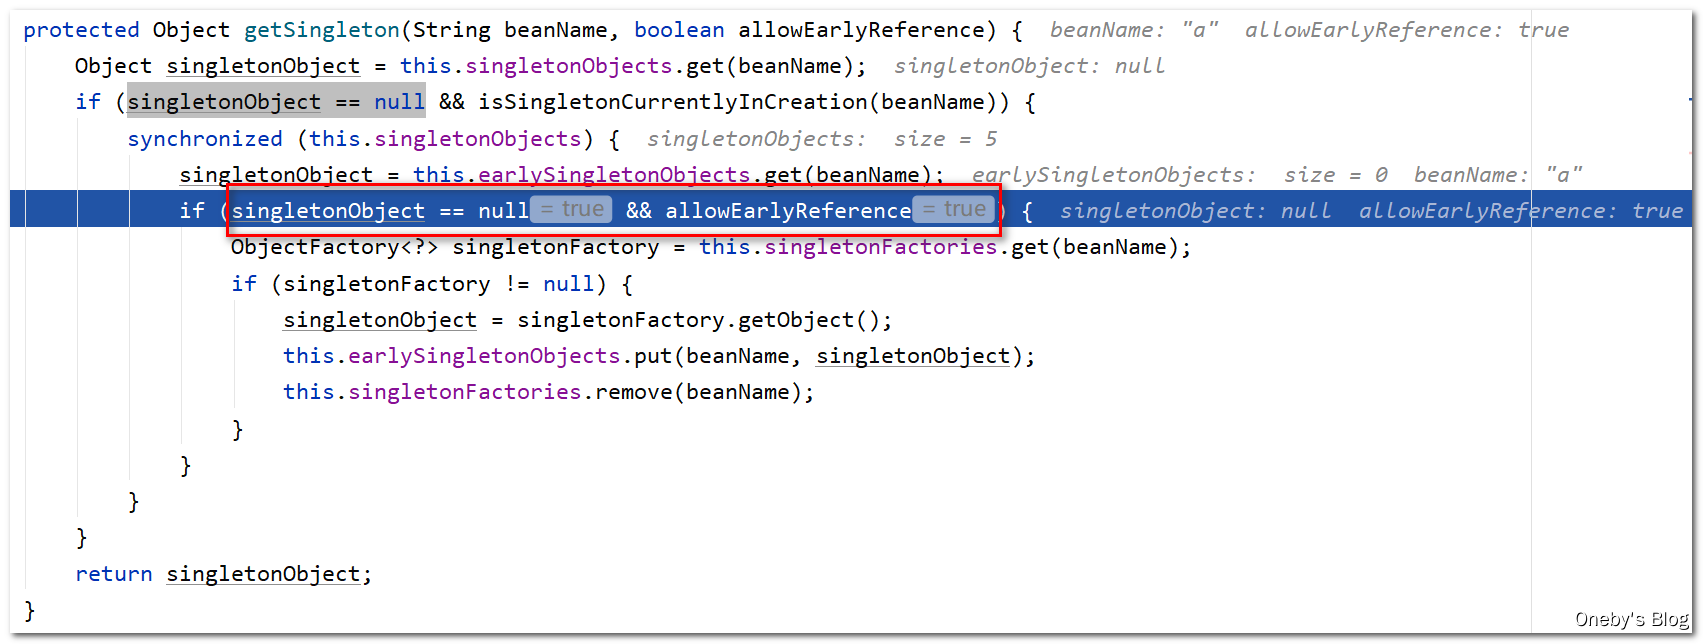
-
从三级缓存中获取 beanA 肯定不为空啦~,因此可以进入第三层
if判断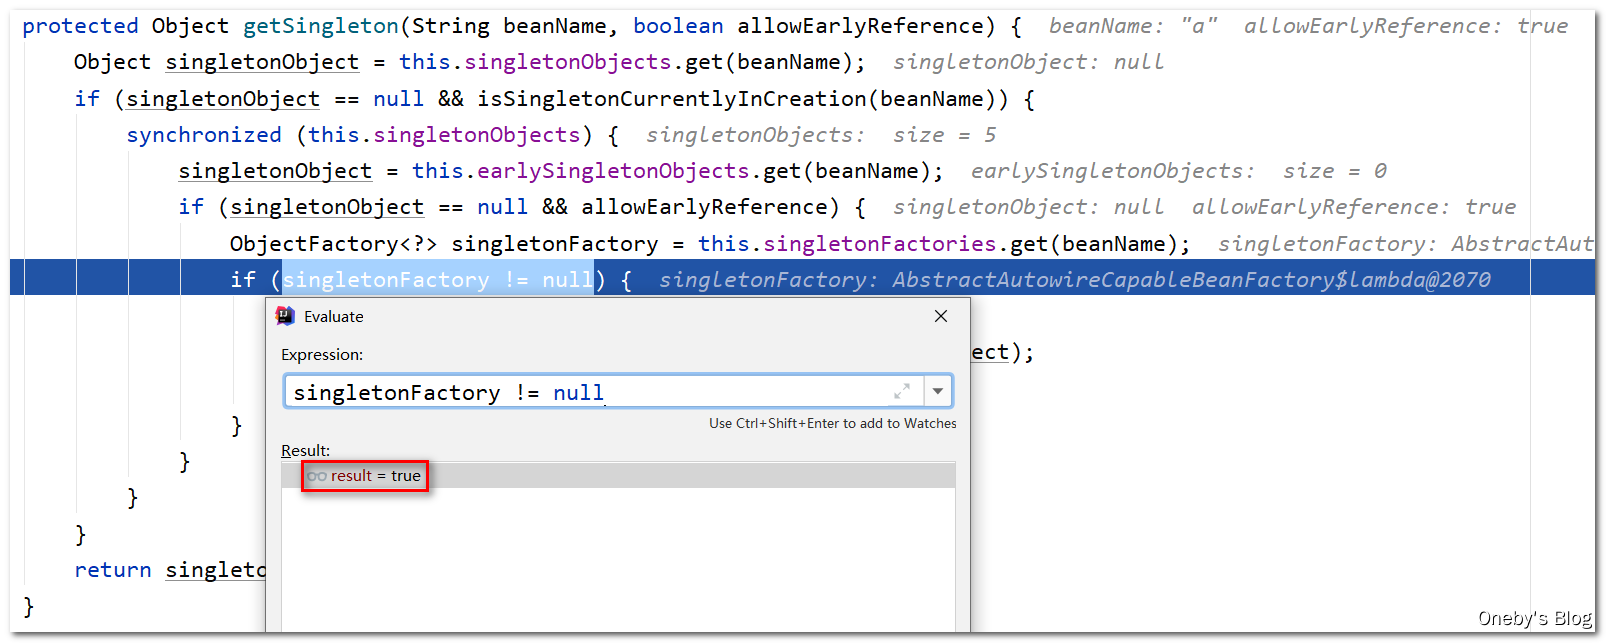
-
①从单例工厂
singletonFactory中获取 beanA;②将 beanA 添加至二级缓存earlySingletonObjects中;③将 beanA 从三级缓存singletonFactories中移除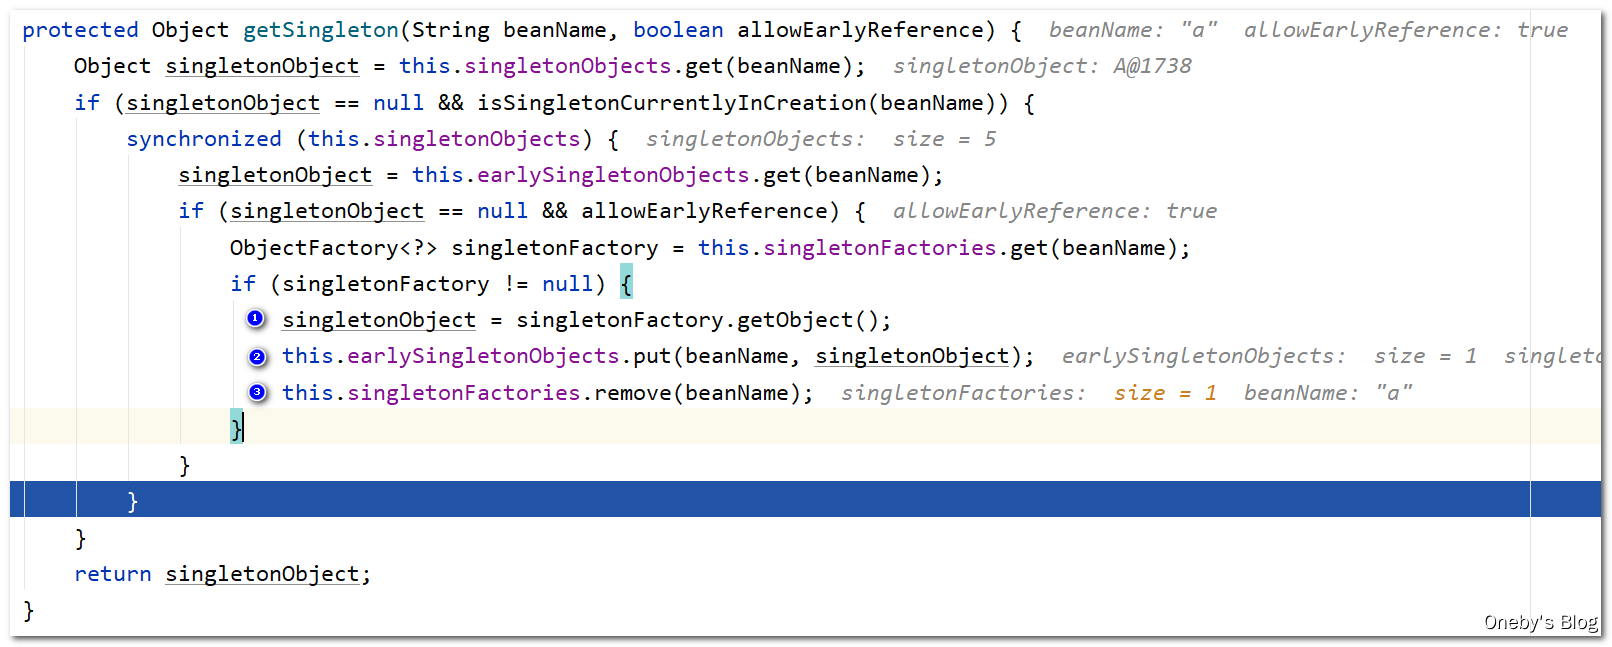
回到
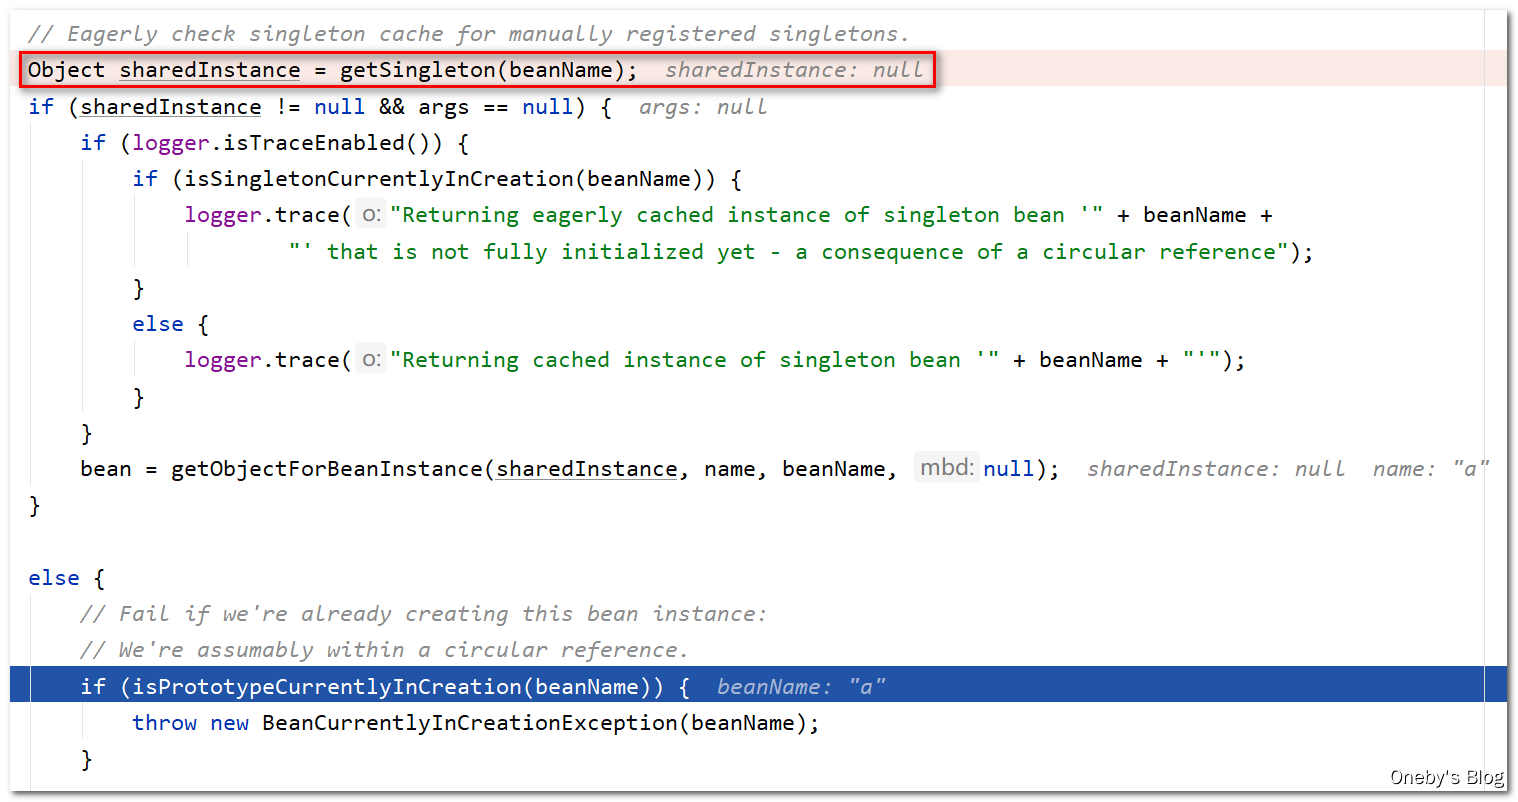
doGetBean(name, null, null, false)方法中
执行 Object sharedInstance = getSingleton(beanName) 将获得之前存入三级缓存 singletonFactories 中的 beanA
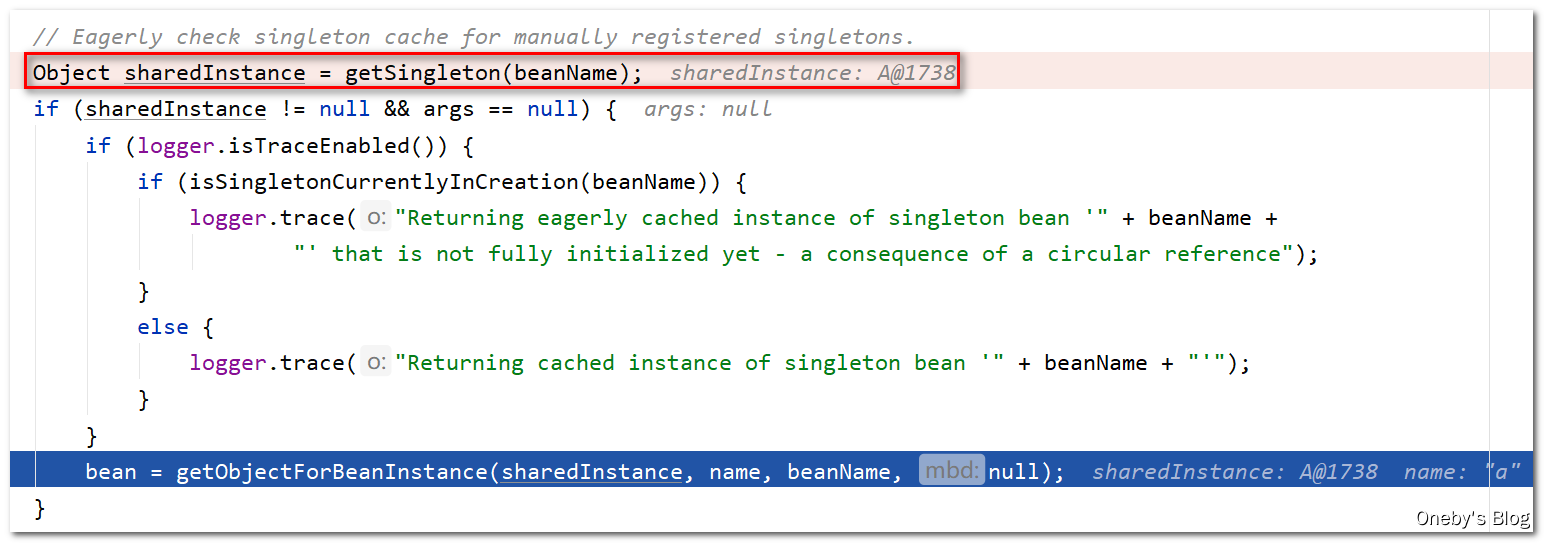
好家伙,获取到 beanA 后就直接返回了
回到
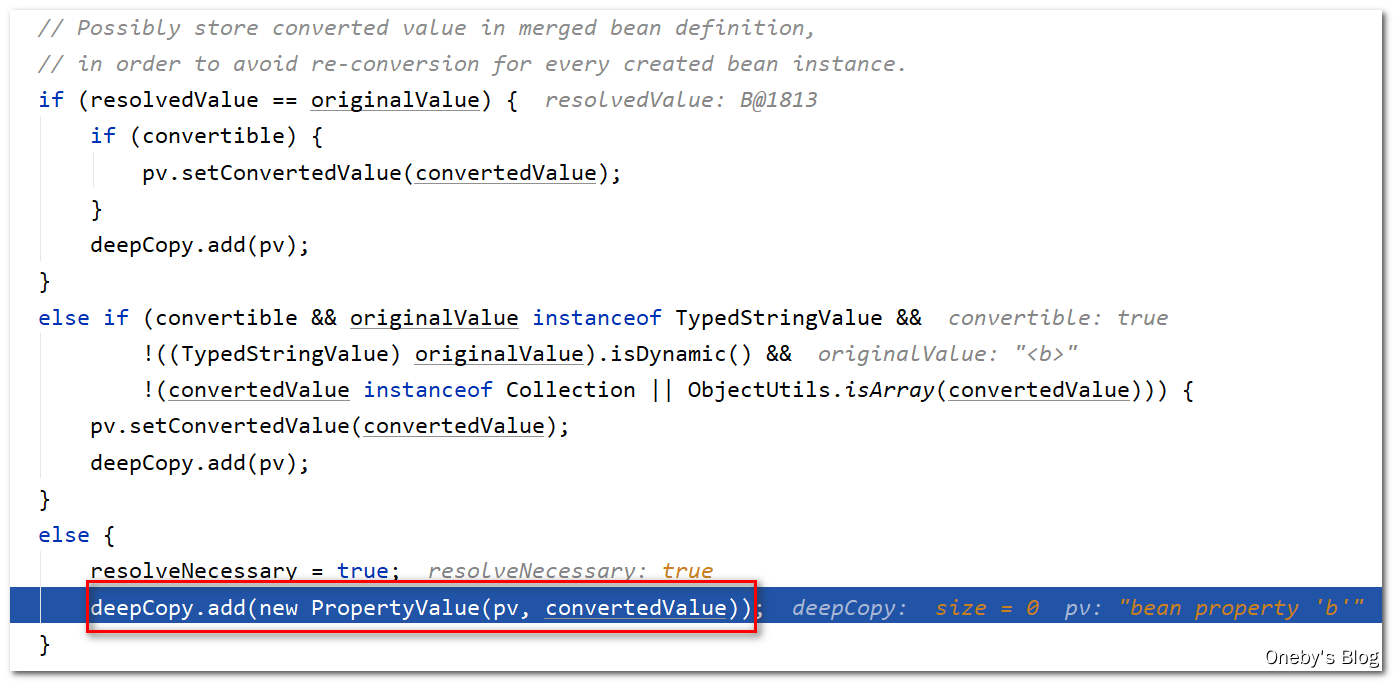
applyPropertyValues(beanName, mbd, bw, pvs)方法中
执行 valueResolver.resolveValueIfNecessary(pv, originalValue) 方法获取到 beanA 实例
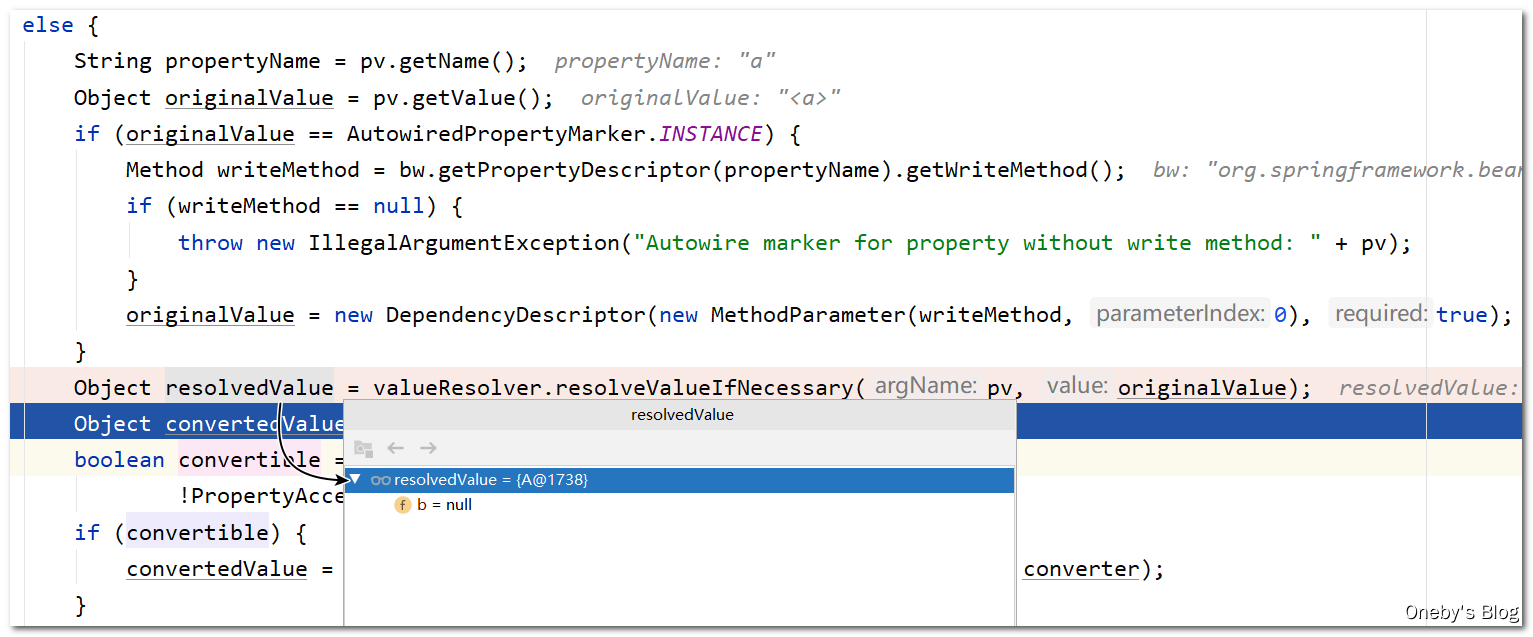
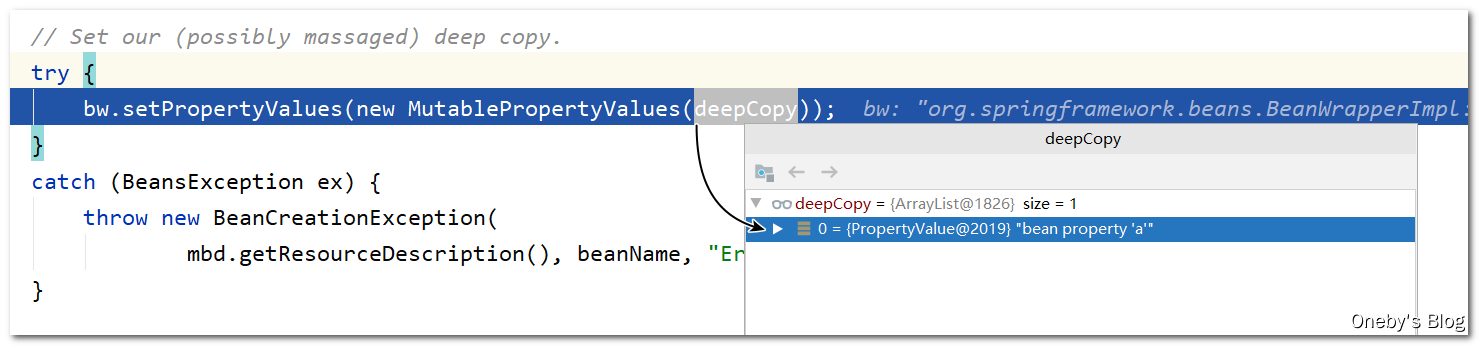
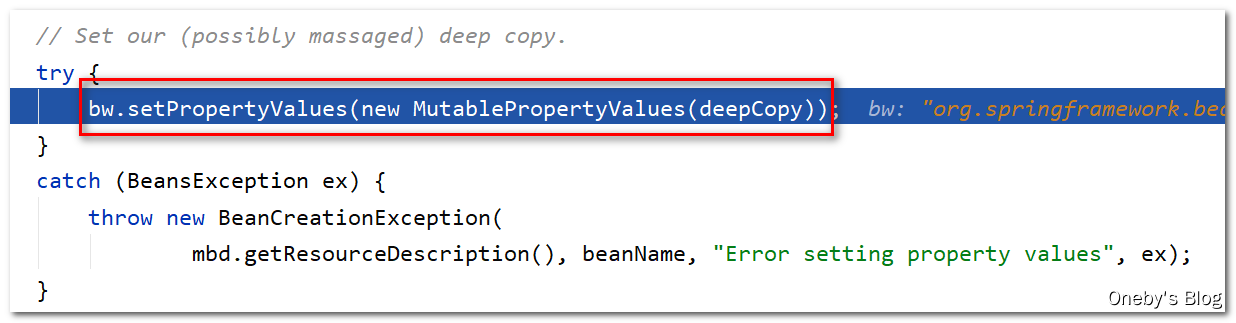
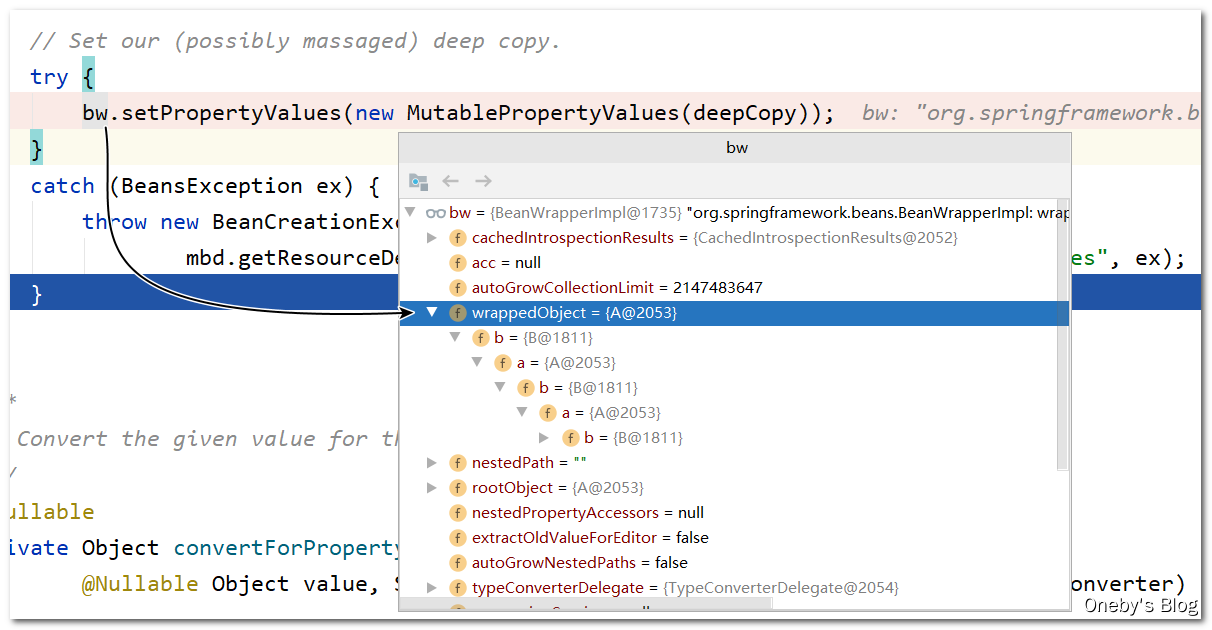
将属性 beanA 添加到 deepCopy 集合中(List<PropertyValue> deepCopy = new ArrayList<>(original.size()))
执行 bw.setPropertyValues(new MutablePropertyValues(deepCopy)) 方法将会填充 beanB 中的 a 属性
进入
bw.setPropertyValues(new MutablePropertyValues(deepCopy))方法
调用了其重载方法 setPropertyValues(pvs, false, false)

进入
setPropertyValues(pvs, false, false)方法
在该方法中会对 bean 的每一个属性进行填充(通过 setPropertyValues(pvs, false, false) 方法对属性进行赋值)
回到
applyPropertyValues(beanName, mbd, bw, pvs)方法中
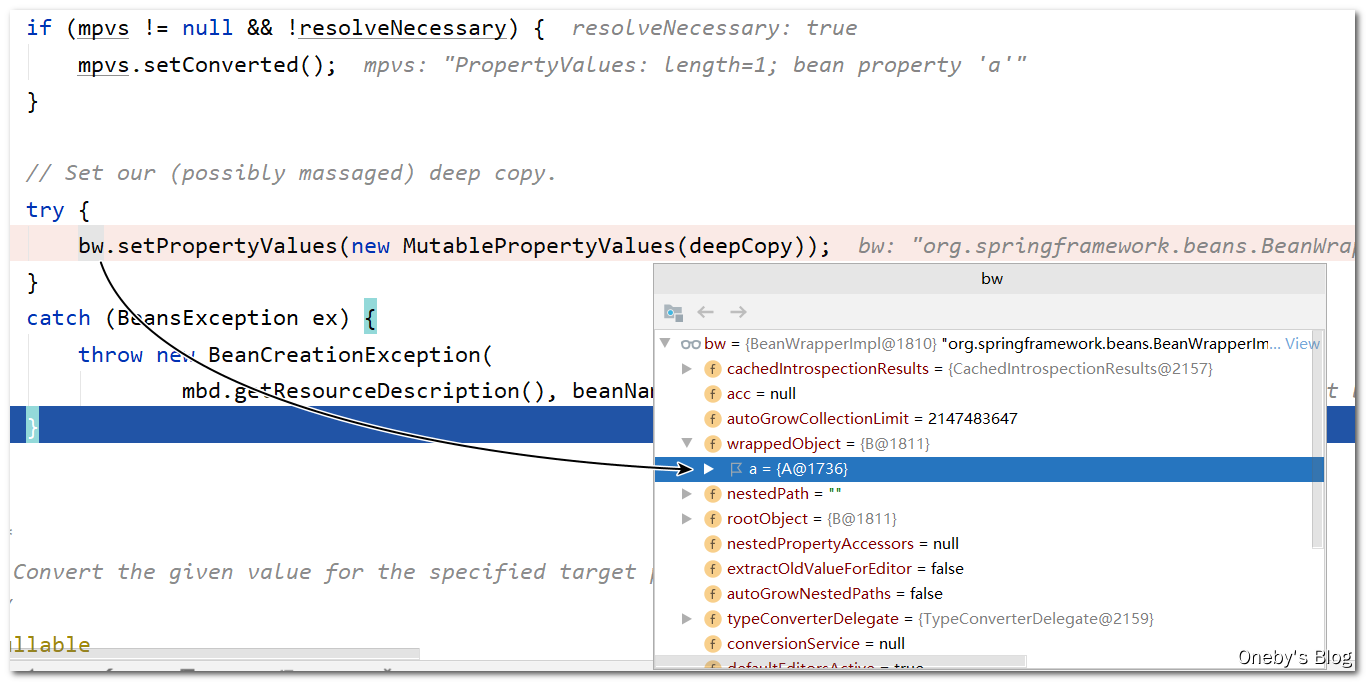
此时 bw 包裹着 beanB,执行 bw.setPropertyValues(new MutablePropertyValues(deepCopy)) 方法会将 deepCopy 中的元素依次赋值给 beanB 的各个属性,此时 beanB 中的 a 属性已经赋值为 beanA
回到
doCreateBean(beanName, mbdToUse, args)方法中
因为 instanceWrapper 封装了 beanB,所以执行了 populateBean(beanName, mbd, instanceWrapper) 方法后,beanB 中的 a 属性就已经被填充啦~可以看到 beanB 中有 beanA,但 beanA 中没有 beanB
执行 getSingleton(beanName, false) 方法,传入的参数 allowEarlyReference = false,表示不允许从三级缓存 singletonFactories 中获取 beanB
进入
getSingleton(beanName, false)方法
由于传入的参数 allowEarlyReference = false,因此第三层 if 判断铁定进不去,而 beanB 在三级缓存 singletonFactories 中存着,因此返回的 singletonObject 为 null
回到
doCreateBean(beanName, mbdToUse, args)方法中
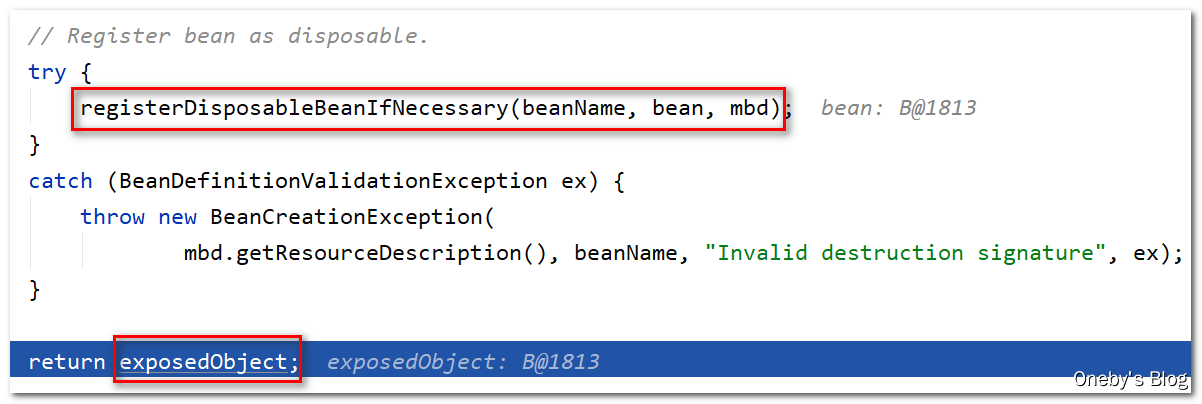
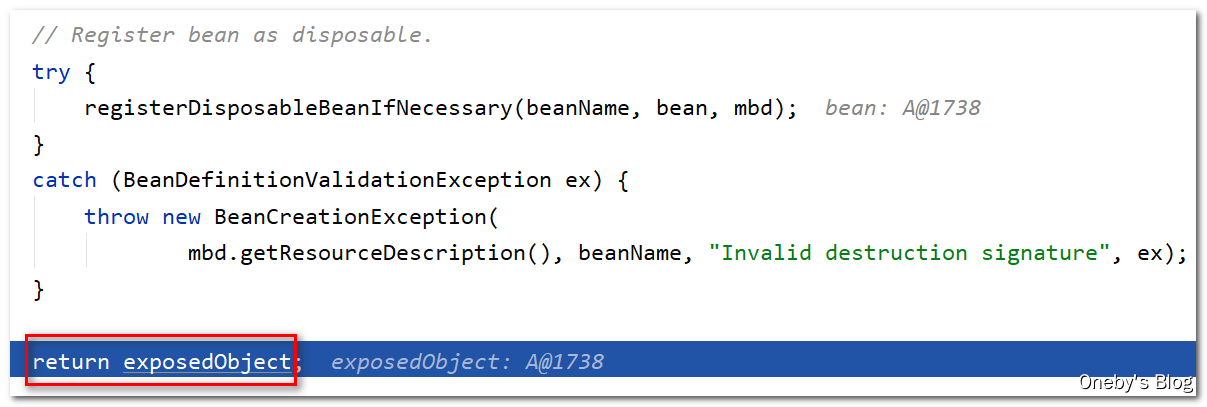
这里应该是执行 bean 的 destroy-method ,应该只会在工厂销毁的时候并且 bean 为单例的条件下,其内部逻辑才会执行。registerDisposableBeanIfNecessary(beanName, bean, mbd) 方法的注释如下:Add the given bean to the list of disposable beans in this factory, registering its DisposableBean interface and/or the given destroy method to be called on factory shutdown (if applicable). Only applies to singletons. 最后将 beanB 返回(属性 a 已经填充完毕)
回到
createBean(beanName, mbd, args)方法
执行 doCreateBean(beanName, mbdToUse, args) 方法得到包装 beanB 实例(属性 a 已经填充完毕),并将其返回
回到
getSingleton(beanName, () -> { ... }方法中
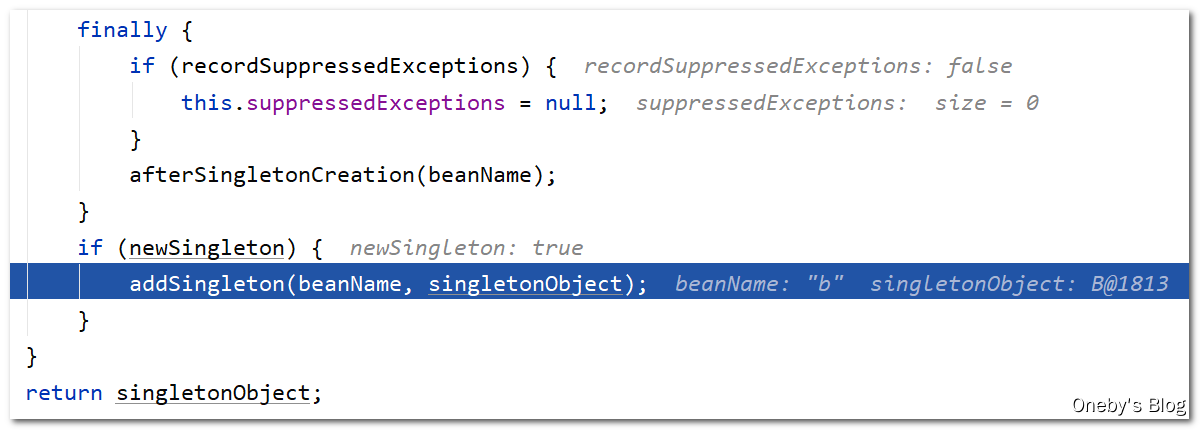
执行 singletonFactory.getObject() 方法获取到 beanB 实,这里的 singletonFactory 是之前调用 getSingleton(beanName, () -> { ... } 方法传入的 Lambda 表达式,然后将 newSingleton 设置为 true
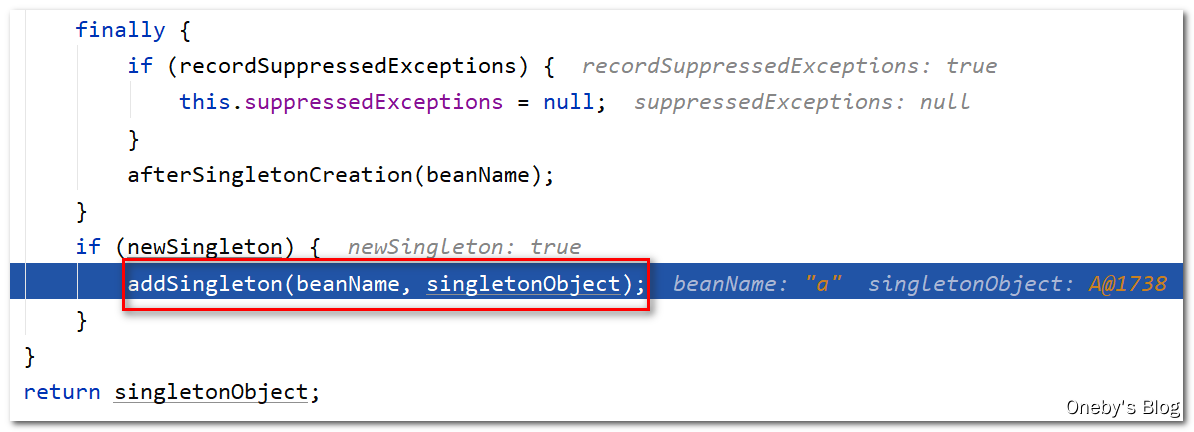
执行 addSingleton(beanName, singletonObject) 方法将 beanB 实例添加到一级缓存 singletonObjects 中
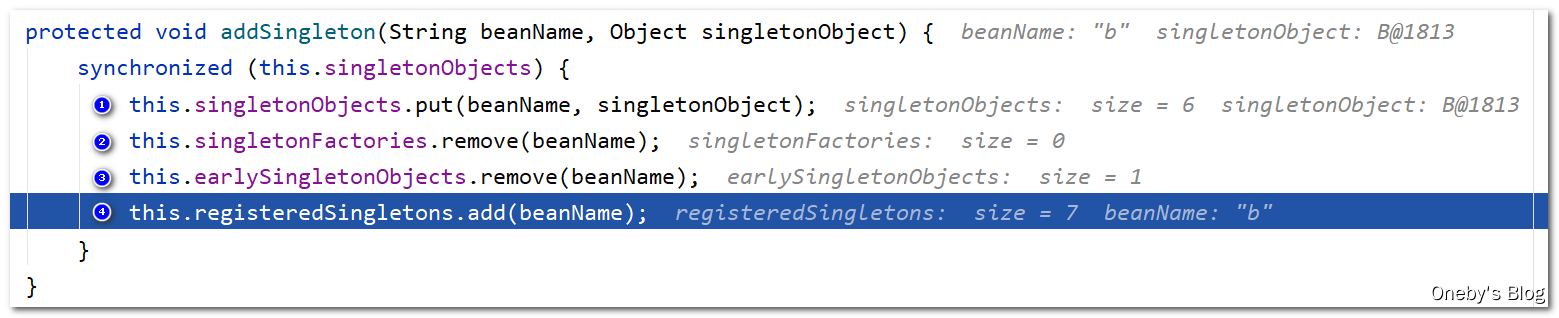
进入
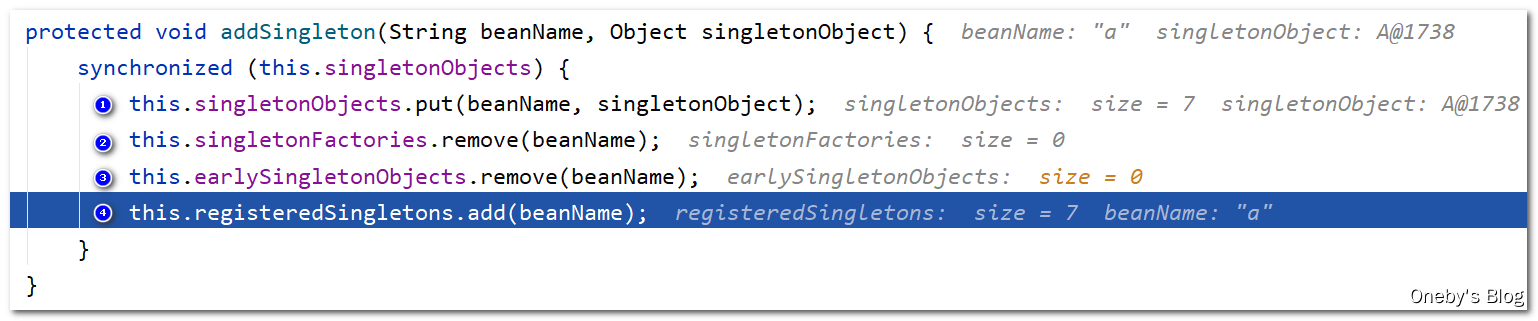
addSingleton(beanName, singletonObject)方法
① 将 beanB 放入一级缓存 singletonObjects 中
② 将 beanB 从三级缓存 singletonFactories 中删除(beanB 确实在三级缓存中)
③ 将 beanB 从二级缓存 earlySingletonObjects 中删除(beanB 并不在二级缓存中)
④ 将 beanB 的 beanName 注册到 registeredSingletons 中(之前添加至三级缓存的时候已经注册过啦~)
回到
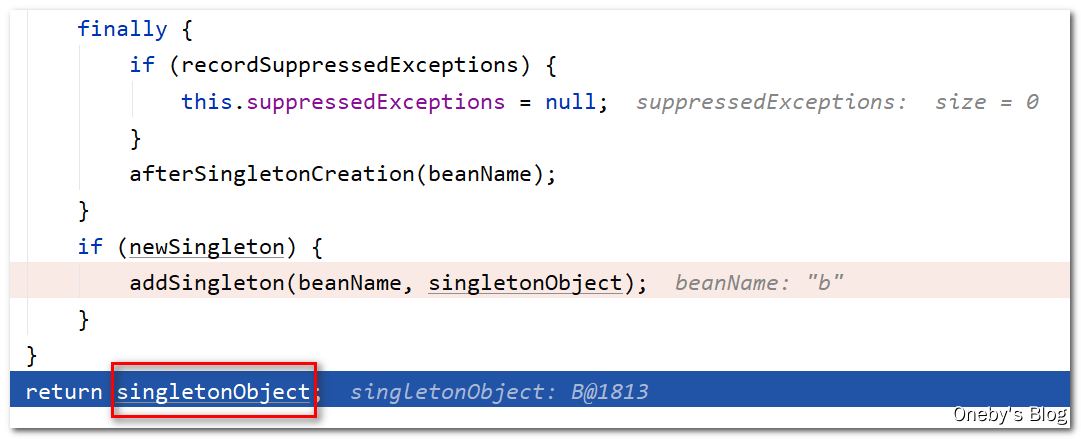
getSingleton(beanName, () -> { ... }方法中
执行 addSingleton(beanName, singletonObject) 将 beanB 添加到一级缓存 singletonObjects 后,将 beanB 返回
回到
doGetBean(name, null, null, false)方法中
执行完 getSingleton(beanName, () -> { ... } 方法后,得到属性已经填充好的 beanB,并且已经将其添加至一级缓存 singletonObjects 中

将 beanB 返回,想想返回到哪儿去了呢?当初时因为 beanA 要填充其属性 b,才执行了创建 beanB 的操作,现在返回肯定是将 beanB 返回给 beanA
2.6.5、beanA 的属性填充
回到
resolveReference(argName, ref)方法中
执行完 this.beanFactory.getBean(resolvedName) 方法后,获得了属性填充好的 beanB 实例,并将其实例返回
回到
applyPropertyValues(beanName, mbd, bw, pvs)方法中
执行完 valueResolver.resolveValueIfNecessary(pv, originalValue) 方法后,将获得属性填充好的 beanB 实例
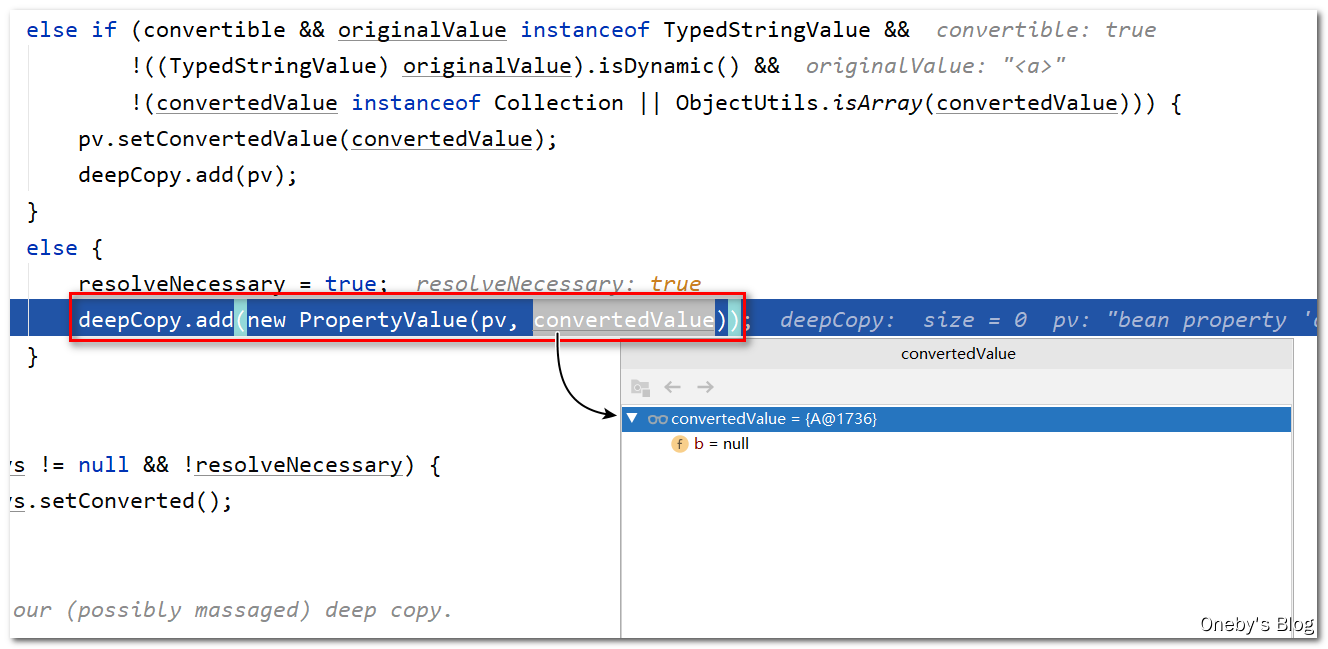
将 b 属性添加至 deepCopy 集合中
执行 bw.setPropertyValues(new MutablePropertyValues(deepCopy)) 方法对 beanA 的 b 属性进行填充
进入
setPropertyValues(pvs, false, false)方法
在 bw.setPropertyValues(new MutablePropertyValues(deepCopy)) 方法中调用了 setPropertyValues(pvs, false, false) 方法,在该方法中会对 bean 的每一个属性进行填充(通过 setPropertyValues(pvs, false, false) 方法对属性进行赋值)
回到
applyPropertyValues(beanName, mbd, bw, pvs)方法中
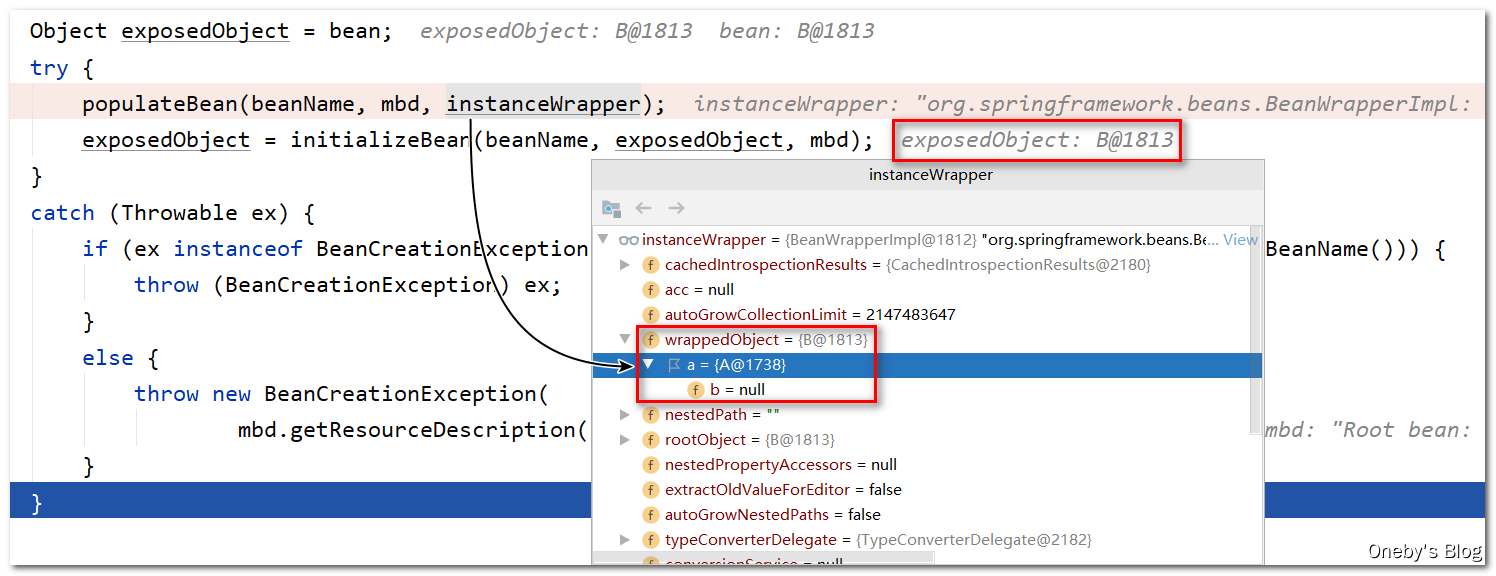
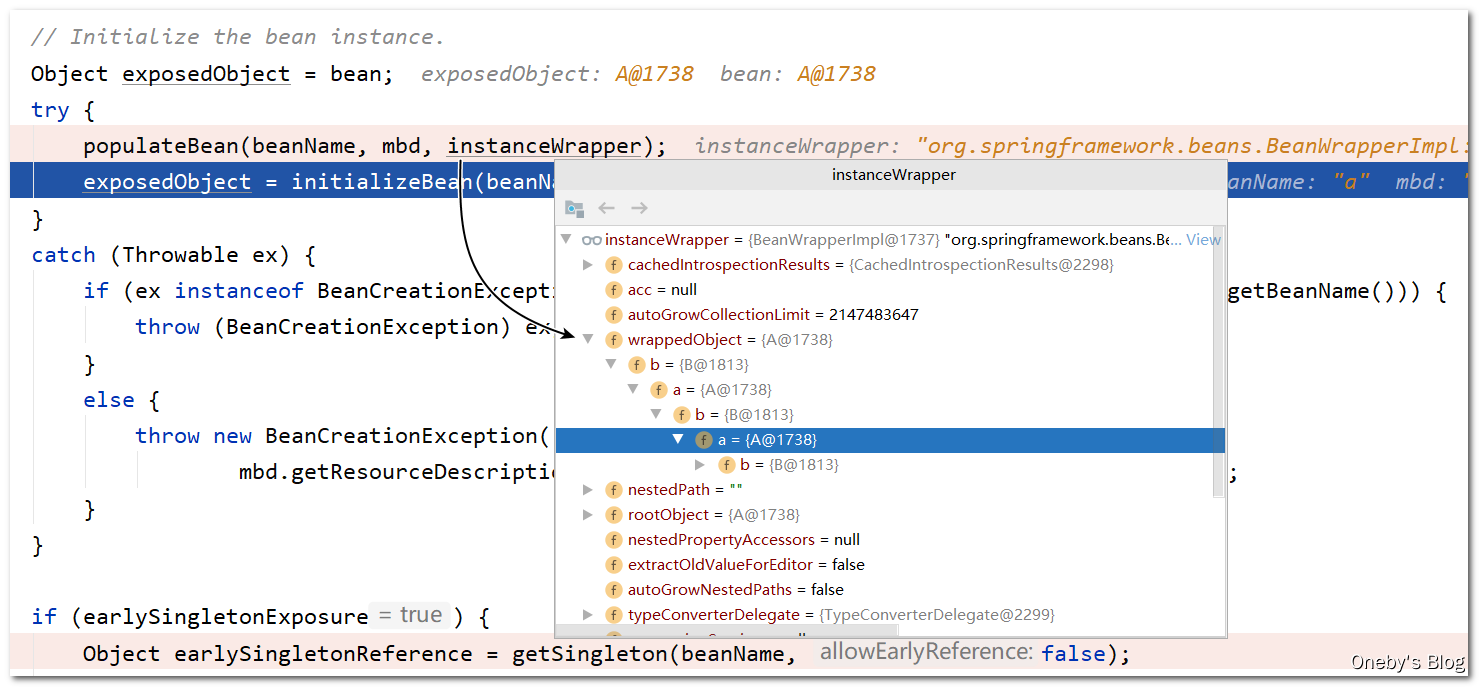
此时 bw 中包裹着 beanA,,执行 bw.setPropertyValues(new MutablePropertyValues(deepCopy)) 方法会将 deepCopy 中的元素依次赋值给 beanA 的各个属性,此时 beanA 中的 b 属性已经赋值为 beanA,又加上之前 beanB 中的 a 属性已经赋值为 beanA,此时可开启无限套娃模式
回到
doCreateBean(beanName, mbdToUse, args)方法中
执行完 populateBean(beanName, mbd, instanceWrapper) 方法后,可以开启无限套娃模式
这次执行 getSingleton(beanName, false) 方法能获取到 beanA 吗?
进入
getSingleton(beanName, false)方法
之前 beanB 中注入 a 属性时,将 beanA 从三级缓存 singletonFactories 移动到了二级缓存 earlySingletonObjects 中,因此可以从二级缓存 earlySingletonObjects 中获取到 beanA
回到
doCreateBean(beanName, mbdToUse, args)方法中
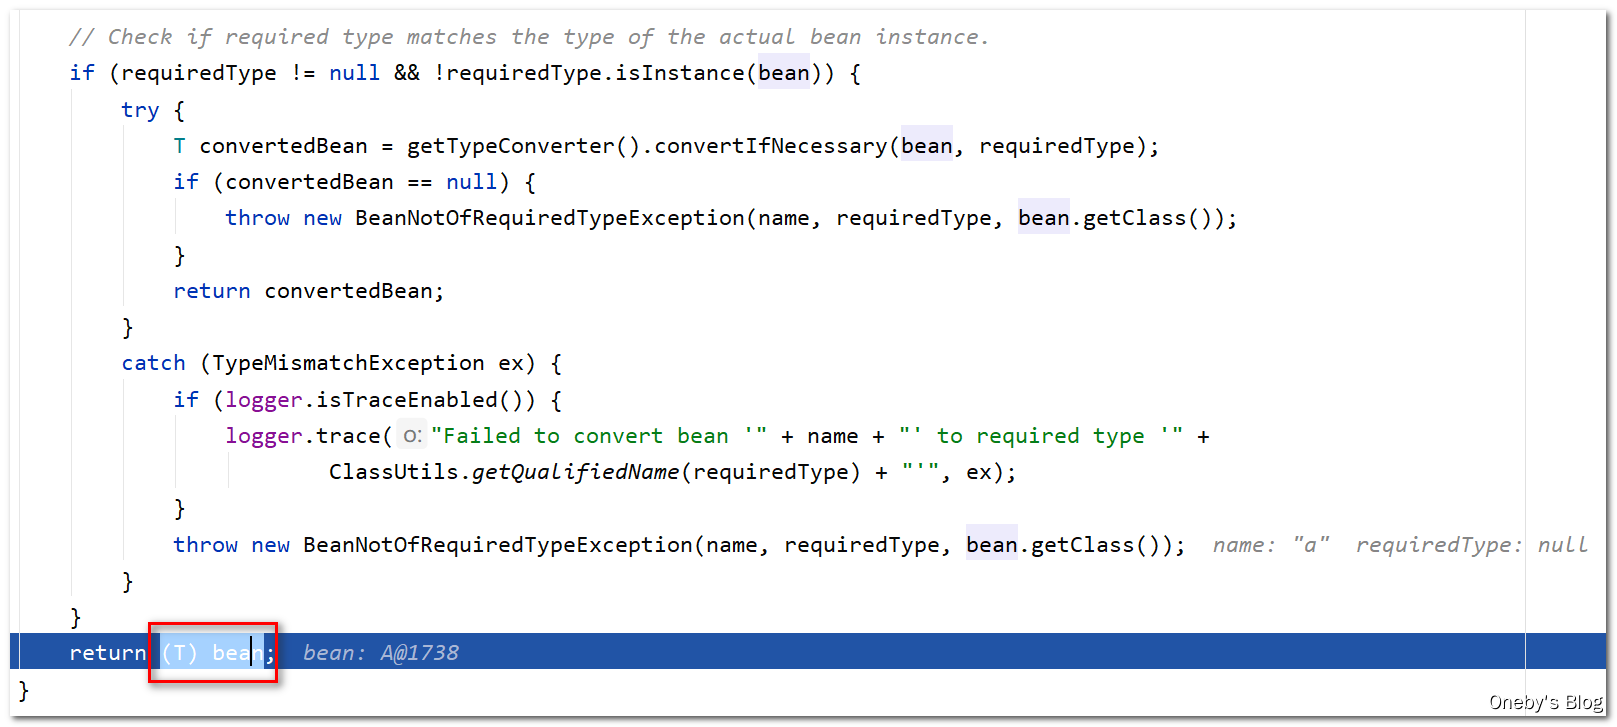
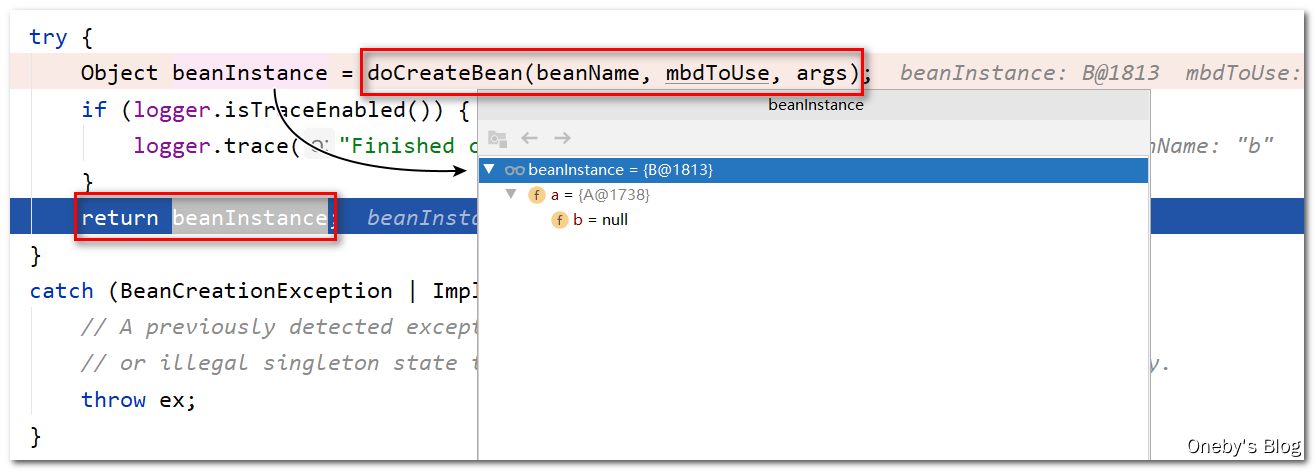
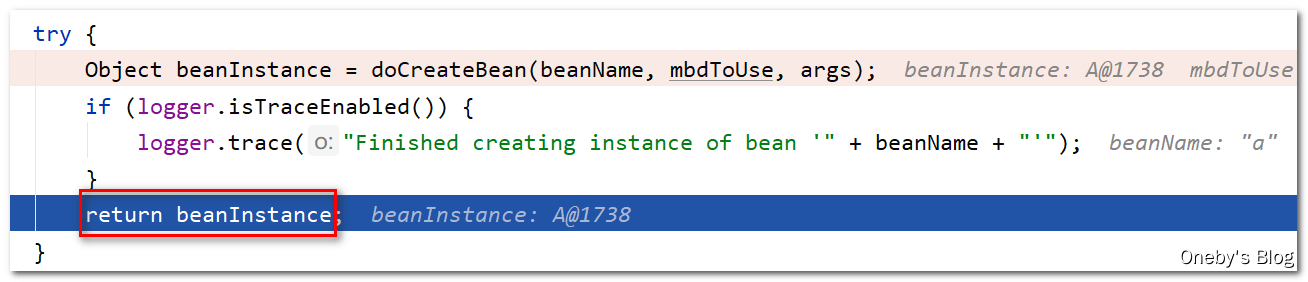
最终将获取到的 beanA 返回
回到
createBean(beanName, mbd, args)方法中
执行 doCreateBean(beanName, mbdToUse, args) 方法后得到 beanA 实例,并将此实例返回
回到
getSingleton(beanName, () -> { ... }方法
执行 singletonFactory.getObject() 方法后将获得 beanA 实例,这里的 singletonFactory 是我们传入的 Lambda 表达式(专门用于创建 bean 实例)
执行 addSingleton(beanName, singletonObject) 方法将 beanA 添加到一级缓存 singletonObjects 中
进入
addSingleton(beanName, singletonObject)方法
① 将 beanA 放入一级缓存 singletonObjects 中
② 将 beanA 从三级缓存 singletonFactories 中删除(beanA 并不在三级缓存中)
③ 将 beanA 从二级缓存 earlySingletonObjects 中删除(beanA 确实在二级缓存中)
④ 将 beanA 的 beanName 注册到 registeredSingletons 中(之前添加至三级缓存的时候已经注册过啦~)
回到
getSingleton(beanName, () -> { ... }方法中
将 beanA 添加至一级缓存 singletonObjects 后,将其返回

回到
doGetBean(name, null, null, false)方法中
执行 getSingleton(beanName, () -> { ... } 方法得到 beanA 实例后,将其返回
回到
preInstantiateSingletons()方法中
终于要结束了。。。执行完 getBean(beanName) 方法后,将得到无限套娃版本的 beanA 和 beanB 实例
2.7、循环依赖总结
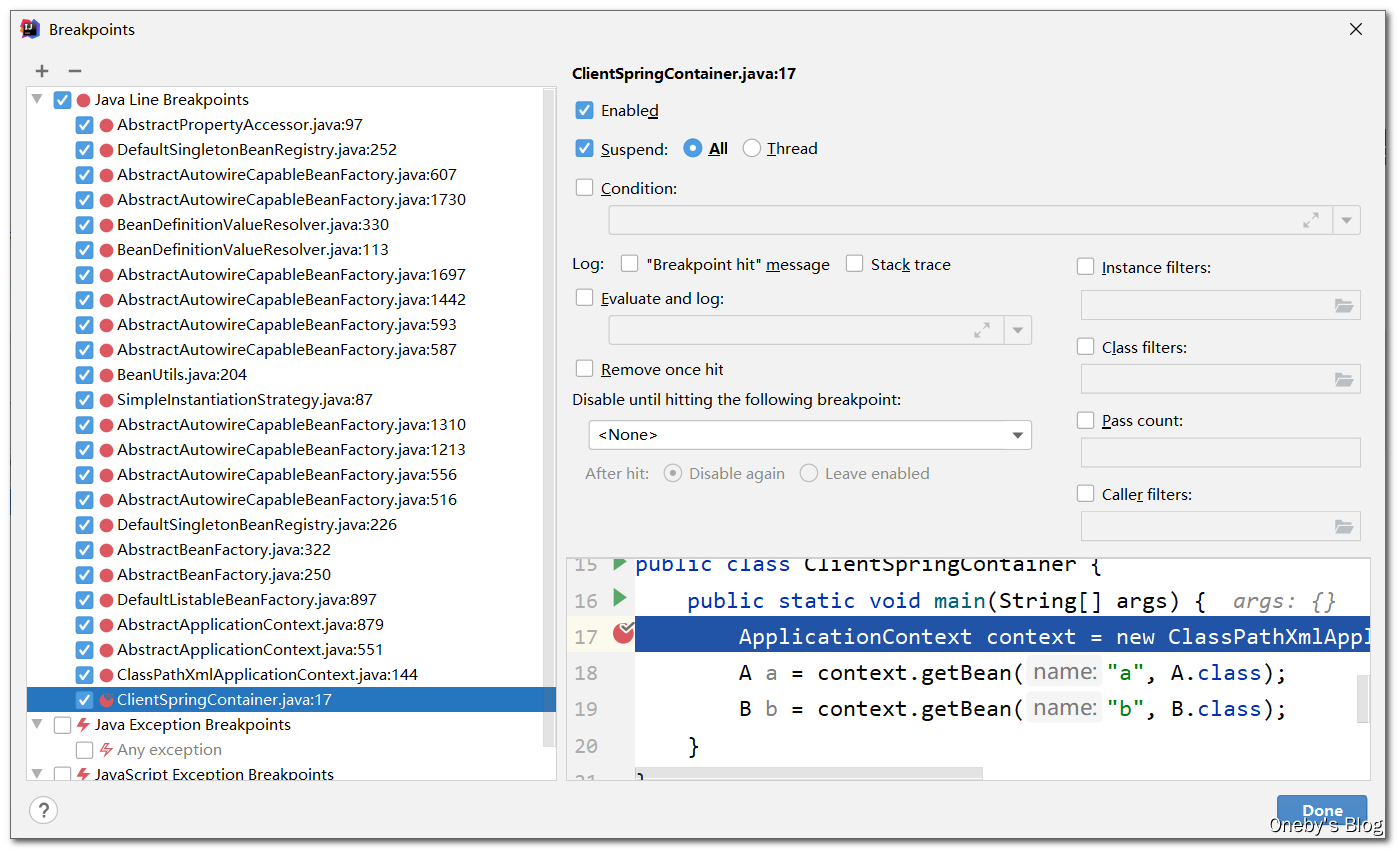
2.7.1、全部 Debug 断点
导出 Debug 所有断点
点击【View Breakpoints】
呐,所有断点~~~
2.7.2、Debug 步骤总结
循环依赖 Debug 的具体步骤
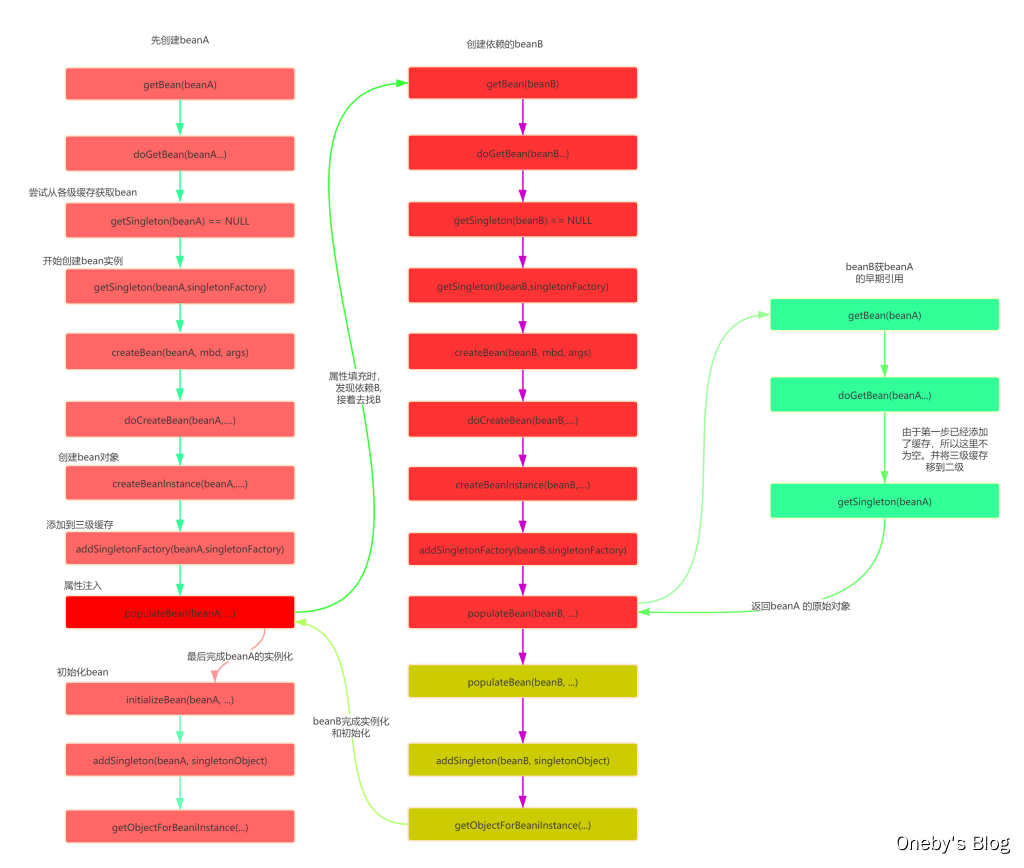
- 调用
doGetBean()方法,想要获取beanA,于是调用getSingleton()方法从缓存中查找beanA - 在
getSingleton()方法中,从一级缓存中查找,没有,返回null doGetBean()方法中获取到的beanA为null,于是走对应的处理逻辑,调用getSingleton()的重载方法(参数为ObjectFactory的)- 在
getSingleton()方法中,先将beanA_name添加到一个集合中,用于标记该bean正在创建中。然后回调匿名内部类的creatBean()方法 - 进入
AbstractAutowireCapableBeanFactory#doCreateBean(),先反射调用构造器创建出beanA的实例,然后判断。是否为单例、是否允许提前暴露引用(对于单例一般为true)、是否正在创建中〈即是否在第四步的集合中)。判断为true则将beanA添加到【三级缓存】中 - 对beanA进行属性填充,此时检测到beanA依赖于beanB,于是开始查找beanB
- 调用
doGetBean()方法,和上面beanA的过程一样,到缓存中查找beanB,没有则创建,然后给beanB填充属性 - 此时beanB依赖于beanA,调用
getsingleton()获取beanA,依次从一级、二级、三级缓存中找,此时从三级缓存中获取到beanA的创建工厂,通过创建工厂获取到singletonObject,此时这个singletonObject指向的就是上面在doCreateBean()方法中实例化的beanA - 这样beanB就获取到了beanA的依赖,于是beanB顺利完成实例化,并将beanA从三级缓存移动到二级缓存中
- 随后beanA继续他的属性填充工作,此时也获取到了beanB,beanA也随之完成了创建,回到
getsingleton()方法中继续向下执行,将beanA从二级缓存移动到一级缓存中
2.7.3、三级缓存总结
Spring 创建 Bean 的两大步骤
Spring创建bean主要分为两个步骤,创建原始bean对象,接着去填充对象属性和初始化
每次创建bean之前,我们都会从缓存中查下有没有该bean,因为是单例,只能有一个。当我们创建 beanA的原始对象后,并把它放到三级缓存中,接下来就该填充对象属性了,这时候发现依赖了beanB,接着就又去创建beanB,同样的流程,创建完 beanB填充属性时又发现它依赖了beanA又是同样的流程。
不同的是:这时候可以在三级缓存中查到刚放进去的原始对象beanA,所以不需要继续创建,用它注入beanB,完成beanB的创建既然 beanB创建好了,所以beanA就可以完成填充属性的步骤了,接着执行剩下的逻辑,闭环完成
Spring解决循环依赖依靠的是Bean的“中间态"这个概念,而这个中间态指的是已经实例化但还没初始化的状态,也即半成品。
实例化的过程又是通过构造器创建的,如果A还没创建好出来怎么可能提前曝光,所以构造器的循环依赖无法解决。
Spring 的三级缓存
Spring为了解决单例的循环依赖问题,使用了三级缓存:
- 其中一级缓存为单例池〈 singletonObjects)
- 二级缓存为提前曝光对象( earlySingletonObjects)
- 三级缓存为提前曝光对象工厂( singletonFactories)
假设A、B循环引用,实例化A的时候就将其放入三级缓存中,接着填充属性的时候,发现依赖了B,同样的流程也是实例化后放入三级缓存,接着去填充属性时又发现自己依赖A,这时候从缓存中查找到早期暴露的A,没有AOP代理的话,直接将A的原始对象注入B,完成B的初始化后,进行属性填充和初始化,这时候B完成后,就去完成剩下的A的步骤,如果有AOP代理,就进行AOP处理获取代理后的对象A,注入B,走剩下的流程。
2.7.4、Debug 后记
我吐了。。。这篇笔记我是记吐了,Debug 源码太累了,而且太麻烦,关键还要抓图,一不小心断点跑过去了,就得重来一遍,本来之前还兴致勃勃想写完笔记自己做个流程图呢,算了算了,赶下一场 Redis 派对去了,有机会再来补流程图吧~
3、后记
由于代码做过迁移,编写本篇笔记时,代码版本为旧代码,因此 GitHub 仓库中的包名和项目名和笔记对应不上,这倒无伤大雅。