我们首先对两版的DataGridView控件进行对比:
版本1:
版本2:

通过对比可以发现,版本2比版本1更加的人性化,增加了行号以及居中了文本信息,同时铺满整个窗体,能够给用户更好的体验。那么怎样做到这样呢?
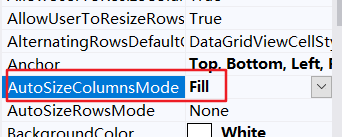
1.使得DataGridView控件铺满整个窗体:
更改AutoSizeColumnsMode属性为Fill
2. 添加自动行序号
//绘制单元格时发生
private void dataGridView1_CellPainting(object sender, DataGridViewCellPaintingEventArgs e)
{
     dataGridView1.RowsDefaultCellStyle.Alignment = DataGridViewContentAlignment.MiddleCenter;
     if (e.ColumnIndex < 0 && e.RowIndex >= 0)
     {
       // 绘制 自动序号
       e.Paint(e.ClipBounds, DataGridViewPaintParts.All);
       Rectangle vRect = e.CellBounds;
       vRect.Inflate(-2, 2);
       TextRenderer.DrawText(e.Graphics, (e.RowIndex + 1).ToString(), e.CellStyle.Font, vRect, e.CellStyle.ForeColor, TextFormatFlags.Right | TextFormatFlags.VerticalCenter);
       e.Handled = true;
      }
}
3.单元格样式设置
private void dataGridView1_CellPainting(object sender, DataGridViewCellPaintingEventArgs e)
{
      //单元格样式设置
      if (e.RowIndex % 2 == 0)
      { // 行序号为双数(含0)时
        e.CellStyle.BackColor = Color.White;
      }
      else
      {
         e.CellStyle.BackColor = Color.Honeydew;
      }
       // 选中单元格时,背景色
       e.CellStyle.SelectionBackColor = Color.Gray;
       //单位格内数据对齐方式
       e.CellStyle.Alignment = DataGridViewContentAlignment.MiddleCenter;
 }
4.禁止使用鼠标拖动行宽与列高
dataGridView1.AllowUserToResizeColumns = false; // 禁拖动列宽度

dataGridView1.AllowUserToResizeRows = false;    // 禁拖动行高度
5.禁用Delete键的删除功能
dataGridView1.AllowUserToDeleteRows = false;
//上述禁用,仅是将用户界面交互的自动新增行禁了,但还是可以通过代码:
dataGridView1.Rows.Remove(DataGridViewRow dataGridViewRow);
//或者
dataGridView1.Rows.RemoveAt(int index);
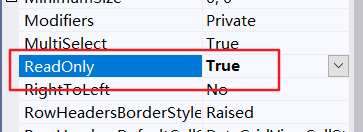
//来删除指定行数据。6.使单元格为不可编辑状态
更改ReadOnly属性为True
7.点击选中整行、整列
参考博客:https://www.cnblogs.com/nimorl/p/9494452.html
dataGridView1.SelectionMode = DataGridViewSelectionMode.FullRowSelect;
// 单击选中整行,枚举
SelectionMode 为枚举类型:
| CellSelect | 可以选定一个或多个单元格 |
| FullRowSelect | 通过单击行的标头或是该行所包含的单元格选定整个行 |
| FullColumnSelect | 通过单击列的标头或该列所包含的单元格选定整个列 |
| RowHeaderSelect | 通过单击行的标头单元格选定此行。 通过单击某个单元格可以单独选定此单元格。 |
| ColumnHeaderSelect | 可以通过单击列的标头单元格选定此列。 通过单击某个单元格可以单独选定此单元格。 |