Flutter对接极光推送实现基础本地推送
原创:@As.Kai
博客地址:https://blog.csdn.net/qq_42362997
如果以下内容对您有帮助,点赞点赞点赞~
首先导入依赖包
需要导入极光推送依赖包:
#极光推送JPush
jpush_flutter: ^0.6.2
#接着pub get
最新pub版本查看:
传送门
配置方面:
在android/app/build.gradle中添加一些配置
android: {
  ....
  defaultConfig {
    ...
    ndk {
        //选择要添加的对应 cpu 类型的 .so 库。
        abiFilters 'armeabi', 'armeabi-v7a', 'x86', 'x86_64', 'mips', 'mips64', 'arm64-v8a',
    }


    manifestPlaceholders = [
        JPUSH_PKGNAME : 你的key,
        JPUSH_APPKEY : "appkey", // NOTE: JPush 上注册的包名对应的 Appkey.
        JPUSH_CHANNEL : "developer-default", //暂时填写默认值即可.
    ]
  }
}
没有极光开发者Id?
进入极光官网https://www.jiguang.cn/
注册登录不用我说了吧
右上角头像点击服务中心 =>开发者平台 点击进入 =>创建应用
填写一下名称 确定=>选择Android平台的消息推送 下一步=>填写你的应用包名
包名找不着?
打开你的项目 找到
android/app/src/main/AndroidManifest.xml 打开
顶部package标签内容就是你的包名 复制过来填写到极光上就完事了
完事后会给到你一个AppKey,拿到这个AppKey之后填写到咱们build.gradle上就行
配置都弄好了之后 咱们来看看如何使用
//极光推送
final JPush _jPush = new JPush();
//异步方法  推送消息监听
Future<void> initPlatformState() async {
    //错误信息
    String platformVersion;
    try {
      //响应时间
      _jPush.addEventHandler(
        //接收通知回调方法
        onReceiveNotification: (Map<String, dynamic> message) async {
          //接收到数据 //进程运行时候可以接受
//        print('>>>>>>>>>flutter接收到推送:${message}');
          setState(() {
            debugLable = '接收到极光推送数据:$message';
//          notifyRoute();
          });
        }, //点击通知毁掉方法
        onOpenNotification: (Map<String, dynamic> message) async {
          await print('触发onOpenNotification>>>>>>>${message.toString()}');
//        notifyRoute();
        },
        //接收自定义消息回调方法
//      onReceiveMessage: (Map<String,dynamic> message) async{
//            print('触发onReceiveMessage');
//            notifyRoute();
//      }
      );
    } on PlatformException {
      platformVersion = '平台版本获取失败,请检查配置';
    }
    if (!mounted) return;
    setState(() {
      debugLable = platformVersion;
      print('deBug===${debugLable.toString()}');
    });
  }
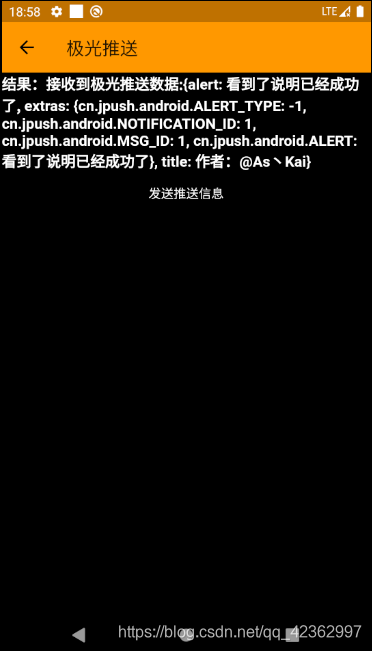
之后 在build中添加按钮点击事件实现点击按钮发送推送:
child: FlatButton(
onPressed: () {
//3秒后时间
var fireDate = DateTime.fromMillisecondsSinceEpoch(
DateTime.now().millisecondsSinceEpoch + 3000);
var localNotification = LocalNotification(
id: 001,
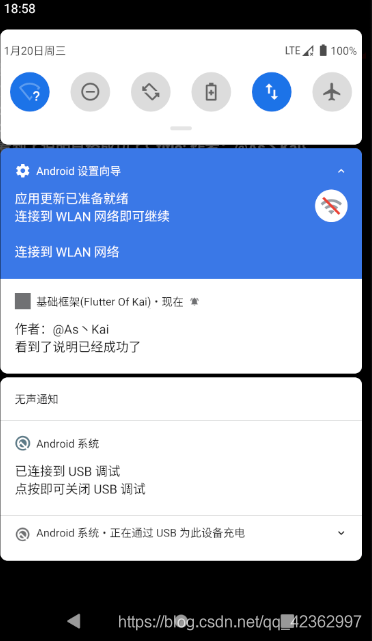
title: '作者:@As丶Kai',
content: '看到了说明已经成功了',
buildId: 1,
fireTime: fireDate,
subtitle: '子标题');
_jPush
.sendLocalNotification(localNotification)
.then((value) {
//传递
setState(() {
debugLable = value;
print('value===${value.toString()}');
});
});
},
child: new Text('发送推送信息',
style: TextStyle(color: Colors.white))),
做了一个3秒的时间戳 3秒后进行推送
var fireDate = DateTime.fromMillisecondsSinceEpoch(
DateTime.now().millisecondsSinceEpoch + 3000);
运行看看效果吧!以上就是极光基础本地推送集成
以下是完整代码:
//极光推送
  final JPush _jPush = new JPush();
  String debugLable = 'Unknown';


//推送跳转
  void notifyRoute() async {
    await Navigator.of(context)
        .push(new MaterialPageRoute(builder: (ctx) => new IndexPage()));
  }


  Future<void> initPlatformState() async {
    //错误信息
    String platformVersion;
    try {
      //响应时间
      _jPush.addEventHandler(
        //接收通知回调方法
        onReceiveNotification: (Map<String, dynamic> message) async {
          //接收到数据 //进程运行时候可以接受
//        print('>>>>>>>>>flutter接收到推送:${message}');
          setState(() {
            debugLable = '接收到极光推送数据:$message';
//          notifyRoute();
          });
        }, //点击通知毁掉方法
        onOpenNotification: (Map<String, dynamic> message) async {
          await print('触发onOpenNotification>>>>>>>${message.toString()}');
//        notifyRoute();
        },
        //接收自定义消息回调方法
//      onReceiveMessage: (Map<String,dynamic> message) async{
//            print('触发onReceiveMessage');
//            notifyRoute();
//      }
      );
    } on PlatformException {
      platformVersion = '平台版本获取失败,请检查配置';
    }
    if (!mounted) return;
    setState(() {
      debugLable = platformVersion;
      print('deBug===${debugLable.toString()}');
    });
  }


  //*******************END****************

@override
void initState() {
  // TODO: implement initState
  initPlatformState();
}
@override
Widget build(BuildContext context) {
setState(() {
  print('deBug===${debugLable.toString()}');
});
return Scaffold(
  backgroundColor: Colors.black,
  appBar: new AppBar(
    brightness: Brightness.dark,
    title: new Text(widget.title),
  ),
  body: return new Column(
  children: [
    new Text(
      '结果:${debugLable}',
      style: TextStyle(
          color: Colors.white,
          fontWeight: FontWeight.bold,
          fontSize: ScreenUtil().setSp(30.0)),
    ),
    new Center(
      child: FlatButton(
          onPressed: () {
            //3秒后时间
            var fireDate = DateTime.fromMillisecondsSinceEpoch(
                DateTime.now().millisecondsSinceEpoch + 3000);
            var localNotification = LocalNotification(
                id: 001,
                title: '作者:@As丶Kai',
                content: '看到了说明已经成功了',
                buildId: 1,
                fireTime: fireDate,
                subtitle: '子标题');
            _jPush
                .sendLocalNotification(localNotification)
                .then((value) {
              //传递
              setState(() {
                debugLable = value;
                print('value===${value.toString()}');
              });
            });
          },
          child: new Text('发送推送信息',
              style: TextStyle(color: Colors.white))),
        )
      ],
    ),
);

}
效果:
关注我,一起成长!
@As.Kai