组件化
在大型应用开发的时候,页面可以划分成很多部分。往往不同的页面,也会有相同的部分。例如可能会有相同的头部导航。
但是如果每个页面都独自开发,这无疑增加了我们开发的成本。所以我们会把页面的不同部分拆分成独立的组件,然后在不同页面就可以共享这些组件,避免重复开发。
全局组件
Vue的component方法来定义一个全局组件。
<!DOCTYPE html>
<html lang="en">
<head>
<meta charset="UTF-8">
<title>COMPONENT</title>
</head>
<body>
<div id="app">
<counter></counter>
</div>
<script src="node_modules/vue/dist/vue.js"></script>
<script>
Vue.component("counter",{
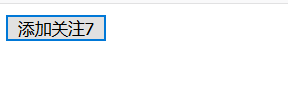
template:'<button @click="count++">添加关注{
{count}}</button>',
data(){
return {
count:0
}
}
})
new Vue({
el:"#app",
})
</script>
</body>
</html>
如果现在页面中显示多个控件需要用div包裹,否则只能显示一个控件
<!DOCTYPE html>
<html lang="en">
<head>
    <meta charset="UTF-8">
    <title>COMPONENT</title>
</head>
<body>
<div id="app">
    <counter></counter>
</div>
<script src="node_modules/vue/dist/vue.js"></script>
<script>
    Vue.component("counter", {


        template: '<div><button @click="count++">添加关注{

     {count}}</button><br/><button @contextmenu.prevent="count++">关注{

     {count}}</button></div> ',
        data() {


            return {


                count: 0
            }
        }
    })
    new Vue({


        el: "#app",
    })
</script>
</body>
</html>
- 组件其实也是一个Vue实例,因此它在定义时也会接收:data、methods、生命周期函数等
- 不同的是组件不会与页面的元素绑定,否则就无法复用了,因此没有el属性。
- 但是组件渲染需要html模板,所以增加了template属性,值就是HTML模板
- 全局组件定义完毕,任何vue实例都可以直接在HTML中通过组件名称来使用组件了。
- data必须是一个函数,不再是一个对象。
局部组件
全局注册,就意味着即便以后你不再使用这个组件,它依然会随着Vue的加载而加载。
因此,对于一些并不频繁使用的组件,我们会采用局部注册。
<!DOCTYPE html>
<html lang="en">
<head>
    <meta charset="UTF-8">
    <title>COMPONENT</title>
</head>
<body>
<div id="app">
    <counter></counter>
    <t_counter></t_counter>
</div>
<script src="node_modules/vue/dist/vue.js"></script>
<script>
    Vue.component("counter", {


        template: '<div><button @click="count++">添加关注{

     {count}}</button><br/><button @contextmenu.prevent="count++">关注{

     {count}}</button></div> ',
        data() {


            return {


                count: 0
            }
        }
    })

    const local_counter= {


        template: '<button v-on:click="count++">加{

     {count}}个数</button>',
        data() {


            return {


                count: 0
            };
        }

    }

    new Vue({


        el: "#app",
        components:{


            t_counter:local_counter
        }
    })
</script>
</body>
</html>
- components就是当前vue对象子组件集合。
- 其key就是子组件名称
- 其值就是组件对象名
- 效果与刚才的全局注册是类似的,不同的是,这个counter组件只能在当前的Vue实例中使用
props(父向子传递)
- 父组件使用子组件时,自定义属性(属性名任意,属性值为要传递的数据)
- 子组件通过props接收父组件数据,通过自定义属性的属性名
父组件使用子组件,并自定义了title属性:
<!DOCTYPE html>
<html lang="en">
<head>
<meta charset="UTF-8">
<title>COMPONENT</title>
</head>
<body>
<div id="app">
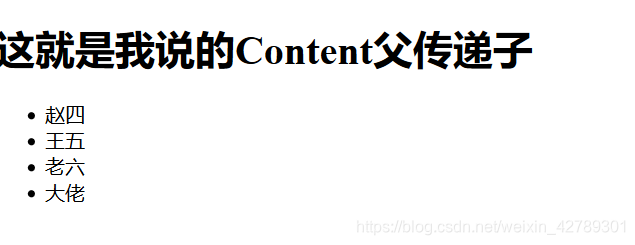
<props_component content="这就是我说的Content父传递子"></props_component>
<t_list :items="users"></t_list>
</div>
<script src="node_modules/vue/dist/vue.js"></script>
<script>
Vue.component("props_component",{
template:'<h1>{
{content}}</h1>',
props:["content"]
})
const props_list = {
template:'\<ul>\
<li v-for="item in items">{
{item.name}}</li>\
</ul>\
',
props: {
items:{
type:Array,
default:[],
required:true
}
}
}
new Vue({
el: "#app",
components:{
t_list:props_list,
},
data:{
users:[{
id:1,name:"赵四"},{
id:2,name:"王五"},{
id:3,name:"老六"},{
id:4,name:"大佬"}]
}
})
</script>
</body>
</html>
- 这个子组件可以对 items 进行迭代,并输出到页面。
- <t_list :items=“users”></t_list> 接受时需要 在前面加
:号 - props:定义需要从父组件中接收的属性
- items:是要接收的属性名称
- type:限定父组件传递来的必须是数组
- default:默认值
- required:是否必须
$emit 子向父的通信
实例
<!DOCTYPE html>
<html lang="en" >
<head>
    <meta charset="UTF-8">
    <title>EMIT</title>
</head>
<body>
<div id="app">
    <h1>number:{

   {number}}</h1>
    <emit_template :num="number" v-on:plus="add_plus" @reduce="min_reduce"></emit_template>
</div>
<script src="node_modules/vue/dist/vue.js"></script>
<script type="text/javascript">
    const emit_template = {


        template: "<div>" +
            "<button v-on:click='plus'>Add</button>" +
            "<button @click='reduce'>min</button>" +
            "</div>",
        props: ['num'],// count是从父组件获取的。
        methods: {


            plus() {


                this.$emit("plus")
            },
            reduce() {


                this.$emit("reduce")
            }
        }
    }
    new Vue({


        el: "#app",
        data: {


            number: 0
        },
        methods: {


            add_plus() {


                this.number++;
            },
            min_reduce() {


                this.number--;
            }
        },
        components: {


            emit_template: emit_template
        }
    })
</script>
</body>
</html>

通过v-on指令将父组件的函数绑定到子组件
在子组件中定义函数,函数的具体实现调用父组件的实现,并在子组件中调用这些函数。当子组件中按钮被点击时,调用绑定的函数
vue提供了一个内置的this.$emit()函数,用来调用父组件绑定的函数
路由vue-router
vue-router简介和安装
使用vue-router和vue可以非常方便的实现 复杂单页应用的动态路由功能。
官网:https://router.vuejs.org/zh-cn/
使用npm安装:npm install vue-router --save

在index.html中引入依赖:
<script src="node_modules/vue-router/dist/vue-router.js"></script>
Login.js
const loginForm = {


    template:'\
    <div>\
    <h2>登录页</h2> \
    用户名:<input type="text"><br/>\
    密码:<input type="password"><br/>\
    </div>\
    '
}
Register.js
const registerForm = {
template:'\
<div>\
<h2>注册页</h2> \
用 户 名:<input type="text"><br/>\
密  码:<input type="password"><br/>\
确认密码:<input type="password"><br/>\
</div>\
'
}
在父组件中引用
<div id="app">
    <span>登录</span>
    <span>注册</span>
    <hr/>
    <div>
        <!--<loginForm></loginForm>-->
        <!--
            疑问:为什么不采用上面的写法?
            由于html是大小写不敏感的,如果采用上面的写法,则被认为是<loginform></loginform>
            所以,如果是驼峰形式的组件,需要把驼峰转化为“-”的形式
         -->
        <login-form></login-form>
        <register-form></register-form>
    </div>
</div>
<script src="node_modules/vue/dist/vue.js"></script>
<script src="node_modules/vue-router/dist/vue-router.js"></script>
<script src="user/login.js"></script>
<script src="user/register.js"></script>
<script type="text/javascript">
    var vm = new Vue({


        el: "#app",
        components: {


            loginForm,
            registerForm
        }
    })
</script>