简介
uiautomator2 是一个可以使用Python对Android设备进行UI自动化的库。其底层基于Google uiautomator,Google提供的uiautomator库可以获取屏幕上任意一个APP的任意一个控件属性,并对其进行任意操作。
参考地址
- https://github.com/openatx/uiautomator2
- https://github.com/openatx/uiautomator2/blob/master/README.md
工作原理
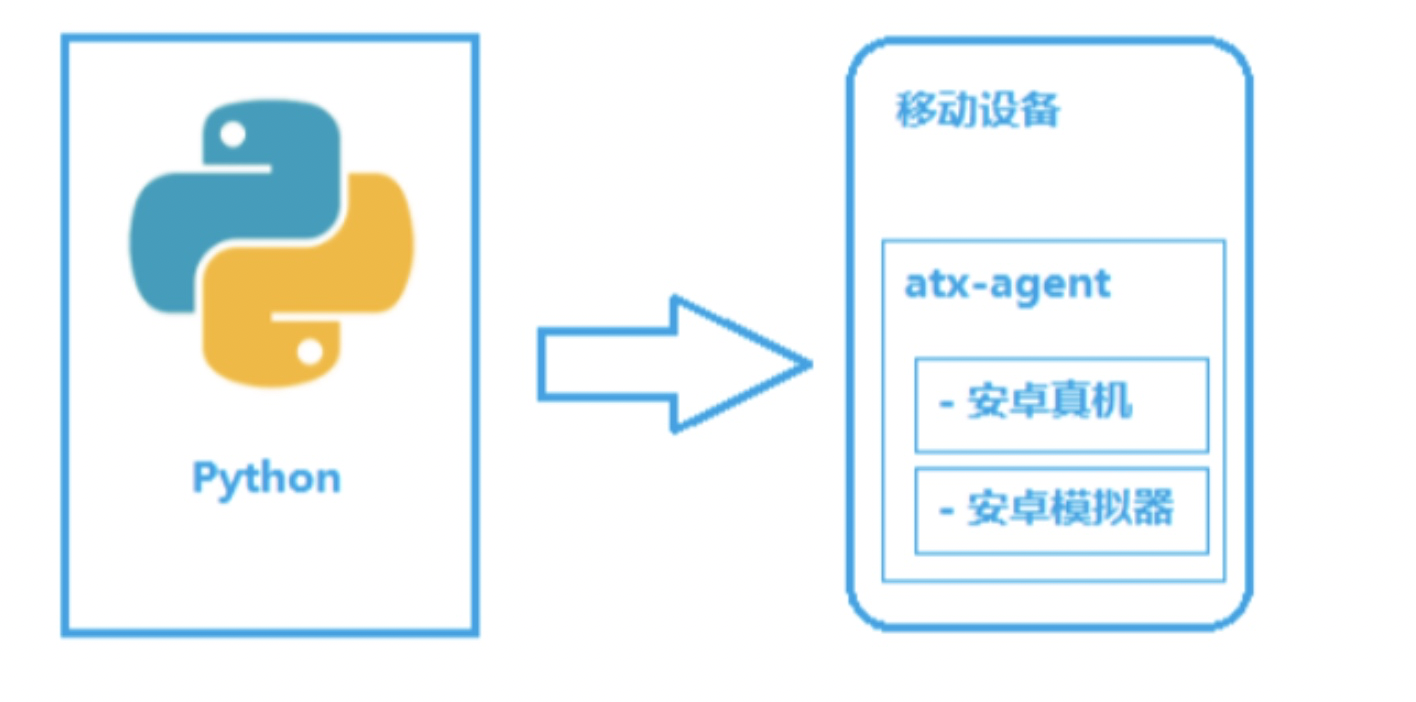
image.png
如图所示,python-uiautomator2主要分为两个部分,python客户端,移动设备
- python端: 运行脚本,并向移动设备发送HTTP请求
- 移动设备:移动设备上运行了封装了uiautomator2的HTTP服务,解析收到的请求,并转化成uiautomator2的代码。
整个过程
- 在移动设备上安装atx-agent(守护进程), 随后atx-agent启动uiautomator2服务(默认7912端口)进行监听
- 在PC上编写测试脚本并执行(相当于发送HTTP请求到移动设备的server端)
- 移动设备通过WIFI或USB接收到PC上发来的HTTP请求,执行制定的操作
安装
pip install uiautomator2
快速入门
import uiautomator2 as u2

# 连接手机
device = u2.connect()
# 打开被测试应用
device(text='探探').click()
手机的链接
查看手机转发端口
adb forward --list
# emulator-5554 tcp:54572 tcp:7912
默认连接
# 通过usb
import uiautomator2 as u2

# 通过usb的链接
device = u2.connect('emulator-5554')

# 通过wifi手机ip[:7912]
# 需要加协议名称http or https
device = u2.connect('http://127.0.0.1')
device = u2.connect('http://127.0.0.1:7912')

print(device.device_info)
WiFi地址连接
# 与默认的connect()方法比不需要加http或者https
device = u2.connect_wifi('127.0.0.1')
device = u2.connect_wifi('127.0.0.1:7912')
app的操作
安装app
device = u2.connect()

#安装app
douyin_apk_download_url = 'http://app.mi.com/download/431355?id=com.ss.android.ugc.aweme&ref=appstore.mobile_download&nonce=-688070196286123466%3A26744574&appClientId=2882303761517485445&appSignature=YiaWgKkNy45Xpev7GFmgZjmGu-UmN7HVvzljPIuovBY'
device.app_install(data=douyin_apk_download_url)
data参数可以是下载地址或者本地apk文件路径
获取app包名
- 方式一
# 1. 要获取包名打开app
device(text='抖音').click()

# 2.获取当前运行app取包名
print(device.app_current())
# {'package': 'com.android.settings', 'activity': 'com.android.settings.SubSettings'}
- 方式二
# 获取所有正在运行的程序
device.app_list_running()
- 方式三
# adb指令获取
adb shell dumpsys activity | find "mFocusedActivity"

adb shell dumpsys activity top | find ACTIVITY

# 以上命令Linux或者macOS替换 find 为 grep
- 方式四
# aapt
aapt dump badging file.apk
# file.apk是apk路径,必须要有apk文件
卸载app
device.app_uninstall(package_name= 'com.p1.mobile.putong')
package_name需要卸载的app包名
启动app
device(text='探探') # 是直接在首屏点击启动
#  直接打开app,传入package_name
device.app_start(package_name='com.p1.mobile.putong')
关闭app
device.app_stop(package_name='com.p1.mobile.putong')
清空app数据
device.app_clear(package_name='com.p1.mobile.putong')
设备操作
设备信息
import uiautomator2 as u2
device  = u2.connect()
print(device.info)
# {'currentPackageName': 'com.p1.mobile.putong', 'displayHeight': 1664, 'displayRotation': 3, 'displaySizeDpX': 400, 'displaySizeDpY': 640, 'displayWidth': 1040, 'productName': 'cancro', 'screenOn': True, 'sdkInt': 23, 'naturalOrientation': False}
# {'udid': 'ZX1G42CPJD-08:00:27:8d:95:e2-Pro_7', 'version': '6.0.1', 'serial': 'ZX1G42CPJD', 'brand': 'Meizu', 'model': 'Pro 7', 'hwaddr': '08:00:27:8d:95:e2', 'port': 7912, 'sdk': 23, 'agentVersion': '0.9.5', 'display': {'width': 1664, 'height': 1040}, 'battery': {'acPowered': True, 'usbPowered': False, 'wirelessPowered': False, 'status': 2, 'health': 2, 'present': True, 'level': 55, 'scale': 100, 'voltage': 3900, 'temperature': 275, 'technology': 'Li-poly'}, 'memory': {'total': 3628052, 'around': '3 GB'}, 'arch': '', 'owner': None, 'presenceChangedAt': '0001-01-01T00:00:00Z', 'usingBeganAt': '0001-01-01T00:00:00Z', 'product': None, 'provider': None}
设备屏幕大小
import uiautomator2 as u2
device  = u2.connect()
print(device.window_size())

#(1664, 1040) (宽度,高度)
截屏操作
import uiautomator2 as u2
device  = u2.connect()
device.screenshot('test.png')
- 参数是截屏文件的保存路径,执行上述代码,会在当前目录生成一张截图文件:test.png
推送文件
device.push(src='test.png',dst='/data/')
- 推送:从本地推送到电脑,
src是本地路径,dst是手机路径
拉取文件
device.pull(src='/data/test.png',dst='test1.png')
- 拉取:与推送相反,从手机拉取文件到本地电脑,
src是手机文件路径,dst是要拉去到本地电脑路径
按键操作(触屏操作)
device.screen_on() # 点亮屏幕
device.screen_off() # 熄灭屏幕
device.press('home') # 手机Home键
device.press('back') #手机返回键
device.press('left') #对应键盘上的向右键<-
device.press('right') #对应键盘上的向右键->
device.press('up') #对应键盘上的向上键
device.press('down') #对应键盘上的向下键
device.press('center') #选中
device.press('menu') #菜单
device.press('search') #查找搜索
device.press('enter') #对应键盘上的Enter键
device.press('delete') #对应键盘上的DEL键 用于删除
device.press('recent') #任务切换界面
device.press('camera') #拍照
device.press('power') #电源键
device.press('volume_up') #声音向上调整
device.press('volume_down') #声音向下调整
device.press('volume_mute') #静音
- 参数也是可以对应的
Android keycode
元素定位
通过某一些特征(定位的依据),确定在一个页面中要操作的实例(元素)。
device(text='探探').click()
元素定位辅助工具:weditor
weditor的优势
- 可以管理多台设备
- 可以在web界面直接操作手机,无须手动操作真机
- 可以生成
uiautomator2代码
安装weditor
pip install weditor
使用weditor
命令行输入weditor,启动weditor
weditor
自动打开浏览器,可以操作web页面,辅助定位
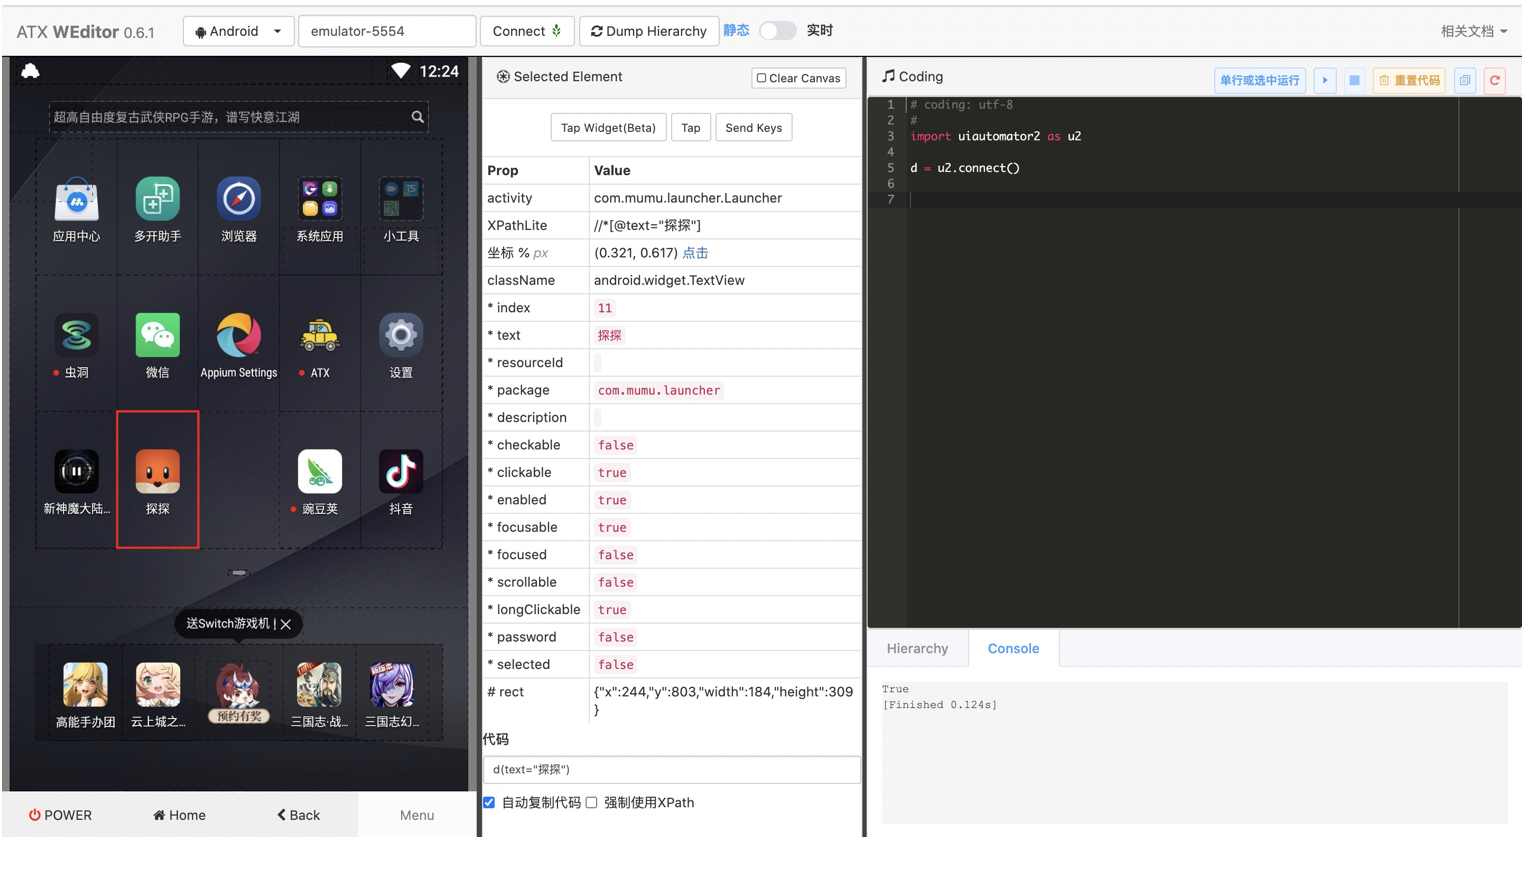
image.png
控件的构成
- 控件的名称,对应的是
className - 控件的属性(特征)
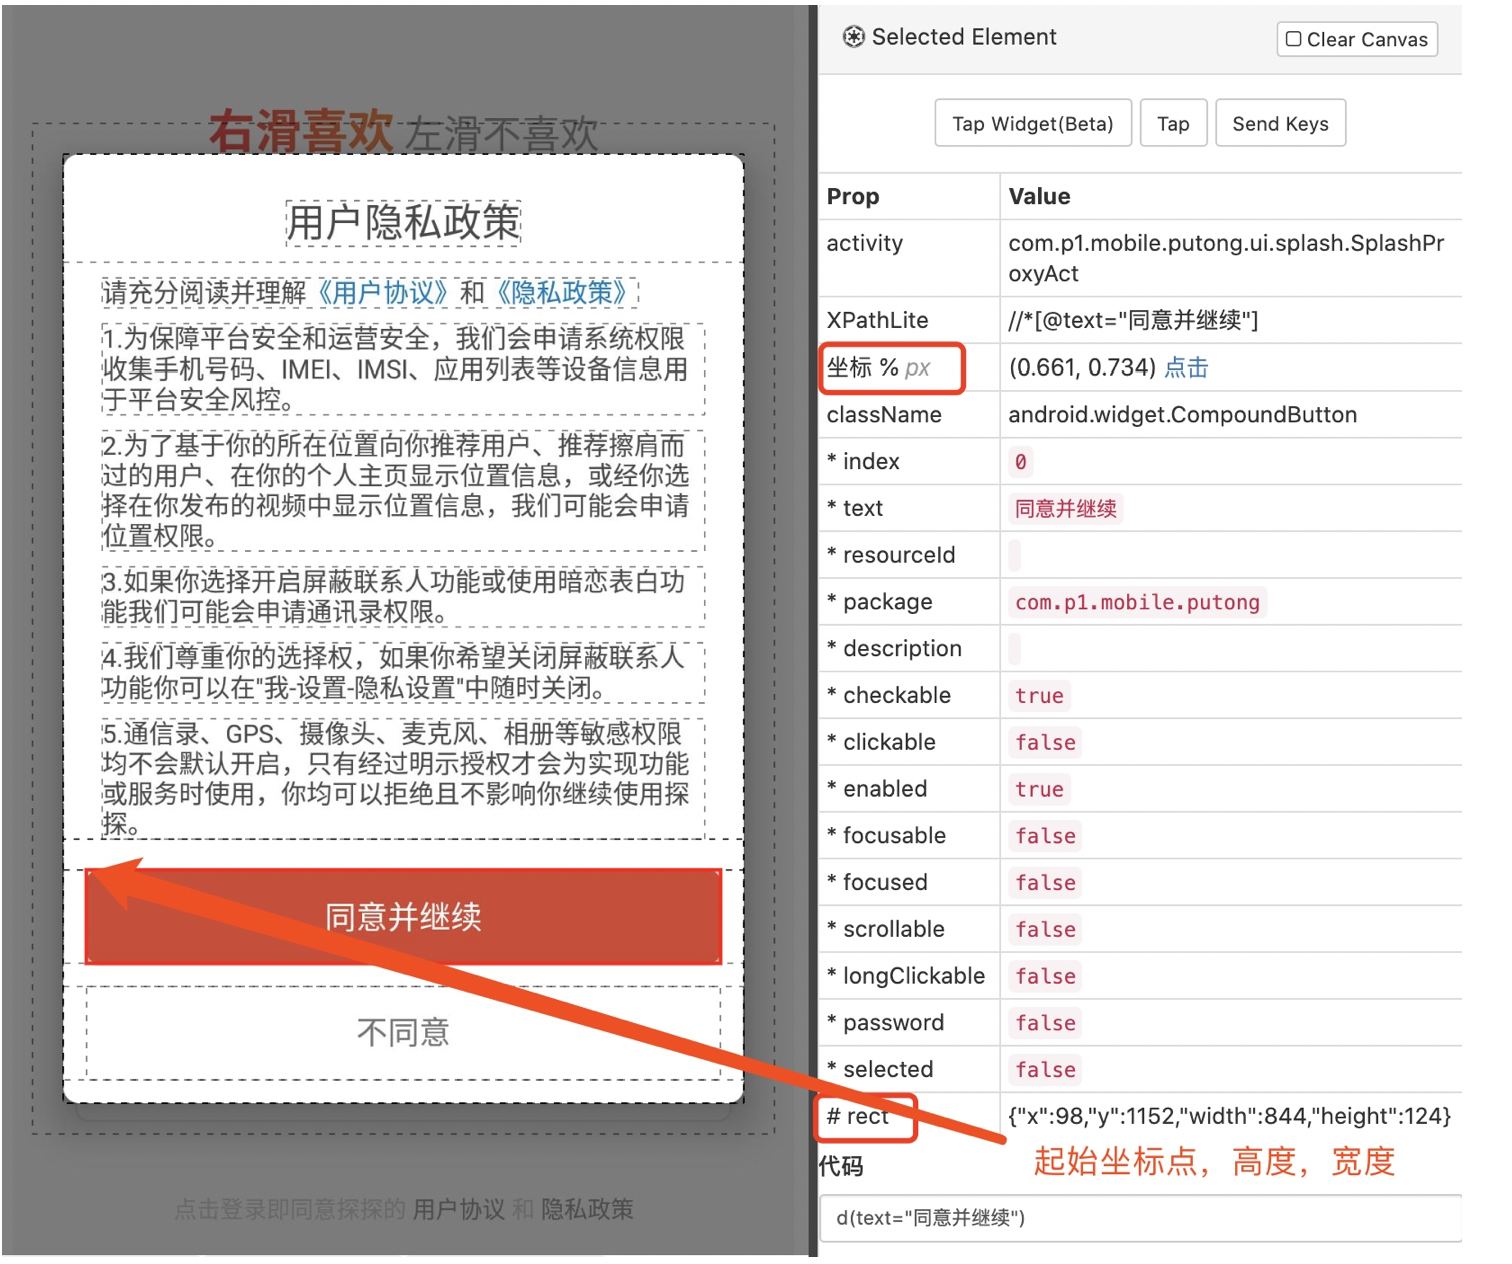
image.png
- 子控件
有哪些定位依据(定位方式)
首先要知道:APP页面是由XML构成的
一个元素的属性都可以作为定位的条件
属性定位
- text, textContains, textMatches, textStartsWith
- className, classNameMatches
- description, descriptionContains, descriptionMatches, descriptionStartsWith
- checkable, checked, clickable, longClickable
- scrollable, enabled,focusable, focused, selected
- packageName, packageNameMatches
- resourceId, resourceIdMatches
- index, instance
说明:
模糊匹配
Contains:包含
Matches:正则匹配
StartsWith:以什么开头
多个条件
ele = d(resourceId="com.android.packageinstaller:id/permission_deny_button",text='拒绝')
多个元素
ele = d(resourceId="com.android.packageinstaller:id/permission_deny_button",instance=0)
- instance传入多个元素的索引位置,从0开始。
上下级关系定位
同级关系sibling
ele= d(resourceId="com.android.packageinstaller:id/button").sibling(resourceId='com.android.packageinstaller:id/permission_deny_button')
子级关系child
ele = d(resourceId="com.android.packageinstaller:id/button").child(resourceId='com.android.packageinstaller:id/permission_deny_button')
父级关系(不推荐)
根据页面相对位置关系定位元素(速度慢)
ele = d(resourceId="com.android.packageinstaller:id/button")
ele.left().click() # 左
ele.right().click() # 右
ele.up().click() # 上
ele.down().click() # 下
xpath元素定位
d.xpath("//*[@content-desc='分享']").click()
APP操作API
点击click
- 通过元素对象点击
d(text='我的').click
- 通过坐标点点击,也可以通过百分比点击(横,纵)
d.click(688,1553) #不建议使用
d.click(0.765,0,971)# 百分比适用于不同屏幕大小的手机
滑动操作
d.swipe(self, fx, fy, tx, ty, duration: Optional[float] = None, steps: Optional[int] = None)
- 适用于指定具体的滑动位置
d.swipe_ext(direction='left',scale=0.9)
- direction:方向
- scale:滑动距离占屏幕的百分比
- 推荐使用
# 先元素定位,再滑动
e = d(text='就业信息')
e.swipe('down',steps=10)
- steps:滑动的时间
输入操作
# 先元素定位,在元素对象上输入
e.send_keys() # 输入
e.set_text() # 输入
e.clear_text() # 清除
截屏操作
- 截屏接触操作
d.screenshot('weixin.png')
- 截屏进阶操作
# 如果不加参数则
im = d.screenshot()
im.save('hello.png')

# 处理1:模糊
from PIL import ImageFilter
im2 = im.filter(ImageFilter.BLUR)
im2.save('helloblur.png')

# 处理2:指定大小
im3 = im.resize((200,400))
im3.save('hellosize.png')
等待
- 强制等待
import time
time.sleep(10)
- 智能等待
UIautomator2默认就有20s等智能等待时间,每一个操作api都可以通过参数
timeout单独该表等待时间,也可覆写默认全局等待时间
- 智能等待APP启动完成
# wait默认20s,超时会报错
d.app_start('',wait=True)

# 修改默认时间两种方式,全局设置隐式等待时间
d.wait_timeout=30
d.implicitly_wait(30)
- 等待页面加载完成
d.wait_activity('页面')
- 等待元素出现
d(text='我的').wait()
- 等待元素消失
d(text='我的').wait_gone()
- 等待点击,设置隐式等待后
e.click(timeout=50)
判断元素是否存在
- 等待元素是否存在
d(text='我的').exist()
e.sleep(10)
- 智能等待

> UIautomator2默认就有20s等智能等待时间,每一个操作api都可以通过参数`timeout`单独该表等待时间,也可覆写默认全局等待时间

- 智能等待APP启动完成


```python
# wait默认20s,超时会报错
d.app_start('',wait=True)

# 修改默认时间两种方式,全局设置隐式等待时间
d.wait_timeout=30
d.implicitly_wait(30)
- 等待页面加载完成
d.wait_activity('页面')
- 等待元素出现
d(text='我的').wait()
- 等待元素消失
d(text='我的').wait_gone()
- 等待点击,设置隐式等待后
e.click(timeout=50)
判断元素是否存在
- 等待元素是否存在
d(text='我的').exist()
文章参考:倔强的数学天才