Deployment与Service资源
Deployment
练习:创建一个Deployment资源对象,名称为bdqn1,replicas: 5个,镜像使用httd镜像
kind: Deployment
apiVersion: extensions/v1beta1
metadata:
  name: test1
spec:
  replicas: 5
  template:
    metadata:
      labels:
        app: test1
    spec:
      containers:
      - name: test1
        image: httpd
        ports:
            - containerPort: 80
分析: Deployment称为高级的Pod控制器,为什么那?我们来仔细看一下
[root@master yaml]# kubectl describe deployments. test1
...
Events:
  Type    Reason             Age   From                   Message
  ----    ------             ----  ----                   -------
  Normal  ScalingReplicaSet  3m5s  deployment-controller  Scaled up replica set test1-644db4b57b to 4
Events:事件提示。它非常重要,它描述了整个资源从开始到现在都做了哪些工作
在此,仔细分析 Events事件描述,会发现:
Deployment没有像我们想象中直接创建并控制后端的Pod,而是又创建了一个新的资源对象:ReplicaSet(bdqn1-7f49d8f579),我们再次查看该RS的详细信息,会看到,RS整个的Events
[root@master yaml]# kubectl describe rs test1-644db4b57b
...
Events:
  Type    Reason            Age    From                   Message
  ----    ------            ----   ----                   -------
  Normal  SuccessfulCreate  9m53s  replicaset-controller  Created pod: test1-644db4b57b-4688l
  Normal  SuccessfulCreate  9m53s  replicaset-controller  Created pod: test1-644db4b57b-72vhc
  Normal  SuccessfulCreate  9m53s  replicaset-controller  Created pod: test1-644db4b57b-rmz8v
  Normal  SuccessfulCreate  9m53s  replicaset-controller  Created pod: test1-644db4b57b-w25q8
此时查看任意一个Pod的详细信息,能够看到此Pod的完整的工作流程
[root@master yaml]# kubectl describe pod test1-644db4b57b-4688l
...
Events:
  Type    Reason     Age   From               Message
  ----    ------     ----  ----               -------
  Normal  Scheduled  11m   default-scheduler  Successfully assigned default/test1-644db4b57b-4688l to node1
  Normal  Pulled     11m   kubelet, node1     Container image "192.168.1.20:5000/httpd:v1" already present on machine
  Normal  Created    11m   kubelet, node1     Created container test1
  Normal  Started    11m   kubelet, node1     Started container test1

service
kind: Service
apiVersion: v1
metadata:
  name: test-svc
spec:
  selector:
    app: test1
  ports:
  - protocol: TCP
    port: 80
    targetPort: 80
默认情况下Service的资源类型Cluster IP,上述YAML文件中,spec.ports.port:描述的是Cluster IP的端口。只是为后端的Pod提供了一个统一的访问入口(在k8s集群内有效)
[root@master yaml]# kubectl get svc
NAME         TYPE        CLUSTER-IP       EXTERNAL-IP   PORT(S)        AGE
kubernetes   ClusterIP   10.96.0.1        <none>        443/TCP        23d
test-svc     NodePort    10.103.159.206   <none>        80:32767/TCP   6s
[root@master yaml]# curl 10.103.159.206
11111
如果想要让外网能够访问到后端Pod,这里应该将Service的资源类型改为NodePort
kind: Service
apiVersion: v1
metadata:
  name: test-svc
spec:
  type: NodePort
  selector:
    app: test1
  ports:
  - protocol: TCP
    port: 80
    targetPort: 80
    nodePort: 32034  #nodePort的有效范围是:30000-32767
上面我们看到了访问Cluster IP ,后端的Pod会轮替着为我们提供服务,也
就是有负载均衡,如果没有Service资源,KUBE-PROXY组件也不会生效,因为它就是负责负载均衡,那么现在有了Service资源,它到底是怎么做到负载均衡的?底层的原理是什么?
表面上来看,通过describe命令,查看SVC资源对应的Endpoint,就能够知道后端真正的Pod。
[root@master yaml]# kubectl describe svc test-svc
...
Endpoints:                10.244.1.33:80,10.244.1.34:80,10.244.2.27:80 + 1 more...
...
通过查看iptables规则,可以了解一下具体的负责均衡过程。
[root@master yaml]# kubectl get svc
NAME         TYPE        CLUSTER-IP       EXTERNAL-IP   PORT(S)        AGE
kubernetes   ClusterIP   10.96.0.1        <none>        443/TCP        23d
test-svc     NodePort    10.103.159.206   <none>        80:32767/TCP   8m11s

[root@master yaml]# iptables-save | grep 10.103.159.206
-A KUBE-SERVICES ! -s 10.244.0.0/16 -d 10.103.159.206/32 -p tcp -m comment --comment "default/test-svc: cluster IP" -m tcp --dport 80 -j KUBE-MARK-MASQ
-A KUBE-SERVICES -d 10.103.159.206/32 -p tcp -m comment --comment "default/test-svc: cluster IP" -m tcp --dport 80 -j KUBE-SVC-W3OX4ZP4Y24AQZNW
#如果目标地址是10.103.159.206/32的80端口,并且走的是TCP协议,那么就把这个流量跳转到KUBE-SVC-W3OX4ZP4Y24AQZNW

[root@master yaml]# iptables-save | grep KUBE-SVC-W3OX4ZP4Y24AQZNW
-A KUBE-SVC-W3OX4ZP4Y24AQZNW -m statistic --mode random --probability 0.25000000000 -j KUBE-SEP-UNUAETQI6W3RVNLM
-A KUBE-SVC-W3OX4ZP4Y24AQZNW -m statistic --mode random --probability 0.33332999982 -j KUBE-SEP-QNYBCG5SL7K2IM5K
-A KUBE-SVC-W3OX4ZP4Y24AQZNW -m statistic --mode random --probability 0.50000000000 -j KUBE-SEP-NP7BZEGCZQZXEG4R
-A KUBE-SVC-W3OX4ZP4Y24AQZNW -j KUBE-SEP-5KNXDMFFQ4CLBFVI

[root@master yaml]# iptables-save | grep KUBE-SEP-UNUAETQI6W3RVNLM
:KUBE-SEP-UNUAETQI6W3RVNLM - [0:0]
-A KUBE-SEP-UNUAETQI6W3RVNLM -s 10.244.1.33/32 -j KUBE-MARK-MASQ
-A KUBE-SEP-UNUAETQI6W3RVNLM -p tcp -m tcp -j DNAT --to-destination 10.244.1.33:80
-A KUBE-SVC-W3OX4ZP4Y24AQZNW -m statistic --mode random --probability 0.25000000000 -j KUBE-SEP-UNUAETQI6W3RVNLM
SNAT:Source NAT(源地址转换);

DNAT:Destination NAT(目标地址转换);

MASQ:动态的源地址转换;

Service实现的负载均衡:默认使用的是iptables规则;
回滚到指定版本
准备3个版本所使用的私有镜像,来模拟每次升级不同的镜像
[root@master yaml]# vim test1.yaml
kind: Deployment
apiVersion: extensions/v1beta1
metadata:
  name: test1
spec:
  replicas: 4
  template:
    metadata:
      labels:
        test: test
    spec:
      containers:
      - name: test1
        image: 192.168.229.187:5000/httpd:v1
[root@master yaml]# vim test2.yaml
kind: Deployment
apiVersion: extensions/v1beta1
metadata:
  name: test1
spec:
  replicas: 4
  template:
    metadata:
      labels:
        test: test
    spec:
      containers:
      - name: test1
        image: 192.168.229.187:5000/httpd:v2
[root@master yaml]# vim test3.yaml
kind: Deployment
apiVersion: extensions/v1beta1
metadata:
  name: test1
spec:
  replicas: 4
  template:
    metadata:
      labels:
        test: test
    spec:
      containers:
      - name: test1
        image: 192.168.1.20:5000/httpd:v3
此处3个yaml文件指定不同版本的镜像。
运行一个服务,并记录一个版本信息。
[root@master yaml]# kubectl apply -f test1.yaml --record
查看有哪些版本信息
[root@master yaml]# kubectl rollout history deployment test1
deployment.extensions/test1
REVISION  CHANGE-CAUSE
1         kubectl apply --filename=test1.yaml --record=true
运行并升级Depoyment资源,并记录版本信息
[root@master yaml]# kubectl apply -f test2.yaml --record
[root@master yaml]# kubectl apply -f test3.yaml --record
把test1的版本进行升级
[root@master yaml]# kubectl set image deploy test1 test1=192.168.1.20:5000/httpd:v2
此时可以运行一个关联的Service资源去做验证,升级是否成功
[root@master yaml]# kubectl apply -f test-svc.yaml
[root@master yaml]# kubectl get deployments. test1 -o wide
回滚到指定版本
[root@master yaml]# kubectl rollout undo deployment test1 --to-revision=1
用label控制pod的位置
添加节点标签
[root@master yaml]# kubectl label nodes node2 disk=ssd
node/node2 labeled
[root@master yaml]# kubectl get nodes --show-labels
删除节点标签
[root@master yaml]# kubectl label nodes node02 disk-
 ...
spec:
  revisionHistoryLimit: 10
  replicas: 3
  template:
    metadata:
      labels:
        app: web
    spec:
      containers:
      - name: test-web
        image: 192.168.1.10:5000/httpd:v1
        ports:
        - containerPort: 80
        nodeSelector:  #添加节点选择器
        disk: ssd  #和标签内容一致
Deployment、Service、Pod是k8s最核心的3个资源对象。
Deployment:最常见的无状态应用的控制器,支持应用的扩缩容、滚动更新等操作。
Servcie:为弹性变动且存在生命周期的Pod对象提供了一个固定的访问接口,用于服务发现和服务访问。
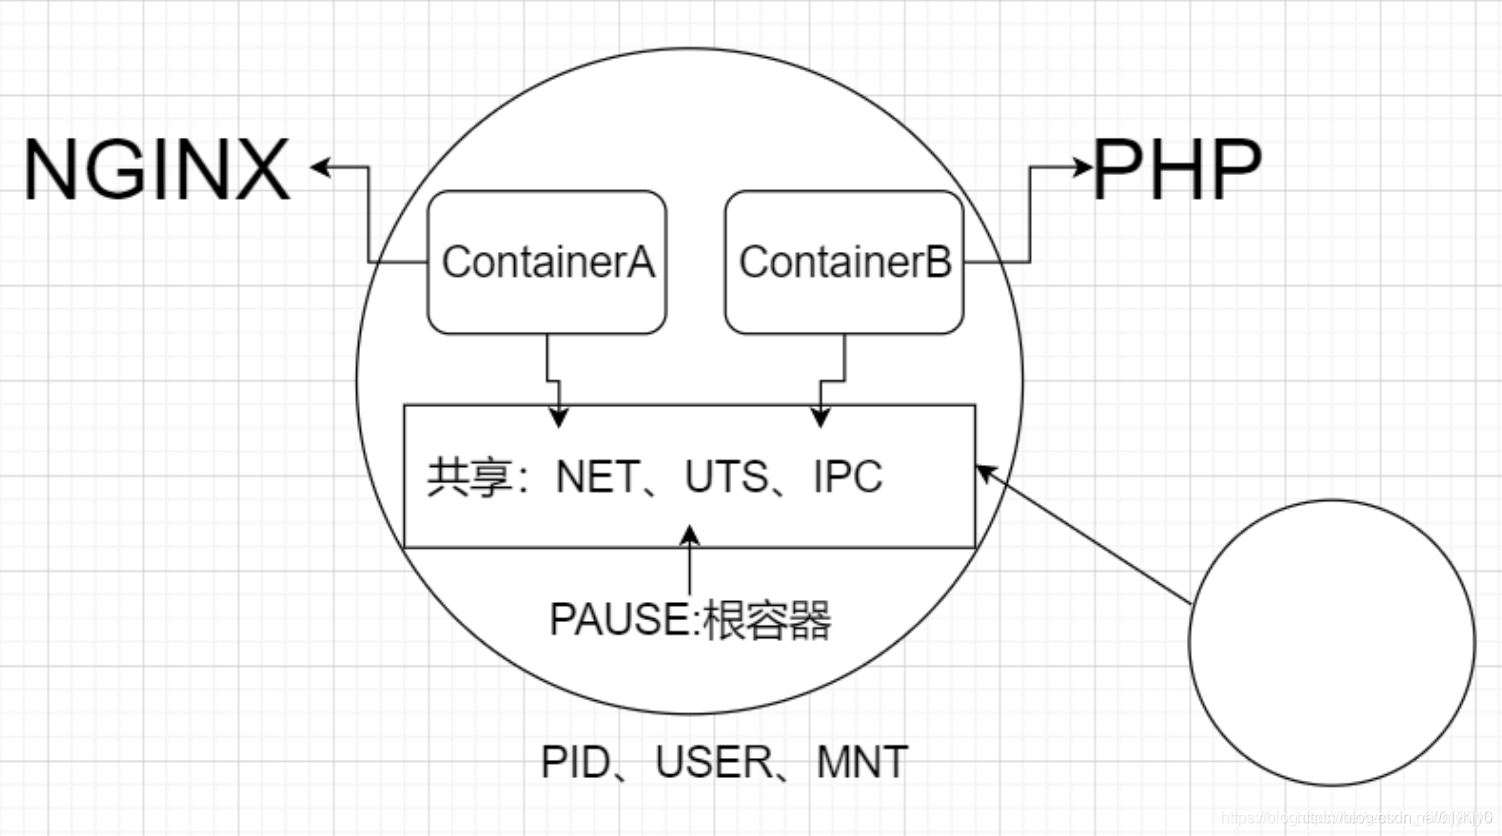
Pod:是运行容器以及调度的最小单位。同一个Pod可以同时运行多个容器,这些容器共享NET、UTS、IPC。除此之外还有USER、PID、MOUNT。
在这里插入图片描述
Namespace名称空间
默认的名称空间: Default
查看名称空间
[root@master ~]# kubectl get ns
查看名称空间详细信息
[root@master ~]# kubectl describe ns default
创建名称空间
命令方式:
[root@master ~]# kubectl create ns bdqn
yaml文件方式:
apiVersion: v1
kind: Namespace
metadata:
  name: test
PS: namespace资源对象仅用于资源对象的隔离,并不能隔绝不同名称空间的Pod之间的通信,那是网络策略资源的功能
查看指定名称空间的资源可以使用–namespace 或者-n 选项
删除某个名称空间
[root@master ~]# kubectl delete ns bdqn
namespace "bdqn" deleted
注意:在执行删除某个名称空间的时候,千万注意,轻易不执行此操作,因为,如果执行之后,默认会将所以在此名称空间之下资源全部删除