yum源安装nginx
关闭防火墙和selinux
[root@localhost ~]# hostnamectl set-hostname nginx
[root@localhost ~]# bash
[root@nginx ~]# systemctl stop firewalld
[root@nginx ~]# systemctl disable firewalld
[root@nginx ~]# setenforce 0
1.配置nginx官方yum源
[root@nginx ~]# vim /etc/yum.repos.d/nginx.repo

[nginx-stable]
name=nginx stable repo
baseurl=http://nginx.org/packages/centos/$releasever/$basearch/
gpgcheck=0
enabled=1
2.安装nginx
[root@nginx ~]# yum -y install nginx
3.查看nginx默认模块
[root@nginx ~]# nginx -V
nginx version: nginx/1.18.0
built by gcc 4.8.5 20150623 (Red Hat 4.8.5-39) (GCC)
built with OpenSSL 1.0.2k-fips  26 Jan 2017
TLS SNI support enabled
configure arguments: --prefix=/etc/nginx --sbin-path=/usr/sbin/nginx --modules-path=/usr/lib64/nginx/modules --conf-path=/etc/nginx/nginx.conf --error-log-path=/var/log/nginx/error.log --http-log-path=/var/log/nginx/access.log --pid-path=/var/run/nginx.pid --lock-path=/var/run/nginx.lock --http-client-body-temp-path=/var/cache/nginx/client_temp --http-proxy-temp-path=/var/cache/nginx/proxy_temp --http-fastcgi-temp-path=/var/cache/nginx/fastcgi_temp --http-uwsgi-temp-path=/var/cache/nginx/uwsgi_temp --http-scgi-temp-path=/var/cache/nginx/scgi_temp --user=nginx --group=nginx --with-compat --with-file-aio --with-threads --with-http_addition_module --with-http_auth_request_module --with-http_dav_module --with-http_flv_module --with-http_gunzip_module --with-http_gzip_static_module --with-http_mp4_module --with-http_random_index_module --with-http_realip_module --with-http_secure_link_module --with-http_slice_module --with-http_ssl_module --with-http_stub_status_module --with-http_sub_module --with-http_v2_module --with-mail --with-mail_ssl_module --with-stream --with-stream_realip_module --with-stream_ssl_module --with-stream_ssl_preread_module --with-cc-opt='-O2 -g -pipe -Wall -Wp,-D_FORTIFY_SOURCE=2 -fexceptions -fstack-protector-strong --param=ssp-buffer-size=4 -grecord-gcc-switches -m64 -mtune=generic -fPIC' --with-ld-opt='-Wl,-z,relro -Wl,-z,now -pie'
4.nginx新版本的配置文件
全局配置文件:/etc/nginx/nginx.conf
虚拟主机配置:/etc/nginx/conf.d/*.conf
例子1:使用域名搭建一台虚拟主机
备份
[root@nginx ~]# cd /etc/nginx/conf.d/
[root@nginx conf.d]# ls
default.conf
[root@nginx conf.d]# mv default.conf default.conf.bak
创建www目录
[root@nginx ~]# mkdir /www
[root@nginx ~]# vim /etc/nginx/conf.d/www.conf
添加:
server{


       listen 80;
       server_name www.benet.com;
       location / {


                root /www;
                index index.html index.html;
        }
}
重启nginx
[root@nginx ~]# systemctl restart nginx
[root@nginx ~]# echo "<h1>nginxnginxnginx</h1>" > /www/index.html
域名解析
我的电脑 > 本地磁盘 > Windows > system32 > drivers > etc > hosts >添加:192.168.1.20 www.benet.com
浏览器访问:

nginx模块
5.nginx目录索引(autoindex自动索引模块)
nginx默认不起用目录索引,更不允许列出网站目录提供下载。
Syntax: autoindex on | off; 索引功能的开或关
Default: autoindex off; 默认关闭
Context: http, server, location 场景:全局、某个虚拟主机、某个虚拟主机的目录
例子:在www网站下,创建download下载目录,索引显示
[root@nginx ~]# mkdir /www/download
[root@nginx ~]# cd /www/download/
[root@nginx download]# touch 1 2 3
[root@nginx download]# echo "aaa" > 1
[root@nginx download]# echo "bbb" > 2
[root@nginx download]# echo "ccc" > 3
[root@nginx download]# ls
1  2  3
配置文件
vim  /etc/nginx/conf.d/www.conf
在server字段中添加:

location /download {


                root /www;
                autoindex on;                   启用索引显示
                charset utf-8,gbk;              字符编码为中文
                autoindex_exact_size on;        显示文件大小
                autoindex_localtime on;         显示文件创建时间
       }
重新加载nginx
[root@nginx download]# systemctl reload nginx
浏览器测试访问:www.benet.com/download/

6.nginx状态监控(status模块)
Syntax: stub_status; 启用状态化追踪
Default: — 默认关闭
Context: server, location 场景:
例子:针对www网站,启用状态化追踪
vim  /etc/nginx/conf.d/www.conf
	在server字段中添加:

location /status {


                stub_status;               启用状态化追踪
                access_log off;            关闭status的日志记录
       }
重新加载nginx
[root@nginx ~]# systemctl reload nginx
浏览器访问:www.benet.com/staus/
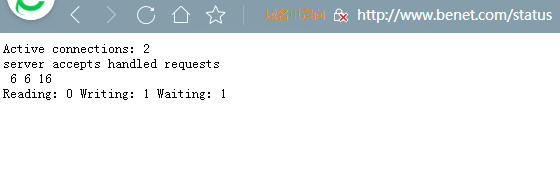
Active connections: 2 当前活跃的连接数
server accepts 6 当前的总tcp连接数
handled 6 成功的连接数
requests 16 总HTTP请求数
7.nginx基于ip的访问控制(access模块)
例子:仅允许内部网段或vpn访问status
vim  /etc/nginx/conf.d/www.conf
修改为:

location /status {


                stub_status;
                access_log off;
                allow 192.168.1.0/24;          仅允许1.0网段访问
                deny all;                      拒绝其他所有
       }
8.nginx基于用户的访问控制(auth模块)
例子:设置访问/status,用户密码验证
[root@nginx ~]# yum -y install httpd-tools
[root@nginx ~]# htpasswd -b -c /etc/nginx/.auth_conf webadmin 123456
Adding password for user webadmin
vim  /etc/nginx/conf.d/www.conf
修改为:
location /status {


                stub_status;
                access_log off;
                auth_basic "input your passwd:";              用户验证启用描述
                auth_basic_user_file /etc/nginx/.auth_conf;   用户验证文件路径
       }
[root@nginx ~]# systemctl reload nginx
浏览器访问:www.benet.com/status/

9.nginx的访问限制
1)limit_conn_module 连接频率限制
例子:
[root@nginx ~]# vim /etc/nginx/nginx.conf
http字段添加:
limit_conn_zone $binary_remote_addr zone=addr:10m;     创建zone区域名为addr,大小10m,保存客户端的二进制ip

[root@nginx ~]# vim /etc/nginx/conf.d/www.conf
server {


		location /download/ {


                 limit_conn addr 1;     一个ip同一时间点只允许建立一个连接
2)limit_req_module 请求频率限制
例子:
[root@nginx ~]# vim /etc/nginx/nginx.conf
http字段添加:
limit_req_zone $binary_remote_addr zone=one:10m rate=1r/s;   创建zone区域名为one,大小10m,
保存客户端的二进制ip,限制请求速率每秒1次
server {


		location /download/ {


			     limit_req zone=one burst=5;   调用请求速率区域,另外设置额外突发5次
10.nginx日志格式:log_format
例子:
http {


      log_format  main  '$remote_addr - $remote_user [$time_ios8601] "$request" ' #定义日志输出格式main
                      '$status $body_bytes_sent "$http_referer" '
                      '"$http_user_agent" "$http_x_forwarded_for"';

    access_log  /var/log/nginx/access.log  main;   #调用日志格式main
nginx日志格式的变量:
$remote_addr			#记录客户端的ip地址
$remote_user			#记录客户端的用户名
$time_local				#通用的时间格式
$time_iso8601			#iso8601时间格式
$request				#请求的方法和请求的HTTP协议
$status					#请求状态码
$body_bytes_sent		#服务器回应的字节数,不包含头部大小
$bytes_sent				#服务器回应的总字节数
$msec					#日志写入时间,单位为秒,精度为毫秒
$http_referer			#记录链接访问源地址
$http_user_agent		#记录客户端浏览器信息
$http_x_forwarded_for	#跨越代理服务器,记录客户机的原始ip
$request_length			#请求包的长度(请求头+请求正文)
$request_time			#请求花费的时间,单位为秒,精度为毫秒
11.nginx的location
语法详解
语法规则: location [=||*|^~] /uri/ { … }
下列以优先级从高到低排序
= 开头表示精确匹配

^~ 开头表示uri以某个常规字符串开头,理解为匹配 url路径即可。

~ 开头表示区分大小写的正则匹配

~* 开头表示不区分大小写的正则匹配

!~和!~*分别为区分大小写不匹配及不区分大小写不匹配的正则

/ 通用匹配,任何请求都会匹配到。
例子:测试匹配符的优先级
[root@nginx ~]# vim /etc/nginx/conf.d/test.conf
server {


        listen 80;
        server_name test.benet.com;

        location / {


                default_type text/html;
                return 200 "location /";
        }
        location =/ {


                default_type text/html;
                return 200 "location =/";
        }
        location ~ / {


                default_type text/html;
                return 200 "location ~ /";
        }
        location ~* / {


                default_type text/html;
                return 200 "location ~* /";
        }
}
保存退出
客户端修改hosts文件,测试访问
真实企业场景配置:*
#通用匹配,任何请求都会匹配到。
location / {


}

#严格区分大小写,匹配.php结尾
location ~ \.php$ {


	fastcgi_pass http://127.0.0.1:9000;
}

#严格区分大小写,匹配.jsp结尾
location ~ \.jsp$ {


	proxy_pass http://127.0.0.1:8080;
}

#不区分大小写匹配
location ~* "\.(sql|bak|tgz|tar.gz|.git)$ {
	default_type text/html;
	return 403 "启用访问控制";
}