首先,如果我们要使用RecyclerView需要创建对应的Adapter。通常的步骤包括以下几步。
继承RecyclerView.Adapter
复习方法
public RecyclerView.ViewHolder onCreateViewHolder(ViewGroup parent, int viewType) { return null; } public void onBindViewHolder(RecyclerView.ViewHolder holder, int position) { } public int getItemCount() { return 0; }
3.创建ViewHolder,需要继承自RecyclerView.ViewHolder。
在使用RecyclerView的过程中,以上三个步骤是基础工作。当然如果你要实现多布局或者实现Item布局的局部刷新等功能,那么你可能需要Override(突然间中文不会写了(〃∀〃))。
今天我们要谈的并不是如何实现多布局的效果或者局部刷新的实现,今天我们主要谈论一点,在我们的日常开发过程中也不得不去考虑的问题——布局优化。
对于布局优化,大家可能想到的方法通常包括:
减少不必要的嵌套
使用标签(include, merge, ViewStub)
减少使用RelativeLayout
使用ConstraintLayout
当然可能还有其他的方式,我们暂时不讨论,如果您愿意与我分享的话,非常欢迎读者朋友们在评论区告诉我。
那么RecyclerView用来做布局优化,答案是可以的。
案列分析
假设我们要实现下面这个界面
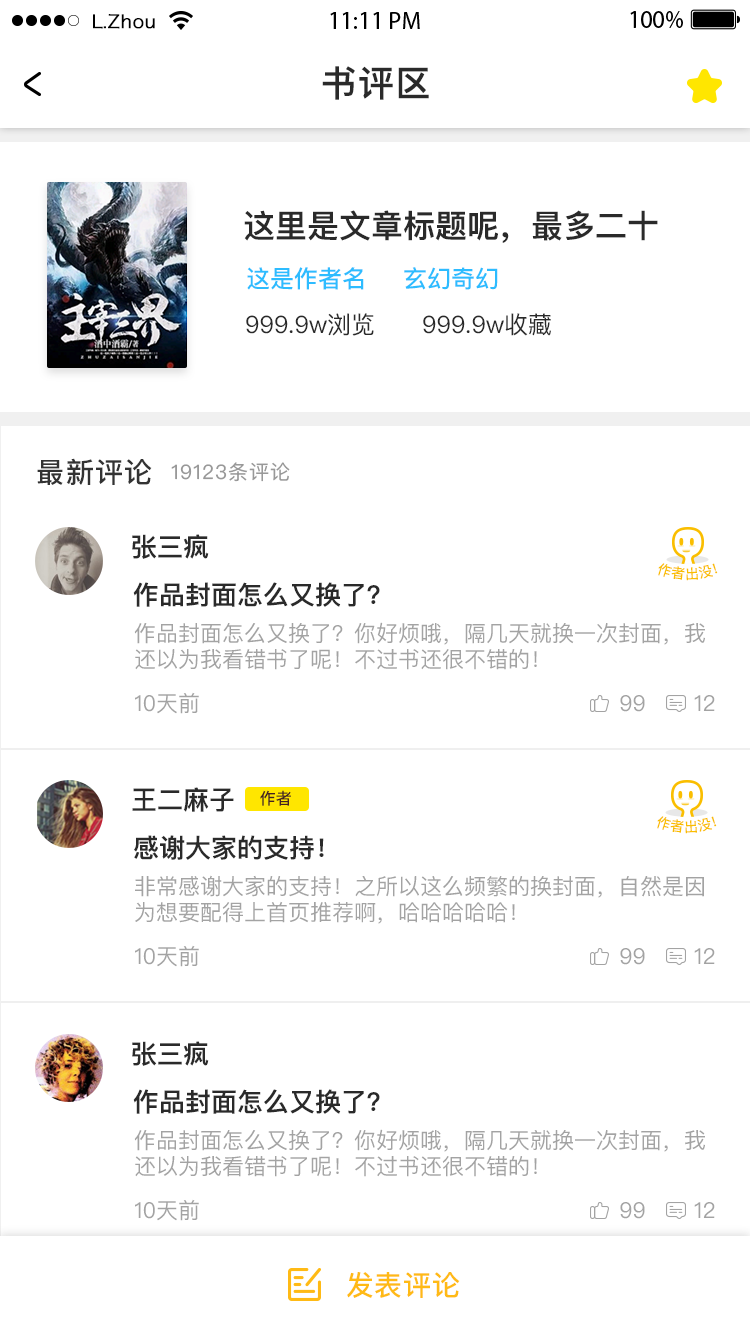
首先分析界面:主要四个方面:从上往下分别是:标题栏,书籍信息,书籍评论,发表评论。那么根据设计的要求,标题栏和发表评论需要常在,需要提供刷新的功能,评论可以一直上拉加载更多。分析以后,我相信大家应该都知道怎么写。下面是我写的一个Demo,仅供参考。
<?xml version="1.0" encoding="utf-8"?> <!--实现刷新--> <android.support.v4.widget.SwipeRefreshLayout xmlns:android="http://schemas.android.com/apk/res/android" xmlns:app="http://schemas.android.com/apk/res-auto" xmlns:tools="http://schemas.android.com/tools" android:id="@+id/main_cl" android:orientation="vertical" android:layout_width="match_parent" android:layout_height="match_parent" tools:context="com.chrissen.demo.MainActivity"> <LinearLayout android:layout_width="match_parent" android:layout_height="match_parent" android:orientation="vertical"> <!--标题栏--> <LinearLayout android:layout_width="match_parent" android:layout_height="40dp"> </LinearLayout> <!--为了实现整体的滑动--> <android.support.v4.widget.NestedScrollView android:layout_width="match_parent" android:layout_height="0dp" android:layout_weight="1"> <LinearLayout android:layout_width="match_parent" android:layout_height="match_parent" android:orientation="vertical"> <!--书籍信息--> <RelativeLayout android:layout_width="match_parent" android:layout_height="150dp"> </RelativeLayout> <!--评论--> <android.support.v7.widget.RecyclerView android:layout_width="match_parent" android:layout_height="0dp" android:layout_weight="1"> </android.support.v7.widget.RecyclerView> </LinearLayout> </android.support.v4.widget.NestedScrollView> <!--添加评论--> <LinearLayout android:layout_width="match_parent" android:layout_height="40dp"> </LinearLayout> </LinearLayout> </android.support.v4.widget.SwipeRefreshLayout>
这样写的话,正常情况下是可以实现我们的功能,但很显然这里面的嵌套比较多。那么怎么优化呢?
首先,我们先分析功能需求:标题栏和底部添加评论布局没有什么问题,问题出在书籍信息和评论部分。为了实现滑动的时候书籍信息能够跟着评论区一起滑动,上面的代码的做法是使用NestedScrollView把它们俩包裹住。需求分析以后,发现实现滑动部分没有必要使用NestedScrollView,为什么呢?我们可是使用RecyclerView了。

如果在开发中用过RecyclerView实现多种布局的需求,应该就明白我要说啥了,其实书籍信息那部分的布局可以作为RecyclerView的头布局,这样一来的话NestedScrollView这一嵌套就没有必要了,而且用RecyclerView实现起来更高雅点(o´罒`o),哈哈。
那么经过上面的分析,我们的代码其实可以这样写:
<?xml version="1.0" encoding="utf-8"?> <android.support.v4.widget.SwipeRefreshLayout xmlns:android="http://schemas.android.com/apk/res/android" xmlns:app="http://schemas.android.com/apk/res-auto" xmlns:tools="http://schemas.android.com/tools" style="@style/CommonRootView" android:background="@android:color/white"> <LinearLayout android:layout_width="match_parent" android:layout_height="match_parent" android:orientation="vertical"> <com.mozhe.yswx.widgets.CustomToolbar android:layout_width="match_parent" android:layout_height="@dimen/yanshi_toolbar_height" app:title="书评区"> </com.mozhe.yswx.widgets.CustomToolbar> <include layout="@layout/view_top_shadow"/> <FrameLayout android:layout_width="match_parent" android:layout_height="match_parent"> <com.mozhe.yswx.widgets.EmptyRecyclerView android:id="@+id/list_rv" android:layout_width="match_parent" android:layout_height="match_parent" android:paddingBottom="50dp" android:clipToPadding="false"> </com.mozhe.yswx.widgets.EmptyRecyclerView> <com.mozhe.yswx.widgets.EmptyView android:id="@+id/empty_view" android:layout_width="wrap_content" android:layout_height="wrap_content" android:layout_gravity="center"> </com.mozhe.yswx.widgets.EmptyView> <LinearLayout android:layout_width="match_parent" android:layout_height="wrap_content" android:orientation="vertical" android:layout_gravity="bottom"> <!--阴影--> <ImageView android:layout_width="match_parent" android:layout_height="wrap_content" android:src="@drawable/icon_shadow_bottom" android:scaleType="fitXY"/> <FrameLayout android:id="@+id/book_comment_bottom_fl" android:layout_width="match_parent" android:layout_height="50dp" android:background="@android:color/white"> <TextView android:layout_width="wrap_content" android:layout_height="wrap_content" android:drawablePadding="10dp" android:layout_gravity="center" android:clickable="true" android:text="发表评论"/> </FrameLayout> </LinearLayout> </FrameLayout> </LinerLayout> </android.support.v4.widget.SwipeRefreshLayout>
这是我在项目中写的,当然考虑到的东西会更多点,所以代码会长点,但我们的中心思想是:如果一个布局中需要使用RecyclerView实现List的功能,同时布局中还存在着其他的布局,这时我们可以考虑能不能仅使用RecyclerView来实现所有的界面。这样如果以后你的公司新入职了一名Android开发,他问你:“这块你是怎么实现的?”你推了推眼镜,然后不屑一顾的说:“就用RecyclerView是实现的”。他可能不知道你怎么弄的,但是,他一定会觉得:牛逼,大神啊,我要以后跟着他混了。然后你用余光瞄他,发觉他要开口问:“这个怎么实现的啊”,然后你在他要问之前,面带微笑着说到:“想学吗,我教你啊”。艹,画面简直不敢想象,不知道你有没有被爽到,但是我的确刺激到了。
上面写的有点飘了,咱们回归正题。可能对于很多老手来说,上面的就是常规操作而已。当然其实我在之前也是知道这么写的,那为什么会突然间想写这篇文章呢。这个就说来话长了,我要开始我的表演了,请准备好纸巾。
我记得我刚开始的时候就是按照第一种方式实现的,但是在测试的时候发现评论列表的数据怎么都显示不出来,当时没想太多,觉得是不是数据没有填充进去,是不是没有调用的Adapte的刷新方法,后面就是进入常规的测试阶段,通过Debugger发现,数据是获得到的,而且数据也是填充到list中的,adapter的刷新方法也是调用的。觉得很奇怪,于是我就开始怀疑是不是布局方面的嵌套导致RecyclerView没有显示,发现这个布局和我书籍详情部分实现热门评论部分的布局结构是一样的,这个时候我开始慌了,不科学啊!然后我要去Google了一下,有的人提了是不是Adapter部分getItemCount()返回的是0,然后抱着严谨的态度前去检查了一下,发现并没有。看了很多文章,发现他们说的那些我都已经注意到了,这个时候简直心态崩了,然后我要跑去问我的学长(之前是我的负责人)然后请他帮忙看一下,他debugger了一会,扔下一句“不知道”。当时就觉得各种不科学,我甚至开始怀疑代码本身了。然后搞着搞着发现天色已晚,然后就回去了。
回去的路上,戴着耳机,骑着Hello单车,脑子就不自觉的在想那问题,其实在Debugger的时候,就已经考虑过要不就用RecylerView做吧,骑车的时候突然间回忆起记得之前看过文章说NestedScrollView嵌套RecyclerView的时候就容易出错,所以就下定决心明天开工的时候就直接用RecyclerView做,第二天果不其然正常了,评论列表出来的时候,嘴巴里吐出一句箴言:“握草!”
唉~~我还是太年轻~~~
虽然功能实现了,但是我并不清楚为什么之前写的会导致评论出不来,如果读者大大们有人有过类似的遭遇或者知道原因的,恳请你们在评论区留下你们的答案,试想如果我看了你的评论知道了原因,然后你回复一句:“很简单啊~”,哈哈,那个画面反正我是不敢想......
最后
这将会是一个系列,主要是关于RecyclerView在项目中的一些使用技巧。感谢您的阅读,我们下篇在见!