Git提交push报错:HTTP 413 curl 22 The requested URL returned error: 413 Request Entity Too Large解决方案(超详细步骤)
文章目录
前言
提交代码push的时候报错:HTTP 413 curl 22 The requested URL returned error: 413 Request Entity Too Large
原因是上传的文件过大,所以会出现以下的错误信息。网上的改法没有用,只能通过使用ssh方式提交才能解决。因此这里给出解决方法。
错误
Total 45 (delta 12), reused 0 (delta 0), pack-reused 0
error: RPC failed; HTTP 413 curl 22 The requested URL returned error: 413
fatal: the remote end hung up unexpectedly
fatal: the remote end hung up unexpectedly
解决方法
如果你已经配置好了ssh密钥,可以直接跳到第四步。
1.检查现有 SSH 密钥
在生成 SSH 密钥之前,您可以检查是否有任何现有的 SSH 密钥。
注: DSA 密钥 (SSH-DSS) 不再受支持。 现有密钥将继续运行,但您不能将新的 DSA 密钥添加到您的 GitHub 帐户。
-
打开 Git Bash。
-
输入
ls -al ~/.ssh以查看是否存在现有 SSH 密钥:$ ls -al ~/.ssh # Lists the files in your .ssh directory, if they exist -
检查目录列表以查看是否已经有 SSH 公钥。 默认情况下,公钥的文件名是以下之一:
- id_rsa.pub
- id_ecdsa.pub
- id_ed25519.pub
如果您没有现有的公钥和私钥对,或者不想使用任何可用于连接到 GitHub 的密钥对,则生成新的 SSH 密钥。
如果您看到列出的现有公钥和私钥对(例如 id_rsa.pub 和 id_rsa),并且您希望使用它们连接到 GitHub,则可以将 SSH 密钥添加到 ssh-agent。
提示:如果您收到错误“~/.ssh 不存在”,不要担心! 我们在生成新的 SSH 密钥时会创建它。
2.生成新 SSH 密钥并添加到 ssh-agent
检查现有 SSH 密钥后,您可以生成新 SSH 密钥以用于身份验证,然后将其添加到 ssh-agent。
如果您还没有 SSH 密钥,则必须生成新 SSH 密钥。 如果您不确定是否已有 SSH 密钥,请检查现有密钥。
如果不想在每次使用 SSH 密钥时重新输入密码,您可以将密钥添加到 SSH 代理,让它管理您的 SSH 密钥并记住您的密码。
生成新 SSH 密钥
-
打开 Git Bash。
-
粘贴下面的文本(替换为您的 GitHub 电子邮件地址)。
$ ssh-keygen -t ed25519 -C "[email protected]"**注:**如果您使用的是不支持 Ed25519 算法的旧系统,请使用以下命令:
$ ssh-keygen -t rsa -b 4096 -C "[email protected]"这将创建以所提供的电子邮件地址为标签的新 SSH 密钥。
> Generating public/private ed25519 key pair. -
提示您“Enter a file in which to save the key(输入要保存密钥的文件)”时,按 Enter 键。 这将接受默认文件位置。
> Enter a file in which to save the key (/c/Users/you/.ssh/id_ed25519):[Press enter] -
在提示时输入安全密码。 更多信息请参阅“使用 SSH 密钥密码”。
> Enter passphrase (empty for no passphrase): [Type a passphrase]
> Enter same passphrase again: [Type passphrase again]
将 SSH 密钥添加到 ssh-agent
将新 SSH 密钥添加到 ssh-agent 以管理密钥之前,应检查现有 SSH 密钥并生成新 SSH 密钥。
如果已安装 GitHub Desktop,可使用它克隆仓库,而无需处理 SSH 密钥。
-
确保 ssh-agent 正在运行。 您可以根据“使用 SSH 密钥密码”中的“自动启动 ssh-agent”说明,或者手动启动它:
# start the ssh-agent in the background $ eval `ssh-agent -s` > Agent pid 59566 -
将 SSH 私钥添加到 ssh-agent。 If you created your key with a different name, or if you are adding an existing key that has a different name, replace id_ed25519 in the command with the name of your private key file.
$ ssh-add ~/.ssh/id_ed25519
3.新增 SSH 密钥到 GitHub 帐户
要配置 GitHub 帐户使用新的(或现有)SSH 密钥,您还需要将其添加到 GitHub 帐户。
在新增 SSH 密钥到 GitHub 帐户之前,您应该已:
- 检查现有 SSH 密钥
- 生成新 SSH 密钥并添加到 ssh-agent
在新增 SSH 密钥到 GitHub 帐户后,您可以重新配置任何本地仓库使用 SSH。 更多信息请参阅“将远程 URL 从 HTTPS 转换为 SSH”。
注: DSA 密钥 (SSH-DSS) 不再受支持。 现有密钥将继续运行,但您不能将新的 DSA 密钥添加到您的 GitHub 帐户。
-
将 SSH 公钥复制到剪贴板。
如果您的 SSH 公钥文件与示例代码不同,请修改文件名以匹配您当前的设置。 在复制密钥时,请勿添加任何新行或空格。
$ clip < ~/.ssh/id_ed25519.pub
# Copies the contents of the id_ed25519.pub file to your clipboard
**提示:**如果
clip不可用,可找到隐藏的.ssh文件夹,在常用的文本编辑器中打开该文件,并将其复制到剪贴板。 -
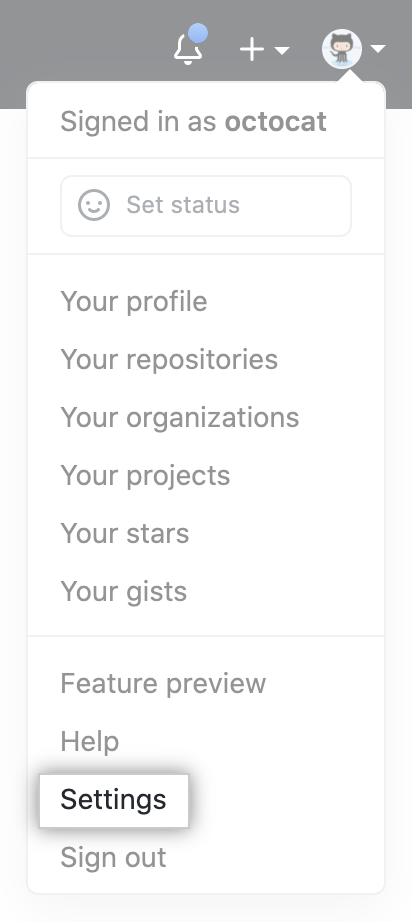
在任何页面的右上角,单击您的个人资料照片,然后单击 Settings(设置)。
-
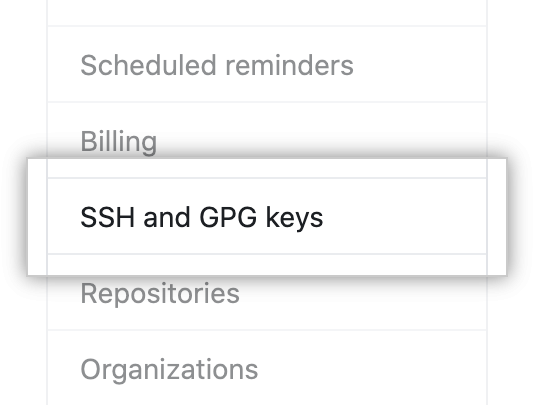
在用户设置侧边栏中,单击 SSH and GPG keys(SSH 和 GPG 密钥)。
-
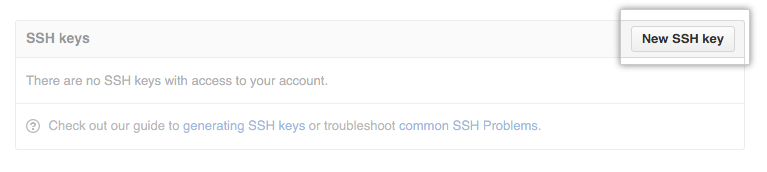
单击 **New SSH key(新 SSH 密钥)**或 Add SSH key(添加 SSH 密钥)。
-
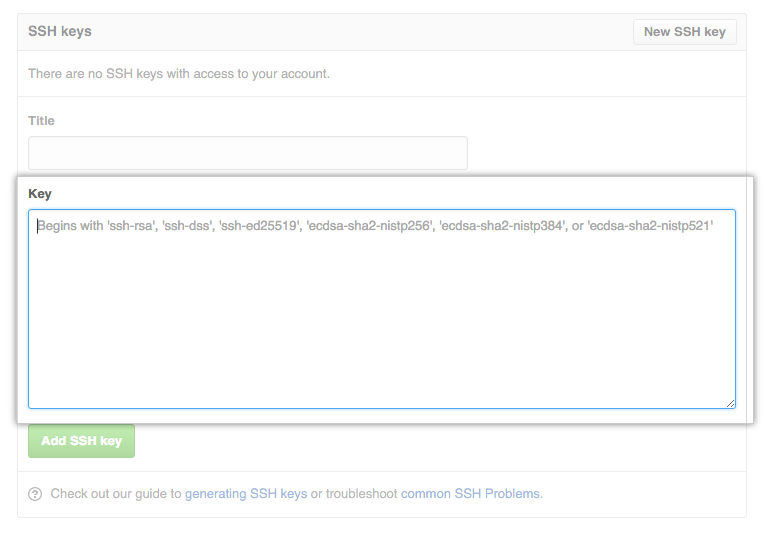
在 “Title”(标题)字段中,为新密钥添加描述性标签。 例如,如果您使用的是个人 Mac,此密钥名称可能是 “Personal MacBook Air”。
-
将密钥粘贴到 “Key”(密钥)字段。
-
单击 Add SSH key(添加 SSH 密钥)。
-
如有提示,请确认您的 GitHub 密码。
4.更改远程仓库的 URL
git remote set-url 命令可更改现有远程仓库的 URL。
git remote set-url 命令使用两个参数:
-
现有远程仓库的名称。 例如,
源仓库或上游仓库是两种常见选择。 -
远程仓库的新 URL。 例如:
-
如果您要更新为使用 HTTPS,您的 URL 可能如下所示:
https://github.com/USERNAME/REPOSITORY.git -
如果您要更新为使用 SSH,您的 URL 可能如下所示:
[email protected]:USERNAME/REPOSITORY.git
-
将远程 URL 从 SSH 切换到 HTTPS
-
打开 Git Bash。
-
将当前工作目录更改为您的本地仓库。
-
列出现有远程仓库以获取要更改的远程仓库的名称。
$ git remote -v > origin [email protected]:USERNAME/REPOSITORY.git (fetch) > origin [email protected]:USERNAME/REPOSITORY.git (push) -
使用
git remote set-url命令将远程的 URL 从 SSH 更改为 HTTPS。
$ git remote set-url origin https://github.com/USERNAME/REPOSITORY.git -
验证远程 URL 是否已更改。
$ git remote -v
# Verify new remote URL
> origin  https://github.com/USERNAME/REPOSITORY.git (fetch)
> origin  https://github.com/USERNAME/REPOSITORY.git (push)
下次对远程仓库执行 git fetch、git pull 或 git push 操作时,您需要提供 GitHub 用户名和密码。 When Git prompts you for your password, enter your personal access token (PAT) instead. Password-based authentication for Git is deprecated, and using a PAT is more secure. For more information, see “Creating a personal access token.”
You can use a credential helper so Git will remember your GitHub username and personal access token every time it talks to GitHub.
将远程 URL 从 HTTPS 切换到 SSH
-
打开 Git Bash。
-
将当前工作目录更改为您的本地仓库。
-
列出现有远程仓库以获取要更改的远程仓库的名称。
$ git remote -v > origin https://github.com/USERNAME/REPOSITORY.git (fetch) > origin https://github.com/USERNAME/REPOSITORY.git (push) -
使用
git remote set-url命令将远程的 URL 从 HTTPS 更改为 SSH。
$ git remote set-url origin [email protected]:USERNAME/REPOSITORY.git -
验证远程 URL 是否已更改。
$ git remote -v
# Verify new remote URL
> origin  [email protected]:USERNAME/REPOSITORY.git (fetch)
> origin  [email protected]:USERNAME/REPOSITORY.git (push)
疑难解答
尝试更改远程时可能会遇到这些错误。
[No such remote ‘name]’
此错误表示您尝试更改的远程不存在:
$ git remote set-url sofake https://github.com/octocat/Spoon-Knife
> fatal: No such remote 'sofake'
检查您是否正确键入了远程仓库的名称。
到此教程结束,当然,你如果想进一步了解SSH并且使用。你还可以继续往下看。
测试 SSH 连接
设置 SSH 密钥并将其添加到您的 GitHub 帐户后,您可以测试连接。
测试 SSH 连接之前,您应已完成以下各项:
- 检查现有 SSH 密钥
- 生成新 SSH 密钥
- 新增 SSH 密钥到 GitHub 帐户
测试连接时,您将需要使用密码(即您之前创建的 SSH 密钥密码)验证此操作。 有关使用 SSH 密钥密码的更多信息,请参阅“使用 SSH 密钥密码”。
-
打开 Git Bash。
-
输入以下内容:
$ ssh -T [email protected]
# Attempts to ssh to GitHub
您可能会看到类似如下的警告:
> The authenticity of host 'github.com (IP ADDRESS)' can't be established. > RSA key fingerprint is SHA256:nThbg6kXUpJWGl7E1IGOCspRomTxdCARLviKw6E5SY8. > Are you sure you want to continue connecting (yes/no)? -
Verify that the fingerprint in the message you see matches GitHub’s RSA public key fingerprint. If it does, then type
yes:> Hi username! You've successfully authenticated, but GitHub does not > provide shell access. -
验证生成的消息包含您的用户名。 如果收到“权限被拒绝”消息,请参阅“错误:权限被拒绝(公钥)”。
使用 SSH 密钥密码
您可以保护 SSH 密钥并配置身份验证代理,这样您就不必在每次使用 SSH 密钥时重新输入密码。
使用 SSH 密钥时,如果有人获得您计算机的访问权限,他们也可以使用该密钥访问每个系统。 要添加额外的安全层,可以向 SSH 密钥添加密码。 您可以使用 ssh-agent 安全地保存密码,从而不必重新输入。
添加或更改密码
通过输入以下命令,您可以更改现有私钥的密码而无需重新生成密钥对:
$ ssh-keygen -p
# Start the SSH key creation process
> Enter file in which the key is (/Users/you/.ssh/id_rsa): [Hit enter]
> Key has comment '/Users/you/.ssh/id_rsa'
> Enter new passphrase (empty for no passphrase): [Type new passphrase]
> Enter same passphrase again: [One more time for luck]
> Your identification has been saved with the new passphrase.
如果您的密钥已有密码,系统将提示您输入该密码,然后才能更改为新密码。
在 Git for Windows 上自动启动 ssh-agent
您可以在打开 bash 或 Git shell 时自动运行 ssh-agent。 复制以下行并将其粘贴到 Git shell 中的 ~/.profile 或 ~/.bashrc 文件中:
env=~/.ssh/agent.env

agent_load_env () {

     test -f "$env" && . "$env" >| /dev/null ; }

agent_start () {


    (umask 077; ssh-agent >| "$env")
    . env=~/.ssh/agent.env

agent_load_env () {

     test -f "$env" && . "$env" >| /dev/null ; }

agent_start () {


    (umask 077; ssh-agent >| "$env")
    . "$env" >| /dev/null ; }

agent_load_env

# agent_run_state: 0=agent running w/ key; 1=agent w/o key; 2= agent not running
agent_run_state=$(ssh-add -l >| /dev/null 2>&1; echo $?)

if [ ! "$SSH_AUTH_SOCK" ] || [ $agent_run_state = 2 ]; then
    agent_start
    ssh-add
elif [ "$SSH_AUTH_SOCK" ] && [ $agent_run_state = 1 ]; then
    ssh-add
fi

unset env

if [ ! "$SSH_AUTH_SOCK" ] || [ $agent_run_state = 2 ]; then
    agent_start
    ssh-add
elif [ "$SSH_AUTH_SOCK" ] && [ $agent_run_state = 1 ]; then
    ssh-add
fi

unset env
如果您的私钥没有存储在默认位置之一(如 ~/.ssh/id_rsa),您需要告知 SSH 身份验证代理其所在位置。 要将密钥添加到 ssh-agent,请输入 ssh-add ~/path/to/my_key。 更多信息请参阅“生成新的 SSH 密钥并添加到 ssh-agent”
**提示:**如果想要 ssh-agent 在一段时间后忘记您的密钥,可通过运行 ssh-add -t <seconds> 进行配置。
现在,当您初次运行 Git Bash 时,系统将提示您输入密码:
> Initializing new SSH agent...
> succeeded
> Enter passphrase for /c/Users/you/.ssh/id_rsa:
> Identity added: /c/Users/you/.ssh/id_rsa (/c/Users/you/.ssh/id_rsa)
> Welcome to Git (version 1.6.0.2-preview20080923)
>
> Run 'git help git' to display the help index.
> Run 'git help ' to display help for specific commands.
在一段时间后忘记您的密钥,可通过运行 ssh-add -t <seconds> 进行配置。
现在,当您初次运行 Git Bash 时,系统将提示您输入密码:
> Initializing new SSH agent...
> succeeded
> Enter passphrase for /c/Users/you/.ssh/id_rsa:
> Identity added: /c/Users/you/.ssh/id_rsa (/c/Users/you/.ssh/id_rsa)
> Welcome to Git (version 1.6.0.2-preview20080923)
>
> Run 'git help git' to display the help index.
> Run 'git help ' to display help for specific commands.
ssh-agent 进程将继续运行,直到您注销、关闭计算机或终止该进程。