最近在使用若依前后端分离框架,源码地址,这里记录下自己的学习过程。主要是为了督促自己的学习,巩固自己对框架的理解。这里也提供下官方的介绍文档地址,毕竟我自己写的和人家的比就是个渣渣。
该项目用到的主要技术,前端:vue+element,后端springboot。
前端目录为ruoyi-ui,为单页面模式,只有一个html文件public/index.html。vue-cli3之后为public/index.html, vue-cli2版本的是根目录下的index.html。主要代码如下:
    <div id="app">
	    <div id="loader-wrapper">
		    <div id="loader"></div>
		    <div class="loader-section section-left"></div>
		    <div class="loader-section section-right"></div>
		    <div class="load_title">正在加载系统资源,请耐心等待</div>
        </div>
	</div>
我们重点关注id="app"这行代码,其他的都是引入css样式。这里的app用于关联src/main.js中的app。
import App from './App'
......
new Vue({


  el: '#app',
  router,
  store,
  render: h => h(App)
})
这里关联了src/App.vue文件。
<template>
  <div id="app">
    <router-view />
  </div>
</template>

<script>
export default  {


  name:  'App'
}
</script>
在这个vue文件中,重点关注 router-view标签。该标签是vue的路由。读取src/router/index.js文件,根据用户请求的路径,跳转到相应的页面。可能用跳转页面不太合适,毕竟该项目前端理论上只有一个页面,应该是根据不同的请求路径,加载不同的内容。
src/router/index.js内容如下:
import Vue from 'vue'
import Router from 'vue-router'

Vue.use(Router)

/* Layout */
import Layout from '@/layout'

/**
 * Note: 路由配置项
 *
 * hidden: true                   // 当设置 true 的时候该路由不会再侧边栏出现 如401,login等页面,或者如一些编辑页面/edit/1
 * alwaysShow: true               // 当你一个路由下面的 children 声明的路由大于1个时,自动会变成嵌套的模式--如组件页面
 *                                // 只有一个时,会将那个子路由当做根路由显示在侧边栏--如引导页面
 *                                // 若你想不管路由下面的 children 声明的个数都显示你的根路由
 *                                // 你可以设置 alwaysShow: true,这样它就会忽略之前定义的规则,一直显示根路由
 * redirect: noRedirect           // 当设置 noRedirect 的时候该路由在面包屑导航中不可被点击
 * name:'router-name'             // 设定路由的名字,一定要填写不然使用<keep-alive>时会出现各种问题
 * meta : {
    noCache: true                // 如果设置为true,则不会被 <keep-alive> 缓存(默认 false)
    title: 'title'               // 设置该路由在侧边栏和面包屑中展示的名字
    icon: 'svg-name'             // 设置该路由的图标,对应路径src/assets/icons/svg
    breadcrumb: false            // 如果设置为false,则不会在breadcrumb面包屑中显示
  }
 */

// 公共路由
export const constantRoutes = [
  {
    path: '/redirect',
    component: Layout,
    hidden: true,
    children: [
      {
        path: '/redirect/:path(.*)',
        component: (resolve) => require(['@/views/redirect'], resolve)
      }
    ]
  },
  {
    path: '/login',
    component: (resolve) => require(['@/views/login'], resolve),
    hidden: true
  },
  {
    path: '/404',
    component: (resolve) => require(['@/views/error/404'], resolve),
    hidden: true
  },
  {
    path: '/401',
    component: (resolve) => require(['@/views/error/401'], resolve),
    hidden: true
  },
  {
    path: '',
    component: Layout,
    redirect: 'index',
    children: [
      {
        path: 'index',
        component: (resolve) => require(['@/views/index'], resolve),
        name: '首页',
        meta: { title: '首页', icon: 'dashboard', noCache: true, affix: true }
      }
    ]
  },
......
]

export default new Router({
  mode: 'history', // 去掉url中的#
  scrollBehavior: () => ({ y: 0 }),
  routes: constantRoutes
})
我们以/login为例,用户请求http://ip:port/login, 就会加载views/login.vue这个界面,显示登录界面。那么这个ip:port是怎么来的呢?这里我们关注下vue-config.js文件
const port = process.env.port || process.env.npm_config_port || 80 // 端口

// 这里只列一部分,具体配置参考文档
module.exports = {


  ......
  devServer: {


    host: '0.0.0.0',
    port: port,
    ......
  }
}
自己电脑上跑这个程序,默认就可以是http://localhost:80。接下来,我们前端执行npm run dev把项目跑起来,看一下具体效果。效果如下图:
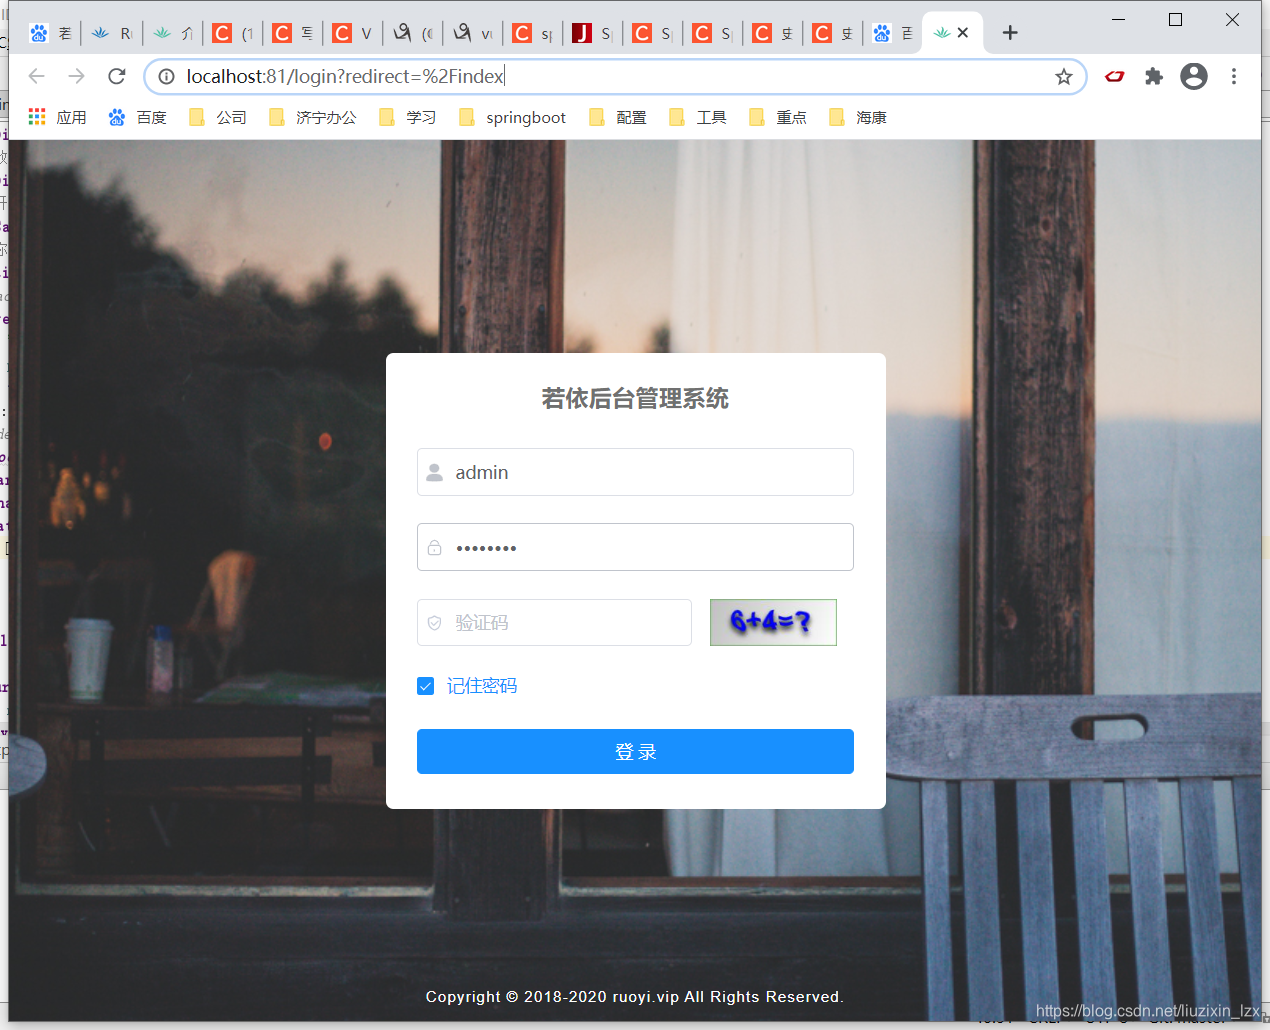
我们看到,输入地址之后,默认跳转到了登录界面,并且url为http://localhost:81/login?redirect=%2Findex。为什么端口号是81呢,我们配置的是80。是 vue-cli-service 内部依赖了一个叫 portfinder 的库,发现80端口被占用了,自动加1。我们回头看一下router/index.js根路径的路由。
{


    path: '',
    component: Layout,
    redirect: 'index',
    children: [
      {


        path: 'index',
        component: (resolve) => require(['@/views/index'], resolve),
        name: '首页',
        meta: {

     title: '首页', icon: 'dashboard', noCache: true, affix: true }
      }
    ]
  },
根据这条路由,页面应该加载views/index.vue啊。为什么路径变成了/login,加载了views/login.vue呢?这是因为路由守卫,请看permission.js文件:
const whiteList = ['/login', '/auth-redirect', '/bind', '/register']

router.beforeEach((to, from, next) => {


  NProgress.start()
  if (getToken()) {


    ......
  } else {


    // 没有token
    if (whiteList.indexOf(to.path) !== -1) {


      // 在免登录白名单,直接进入
      next()
    } else {


      next(`/login?redirect=${

      to.fullPath}`) // 否则全部重定向到登录页
      NProgress.done()
    }
  }
})
这个文件是在src/main.js进行引入的。
router.beforeEach就可以理解为每一个路由请求之前,先干点啥。因为我们还没有登录过,getToken肯定无法返回,“/”请求也不在白名单中,所以最后会走到next(/login?redirect=${to.fullPath}), 也就和我们的地址http://localhost:81/login?redirect=%2Findex对应起来了。这里的%2F是/的URL编码。这就是显示登录界面的整个流程啦。
作为一个程序员,平常都是根据框架,添加新功能或者修改原来的代码。大部分时间都是复制、粘贴、修改,原理性的东西都不能深入的去理解。这样对于自己的成长很不利,我也是深受其害,因此决定厚着脸皮写个博客,只是为了督促自己。也希望大家多多指教。
下一章,若依前后端分离框架学习-2:登录过程