交互脚本
一、expect实现简单的交互登录
前提:
- 如果
linux主机没有安装expect,记得先安装#yum install -y expect - 安装后查看所在位置
sh脚本开头要写成#!/use/bin/expect(查看expect安装位置#which expect)
注意:执行expect脚本要使用 #./auto-login-ssh.sh,
因为expect不是bash脚本,不能使用#bash auto-login-ssh.sh执行
1.1 expect基本用法
expect定制变量方式
 	set [变量名] [变量值]
 	set ip 192.168.1.2   #ip:为变量名  192.168.1.2:为变量值
#!/usr/bin/expect
#use expect auto input username&password ssh
#v1.1 by zjz 2020-04-25
#expect 定义变量
#spawn ssh [email protected]
set user root #用户为root
set ip 192.168.31.153 #ip
set password Aa123456 #密码
set timeout 3 #命令执行后等待3s执行下条
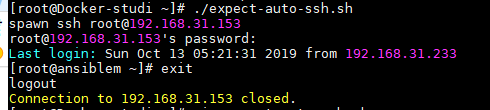
spawn ssh $user@$password
expect {
"yes/no" {
send "yes\r"; exp_continue }
"password" {
send "Aa123456\r" }; #\r等于回车
}
interact
执行结果:
1.2 使用$argv 输入
[root@localhost sh]# cat autoV2-login-ssh.sh
#!/usr/bin/expect
# aotu input username:password login ssh
# v1.0 by zjz 2019-11-06
set ip [lindex $argv 0 ]  #这个0相当于shell的$1
set user [lindex $argv 1 ]
set password Zz123456
set timeout 5

spawn ssh $user@$ip

expect {


        "yes/no" {

    send "yes\r"; exp_continue }
        "password:" {

    send "$password\r" };
}
interact

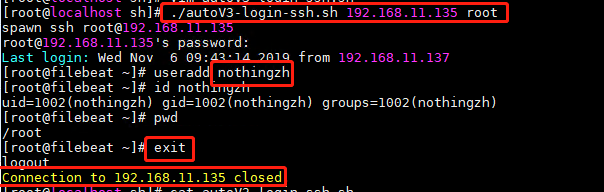
1.3 登录客户端后执行添加用户操作
#!/usr/bin/expect
#aotu input username:password login ssh and add user
#v1.2 by zjz 2020-04-25 22:23:08

set ip [lindex $argv 0]
set user [lindex $argv 1]
set password Aa123456
set timeout 3

spawn ssh $user@$ip
expect {


		"yes/no" {

    send "yes\r";exp_continue }
		"password:" {

    send "$password\r"};
}
expect "]#"
send "useradd nothingzh\r"
send "id nothingzh\r"
send "exit\r"
interact
更多更好的原创文章,请访问官方网站: 点我就能跳转咯-》https://nothingzh.gitee.io
也可关注“哎呦运维”微信订阅号,随时接受文章推送。