实现步骤
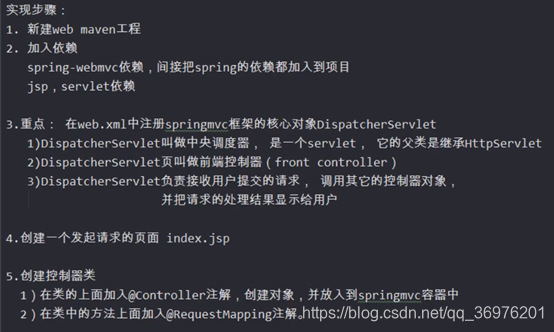
创建项目
加入依赖
加入Servlet和springmvc的依赖
<!--    Servlet依赖-->
    <dependency>
      <groupId>javax.servlet</groupId>
      <artifactId>javax.servlet-api</artifactId>
      <version>4.0.1</version>
      <scope>provided</scope>
    </dependency>

    <!--springmvc-->
    <dependency>
      <groupId>org.springframework</groupId>
      <artifactId>spring-webmvc</artifactId>
      <version>5.2.7.RELEASE</version>
    </dependency>
注册DispatherServlet
需要在tomcat启动后就创建DispatcherServlet对象的实例,在创建过程中会同时创建出springmvc容器对象,会读取springmvc的配置文件,
把这个配置文件中的对象都创建好,当用户发起请求时就可以直接使用对象
会在init方法中创建容器,读取配置文件,然后把容器对象放到ServletContext中、
      //创建容器,读取配置文件
      WebApplicationContext ctx=new ClassPathXmlApplicationContext("springmvc.xml");
      //把容器对象放入到ServletContext中
	  getServletContext().setAttribute(key,ctx);
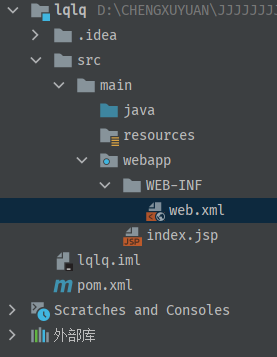
web.xml
<?xml version="1.0" encoding="UTF-8"?>
<web-app xmlns="http://xmlns.jcp.org/xml/ns/javaee"
         xmlns:xsi="http://www.w3.org/2001/XMLSchema-instance"
         xsi:schemaLocation="http://xmlns.jcp.org/xml/ns/javaee http://xmlns.jcp.org/xml/ns/javaee/web-app_4_0.xsd"
         version="4.0">
    <!--  声明,注册springmvc的核心对象DispatherServlet     -->
    <servlet>
        <servlet-name>springmvc</servlet-name>
        <servlet-class>org.springframework.web.servlet.DispatcherServlet</servlet-class>

        <!--springmvc默认读取的是/WEB-INF/<servlet-name>-servlet.xml文件,
        可以自定义springMVC读取配置文件的位置-->
        <init-param>
            <!--            springMvc的配置文件的位置-->
            <param-name>contextConfigLocation</param-name>
            <param-value>classpath:springmvc.xml</param-value>
        </init-param>

        <!--    在tomcat启动后,创建Servlet对象,表示tomcat启动后
        创建对象的顺序。他的数值越小,创建对象的时间越早-->
        <load-on-startup>1</load-on-startup>
    </servlet>

    <servlet-mapping>
        <servlet-name>springmvc</servlet-name>
        <!--        url-pattern使用框架的时候可以有两种值:
                    1、一种是使用扩展名:*.do,表示以.do结尾的请求都会映射到这个Servlet
                    tomcat自带一个DefaltServlet,未映射的请求和静态资源都会交给这个Servlet去处理

                    2、第二种是使用斜杠"/",所有静态资源(html,js,jpg等)都给这个映射的Servlet去处理,而DispatcherServlet没有
                    处理静态资源的能力,动态资源some.do是可以访问的,因为程序中有控制器对象
                    第一种解决方案:
                        是在springmvc的配置文件中加入<mvc:default-servlet-handler/>注解
                     第二种解决方案:
                        在springmvc中加入<mvc:resource>-->

                <url-pattern>*.do</url-pattern>
<!--        <url-pattern>/</url-pattern>-->
    </servlet-mapping>
</web-app>
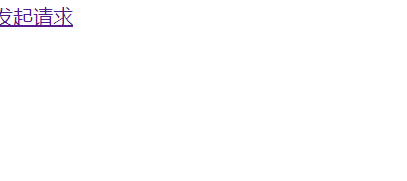
发起请求页面
index.jsp
<%@ page contentType="text/html;charset=UTF-8" language="java" %>
<html>
<head>
    <title>Title</title>
</head>
<body>
<a href="test/some.do">发起请求</a><br/>
</body>
</html>
创建控制器类
处理用户请求的方法,可以有多种返回值,多种参数
@RequestMapping请求映射,把一个请求地址和一个方法绑定在一起,
可以在方法上面也可以在类上面,放在类上面表示请求地址的公共部分
value 是一个String[],表示请求的url地址也可以是一个String数组,表示多个url
ModelAndView表示本次请求的处理结果,、
Model: 数据,请求处理完成后,要显示给用户的数据
View: 视图,比如jsp等等
添加数据,这种方式添加的是域属性
指定视图,指定视图的完整路径,框架对视图执行的转发forward操作,和视图解析器中的字符串相加
method属性,指定请求方式
package controller;

import org.springframework.stereotype.Controller;
import org.springframework.web.bind.annotation.RequestMapping;
import org.springframework.web.bind.annotation.RequestMethod;
import org.springframework.web.servlet.ModelAndView;

@Controller
@RequestMapping("/test")
public class MyController {


    @RequestMapping(value ={

    "/some.do","/other.do"},method = RequestMethod.GET)
    public ModelAndView doSome(){


        System.out.println("Jinlai");
        ModelAndView mv=new ModelAndView();
        //添加数据,这种方式添加的是域属性
        //request.setAttribute("msg","Hi");
        mv.addObject("msg","Hi");
        //指定视图,指定视图的完整路径,框架对视图执行的转发forward操作,和视图解析器中的字符串相加
        mv.setViewName("/show.jsp");
        return mv;
    }
}
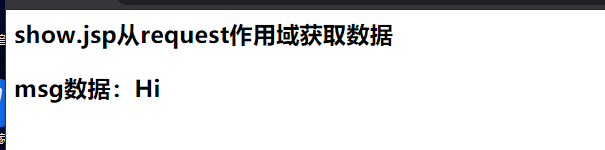
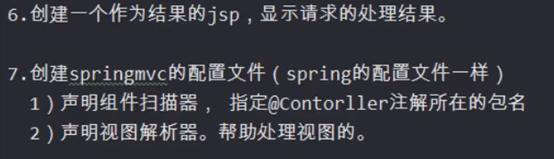
创建一个作为结果的jsp
show.jsp
<%@ page contentType="text/html;charset=UTF-8" language="java" %>
<html>
<head>
    <title>Title</title>
</head>
<body>
<h3>show.jsp从request作用域获取数据</h3>
<h3>msg数据:${msg}</h3>
</body>
</html>
springmvc配置文件
声明组件扫描器
<?xml version="1.0" encoding="UTF-8"?>
<beans xmlns="http://www.springframework.org/schema/beans"
       xmlns:xsi="http://www.w3.org/2001/XMLSchema-instance"
       xmlns:context="http://www.springframework.org/schema/context"
       xsi:schemaLocation="http://www.springframework.org/schema/beans http://www.springframework.org/schema/beans/spring-beans.xsd http://www.springframework.org/schema/context https://www.springframework.org/schema/context/spring-context.xsd">
    <!--声明组件扫描器-->
    <context:component-scan base-package="controller"/>

</beans>
运行结果