什么是Ability?
Ability 是应用所具备能力的抽象,也是应用程序的重要组成部分。一个应用可以具备多种能力(即可以包含多个 Ability),HarmonyOS 支持应用以 Ability 为单位进行部署。Ability 可以分为 FA(Feature Ability)和 PA(Particle Ability)两种类型,每种类型为开发者提供了不同的模板,以便实现不同的业务功能。
一、FA(Feature Ability)
1、概述
- 中文意思是功能能力,它支持Page Ability 页面能力用于提供与用户交互的能力。一个
Page可以由一个或多个AbilitySlice构成,AbilitySlice是指应用的单个页面及其控制逻辑的总和。
2、本质
Feature Ability本质上就是一个页面,我们称为Page,主要用于与用户交互。一个Page实例可以包含一组相关页面,每个页面用一个AbilitySlice实例表示。这里的Page,相当于Android中的Activity,Abilityslice相当于Layout。
//Ability
public class MainAbility extends Ability {


    @Override
    public void onStart(Intent intent) {


        super.onStart(intent);
        //默认显示为MainAbilitySlice
        super.setMainRoute(MainAbilitySlice.class.getName());
    }
}

//MainAbilitySlice
public class MainAbilitySlice extends AbilitySlice {


    @Override
    public void onStart(Intent intent) {


        super.onStart(intent);
        //MainAbilitySlice的布局文件
        super.setUIContent(ResourceTable.Layout_ability_main);
    }
3、使用以及注意事项
- 一个
Page可以包含多个AbilitySlice,但是Page进入前台时界面默认只展示一个AbilitySlice。默认展示的AbilitySlice是通过setMainRoute()方法来指定的。 - 如果需要更改默认展示的
AbilitySlice,可以通过addActionRoute()方法为此AbilitySlice配置一条路由规则,当其他Page实例期望导航到此AbilitySlice时,可以在Intent中指定Action。
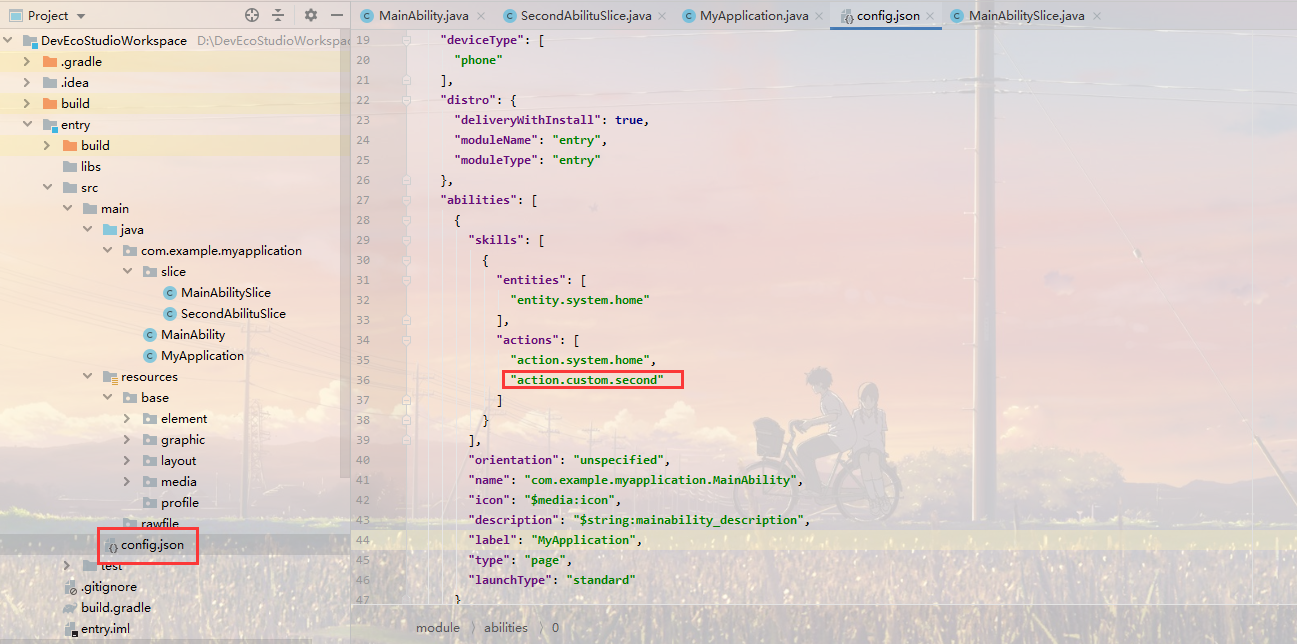
addActionRoute("action.custom.second", SecondAbilituSlice.class.getName());
- 配置了新的路由规则后,需要在配置文件中将其声明,否则会找不到。
4、Feature Ability和Slice的生命周期方法

AbilitySlice作为Page Ability的组成单元,其生命周期是依托于其所属Page Ability生命周期的。AbilitySlice和Page Ability具有相同的生命周期状态和同名的回调,当Page Ability生命周期发生变化时,它的AbilitySlice也会发生相同的生命周期变化。AbilitySlice还具有独立于Page Ability的生命周期变化,这发生在同一Page Ability中的AbilitySlice之间导航时,此时Page Ability的生命周期状态不会改变,AbilitySlice生命周期回调与Page Ability的相应回调类似。- 当
Page Ability被系统销毁时,其所有已实例化的AbilitySlice将联动销毁,而不仅是处于前台的AbilitySlice。
package com.example.myharmonyosprj.slice;
import com.example.myharmonyosprj.ResourceTable;
import ohos.aafwk.ability.AbilitySlice;
import ohos.aafwk.content.Intent;
import ohos.agp.components.Text;
import ohos.agp.window.dialog.ToastDialog;
public class AbilitySliceLifecycle extends AbilitySlice {
private Text txtLog;
@Override
public void onStart(Intent intent) {
super.onStart(intent);
super.setUIContent(ResourceTable.Layout_ability_slice_licecycle_layout);
txtLog = (Text) findComponentById(ResourceTable.Id_log);
if (txtLog != null) {
//设置是否在文本视图中以多行显示文本。
txtLog.setMultipleLine(true);
//在文本视图中将文本字符串追加到现有文本。
txtLog.append("onStart\n");
}
}
@Override
protected void onActive() {
super.onActive();
txtLog.append("onActive\n");
}
@Override
protected void onInactive() {
super.onInactive();
txtLog.append("onInactive\n");
}
@Override
protected void onForeground(Intent intent) {
super.onForeground(intent);
txtLog.append("onForeground\n");
}
@Override
protected void onBackground() {
super.onBackground();
txtLog.append("onBackground\n");
}
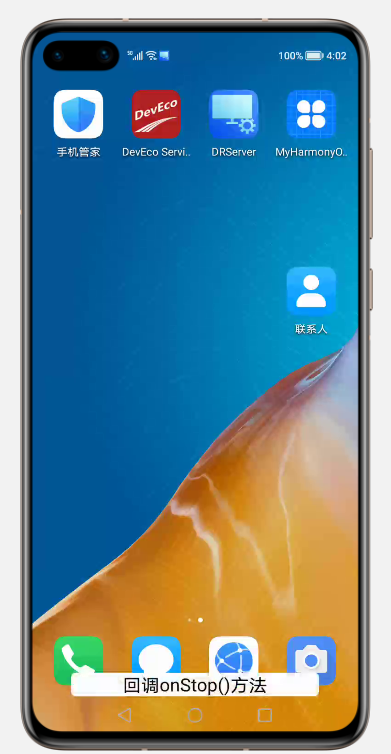
@Override
protected void onStop() {
super.onStop();
new ToastDialog(this)
.setText("回调onStop()方法")
.show();
}
}
当启动程序的时候,回调
OnStart()方法,然后页面获得焦点后调用OnActive()方法
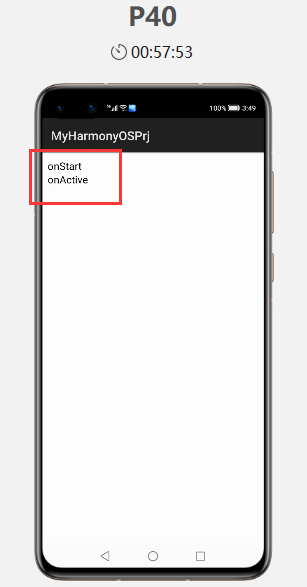
此时我们点击菜单键,将程序挂到后台,然后再切换回来
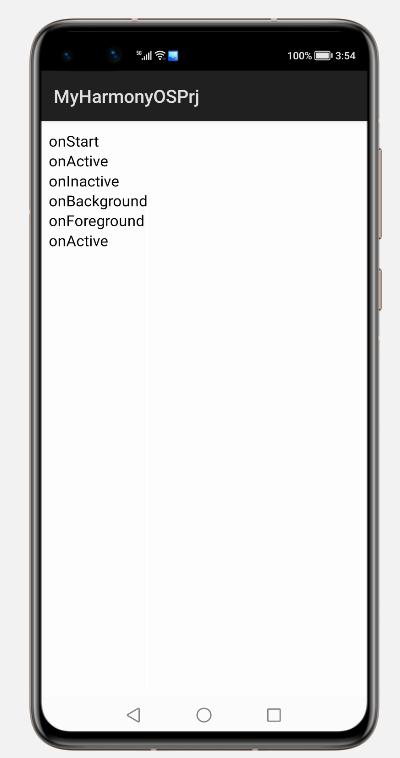
发现首先回调了
onInactive()方法,也就是当前界面失去焦点,然后程序保持在后台运行,回调onBackground()方法,当程序从后台运行状态再次切换回当前页面显示状态时,页面重新获取焦点,回调onForeground()方法,最后再回调onActive()方法。
最后退出程序
以上就是
Ablity和Slice生命周期方法的简单演示
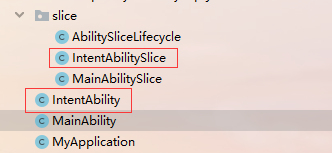
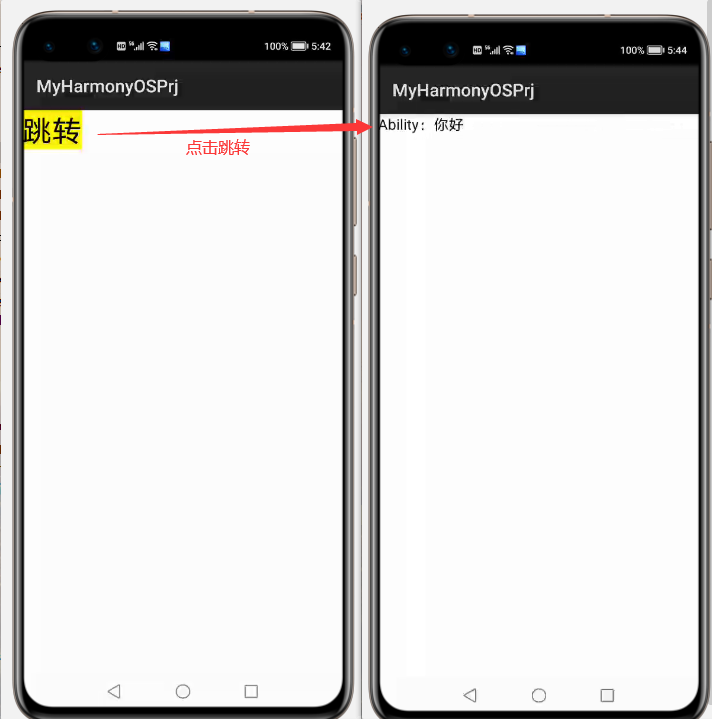
5、Ability之间的切换和传值
创建一个新的page,名称为IntentAbility,创建完毕后,自动生成一个IntentAbilitySlice
- 无参数跳转
present(new IntentAbilitySlice(),new Intent());
- 携带参数跳转
Intent intent = new Intent();
intent.setParam("data", "你好");
present(new IntentAbilitySlice(), intent);
如果携带了参数跳转,如何获取到传递的参数呢?

发现在我们需要跳转过去的Slice的
onStart()方法的参数就是一个Intent,所以可以直接通过intent获取传递过来的参数
String param = intent.getStringParam("data");
完整代码
//MainSlice
package com.example.myharmonyosprj.slice;

import com.example.myharmonyosprj.ResourceTable;
import ohos.aafwk.ability.AbilitySlice;
import ohos.aafwk.content.Intent;
import ohos.agp.components.Button;

/**
 * @description MainAbilitySlice
 * @author PengHuAnZhi
 * @date 2021/1/10 17:13
 */
public class MainAbilitySlice extends AbilitySlice {


    private Button button;

    @Override
    public void onStart(Intent intent) {


        super.onStart(intent);
        super.setUIContent(ResourceTable.Layout_ability_main);
        InitView();
    }
    private void InitView() {


        button = (Button) findComponentById(ResourceTable.Id_btn);
        if(button != null) {


            button.setClickedListener(component -> {


                //传参跳转
                Intent intent = new Intent();
                intent.setParam("data", "你好");
                present(new IntentAbilitySlice(), intent);
                //不传参跳转
                //present(new IntentAbilitySlice(),new Intent());
            });
        }
    }
    @Override
    public void onActive() {


        super.onActive();
    }

    @Override
    public void onForeground(Intent intent) {


        super.onForeground(intent);
    }
}
//目标Slice
package com.example.myharmonyosprj.slice;

import com.example.myharmonyosprj.ResourceTable;
import ohos.aafwk.ability.AbilitySlice;
import ohos.aafwk.content.Intent;
import ohos.agp.components.Text;

/**
 * @description 由MainSlice跳转过来
 * @author PengHuAnZhi
 * @date 2021/1/10 17:14
 */
public class IntentAbilitySlice extends AbilitySlice {


    private Text text;

    @Override
    public void onStart(Intent intent) {


        super.onStart(intent);
        super.setUIContent(ResourceTable.Layout_ability_intent);
        initView();
        if(text != null) {


            String param = intent.getStringParam("data");
            text.setText("Ability:"+param);
        }
    }

    private void initView() {


        text = (Text) findComponentById(ResourceTable.Id_text_intent);
    }

    @Override
    public void onActive() {


        super.onActive();
    }

    @Override
    public void onForeground(Intent intent) {


        super.onForeground(intent);
    }
}
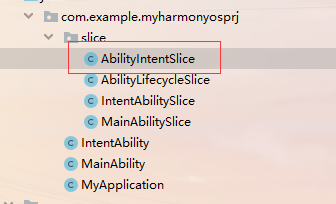
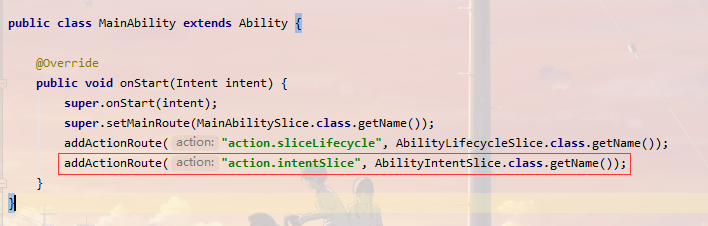
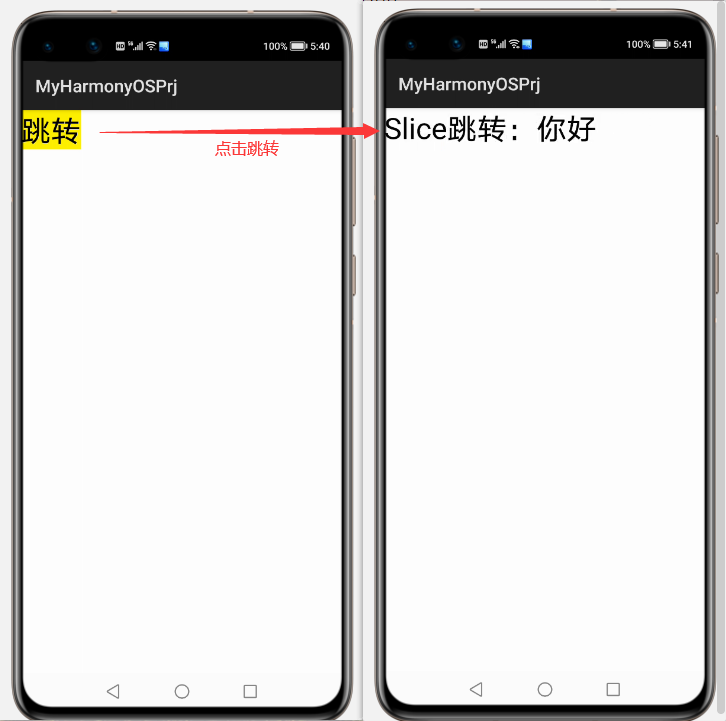
6、Slice之间的切换和传值
在MainAbility下创建一个新的Slice,命名为AbilityIntentSlice(命名有点相近,可能有点不好区分,见谅哈哈!)
添加完一个新的Slice以后,注意添加一个新的路由规则,并且在配置文件中将其声明

在Ability跳转的基础上,只修改跳转代码
//传参跳转
Intent intent = new Intent();
intent.setParam("data", "你好");
present(new AbilityIntentSlice(), intent);
//不传参跳转
//present(new AbilityIntentSlice(),new Intent());
结果
二、AA(Atomic Ability)
Atomic Ability支持Service模板和Data模板
1、Service模板:用于提供后台运行任务的能力
1.1、概述
- 官方解释基于
Service模板的Ability(以下简称“Service”)主要用于后台运行任务(如执行音乐播放、文件下载等),但不提供用户交互界面。Service可由其他应用或Ability启动,即使用户切换到其他应用,Service仍将在后台继续运行。
1.2、特点
- 运行在主线程中,故开发过程中,如果某一个模块操作时间过长,就应该放在一个子线程中,防止主线程阻塞,导致应用程序无响应;
- 和
Android类似,Service是单实例的,在一个设备上,相同的Service只会存在一个实例。如果多个Ability共用这个实例,只有当与Service绑定的所有Ability都退出后,Service才能够退出。
1.3、创建一个Service
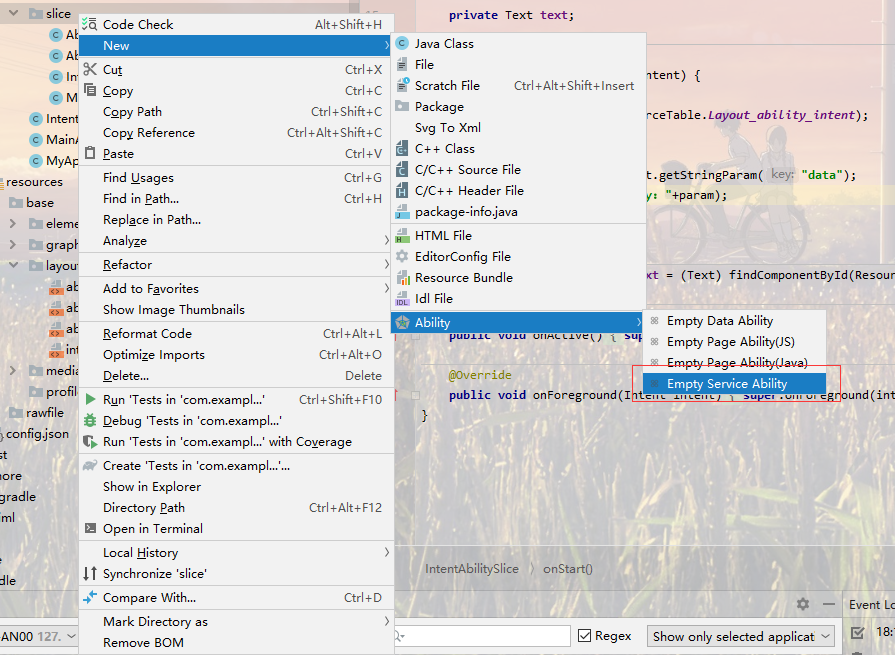
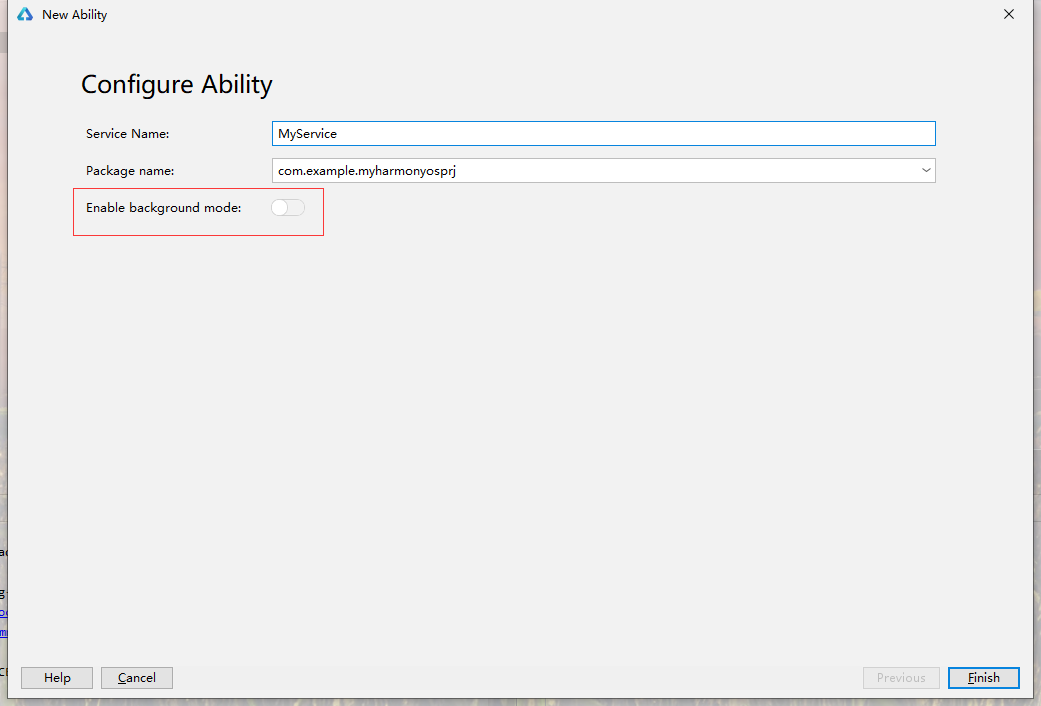
这里的
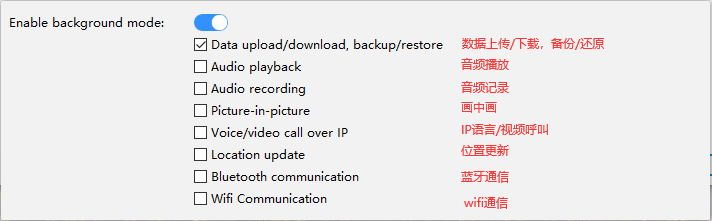
Enable background mode如果开启,就表示你的Service要在后台运行,还可以自己选择你要在后台干嘛。
这里我们不勾选,直接创建
创建完毕后,配置文件中就会自动生成相关的属性,且
type为service

1.4、Service生命周期
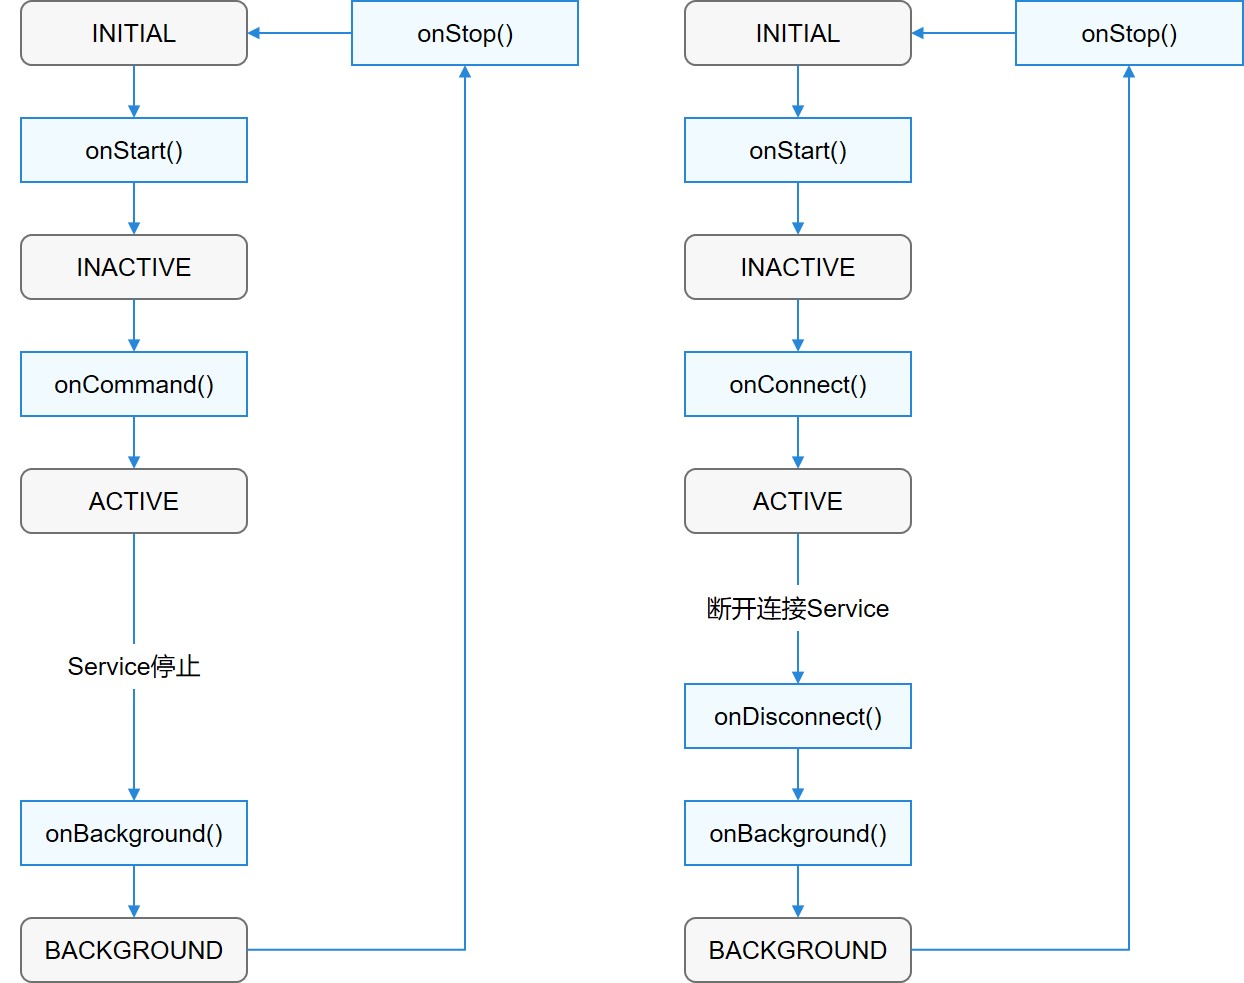
package com.example.myharmonyosprj;

import ohos.aafwk.ability.Ability;
import ohos.aafwk.content.Intent;
import ohos.rpc.IRemoteObject;
import ohos.hiviewdfx.HiLog;
import ohos.hiviewdfx.HiLogLabel;

public class MyService extends Ability {


    private static final HiLogLabel LABEL_LOG = new HiLogLabel(3, 0xD001100, "MyService");

    @Override
    //创建 Service 的时候调用,用于 Service 的初始化,在 Service 的整个生命周期只会调用一次。
    public void onStart(Intent intent) {


        HiLog.info(LABEL_LOG, "MyService::onStart");
        super.onStart(intent);
    }

    @Override
    //在 Service 创建完成之后调用,该方法在客户端每次启动该 Service 时都会调用,用户可以在该方法中做一些调用统计、初始化类的操作。
    public void onBackground() {


        super.onBackground();
        HiLog.info(LABEL_LOG, "MyService::onBackground");
    }

    @Override
    //在 Service 销毁时调用。Service 应通过实现此方法来清理任何资源,如关闭线程、注册的侦听器等。
    public void onStop() {


        super.onStop();
        HiLog.info(LABEL_LOG, "MyService::onStop");
    }

    @Override
    //在 Service 创建完成之后调用,该方法在客户端每次启动该 Service 时都会调用,用户可以在该方法中做一些调用统计、初始化类的操作。
    public void onCommand(Intent intent, boolean restart, int startId) {


        HiLog.info(LABEL_LOG, "MyService::onCommand");
    }

    @Override
    //在 Ability 和 Service 连接时调用,该方法返回 IRemoteObject 对象,用户可以在该回调函数中生成对应 Service 的 IPC 通信通道,以便 Ability 与 Service 交互。Ability 可以多次连接同一个 Service,系统会缓存该 Service 的 IPC 通信对象,只有第一个客户端连接 Service 时,系统才会调用 Service 的 onConnect 方法来生成 IRemoteObject 对象,而后系统会将同一个 RemoteObject 对象传递至其他连接同一个 Service 的所有客户端,而无需再次调用 onConnect 方法(也就是单例)。
    public IRemoteObject onConnect(Intent intent){


        HiLog.info(LABEL_LOG, "MyService::onConnect");
        return null;
    }

    @Override
    //在 Ability 与绑定的 Service 断开连接时调用。
    public void onDisconnect(Intent intent) {


        HiLog.info(LABEL_LOG, "MyService::onDisconnect");
    }
}
1.5、启动一个Service
因为
Service也是Ability的一种,开发者同样可以通过将Intent传递给该方法来启动Service。不仅支持启动本地Service,还支持启动远程Service。
1.5.1、本地Service
在MainAbilitySlice布局文件中添加一个按钮,并设置一个点击事件监听器
        serviceBtn = (Button) findComponentById(ResourceTable.Id_btn_service);
        if (serviceBtn != null) {


            serviceBtn.setClickedListener(component -> startupLocalService());
        }
}
private void startupLocalService() {


        Intent intent = new Intent();
        //构建操作方式
        Operation operation = new Intent.OperationBuilder()
                // 设备id
                .withDeviceId("")
                // 应用的包名
                .withBundleName("com.example.myharmonyosprj")
                // 跳转目标的路径名  通常是包名+类名
                .withAbilityName("com.example.myharmonyosprj.MyService")
                .build();
        //设置操作
        intent.setOperation(operation);
        startAbility(intent);
    }
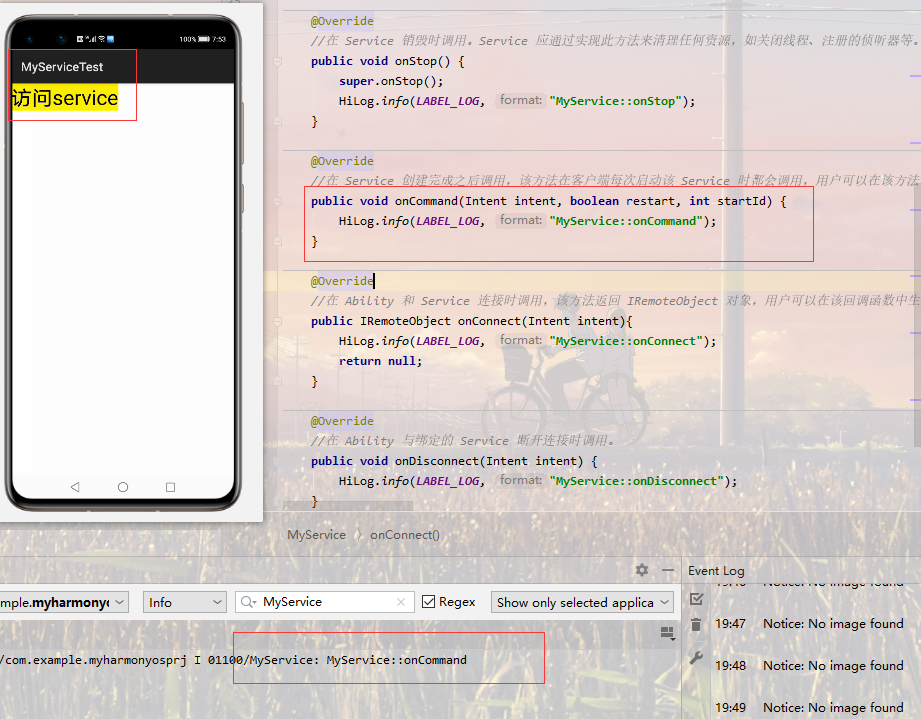
点击按钮启动
Service
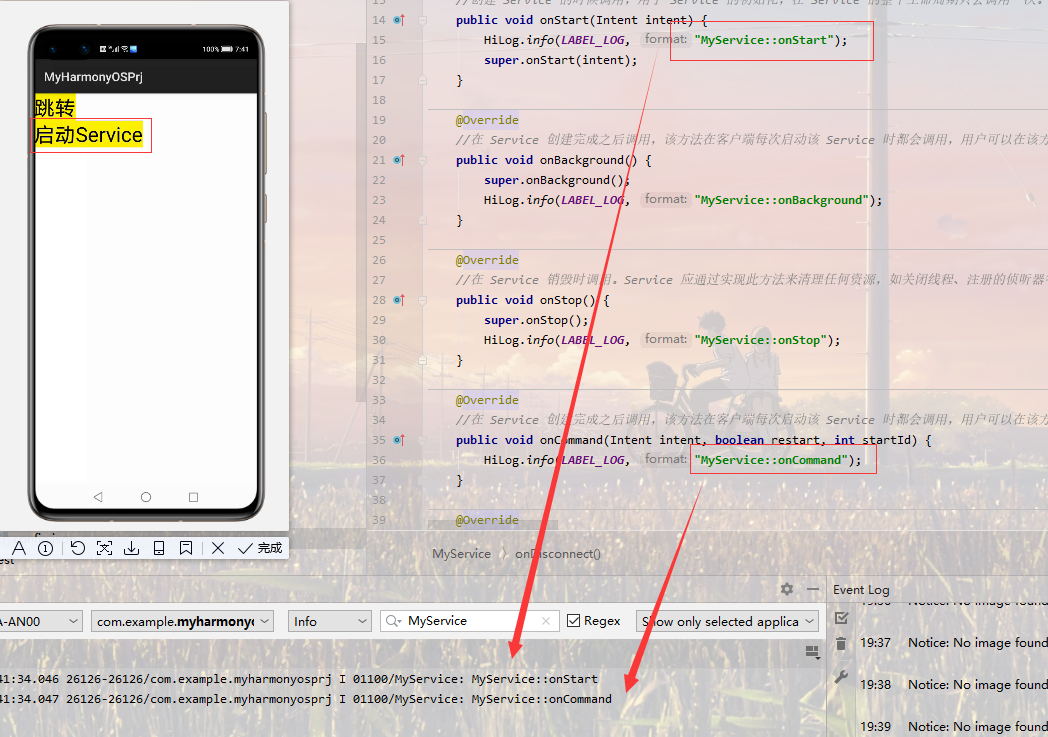
可以看出,由于
Service尚未运行,则系统会先调用onStart()来初始化Service,再回调Service的onCommand()方法来启动Service。
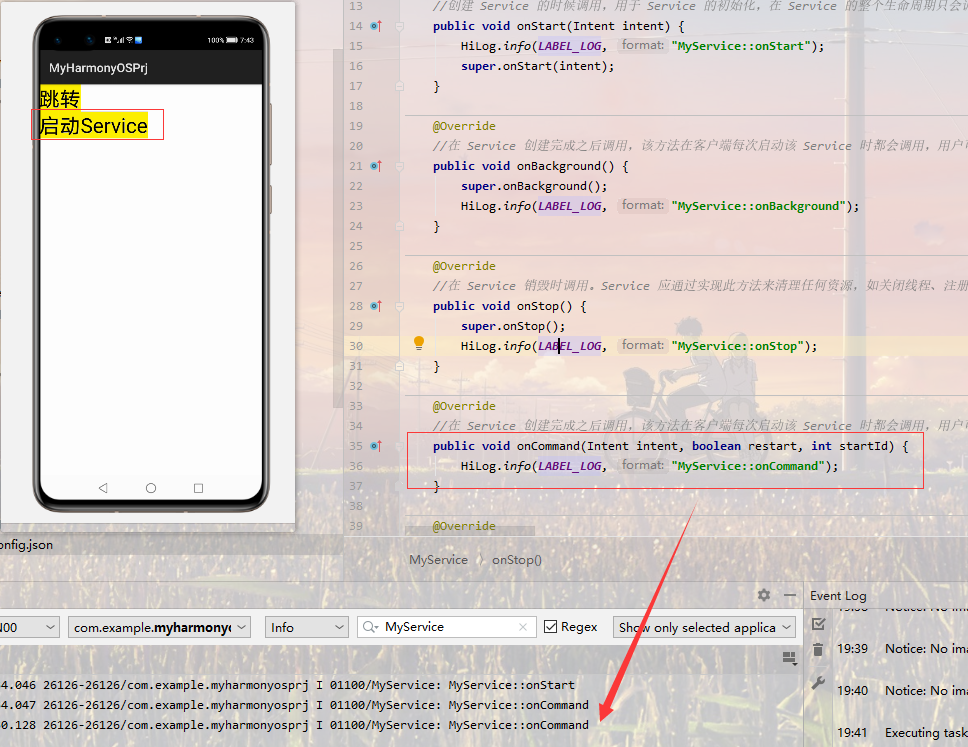
此时我们再点击一下启动,就会发现,只执行
onCommand()
1.5.2、远程Service
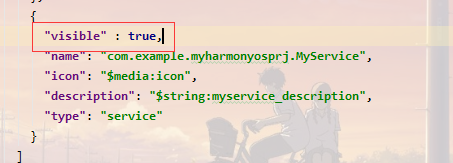
首先保证
service是否允许其他应用发现,否则即使知道了包名和类名,也无法访问,如果没有开启,只需要在配置文件中加上一行代码即可(换句话说就是默认为false)
"visible" : true,
创建一个新的应用,简单添加一个按钮,并设置其点击事件监听器
private void initView() {


    button = (Button) findComponentById(ResourceTable.Id_service_btn);
    if(button != null){


        button.setClickedListener(component -> {


            Intent intent = new Intent();
            //构建操作方式
            Operation operation = new Intent.OperationBuilder()
                // 设备id
                .withDeviceId("")
                // 应用的包名
                .withBundleName("com.example.myharmonyosprj")
                // 跳转目标的路径名  通常是包名+类名
                .withAbilityName("com.example.myharmonyosprj.MyService")
                .build();
            //设置操作
            intent.setOperation(operation);
            //开启服务
            startAbility(intent);
        });
    }
}
点击按钮验证
1.6、停止一个Service
Service一旦创建就会一直保持在后台运行,除非必须回收内存资源,否则系统不会停止或销毁Service。开发者可以在Service中通过terminateAbility()停止本Service或在其他Ability调用stopAbility()来停止Service。- 停止
Service同样支持停止本地设备Service和停止远程设备Service,使用方法与启动Service一样。一旦调用停止Service的方法,系统便会尽快销毁Service。
1.6.1、通过其他Ability停止服务
MainAbilitySlice中新增一个停止按钮,并设置对应的点击事件监听器,关闭服务的方法很简单,和开启的过程几乎相同,只需要将startAbility改为stopAbility
private void stopLocalService() {


    Intent intent = new Intent();
    //构建操作方式
    Operation operation = new Intent.OperationBuilder()
        // 设备id
        .withDeviceId("")
        // 应用的包名
        .withBundleName("com.example.myharmonyosprj")
        // 跳转目标的路径名  通常是包名+类名
        .withAbilityName("com.example.myharmonyosprj.MyService")
        .build();
    //设置操作
    intent.setOperation(operation);
    //停止服务
    stopAbility(intent);
}
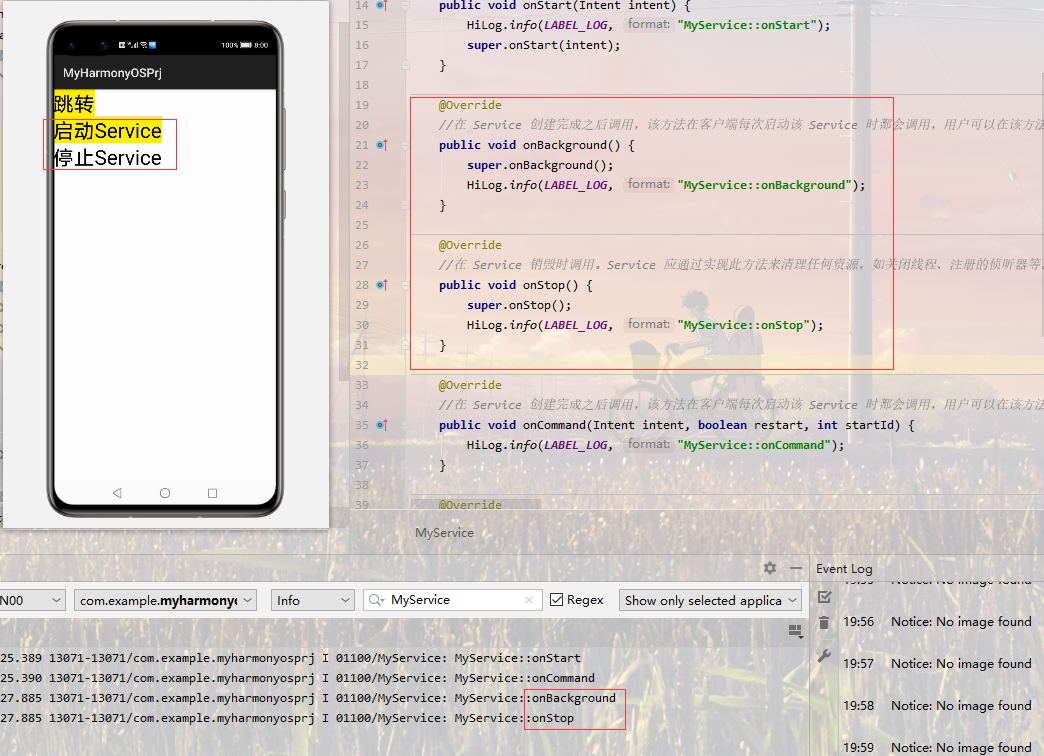
观察发现,关闭
service的时候,系统会把服务放到后台,然后再通过stop来停止这个服务,远程停止同理就不演示了。
1.6.2、直接在本Service中停止服务
创建一个线程池,并使用线程池开启一个线程延时关闭
service,
/**
 * @description 自定义的Service
 * @author PengHuAnZhi
 * @date 2021/1/10 20:19
 */
public class MyService extends Ability {


    private static final HiLogLabel LABEL_LOG = new HiLogLabel(3, 0xD001100, "MyService");
    /**
     * @description 创建一个线程池
     */
    private static ScheduledExecutorService scheduledExecutorService = Executors.newScheduledThreadPool(4);
    //    private ThreadFactory threadFactory = new ThreadFactory() {


//        @Override
//        public Thread newThread(final Runnable runnable) {


//            return new Thread() {


//                @Override
//                public void run() {


//                    runnable.run();
//                }
//            };
//        }
//    };
    private ThreadFactory threadFactory = runnable -> new Thread(() -> runnable.run());

    private void stopService() {


        HiLog.info(LABEL_LOG, "MyService::开始倒计时3s");
        // 延时任务
        scheduledExecutorService.schedule(threadFactory.newThread(new Runnable() {


            @Override
            public void run() {


                //停止服务当前服务
                terminateAbility();
            }
            //延时三秒执行
        }), 3, TimeUnit.SECONDS);
    }
    @Override
    public void onStart(Intent intent) {


        HiLog.info(LABEL_LOG, "MyService::onStart");
        super.onStart(intent);
    }

    @Override
    public void onBackground() {


        super.onBackground();
        HiLog.info(LABEL_LOG, "MyService::onBackground");
    }

    @Override
    public void onStop() {


        super.onStop();
        HiLog.info(LABEL_LOG, "MyService::onStop");
    }

    @Override
    public void onCommand(Intent intent, boolean restart, int startId) {


        HiLog.info(LABEL_LOG, "MyService::onCommand");
        stopService();

    }
}
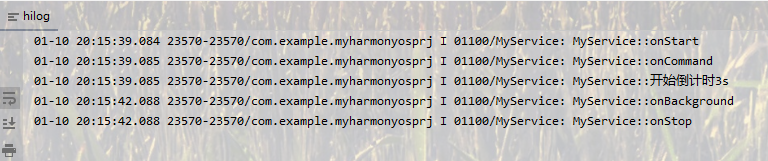
发现和在Ability中停止Service过程是一样的
1.7、连接Service Ability
以上连接
Service不涉及到Ability和Service之间的数据交互,如果需要交互的话,就需要创建Connection。
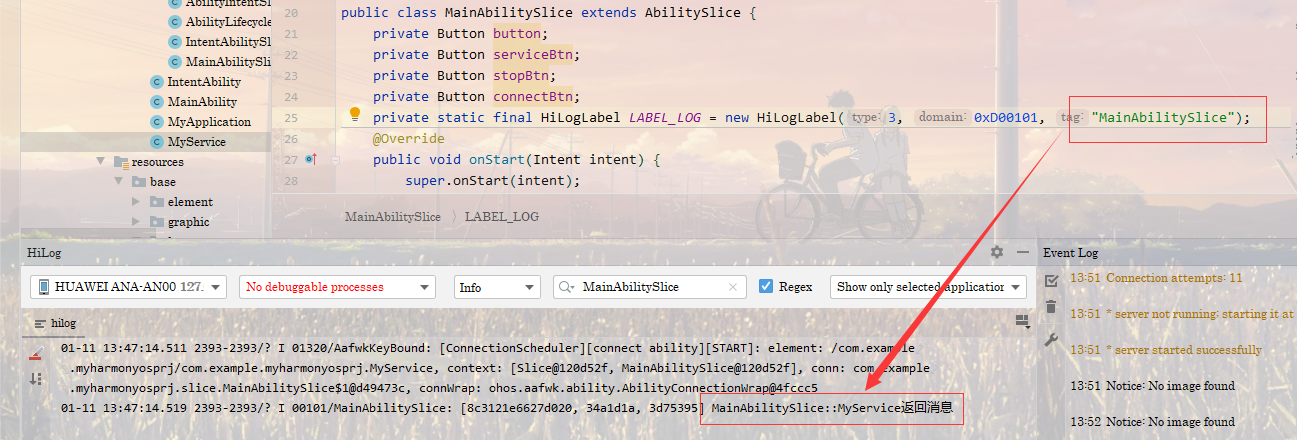
在与Service进行交互的时候,是通过connectAbility()方法开启连接到服务的,而使用connectAbility()的时候,需要传入目标Intent与IAbilityConnection接口的实例。而IAbilityConnection接口的实例必须实现两个方法,一个是onAbilityConnectDone(),另一个是onAbilityDisconnectDone(),前者用来处理连接的回调,后者用来处理断开连接的回调。
添加一个按钮,实现其点击事件监听器,并回调连接方法,方法体如下
private void connectService() {


    Intent intent = new Intent();
    //构建操作方式
    Operation operation = new Intent.OperationBuilder()
        // 设备id
        .withDeviceId("")
        // 应用的包名
        .withBundleName("com.example.myharmonyosprj")
        // 跳转目标的路径名  通常是包名+类名
        .withAbilityName("com.example.myharmonyosprj.MyService")
        .build();
    //设置操作
    intent.setOperation(operation);
    //连接到服务
    connectAbility(intent,connection);
}
其中
connection为IAbilityConnection的实现类,自己定义如下
private IAbilityConnection connection = new IAbilityConnection() {
// 连接到 Service 的回调
@Override
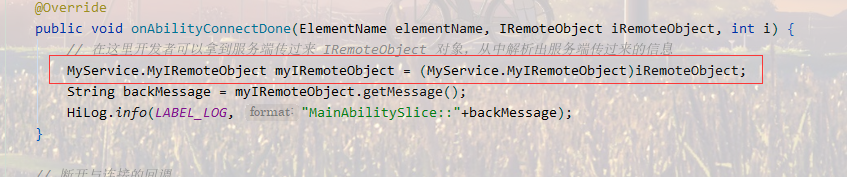
public void onAbilityConnectDone(ElementName elementName, IRemoteObject iRemoteObject, int i) {
// 在这里开发者可以拿到服务端传过来 IRemoteObject 对象,从中解析出服务端传过来的信息
}
// 断开与连接的回调
@Override
public void onAbilityDisconnectDone(ElementName elementName, int i) {
}
};
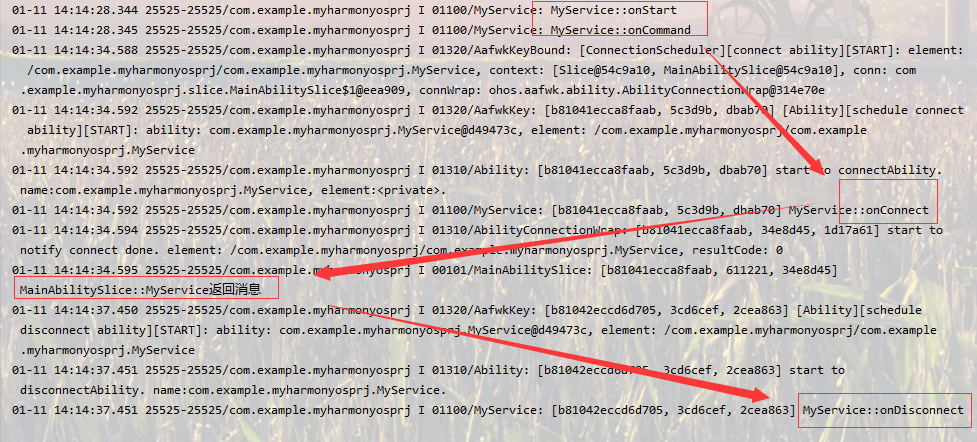
测试连接是否正确
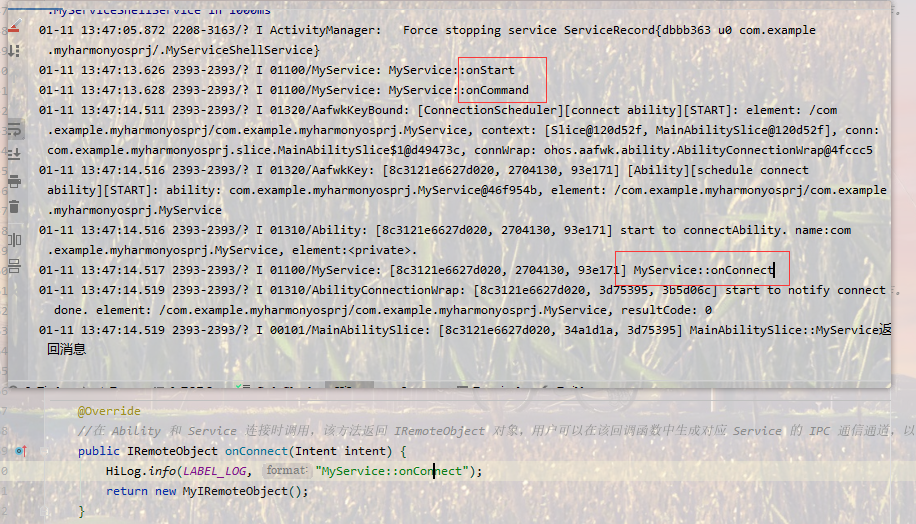
连接完成以后,就是数据交互,在
Ability中如何获取Service中的数据呢?对比Android中Service连接的时候的数据交互,在Service中定义一个内部类,继承自LocalRemoteObject,对应Android中的Binder对象
public class MyIRemoteObject extends LocalRemoteObject {


    public String getMessage(){


        return "MyService返回消息";
    }
}
注意这里需要继承的不是
RemoteObject,官方文档和好多博客都是继承的RemoteObject,所以我就很纳闷了,是我一开始就错了吗?如果继承的是RemoteObject,代码不会报错,但是运行会报强制类型转换失败的错误。
这里的
LocalRemoteObject是RemoteObject的子类,小人才疏学浅,我也不懂为什么这个地方不能用,暂且就这样记吧。
如代码所写,我们就可以获取到由
MyService给我们传递的参数了。
1.8、断开Service Ability
很简单,一行代码,需要的
connection参数就是之前用到的IAbilityConnection
//断开连接
disconnectAbility(connection);
1.9、前台Service
1.9.1、概述
最通用的前台服务就是音乐播放了,用手机的时候它会在通知栏创建,然后播放音乐,前台服务是那些被认为用户知道(用户所认可的)且在系统内存不足的时候不允许系统杀死的服务。前台服务必须给状态栏提供一个通知,它被放到正在运行标题之下——这就意味着通知只有在这个服务被终止或从前台主动移除通知后才能被解除。
1.9.2、开启前台Service
步骤如下:
- 调用
keepBackgroundRunning()将Service与通知绑定,然后在onStart()方法中将其调用
private void startForegroundService(){


    //创建通知请求 设置通知id为1234
    NotificationRequest request = new NotificationRequest(1234);
    //创建普通通知
    NotificationRequest.NotificationNormalContent content = new NotificationRequest.NotificationNormalContent();
    //设置通知的标题和内容
    content.setTitle("QQ音乐").setText("七里香");
    //创建通知内容
    NotificationRequest.NotificationContent notificationContent = new NotificationRequest.NotificationContent(content);
    //设置通知
    request.setContent(notificationContent);
    keepBackgroundRunning(1234,request);
    HiLog.info(LABEL_LOG,"MainAbilitySlice::startForegroundService");
}
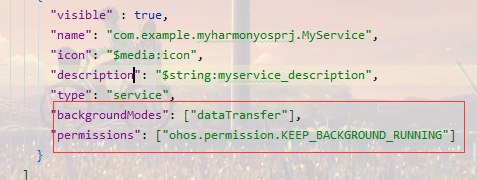
- 在配置文件中声明
ohos.permission.KEEP_BACKGROUND_RUNNING权限,该权限是normal级别 - 在配置文件中添加对应的
backgroundModes参数
"backgroundModes": ["dataTransfer"],
"permissions": ["ohos.permission.KEEP_BACKGROUND_RUNNING"]
运行程序后启动
Service

看着是启动成功了,是否真的是前台服务,我也不会求证,就这样吧
1.9.3、停止前台Service
停止只需要一行代码
cancelBackgroundRunning();
2、Data模板:用于对外部提供统一的数据访问抽象;
这里不得不吐槽官方文档写的太简单,学习成本忒高了,先打个差评
2.1、概述
- 使用
Data模板的Ability有助于应用管理其自身和其他应用存储数据的访问,并提供与其他应用共享数据的方法。Data既可用于同设备不同应用的数据共享,也支持跨设备不同应用的数据共享。(这不就是Android的内容提供者ContentProvider嘛)
2.2、权限授予
在进行数据文件的操作之前,我们首先注册一下我们用户存储读取权限
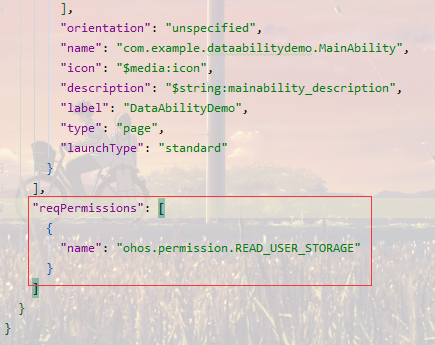
"reqPermissions": [
    {


        "name": "ohos.permission.READ_USER_STORAGE"
    }
]
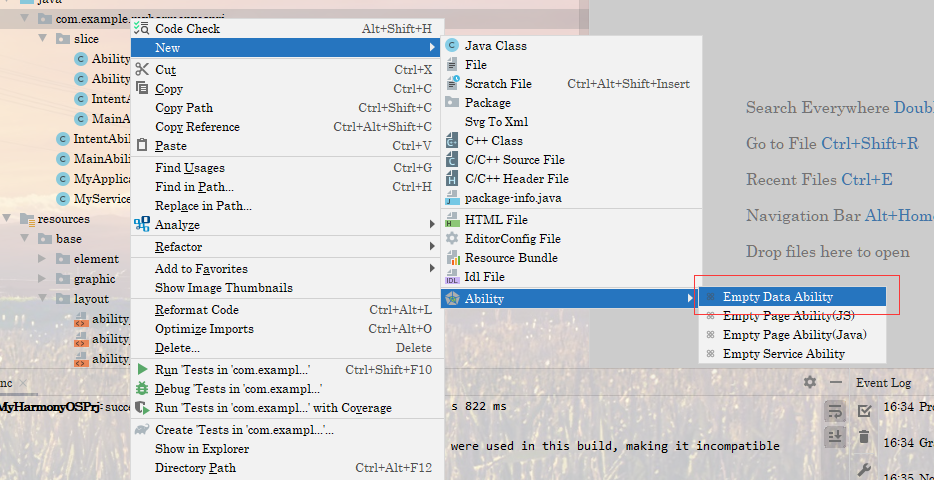
2.3、创建Data Ability
- 创建完毕后打开全局配置文件
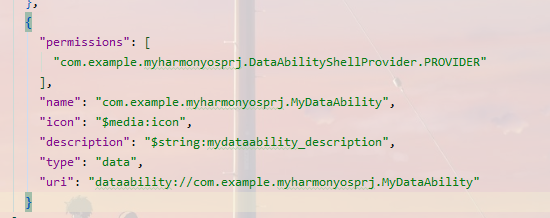
可以看到系统帮我们自动生成了
Data Ability的配置代码,其中type为data表示这是一个Data Ability,uri又是什么呢,学过Android的应该不陌生,URI(Uniform Resource Identifier)通用资源标志符,是用来标识一个具体的数据。HarmonyOS的URI仍基于URI通用标准,格式如下:

scheme:协议方案名,固定为“dataability”,代表Data Ability所使用的协议类型。
authority:设备ID,如果为跨设备场景,则为目的设备的IP地址;如果为本地设备场景,则不需要填写。
path:资源的路径信息,代表特定资源的位置信息。
query:查询参数。
fragment:可以用于指示要访问的子资源。
URI示例:
跨设备场景:dataability://device_id/com.huawei.dataability.persondata/person/10
本地设备:dataability:///com.huawei.dataability.persondata/person/10
- 开放对其他程序可见,和
Service一样,我们可以将本程序中的数据提供给外部程序访问,这时候同样需要将visible值设置为true

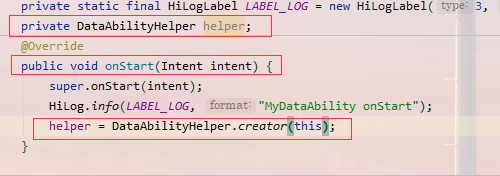
2.4、创建DataAbilityHelper
DataAbilityHelper为开发者提供了creator()方法来创建DataAbilityHelper实例。该方法为静态方法,有多个重载。最常见的方法是通过传入一个context对象来创建DataAbilityHelper对象。
2.5、使用DataAbilityHelper访问Data Ability
2.5.1、访问文件
DataAbilityHelper为开发者提供了FileDescriptor openFile (Uri uri, String mode)方法来操作文件。此方法需要传入两个参数,其中uri用来确定目标资源路径,mode用来指定打开文件的方式,可选方式包含r(读),w(写),rw(读写),wt(覆盖写),wa(追加写),rwt(覆盖写且可读),该方法返回一个目标文件的FD(文件描述符),把文件描述符封装成流,开发者就可以对文件流进行自定义处理。
重写openFile
@Override
public FileDescriptor openFile(Uri uri, String mode) throws FileNotFoundException {


    //获取文件  通过uri获取解码路径列表的第2条数据
    File file = new File(uri.getDecodedPathList().get(1));
    if (!"rw".equals(mode)) {


        file.setReadOnly();
    }
    //通过文件获取文件输入流
    FileInputStream fileIs = new FileInputStream(file);
    FileDescriptor fd = null;
    try {


        //根据文件输入流获取文件描述符
        fd = fileIs.getFD();
    } catch (IOException e) {


        e.printStackTrace();
    }
    // 绑定文件描述符
    return MessageParcel.dupFileDescriptor(fd);
}
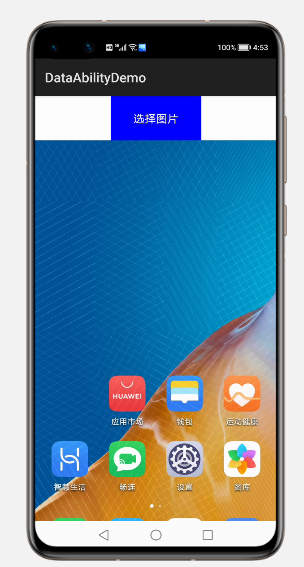
测试
在
MainAbilitySlice布局文件中加入一个按钮控件和一个图片控件
<?xml version="1.0" encoding="utf-8"?>
<DirectionalLayout
    xmlns:ohos="http://schemas.huawei.com/res/ohos"
    ohos:height="match_parent"
    ohos:width="match_parent"
    ohos:orientation="vertical">

    <Button
        ohos:id="$+id:select_image"
        ohos:height="200px"
        ohos:width="400px"
        ohos:background_element="$graphic:background_ability_main"
        ohos:layout_alignment="horizontal_center"
        ohos:text="选择图片"
        ohos:text_color="#FFFFFF"
        ohos:text_size="50"/>

    <Image
        ohos:id="$+id:file_img"
        ohos:height="match_content"
        ohos:width="match_content"/>

</DirectionalLayout>
在
MainAbility中初始化相应的控件,对按钮设置一个点击事件监听器,然后通过DataAbilityHelper来获取图片资源,显示到图片控件中(图片为一个截图),完整代码如下
/**
 * @author PengHuAnZhi
 * @description 测试DataAbility的读取文件
 * @date 2021/1/12 16:38
 */
public class MainAbilitySlice extends AbilitySlice {


    private Button mSelectImage;
    private static HiLogLabel hiLogLabel = new HiLogLabel(3, 0, "MainAbilitySlice");
    private DataAbilityHelper dataAbilityHelper = DataAbilityHelper.creator(this);
    private Image mFileImg;

    @Override
    public void onStart(Intent intent) {


        super.onStart(intent);
        super.setUIContent(ResourceTable.Layout_ability_main);
        //1、读取权限设置(项目配置和用户确认)
        String[] permission = {

    "ohos.permission.READ_USER_STORAGE"};
        requestPermissionsFromUser(permission, 0);
        mSelectImage = (Button) findComponentById(ResourceTable.Id_select_image);
        mFileImg = (Image) findComponentById(ResourceTable.Id_file_img);
        mSelectImage.setClickedListener(component -> {


            ResultSet resultSet = null;
            try {


                /**
                 * 获取查询的结果集
                 *      第一个参数为文件对应的Uri
                 *      第二个参数为想要查询的字段,这里因为是查询所有的图片,所以填null即可
                 *      第三个参数为查询条件,同样为null
                 */
                resultSet = dataAbilityHelper.query(AVStorage.Images.Media.EXTERNAL_DATA_ABILITY_URI, null, null);
                //因为这里只需要显示一张图片,虚拟机相册里面也只有一张图,所以就不遍历了,直接获取第一条即可
                resultSet.goToNextRow();
                //通过指定的下标获取列索引,通过获得的列索引获取到该图片的资源id。
                int mediaId = resultSet.getInt(resultSet.getColumnIndexForName(AVStorage.Images.Media.ID));
                //将图片id转换为Uri类型
                Uri uri = Uri.appendEncodedPathToUri(AVStorage.Images.Media.EXTERNAL_DATA_ABILITY_URI, mediaId + "");
                HiLog.error(hiLogLabel, "" + uri);
                FileDescriptor fileDescriptor = dataAbilityHelper.openFile(uri, "r");
                //获取文件输入流
                FileInputStream fileInputStream = new FileInputStream(fileDescriptor);
                ImageSource imageSource = ImageSource.create(fileInputStream, null);
                PixelMap pixelMap = imageSource.createPixelmap(null);
                mFileImg.setPixelMap(pixelMap);
            } catch (DataAbilityRemoteException | FileNotFoundException e) {


                e.printStackTrace();
            }
        });
    }

    @Override
    public void onActive() {


        super.onActive();
    }

    @Override
    public void onForeground(Intent intent) {


        super.onForeground(intent);
    }
}
2.5.2、访问数据库
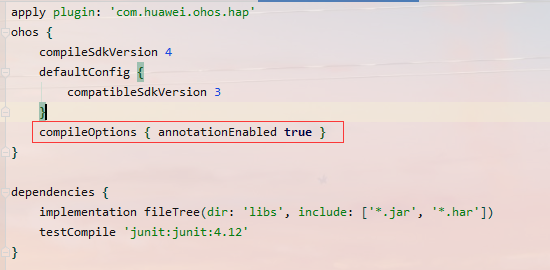
对数据库操作这里需要用到注解,所以需要到
build.gradle中开启注解,同步之后即可使用
compileOptions { annotationEnabled true }
首先就是需要定义出数据库中的相关实体类
- 数据库对象
package com.example.dataabilitydemo;

import ohos.data.orm.OrmDatabase;
import ohos.data.orm.annotation.Database;

/**
 * @author admin
 * @version 1.0.0
 * @ClassName BookStore.java
 * @Description TODO
 * @createTime 2021年01月12日 17:16:00
 */
@Database(entities = {

    User.class}, version = 1)
public abstract class BookStore extends OrmDatabase {


}
- 用户对象
package com.example.dataabilitydemo;

import ohos.data.orm.OrmObject;
import ohos.data.orm.annotation.Entity;
import ohos.data.orm.annotation.Index;
import ohos.data.orm.annotation.PrimaryKey;

/**
 * @author admin
 * @version 1.0.0
 * @ClassName User.java
 * @Description TODO
 * @createTime 2021年01月12日 17:19:00
 */
@Entity(tableName = "user", ignoredColumns = {

    "ignoreColumn1", "ignoreColumn2"},
        indices = {

    @Index(value = {

    "firstName", "lastName"}, name = "name_index", unique = true)})
public class User extends OrmObject {


    // 此处将userId设为了自增的主键。注意只有在数据类型为包装类型时,自增主键才能生效。
    @PrimaryKey(autoGenerate = true)
    private Integer userId;
    private String firstName;
    private String lastName;
    private int age;
    private double balance;
    private int ignoreColumn1;
    private int ignoreColumn2;

    public Integer getUserId() {


        return userId;
    }

    public void setUserId(Integer userId) {


        this.userId = userId;
    }

    public String getFirstName() {


        return firstName;
    }

    public void setFirstName(String firstName) {


        this.firstName = firstName;
    }

    public String getLastName() {


        return lastName;
    }

    public void setLastName(String lastName) {


        this.lastName = lastName;
    }

    public int getAge() {


        return age;
    }

    public void setAge(int age) {


        this.age = age;
    }

    public double getBalance() {


        return balance;
    }

    public void setBalance(double balance) {


        this.balance = balance;
    }

    public int getIgnoreColumn1() {


        return ignoreColumn1;
    }

    public void setIgnoreColumn1(int ignoreColumn1) {


        this.ignoreColumn1 = ignoreColumn1;
    }

    public int getIgnoreColumn2() {


        return ignoreColumn2;
    }

    public void setIgnoreColumn2(int ignoreColumn2) {


        this.ignoreColumn2 = ignoreColumn2;
    }

    @Override
    public String toString() {


        return "User{" +
                "userId=" + userId +
                ", firstName='" + firstName + '\'' +
                ", lastName='" + lastName + '\'' +
                ", age=" + age +
                ", balance=" + balance +
                ", ignoreColumn1=" + ignoreColumn1 +
                ", ignoreColumn2=" + ignoreColumn2 +
                '}';
    }
}
在
DataAbility中定义相关属性
//这里要跟config.json中的URI保持一致
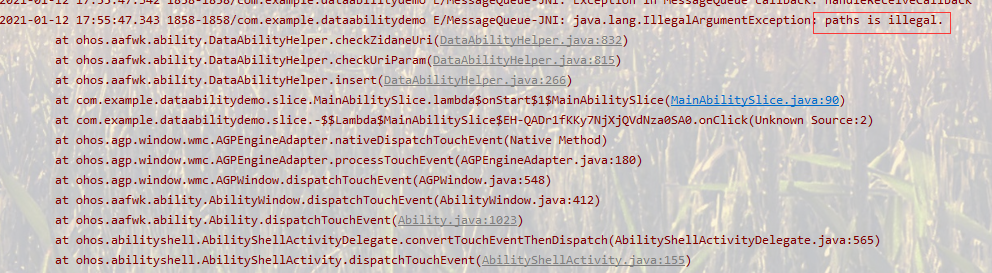
private String uriString = "dataability:///com.example.dataabilitydemo.MyDataAbility";
private static final String DATABASE_NAME = "BookStore.db";
private static final String DATABASE_NAME_ALIAS = "BookStore";
private static OrmContext ormContext = null;
注意这里的uri字符串中是三个斜杠,如果你没有注意到这里的话,恭喜你会报非法路径的错误(paths is illegal)
初始化数据库连接。系统会在应用启动时调用
onStart()方法创建Data实例。在此方法中,开发者应该创建数据库连接,并获取连接对象,以便后续和数据库进行操作。为了避免影响应用启动速度,开发者应当尽可能将非必要的耗时任务推迟到使用时执行,而不是在此方法中执行所有初始化
public void onStart(Intent intent) {


    super.onStart(intent);
    HiLog.info(LABEL_LOG, "MyDataAbility onStart");
    DatabaseHelper helper = new DatabaseHelper(this);
    ormContext = helper.getOrmContext(DATABASE_NAME_ALIAS, DATABASE_NAME, BookStore.class);
}
重写增删改查方法
//查
@Override
public ResultSet query(Uri uri, String[] columns, DataAbilityPredicates predicates) {


    if (ormContext == null) {


        HiLog.error(LABEL_LOG, "failed to query, ormContext is null");
        return null;
    }
    //查询数据库
    OrmPredicates ormPredicates = DataAbilityUtils.createOrmPredicates(predicates, User.class);
    ResultSet resultSet = ormContext.query(ormPredicates, columns);
    if (resultSet.getRowCount() == 0) {


        HiLog.info(LABEL_LOG, "resultSet is null");
    }
    return resultSet;
}
//增
@Override
public int insert(Uri uri, ValuesBucket value) {


    // 参数校验
    HiLog.info(LABEL_LOG, "UserDataAbility insert");
    if (ormContext == null) {


        HiLog.error(LABEL_LOG, "failed to insert, ormContext is null");
        return -1;
    }
    // 构造插入数据
    User user = new User();
    user.setUserId(value.getInteger("userId"));
    user.setFirstName(value.getString("firstName"));
    user.setLastName(value.getString("lastName"));
    user.setAge(value.getInteger("age"));
    user.setBalance(value.getDouble("balance"));
    // 插入数据库
    boolean isSuccess;
    isSuccess = ormContext.insert(user);
    if (!isSuccess) {


        HiLog.error(LABEL_LOG, "failed to insert");
        return -1;
    }
    isSuccess = ormContext.flush();
    if (!isSuccess) {


        HiLog.error(LABEL_LOG, "failed to insert flush");
        return -1;
    }
    DataAbilityHelper.creator(this, uri).notifyChange(uri);
    int id = Math.toIntExact(user.getRowId());
    HiLog.info(LABEL_LOG, "insert id=" + id);
    return id;
}
//删
@Override
public int delete(Uri uri, DataAbilityPredicates predicates) {


    if (ormContext == null) {


        HiLog.error(LABEL_LOG, "failed to delete, ormContext is null");
        return -1;
    }
    OrmPredicates ormPredicates = DataAbilityUtils.createOrmPredicates(predicates, User.class);
    int value = ormContext.delete(ormPredicates);
    DataAbilityHelper.creator(this, uri).notifyChange(uri);
    HiLog.info(LABEL_LOG, "delete value=" + value);
    return value;
}
//改
@Override
public int update(Uri uri, ValuesBucket value, DataAbilityPredicates predicates) {


    if (ormContext == null) {


        HiLog.error(LABEL_LOG, "failed to update, ormContext is null");
        return -1;
    }
    OrmPredicates ormPredicates = DataAbilityUtils.createOrmPredicates(predicates, User.class);
    int index = ormContext.update(ormPredicates, value);
    HiLog.info(LABEL_LOG, "UserDataAbility update value:" + index);
    DataAbilityHelper.creator(this, uri).notifyChange(uri);
    return index;
}
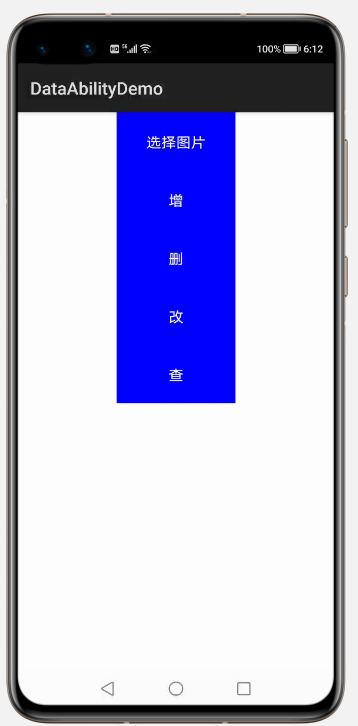
DataAbility到此就完成了,现在需要的就是在MainAbilitySlice中添加相应的控件进行测试即可
MainAbilitySlice完整代码
package com.example.dataabilitydemo.slice;

import com.example.dataabilitydemo.ResourceTable;
import ohos.aafwk.ability.AbilitySlice;
import ohos.aafwk.ability.DataAbilityHelper;
import ohos.aafwk.ability.DataAbilityRemoteException;
import ohos.aafwk.content.Intent;
import ohos.agp.components.Button;
import ohos.agp.components.Image;
import ohos.data.dataability.DataAbilityPredicates;
import ohos.data.rdb.ValuesBucket;
import ohos.data.resultset.ResultSet;
import ohos.hiviewdfx.HiLog;
import ohos.hiviewdfx.HiLogLabel;
import ohos.media.image.ImageSource;
import ohos.media.image.PixelMap;
import ohos.media.photokit.metadata.AVStorage;
import ohos.utils.net.Uri;

import java.io.FileDescriptor;
import java.io.FileInputStream;
import java.io.FileNotFoundException;

/**
 * @author PengHuAnZhi
 * @date 2021/1/12 16:38
 */
public class MainAbilitySlice extends AbilitySlice {


    private Button mSelectImage;
    private static HiLogLabel hiLogLabel = new HiLogLabel(3, 0, "MainAbilitySlice");
    private String uriString = "dataability:///com.example.dataabilitydemo.MyDataAbility";
    private DataAbilityHelper dataAbilityHelper = DataAbilityHelper.creator(this);
    private Image mFileImg;
    private Button mAddBtn;
    private Button mDeleteBtn;
    private Button mUpdateBtn;
    private Button mQueryBtn;

    @Override
    public void onStart(Intent intent) {


        super.onStart(intent);
        super.setUIContent(ResourceTable.Layout_ability_main);
        //1、读取权限设置(项目配置和用户确认)
        String[] permission = {

    "ohos.permission.READ_USER_STORAGE"};
        requestPermissionsFromUser(permission, 0);
        mSelectImage = (Button) findComponentById(ResourceTable.Id_select_image);
        mFileImg = (Image) findComponentById(ResourceTable.Id_file_img);
        mSelectImage.setClickedListener(component -> {


            ResultSet resultSet = null;
            try {


                /**
                 * 获取查询的结果集
                 *      第一个参数为文件对应的Uri
                 *      第二个参数为想要查询的字段,这里因为是查询所有的图片,所以填null即可
                 *      第三个参数为查询条件,同样为null
                 */
                resultSet = dataAbilityHelper.query(AVStorage.Images.Media.EXTERNAL_DATA_ABILITY_URI, null, null);
                //因为这里只需要显示一张图片,虚拟机相册里面也只有一张图,所以就不遍历了,直接获取第一条即可
                resultSet.goToNextRow();
                //通过指定的下标获取列索引,通过获得的列索引获取到该图片的资源id。
                int mediaId = resultSet.getInt(resultSet.getColumnIndexForName(AVStorage.Images.Media.ID));
                //将图片id转换为Uri类型
                Uri uri = Uri.appendEncodedPathToUri(AVStorage.Images.Media.EXTERNAL_DATA_ABILITY_URI, mediaId + "");
                HiLog.error(hiLogLabel, "" + uri);
                FileDescriptor fileDescriptor = dataAbilityHelper.openFile(uri, "r");
                //获取文件输入流
                FileInputStream fileInputStream = new FileInputStream(fileDescriptor);
                ImageSource imageSource = ImageSource.create(fileInputStream, null);
                PixelMap pixelMap = imageSource.createPixelmap(null);
                mFileImg.setPixelMap(pixelMap);
            } catch (DataAbilityRemoteException | FileNotFoundException e) {


                e.printStackTrace();
            }
        });
        mAddBtn = (Button) findComponentById(ResourceTable.Id_add_btn);
        mDeleteBtn = (Button) findComponentById(ResourceTable.Id_delete_btn);
        mUpdateBtn = (Button) findComponentById(ResourceTable.Id_update_btn);
        mQueryBtn = (Button) findComponentById(ResourceTable.Id_query_btn);
        mAddBtn.setClickedListener(component -> {


            // 构造插入数据
            HiLog.info(hiLogLabel, "MainAbilitySlice insertDataAbility");
            Uri uri = Uri.parse(uriString);
            ValuesBucket valuesBucket = new ValuesBucket();
            valuesBucket.putString("firstName", "彭");
            valuesBucket.putString("lastName", "焕智");
            valuesBucket.putInteger("age", 12);
            valuesBucket.putDouble("balance", 200.0);
            try {


                dataAbilityHelper.insert(uri, valuesBucket);
            } catch (DataAbilityRemoteException e) {


                e.printStackTrace();
            }
        });
        mDeleteBtn.setClickedListener(component -> {


            Uri uri = Uri.parse(uriString);
            // 构造删除条件
            DataAbilityPredicates predicates = new DataAbilityPredicates();
            predicates.equalTo("lastName", "焕智");
            try {


                dataAbilityHelper.delete(uri, predicates);
            } catch (DataAbilityRemoteException e) {


                e.printStackTrace();
            }
        });
        mUpdateBtn.setClickedListener(component -> {


            // 构造更新条件
            DataAbilityPredicates predicates = new DataAbilityPredicates();
            predicates.equalTo("lastName", "焕智");
            // 构造更新数据
            ValuesBucket valuesBucket = new ValuesBucket();
            valuesBucket.putString("firstName", "彭彭");
            valuesBucket.putInteger("age", 12);
            Uri uri = Uri.parse(uriString);
            try {


                dataAbilityHelper.update(uri, valuesBucket, predicates);
            } catch (DataAbilityRemoteException e) {


                e.printStackTrace();
            }
        });
        mQueryBtn.setClickedListener(component -> {


            // 构造查询条件
            DataAbilityPredicates predicates = new DataAbilityPredicates();
            predicates.equalTo("lastName", "焕智");
            // 进行查询
            String[] columns = new String[]{

    "firstName"};
            Uri uri = Uri.parse(uriString);
            ResultSet resultSet = null;
            try {


                resultSet = dataAbilityHelper.query(uri, columns, predicates);
            } catch (DataAbilityRemoteException e) {


                e.printStackTrace();
            }
            // 处理结果
            while (resultSet.goToNextRow()) {


                // 在此处理ResultSet中的记录;
                HiLog.info(hiLogLabel, "firstName=" + resultSet.getString(0));
            }
        });
    }

    @Override
    public void onActive() {


        super.onActive();
    }

    @Override
    public void onForeground(Intent intent) {


        super.onForeground(intent);
    }
}
测试结果
- 增

- 查

- 改

- 再查

- 删

- 再查
