先上效果图.
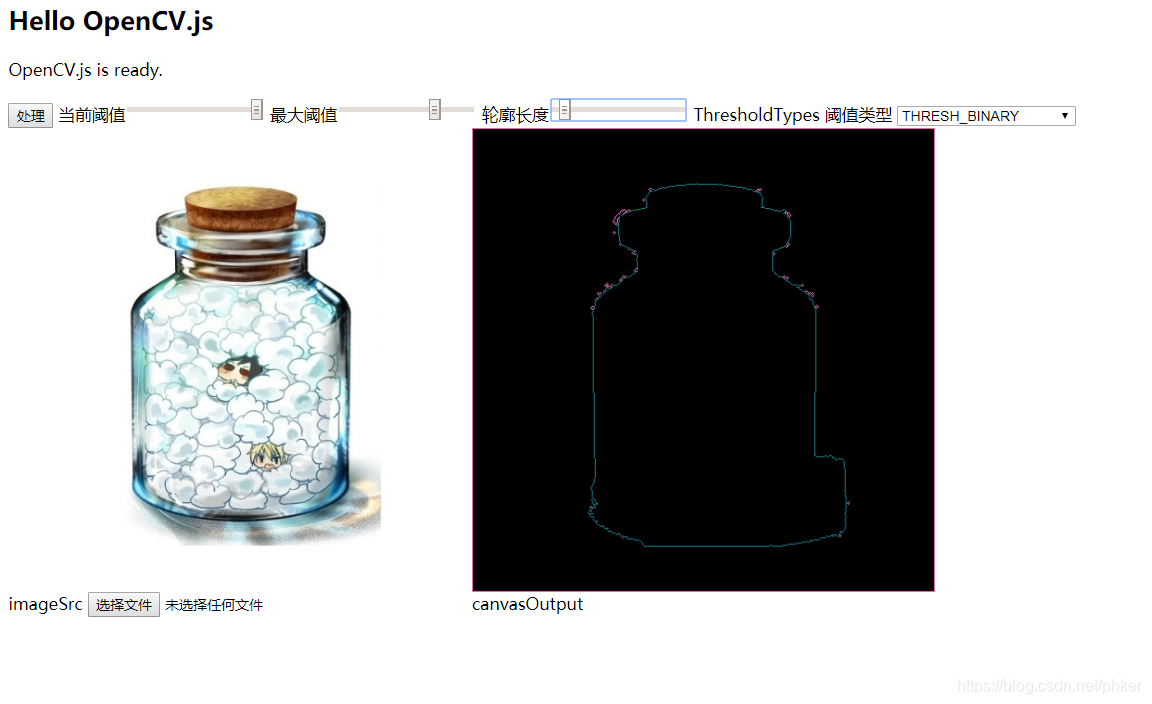
能够通过OpenCV提取轮廓,并根据鼠标的位置显示相应的轮廓
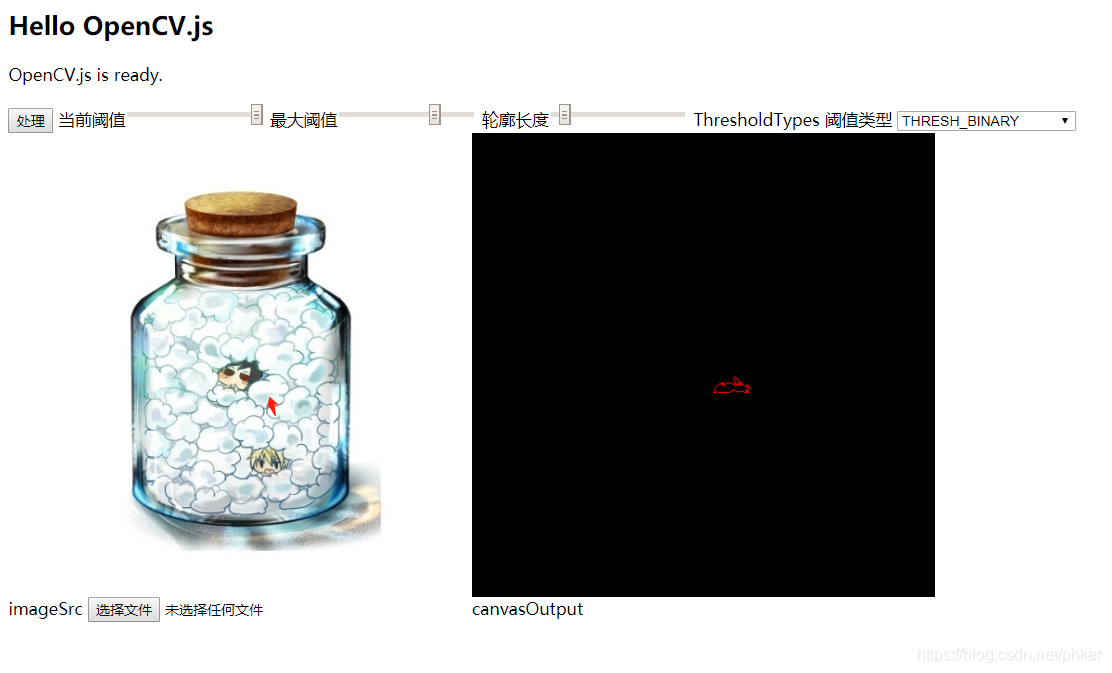
不会做动态图, 就先放两个效果图吧.
刚开始存在一些bug. 长时间使用. 会内存溢出和报错. 具体跟Webassembly 有关,后来解决了. 要执行dst.delete()
You have to call delete method of cv.Mat to free memory allocated in Emscripten’s heap. Please refer to Memeory management of Emscripten for details.
<html>
  <head>
  <meta charset="utf-8">
  <title>Hello OpenCV.js</title>


  <script async src="opencv4.5.0.js" onload="onOpenCvReady();" type="text/javascript"></script>

  </head>
  <body>
  <h2>Hello OpenCV.js</h2>
  <p id="status">OpenCV.js is loading...</p>
  <input type="button" value="处理" onclick="process()"/>
  当前阈值<input id="thresh" type="range"  min="0" max="250" step="1" value="250" onchange="process()">
  最大阈值<input id="maxThresh" type="range"  min="0" max="250" step="1" value="255" onchange="process()">

  轮廓长度<input id="startContoursLength" type="range"  min="1" max="50000" step="1" value="10" onchange="process()">

  ThresholdTypes 阈值类型
  <select id="ThreshType" onchange="process()">
    <option value="THRESH_BINARY">THRESH_BINARY</option>
    <option value="THRESH_BINARY_INV">THRESH_BINARY_INV</option>
    <option value="THRESH_TRUNC">THRESH_TRUNC</option>
    <option value="THRESH_TOZERO">THRESH_TOZERO</option>
    <option value="THRESH_TOZERO_INV">THRESH_TOZERO_INV</option>
    <option value="THRESH_MASK">THRESH_MASK</option>
    <option value="THRESH_OTSU">THRESH_OTSU</option>
    <option value="THRESH_TRIANGLE">THRESH_TRIANGLE</option>
  </select>
  <div>
    <div class="inputoutput" style="width: 40%; float: left;">
      <img id="imageSrc" alt="No Image" src="pingzi.jpg" style="width: 100%;" />
      <div class="caption">imageSrc <input type="file" id="fileInput" name="file" /></div>
    </div>
    <div class="inputoutput"  style="width: 40%; float: left; ">
      <canvas id="canvasOutput" style="width: 100%;" ></canvas>
      <div class="caption">canvasOutput</div>
    </div>
  </div>
  <script type="text/javascript">


  let ImageContours = {


    contours:null,
    hierarchy:null,
    cols:0,
    height:0,

  }

  function onOpenCvReady()
  {


    document.getElementById('status').innerHTML = 'OpenCV.js is ready.';
    process();


    let inputElement = document.getElementById('fileInput');
    inputElement.addEventListener('change', (e) => {


      imgElement.src = URL.createObjectURL(e.target.files[0]);
    }, false);


    let imgElement = document.getElementById('imageSrc');
    imgElement.onload = process;

  }

  function process() {


    const thresh = document.getElementById('thresh').value * 1.0; // 当前阈值
    const maxThresh = document.getElementById('maxThresh').value * 1.0;//最大阈值
    const startContoursLength = document.getElementById('startContoursLength').value * 1.0;//其实显示长度


    let ThreshType = document.getElementById('ThreshType').value ; // 阈值类型
    if(ThreshType == "THRESH_BINARY") {

      ThreshType = cv.THRESH_BINARY;}
    else if(ThreshType == "THRESH_BINARY") {

      ThreshType = cv.THRESH_BINARY;}
    else if(ThreshType == "THRESH_BINARY_INV") {

      ThreshType = cv.THRESH_BINARY_INV;}
    else if(ThreshType == "THRESH_TRUNC") {

      ThreshType = cv.THRESH_TRUNC;}
    else if(ThreshType == "THRESH_TOZERO") {

      ThreshType = cv.THRESH_TOZERO;}
    else if(ThreshType == "THRESH_TOZERO_INV") {

      ThreshType = cv.THRESH_TOZERO_INV;}
    else if(ThreshType == "THRESH_MASK") {

      ThreshType = cv.THRESH_MASK;}
    else if(ThreshType == "THRESH_OTSU") {

      ThreshType = cv.THRESH_OTSU;}
    else if(ThreshType == "THRESH_TRIANGLE") {

      ThreshType = cv.THRESH_TRIANGLE;}

    let imgElement = document.getElementById('imageSrc');
    let src = cv.imread(imgElement);
    ImageContours.cols= src.cols;
    ImageContours.rows= src.rows;

    console.log('图像 width: ' + src.cols + '\n' +
            '图像 height: ' + src.rows + '\n' +
            '图像 size: ' + src.size().width + '*' + src.size().height + '\n' +
            '图像 depth: ' + src.depth() + '\n' +
            '图像 channels ' + src.channels() + '\n' +
            '图像 type: ' + src.type() + '\n');

    let dst = cv.Mat.zeros(src.cols, src.rows, cv.CV_8UC3);

    cv.cvtColor(src, src, cv.COLOR_RGB2HSV, 0);

    // 统一调整亮度
    if (src.isContinuous()) {


        // let H = src.data[row * src.cols * src.channels() + col * src.channels()];
        // let S = src.data[row * src.cols * src.channels() + col * src.channels() + 1];
        // let V = src.data[row * src.cols * src.channels() + col * src.channels() + 2];
        // 由上述3行可知, 第一个元素是H 色调(H),第二个元素是S饱和度(S),第三个元素是V 明度(V)
        // src.data[0] = H
        // src.data[1] = S
        // src.data[2] = V
        for(let i=0; i * 3 < src.data.length;i++ ){


          src.data[i * 3 ] = 200 // 把亮度统一调为200
        }
    }
    // 再转回来
    cv.cvtColor(src, src, cv.COLOR_HSV2RGB, 0);

    //cv.imshow('canvasOutput', src);
    //return
    //debugger;
    // 产生灰度图
    cv.cvtColor(src, src, cv.COLOR_RGB2GRAY, 0);


    cv.threshold(src, src, thresh, maxThresh, ThreshType);
    let contours = new cv.MatVector(); // 轮廓
    let hierarchy = new cv.Mat(); //等级

    // 查找轮廓
    // 最后一个参数轮廓近似法 cv.CHAIN_APPROX_SIMPLE
    // 这是cv.findContours函数中的第三个参数。它实际上表示什么?
    // 上面我们告诉我们轮廓是强度相同的形状的边界。它存储形状边界的(x,y)坐标。但是它存储所有坐标吗?这是通过这种轮廓近似方法指定的。
    // 如果传递cv.CHAIN_APPROX_NONE,则会存储所有边界点。但是实际上我们需要所有这些要点吗?例如,您找到了一条直线的轮廓。您是否需要线上的所有点代表该线?不,我们只需要该线的两个端点即可。这就是cv.CHAIN_APPROX_SIMPLE所做的。它删除所有冗余点并压缩轮廓,从而节省内存。
    // 下面的矩形图像演示了此技术。只需在轮廓数组中的所有坐标上绘制一个圆(以蓝色绘制)。第一图像显示点I与得到cv.CHAIN_APPROX_NONE(734点)和第二图像显示了一个与cv.CHAIN_APPROX_SIMPLE(仅4分)。看,它可以节省多少内存!!!
    // https://docs.opencv.org/master/d4/d73/tutorial_py_contours_begin.html
    // cv.findContours(src, contours, hierarchy, cv.RETR_CCOMP, cv.CHAIN_APPROX_SIMPLE); //这种方法用4个点表示一个矩形
    cv.findContours(src, contours, hierarchy, cv.RETR_CCOMP, cv.CHAIN_APPROX_NONE); // 这种方法记录线上的每个点.

    // 把轮廓存起来.
    if (ImageContours.contours!== null) {


      ImageContours.contours.delete()  //删除老的
    }
    ImageContours.contours = contours; //缓存起来, ,后面好捕捉

    if (ImageContours.hierarchy!== null) {


      ImageContours.hierarchy.delete()
    }
    ImageContours.hierarchy = hierarchy;//缓存起来, ,后面好捕捉


    // // 用随机颜色绘制轮廓线
    for (let i = 0; i < contours.size(); ++i) {


        if(ImageContours.contours.get(i).data.length > startContoursLength)
        {


          let color = new cv.Scalar(Math.round(Math.random() * 255), Math.round(Math.random() * 255),
                                    Math.round(Math.random() * 255));
          // let color = new cv.Scalar(255,255,255)
          cv.drawContours(dst, contours, i, color, 1, cv.LINE_8, hierarchy, 100);
        }
    }
    // for (let i = 0; i < cccc.rows; i++) {


    //     for (let j = 0; j < cccc.cols; j++) {


    //         console.log(cccc.intPtr(i, j))
    //         // if (cccc.intPtr(i, j)[0] == -1) {


    //         //     src.ucharPtr(i, j)[0] = 255; // R
    //         //     src.ucharPtr(i, j)[1] = 0; // G
    //         //     src.ucharPtr(i, j)[2] = 0; // B
    //         // }
    //     }
    // }

    // 绘制到目标区域
    cv.imshow('canvasOutput', dst);
    src.delete();
    dst.delete();
    // contours.delete();
    // hierarchy.delete();
    // cv.imshow('canvasOutput', mat);
  }


  let imgElement = document.getElementById('imageSrc');

  imgElement.addEventListener('mousemove',heightCont , false);// 捕捉最近的轮廓.高亮显示
  // 禁止图片拖动
  document.getElementById('imageSrc').onmousedown = function(e){


      e.preventDefault()
  };

  // 高亮轮廓
  function heightCont(e){


     x = e.offsetX;
     y = e.offsetY;
     // 先捕捉
     //console.log(x,y)

     // let imgElement = document.getElementById('imageSrc');
     if(ImageContours.contours == null) {


       console.log("此图像还没初始化过.");
       process();
       return;
     }


     // 计算那个轮廓距离x,y点最近. 就显示那个.
     // 查找距离点最近的轮廓.
     //
    //  latelyPoint = null; //最近的点
    //  latelyContours = null;//最近的轮廓

    // let color = new cv.Scalar(255, 255,255);

    //contoursIndex = 0
    //  for (let i = 0; i < imgElement.contours.size(); ++i) {


    //    loss = 100000
    //    console.log(imgElement.contours.get(i))
    //    Math.abs(x,y)

    //    //latelyContours = imgElement.contours;
    //    contoursindex = i;
    //  }
    // let markers =  imgElement.contours.get(0) ;
    // for (let i = 0; i < markers.rows; i++) {


    //     for (let j = 0; j < markers.cols; j++) {


    //         if (markers.intPtr(i, j)[0] == -1) {


    //             src.ucharPtr(i, j)[0] = 255; // R
    //             src.ucharPtr(i, j)[1] = 0; // G
    //             src.ucharPtr(i, j)[2] = 0; // B
    //         }
    //     }
    // }

    minidist = 1000000000;
    nearContoursIndex = -1; //距离最近的轮廓
    //捕捉轮廓, 查找距离光标最近的轮廓
    for (let i = 0; i < ImageContours.contours.size(); ++i) {


        let color = new cv.Scalar(255, 255,0);
        //if(ImageContours.contours.get(i).data.length > startContoursLength)
        {


          let cnt = ImageContours.contours.get(i)
          // console.log(cnt)
          //https://docs.opencv.org/master/d5/d45/tutorial_py_contours_more_functions.html
          // 此功能查找图像中的点与轮廓之间的最短距离。它返回的距离为:当点在轮廓外时为负;当点在轮廓内时为正;如果点在轮廓上,则返回零。
          // 在函数中,第三个参数是measureDist。如果为True,则找到带符号的距离。如果为False,则查找该点是在轮廓内部还是外部或轮廓上(分别返回+ 1,-1、0)
          // 注意
          // 如果您不想找到距离,请确保第三个参数为False,因为这是一个耗时的过程。因此,将其设置为False可使速度提高2-3倍。
          // let dist = cv.pointPolygonTest(cnt, new cv.Point(x,y),true)
          // console.log("距离"+ dist);
          // if (minidist > dist)
          // {


          //   minidist= dist;
          //   nearContoursIndex = i;
          // }

          let dist = cv.pointPolygonTest(cnt, new cv.Point(x,y),false)
          cnt.delete();
          cnt = null;
          // console.log("距离"+ dist);
          if (dist >= 0)
          {


            nearContoursIndex = i;
            break;
          }
        }
    }
    //let src = cv.imread(imgElement);


    // 显示最近的轮廓
    if (nearContoursIndex != -1){


      let dst = cv.Mat.zeros(ImageContours.cols, ImageContours.rows, cv.CV_8UC3);
      // console.log("找到轮廓",nearContoursIndex)
      let color = new cv.Scalar(255, 0,0);
      cv.drawContours(dst, ImageContours.contours, nearContoursIndex, color, 1, cv.LINE_8, ImageContours.hierarchy, 100);

      cv.imshow('canvasOutput', dst);
      dst.delete();
    }

     // imgElement.contours is MatVector  get(0) is Mat
    //  cv.imshow("canvasOutput",markers);
     //cv.drawContours(dst, imgElement.contours, contoursIndex, color, 1, cv.LINE_8, hierarchy, 100);

  }


  </script>
  </body>
  </html>
里面的瓶子图随便换
opencv4.5.0.js 需要到 https://docs.opencv.org/4.5.0/opencv.js 下载, 另存为就可以了.
https://docs.opencv.org/可以下载到各个版本的opencv.js