实验拓扑:
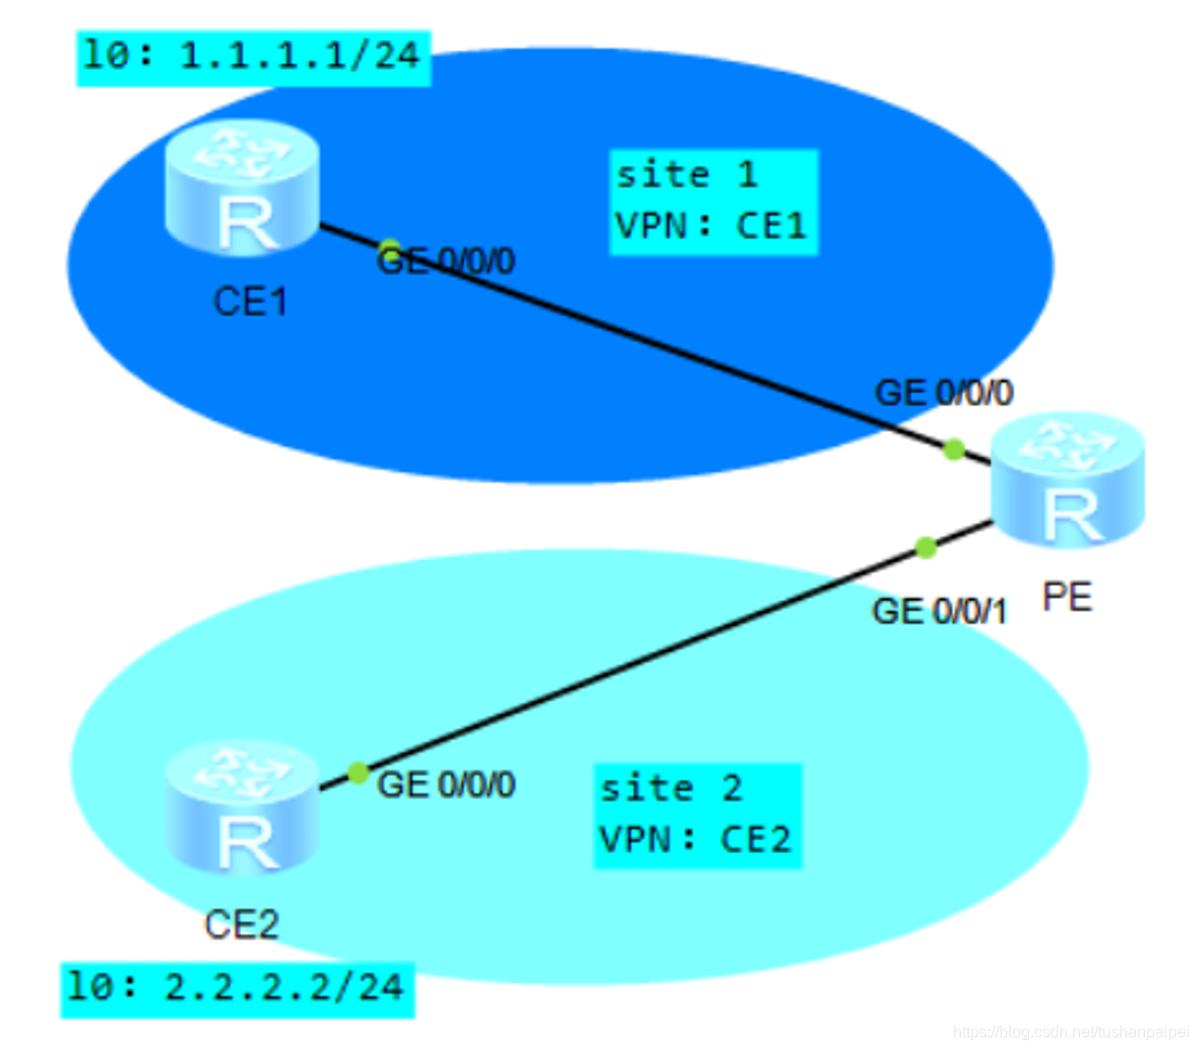
保证CE1和CE2的L0接口互相能够访问。
配置思路:
一、在PE1上配置VPN实例,为VPN实例配置不同的VPN-Target属性,实现不同VPN的隔离。
ip vpn-instance CE1
ipv4-family
route-distinguisher 101:1
vpn-target 100:1 export-extcommunity
vpn-target 100:1 200:1 import-extcommunity //本地互访需要多添加一个接受对方发送tag的接入属性
ip vpn-instance CE2
ipv4-family
route-distinguisher 102:1
vpn-target 200:1 export-extcommunity
vpn-target 200:1 100:1 import-extcommunity
二、在PE1上配置与CE相连的接口与VPN实例绑定,接入VPN用户。
interface GigabitEthernet0/0/0
ip binding vpn-instance CE1
ip address 10.1.10.254 255.255.255.0
interface GigabitEthernet0/0/1
ip binding vpn-instance CE2
ip address 10.1.20.254 255.255.255.0
三、在PE1上使能BGP-VPNv4地址族,配置将到本地CE的直连路由引入VPN路由表,同时在CE上配置访问另一CE设备的路由,以实现本地互访。
CE1:(CE2同理)
interface GigabitEthernet0/0/0
ip address 10.1.10.1 255.255.255.0
interface LoopBack0
ip address 1.1.1.1 255.255.255.0
ospf 1
area 0.0.0.0
network 0.0.0.0 255.255.255.255
PE-BGP:
bgp 100
ipv4-family vpn-instance CE1
import-route ospf 1
ipv4-family vpn-instance CE2
import-route ospf 2
PE-OSPF:
ospf 1 vpn-instance CE1
import-route bgp
area 0.0.0.0
network 10.1.10.254 0.0.0.0
ospf 2 vpn-instance CE2
import-route bgp
area 0.0.0.0
network 10.1.20.254 0.0.0.0
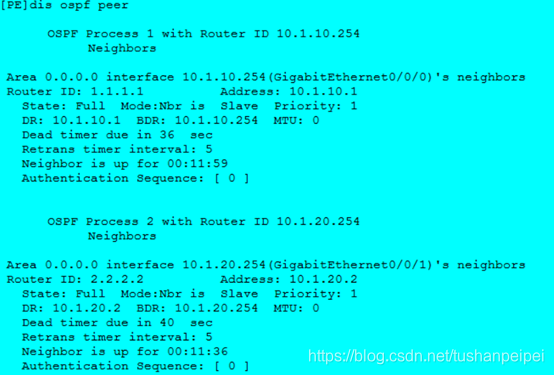
四、配置完成后在PE上查看OSPF的邻居关系是否建立成功:
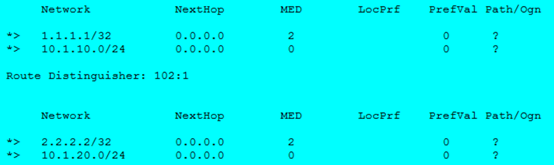
然后在CE上查看是否学习到了对方的路由条目:(已经学习)
CE1上:

CE2上:

两个CE的回环口互ping检测:

本地互通时路由信息交互过程:
站点的路由信息通过重分发进入了BGP的对应VPN实例中,并自动重分发进入BGP VPNv4中。
然后在BGP VPNv4中进行思网路由交叉(所以需要修改对应的接入属性),条目进入另外一个BGP实例中,然后重分发进入另外一个站点,这样就能互相学习到对方的路由条目了。
本地互通时流量的走向:
以CE1pingCE2为例:
CE1查看对应的路由表:将报文发送给PE1

PE1因为是从实例CE1接收的,所以需要查看的是CE1实例的路由表:
[PE]dis ip routing-table vpn-instance CE1

这个条目是从从BGP接收到的,按照出接口和下一跳发送给CE2,完成单向通信,回程类似。