模块编写参考教程:
https://thomasnyberg.com/cpp_extension_modules.html
https://docs.python.org/3/extending/extending.html
调试参考:
https://stackoverflow.com/questions/15253586/python-extension-debugging
https://wiki.python.org/moin/DebuggingWithGdb
https://blog.csdn.net/wfdtxz/article/details/7368357
python编程的确很方面,但有的时候速度上不如c和c++,对于处理的数据量比较大的情况下还是需要使用python 调用c++的方法,本使用的是python extension的方式,数据转换比较繁琐,这里只提供了自己的一个模板,方便记住。
首先需要创建一个文件夹,报错扩展模块:

其中cpp目录用来保存cpp文件,setup.py用来编译和安装扩展模块。
cpp目录下主要包含以下文件:
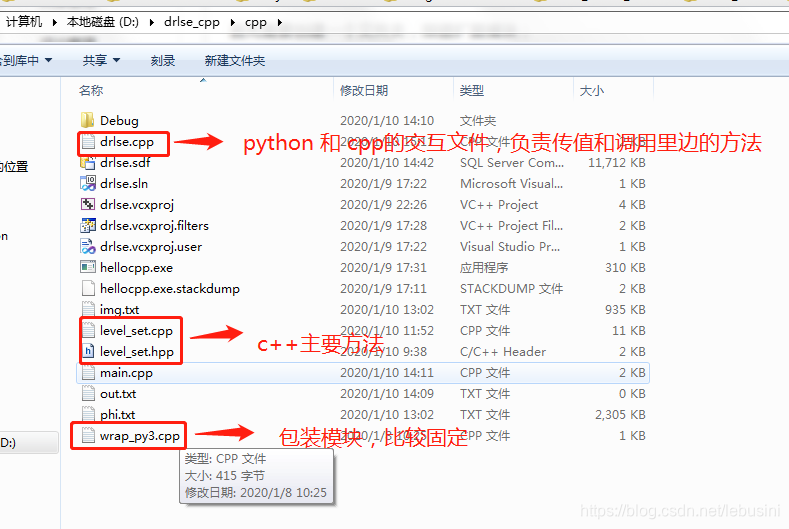
主要内容格式如下:
setup.py:
此文件主要负责编译c++模块,封装成python可以调用的形式。这里主要修改module_name1项为自己的包名字,sources中为自己用到的cpp文件路径。
import sys
import numpy as np
from distutils.core import setup
from distutils.extension import Extension
package_name = 'level-set'
module_name1 = 'drlse'
version = sys.version[0]
wrap_source = './cpp/wrap_py{0:}.cpp'.format(version)
module1 = Extension(module_name1,
                    include_dirs=[np.get_include(), './cpp'],
                    sources=['./cpp/drlse.cpp',
                             './cpp/level_set.cpp', wrap_source])

setup(name=package_name,
      ext_modules=[module1])
drlse.cpp:
这里调用c++模块,将python变量的传递给c++方法,并返回c++的结果给python
此中切记要使用NPY_FLOAT32数据类型,不要使用NPY_FLOAT64类型,不然结果返回给python会出现错误。
#include <Python.h>
#include "numpy/arrayobject.h"
#include "level_set.hpp"
#include <iostream>
using namespace std;
// example to use numpy object: http://blog.debao.me/2013/04/my-first-c-extension-to-numpy/
// write a c extension ot Numpy: http://folk.uio.no/hpl/scripting/doc/python/NumPy/Numeric/numpy-13.html
static PyObject *
level_set_wrapper(PyObject *self, PyObject *args)
{
PyObject *I=NULL,*phi=NULL;
float W,H,mu,timestep,lambda,alfa,epsilon,potential_function,iters;
PyArrayObject *arr_I=NULL;
PyArrayObject *arr_phi=NULL;
if (!PyArg_ParseTuple(args, "OOfffffffff", &I,&phi,&W,&H,&mu,×tep,&lambda,&alfa,&epsilon,&potential_function,&iters)) return NULL;
arr_I = (PyArrayObject*)PyArray_FROM_OTF(I, NPY_FLOAT32, NPY_IN_ARRAY);
if (arr_I == NULL) return NULL;
arr_phi = (PyArrayObject*)PyArray_FROM_OTF(phi, NPY_FLOAT32, NPY_IN_ARRAY);
if (arr_phi == NULL) return NULL;
npy_intp * shape = PyArray_DIMS(arr_I); // npy_intp array of length nd showing length in each dim.
drlse_Evolution((float*)arr_I->data, (float*)arr_phi->data, int(W), int(H), mu, timestep, lambda, alfa,
epsilon, (int)potential_function, (int)iters);
cout<<1<<endl;
// level_set2D.InitPhi(mask, image_width, image_height)
// alfa = 0;
// level_set2D.Evolution();
// float* final_phi = level_set2D.GetPhi();
// PyArrayObject * phi_np = (PyArrayObject*) PyArray_SimpleNewFromData(2, shape, NPY_FLOAT64, final_phi);
Py_DECREF(arr_I);
//Py_DECREF(arr_phi);
return PyArray_Return(arr_phi);
}
static PyMethodDef Methods[] = {
{"drlse", level_set_wrapper, METH_VARARGS, "computing drlse by cpp"},
{NULL, NULL, 0, NULL}
};
wrap_py3.cpp:
其中需要修改方法名。
#include "drlse.cpp"


static struct PyModuleDef cGeosDis =
{
    PyModuleDef_HEAD_INIT,
    "drlse", /* name of module */
    "",          /* module documentation, may be NULL */
    -1,          /* size of per-interpreter state of the module, or -1 if the module keeps state in global variables. */
    Methods
};


PyMODINIT_FUNC PyInit_drlse(void) {
    import_array();
    return PyModule_Create(&cGeosDis);
}
主要方法模块就不再列了,跟正常的c++写法没有区别主要用来实现自己要提高效率的方法。
以上这些文件,最复杂的是drlse.cpp文件,也就是连接文件,这是这里边的核心,其他模块都比较模板。这些文件准备好以后,可以执行命令以后对方法进行调用。
python setup.py build

python setup.py install
随后可以再python中对模块进行调用和测试,如此调用:
import drlse
import numpy as np
from PIL import Image

filename = '216748_216749-100180_100181-18.jpg'
img = np.array(Image.open(filename).convert('L'))
W,H=img.shape
image_size = W * H
timestep = 5
potential_function=1
c0=2
mu = 0.2 / timestep
_lambda = 20
alfa = 4
epsilon = 1.5
iters = 50


initialLSF = 2 * np.ones(img.shape)
phi=initialLSF.copy()
phi[100:120,100:120]=-c0
final_phi=drlse.drlse(img.astype(np.float32),phi.astype(np.float32), W,H,mu,timestep,_lambda,alfa,epsilon, potential_function,iters)
ted=1
print(final_phi)
整个过程中最复杂的部分就是调试,目前没有能够实现再IDE中进行联调。我调试的方法是在cygwin中安装gdb对python测试模块进行调试,然后去发现那一部分有错误,再去查找代码。这部分主要是对drlse.cpp这种连接代码进行调试。c++部分自己单独写了main函数进行了调试,这个过程弄得及其麻烦。。。
调试的时候要注意,使用不同的build命令,我在cygwin中的命令为
CFLAGS='-Wall -O0 -g' python3 setup.py build感想:之前已经进行过一次python 扩展编程,用了两三天,这回有一次实现另一个方法,还是用了两三天,因此特别记录一下,也希望可以帮助其他有需要的人一下。这个流程比较繁琐,希望有大牛能够提供一种更加有效率和简洁的解决方案。