目录:
which命令
在PATH变量指定的路径中,搜索某个系统命令的位置,并且返回第一个搜索结果。也就是说,使用which命令,就可以看到某个系统命令是否存在,以及执行的到底是哪一个位置的命令。
用法:
which  可执行文件名称
实例:
[root@localhost ~]# which pwd
/bin/pwd
whereis命令
可以查找指定命令的二进制文件、源文件和帮助文件。
[root@localhost ~]# whereis whereis
whereis: /usr/bin/whereis /usr/share/man/man1/whereis.1.gz
需要注意的是,输出的第一个路径才是你想要的结果。
使用 whereis 命令,同时也会显示帮助页面和源码所在路径。
(如果能找到的情况下会显示,但是在这一例中没有找到)
所以你在输出中看见的第二个路径就是帮助页面文件所在位置。
| -b | 只查找可执行文件(二进制文件) |
|---|---|
| -m | 只查找帮助文件 |
| -s | 源代码文件 |
实例:
[root@localhost ~]# whereis -b whereis
whereis: /usr/bin/whereis
[root@localhost ~]# whereis -s whereis
whereis:
[root@localhost ~]# whereis -m whereis
whereis: /usr/share/man/man1/whereis.1.gz
locate命令
先建立一个包括系统内所有档案名称及路径的数据库,之后当寻找时就只需查询这个数据库。(在一般的 distribution 之中,数据库的建立都被放在 crontab 中自动执行)
使用locate前先执行 updatedb
工作特征:
- 查找速度快
- 模糊查找
- 非实时查找
命令需安装:yum install mlocate -y
| -b | 只匹配路径中的基名 |
|---|---|
| -c | 统计总共有多少符合条件个文件 |
实例:
[root@localhost ~]# updatedb
[root@localhost ~]# locate -c /etc/sh
3
[root@localhost ~]# locate /etc/sh
/etc/shadow
/etc/shadow-
/etc/shells
find命令
find命令是一个实时查找工具,通过遍历指定路径而完成对文件的查找;在使用该命令时,如果不选定参数,则在当前目录下查找子目录与文件并显示之;另外,任何位于参数之前的字符串,都将视为欲查找的目录名。
工作特征:
- 精确实时
- 速度慢
- 可能只搜索用户具备读取和执行权限的目录。
用法:
find [OPTION]... [查找路径] [查找条件] [处理动作]
查找的起始路径: 指定具体的搜索目录,默认为当前目录
查找条件: 指定查找的标准,大小,文件名,类型。默认是指定路径下的所有文件
处理动作: 符合查找条件的文件做出的操作,例如cp,rm,默认为输出到标准输出
1).查找条件:
.按逻辑条件查找
| -a | 与 |
|---|---|
| -o | 或 |
| -not | 非 |
| ! | 非 |
.按文件名查找
1.-name “pattern” 引号需要加
2.支持通配符 * ? [] [^]
3.-iname “pattern” 不区分大小写
4.-regex “pattern” 匹配整个路径 而不是文件名
实例:
[root@localhost var]# find -name  "fil*"
./lib/yum/rpmdb-indexes/file-requires
[root@localhost var]# find -iname  "Fil*"
./lib/yum/rpmdb-indexes/file-requires
./lib/rpm/Filedigests
[root@localhost var]# find /  -regex  /t.*/f.*
/tmp/file
.根据文件的从属关系查找
| -user | 属主 |
|---|---|
| -group | 属组 |
| -uid GID | 属主ID |
| -gid GID | 属组ID |
| -nouser | 没有属主的文件 |
| -nogroup | 没有属组的文件 |
实例:
查找/var目录下属主为root,且属组为mail的所有文件
[root@localhost ~]#  find /var  -user root -group mail
/var/spool/mail
查找/var目录下不属于root
[root@localhost ~]#  find /var ! -user root
/var/lib/dav
/var/lib/postfix
/var/lib/postfix/master.lock
/var/cache/mod_proxy
/var/spool/mail/fedore
/var/spool/mail/gentooo
/var/spool/mail/gentoo
/var/spool/postfix/active
/var/spool/postfix/defer
/var/spool/postfix/hold
/var/spool/postfix/flush
/var/spool/postfix/saved
/var/spool/postfix/trace
/var/spool/postfix/public
.根据文件类型查找
-type TYPE
TYPE:
| f | 普通文件 |
|---|---|
| d | 目录 |
| b | 块设备文件 |
| l | 链接文件 |
| c | 字符设备文件 |
| p | 管道文件 |
| s(socket) | 套接字文件 |
.根据文件的大小查找
         -size  [+|-] #UNIT
#UNIT:(#-1,#]
-#UNIT:[0,#-1]
+#UNIT:(#,OO)
实例:
find / -size 10M 10M前面什么都不加,查找的就是文件大小为9M-10M的文件(不包括9M,包括10M)
find / -size -10M,查找的文件大小为0M-9M
find / -size +10M,查找的文件大小为>10M
.根据时间戳查找
以天/分钟为单位
-atime/amin   [+|-]# 文件最后访问时间
-mtime/mmin	 [+|-]# 文件最后修改时间
-ctime/cmin   [+|-]# 文件最后改变时间
#:[#,#-1): 10   大于等于10天前,小于9天前
-#:(#,0]    -10  最后的访问时间10天以内
+#:(oo,#-1] +10  最后的访问时间在9天以前,包括9天
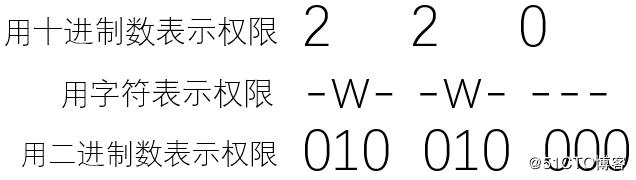
.根据文件权限来查找
-perm [-| /]mode
权限位:读(4) 写(2) 执行(1)
| mode | 9位权限位所有的权限位保持一致 |
|---|---|
| /mode | 只要包含,且9位权限中每个权限中有一个满足即可 或 |
| -mode | 只要包含,且9位权限中每个权限均要满足 与 |
 实例:
-rwxr-xr-x 1 root root 0 6月 17 11:05 testl
-r--r--r-- 1 root root 0 6月 17 11:05 test2
-rw------- 1 root root 0 6月 17 11:05 test3
-w------- 1 root root 0 6月 17 11:05 test4
[root@localhost test]#find.-perm 444(什么都不加代表要权限位一样才行)
./test2
[root@localhost test]#find.-perm 200
./test4
[root@localhost test]#find .-perm -200
./test4 <-此文件权限为200
./test3 <-此文件权限为600
./testl <-此文件权限为755
#搜索文件的权限包含200的文件,不会找到test2文件,因为test2的权限为444,不包含200权限。
因为 test4 的权限 200(-w-------),test3 的权限 600(-rw-------)和test1 的权限 755(-rwxr-xr-x) 都包含 200(--w-------) 权限,所以可以找到;而 test2 的权限是 444 (-r--r--r--),不包含 200 (--w-------)权限。
-mode是九位权限都要包含(与),/mode只要九位权限有三位与之相符即可(或)
.目录层级
-path 基于目录层级
.基于目录深度查找
-maxdepth 最大深度
-mindepth 最小深度
实例:
查找/tmp目录下第三层目录中的文件
[root@nebula tmp]# find /tmp/ -maxdepth 3   -mindepth 3 -name "file*"
/tmp/test/test/file_test
查找/tmp目录下第四层目录中的文件
[root@nebula tmp]# find /tmp/ -maxdepth 4   -mindepth 4 -name "file*"
/tmp/test/test/test/file_new
.处理动作
| 默认动作,输出到标准输出作 | |
|---|---|
| -fls /path/to/somefile | 将查找到的文件的长格式信息写入到指定文件中 |
| -ok commond {} \ ; | 对执行的每个文件做commond操作,每次的操作需要用户确认 |
| -exec commond {}\ ; | 对执行的每个文件做commond操作 |
| -xargs -0 commond {}\ ; | 对执行的每个文件做commond操作 |