MySQL的安装与部署:
一、yum安装MySQL
1.下载rpm包
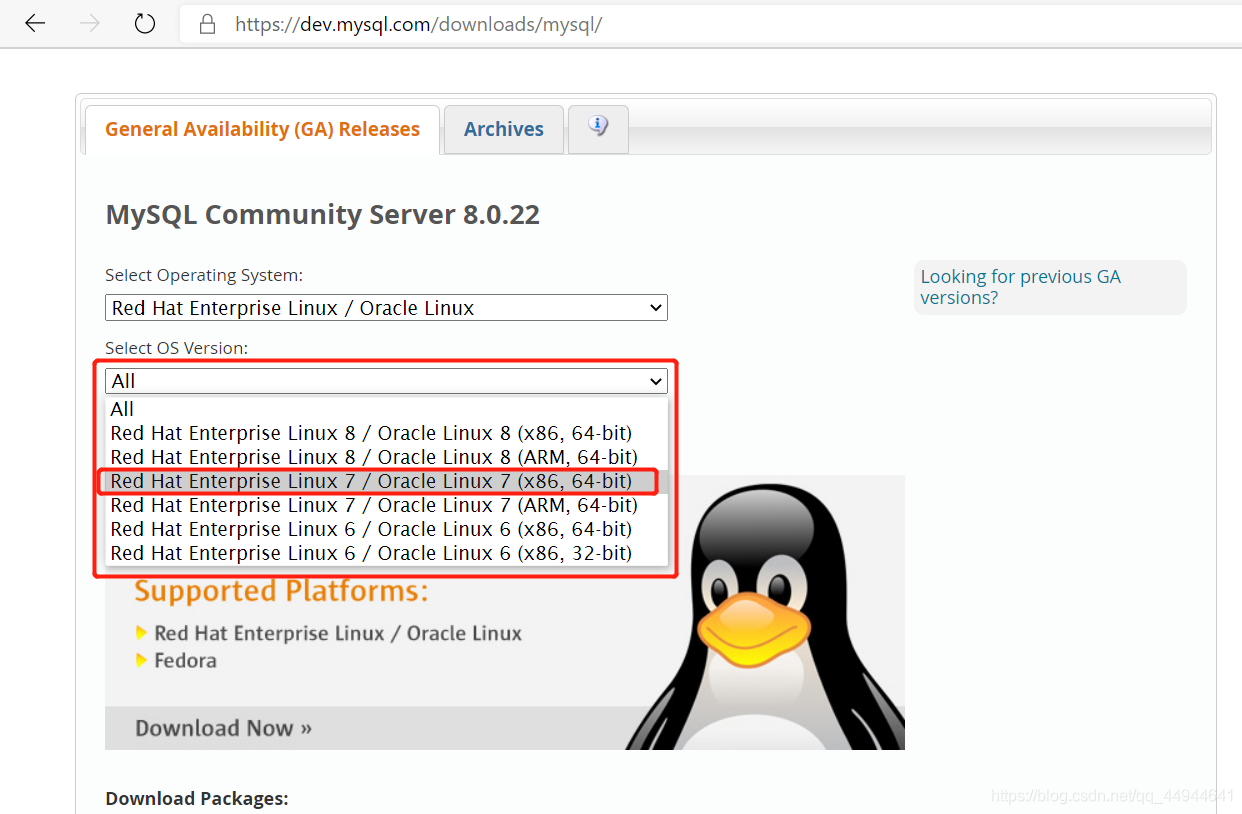
首先进入MySQL下载官网 https://dev.mysql.com/downloads/mysql/
注意:该方法安装时,虽然安装包下载到了本地,但是安装的过程中存在依赖,因此要修改安装网络源来接触依赖
这个需要根据自身情况去选择哪一个
接着选择第一个下载
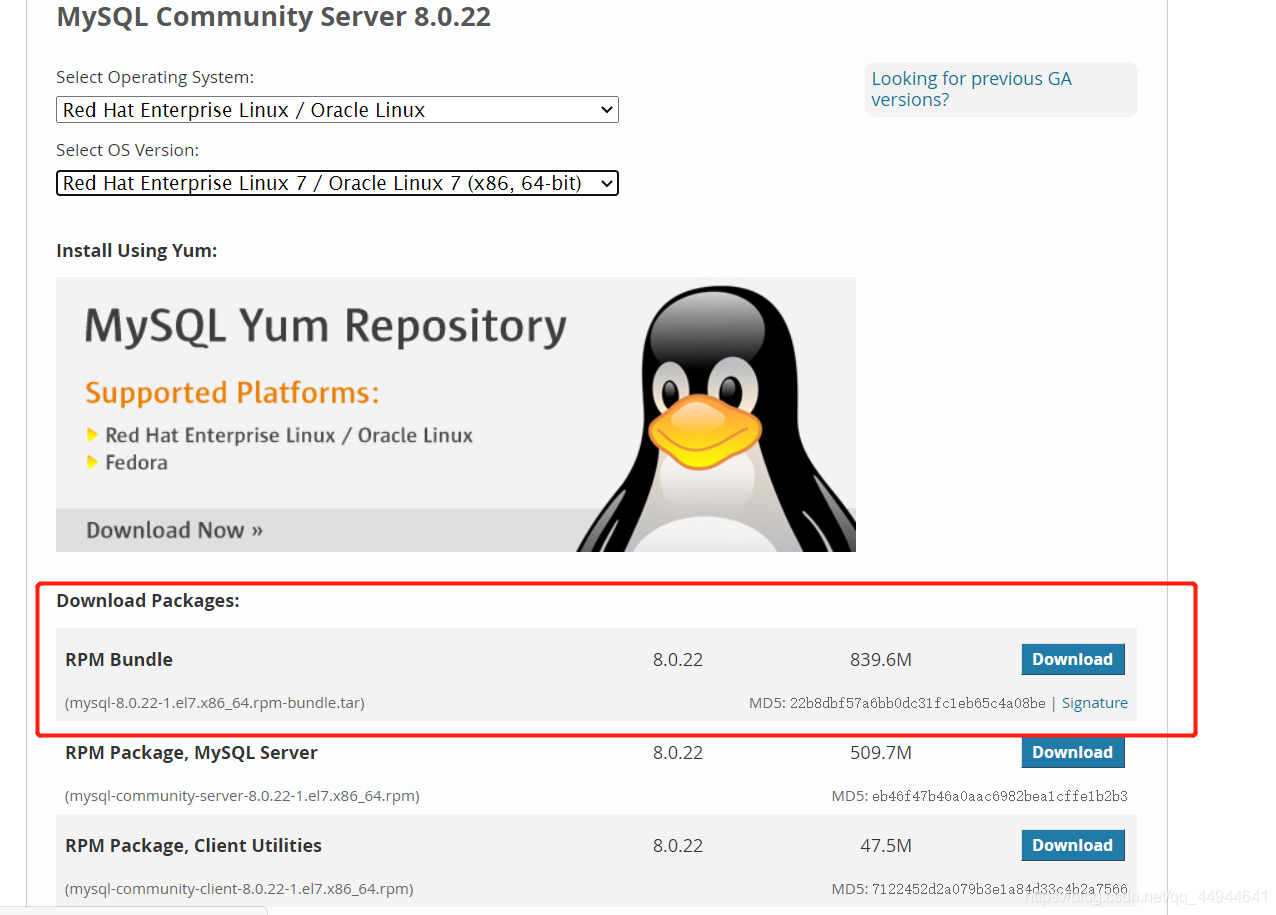
下载好之后,将下载的包拷贝到虚拟机上,接着在虚拟机上进行安装
安装步骤:
1.rpm -e mariadb-libs postfix(卸载mariadb,linux的默认数据库)
2.groupadd mysql
3.useradd -g mysql mysql
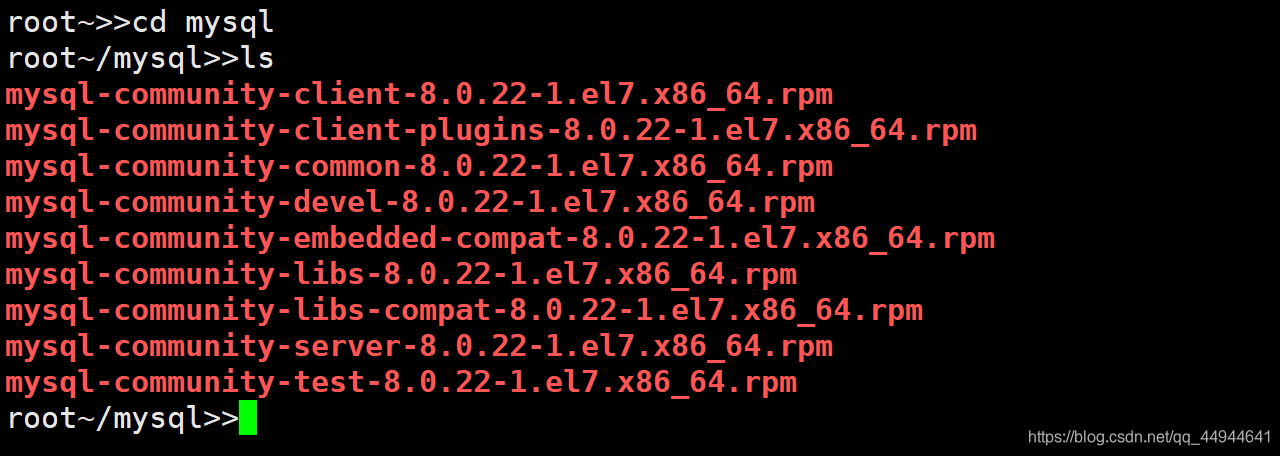
4.mkdir mysql
5.tar -xf mysql-8.0.22-1.el7.x86_64.rpm-bundle.tar -C mysql(-C解压到指定目录)
6.然后进行yum安装
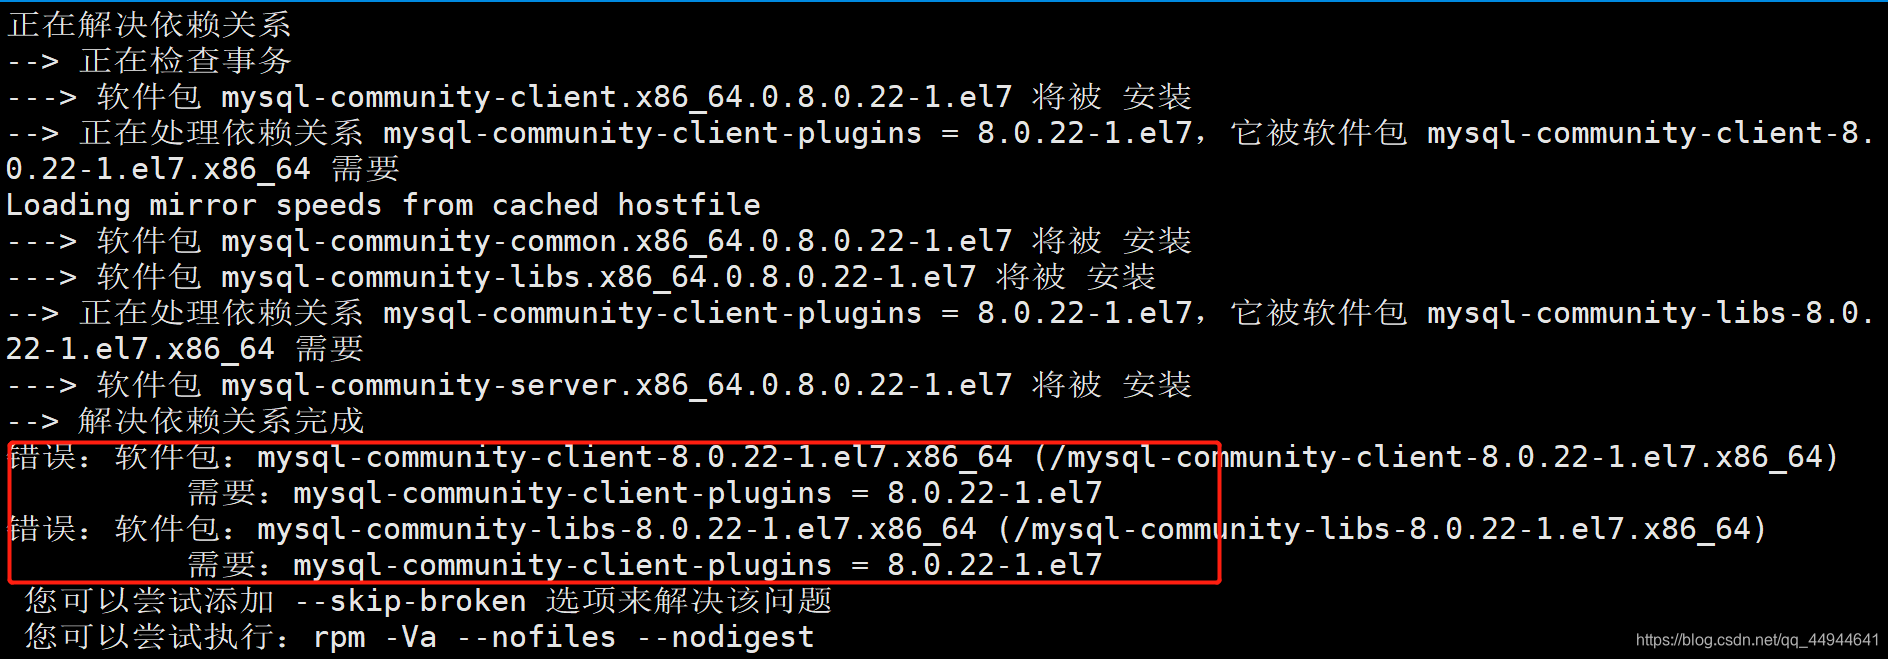
7.yum localinstall mysql-community-client-8.0.22-1.el7.x86_64.rpm mysql-community-server-8.0.22-1.el7.x86_64.rpm mysql-community-libs-8.0.22-1.el7.x86_64.rpm mysql-community-common-8.0.22-1.el7.x86_64.rpm
出现了这个怎么办呢,不要着急,按哪里出错了
8.yum localinstall mysql-community-client-8.0.22-1.el7.x86_64.rpm mysql-community-server-8.0.22-1.el7.x86_64.rpm mysql-community-libs-8.0.22-1.el7.x86_64.rpm mysql-community-common-8.0.22-1.el7.x86_64.rpm mysql-community-client-plugins-8.0.22-1.el7.x86_64.rpm
9.到此为止,就安装好了
启动:
1.systemctl start mysqld
2. systemctl enable mysqld(开机启动)
查看密码并修改密码:
1.grep “temporary password” /var/log/mysqld.log
框出来的就是咱们所查到的密码
2.修改密码


2.官方源安装
缺点:速度慢
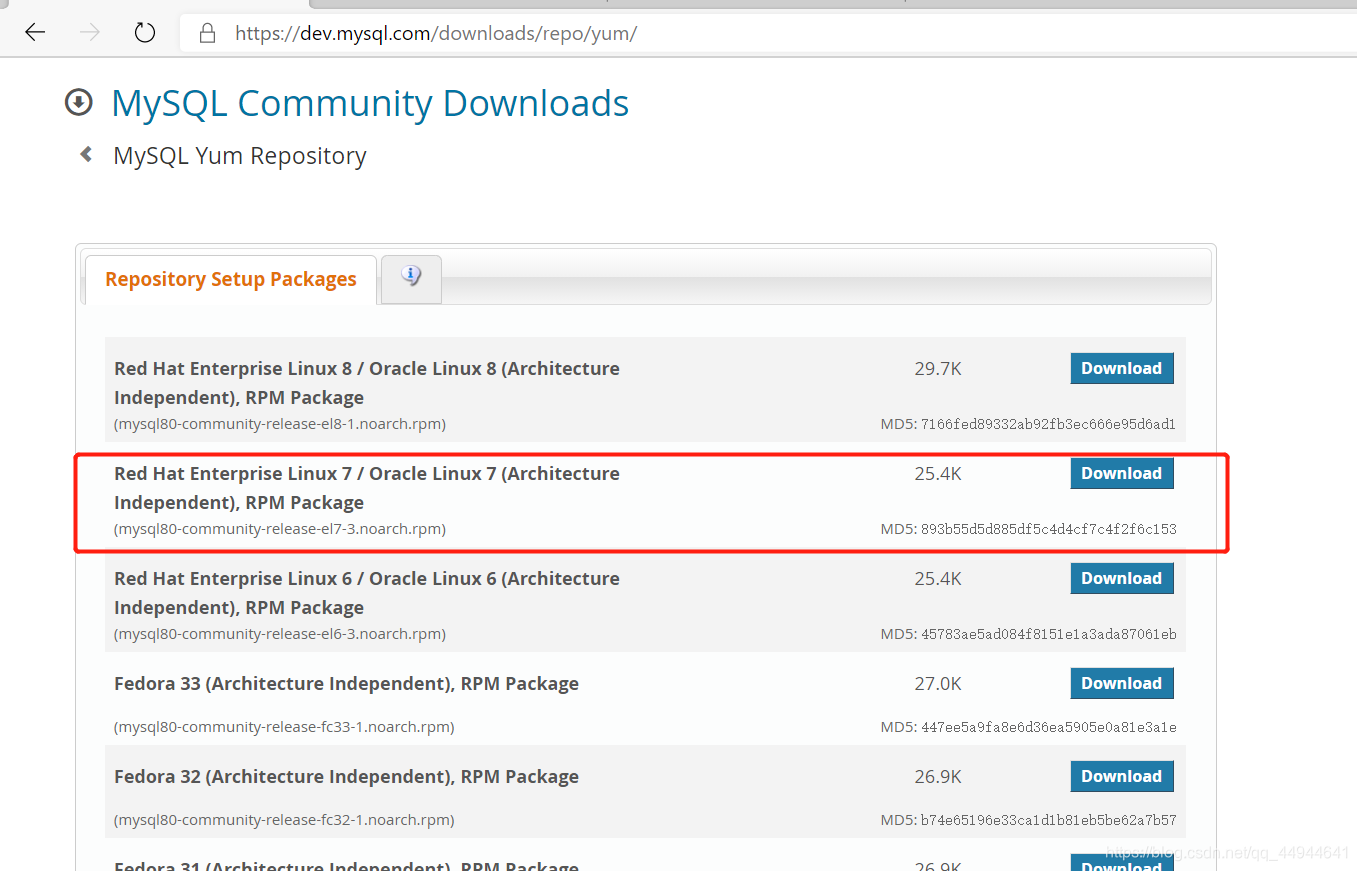
进入MySQL官网https://dev.mysql.com/downloads/repo/yum/下载
下载哪一个版本根据自身情况选择
1.yum install mysql80-community-release-el7-3.noarch.rpm
2.yum list |grep “mysql-community”
3.yum install mysql-community-client mysql-community-server
二、二进制安装MySQL
1.下载glibc版本的mysql ,http://ftp.ntu.edu.tw/MySQL/Downloads/MySQL-8.0/
2.安装系统依赖包,yum -y install make gcc-c++ cmake bison-devel ncurses-devel readline-devel libaio-devel perl libaio wget lrzsz vim libnuma* bzip2 xz
3.关闭selinux
setenforce 0 #暂时关闭
sed -i ‘s/SELINUX=enforcing/SELINUX=disabled/’ #永久关闭
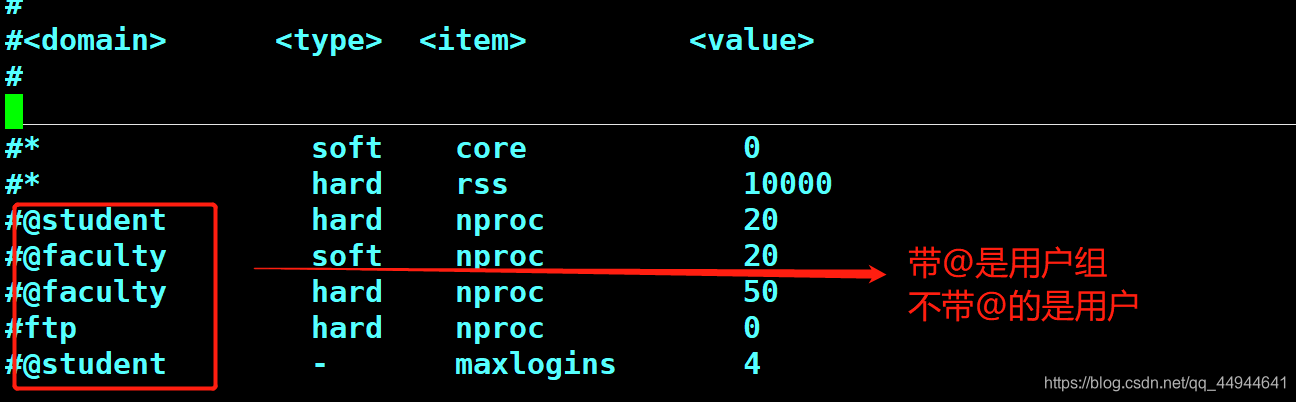
4.修改配置文件的参数
vim /etc/security/limits.conf
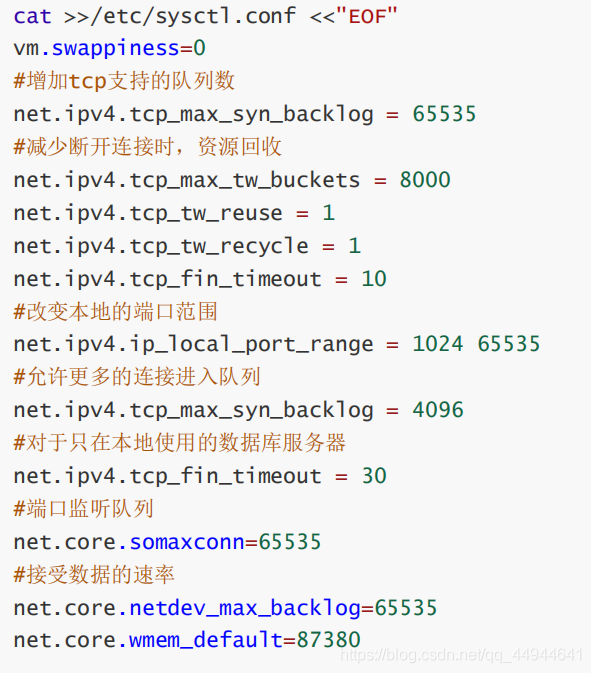
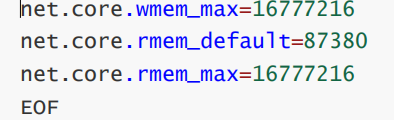
5.修改内核的参数
sysctl -p #立即生效
6.mysql的安装配置:
(1)解压安装包 tar xjf mysql-8.0.19-linux-glibc2.12-x86_64.tar.xz -C /opt/
(2)做软连接到/usr/bin
[root@localhost ~]# cd /opt/
[root@localhost opt]# cd /usr/local/
[root@localhost local]# ln -s /opt/mysql-8.0.19-linux-glibc2.12-x86_64 mysql/
(3)创建用户
[root@localhost ~]# groupadd mysql
[root@localhost ~]# useradd -g mysql mysql -d /home/mysql -s /sbin/nologin
(4)修改目录权限
[root@localhost local]# chown -R mysql.mysql mysql/*
(5)初始化数据库
[root@localhost local]# cd mysql/
[root@localhost mysql]# bin/mysqld --initialize --user=mysql --basedir=/usr/local/mysql --datadir=/usr/local/mysql/data
(6)创建配置文件,配置文件若存在需要先注释
[root@localhost mysql]# if [ -f /etc/my.cnf ]; then mv /etc/my.cnf “/etc/my.cnf.date +%Y%m%d%H%m.bak”; fi
(7)修改配置文件
[root@localhost profile.d]# vim /etc/my.cnf
[client]
port = 3306
socket = /tmp/mysql.sock[mysqld]
server_id=10
port = 3306
user = mysql
character-set-server = utf8
default_storage_engine = innodb
log_timestamps = SYSTEM
socket = /tmp/mysql.sock
basedir = /usr/local/mysql
datadir = /usr/local/mysql/data
pid-file = /usr/local/mysql/data/mysqld.pid
max_connections = 1000
max_connect_errors = 1000
table_open_cache = 1024
max_allowed_packet = 128M
open_files_limit = 65535
#####=============================[innodb] ==============================innodb_buffer_pool_size = 1024M
innodb_file_per_table = 1
innodb_write_io_threads = 4
innodb_read_io_threads = 4
innodb_purge_threads = 2
innodb_flush_log_at_trx_commit = 1
innodb_log_file_size = 512M
innodb_log_files_in_group = 2
innodb_log_buffer_size = 16M
innodb_max_dirty_pages_pct = 80
innodb_lock_wait_timeout = 30
innodb_data_file_path=ibdata1:10M:autoextend#####================================[log]
============================log_error = /var/log/mysql-error.log
slow_query_log = 1
long_query_time = 1
slow_query_log_file = /var/log/mysql-slow.log
sql_mode=NO_ENGINE_SUBSTITUTION,STRICT_TRANS_TABLES
(8)为MySQL提供sysv服务脚本
[root@localhost profile.d]# cd /usr/local/mysql/
[root@localhost mysql]# cp support-files/mysql.server /etc/rc.d/init.d/mysqld
[root@localhost mysql]# chmod +x /etc/rc.d/init.d/mysqld
(9)启动MySQL
[root@localhost mysql]# chkconfig --add mysqld --添加为系统服务
[root@localhost mysql]# chkconfig mysqld on --开机自启动
[root@localhost mysql]# systemctl start mysqld
(10)将MySQL的bin目录加入PATH环境变量,编辑/etc/profile文件,使用mysql客户端命令
[root@localhost ~]# cd /etc/profile.d/
[root@localhost ~]# vim mysql.rc
export PATH=$PATH:/usr/local/mysql/bin #添加这一条
root@localhost ~]# source mysql.sh
(11)数据库登录并改密码
[root@localhost mysql]# mysql -uroot -p
Enter password:
Welcome to the MySQL monitor. Commands end with ; or \g.
Your MySQL connection id is 8
Server version: 8.0.19 MySQL Community Server - GPL
Copyright © 2000, 2020, Oracle and/or its affiliates. All rights reserved.
Oracle is a registered trademark of Oracle Corporation and/or its
affiliates. Other names may be trademarks of their respective
owners.
Type ‘help;’ or ‘\h’ for help. Type ‘\c’ to clear the current input statement.
mysql> alter user ‘root’@‘localhost’ identified by ‘ABC123.com’; #修改密码为ABC23.com