一.如何写驱动呢?
先讲解驱动框架,然后写出first_drv驱动程序,来打印一些信息
写出first_drv驱动程序需要以下几步:
(1)写出驱动程序first_drv_open first_drv_write
(2)需要定义file_operations结构体来封装驱动函数first_drv_open first_drv_write
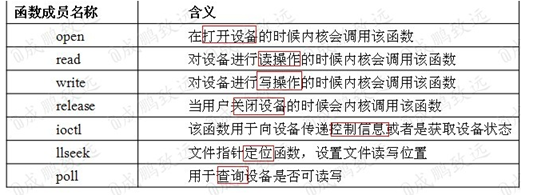
对于字符设备来说,常用file_operations以下几个成员:
(3) 模块加载函数,通过函数 register_chrdev(major, “first_drv”, &first_drv_fops) 来注册字符设备
(4)写驱动的first_drv_init 入口函数来调用这个register_chrdev()注册函数,
(5)通过module_init()来修饰入口函数,使内核知道有这个函数
(6)写驱动的first_drv_exit出口函数,调用这个unregister_chrdev()函数卸载,
(7) 通过module_exit()来修饰出口函数
(8) 模块许可证声明, 最常见的是以MODULE_LICENSE( “GPL v2” )来声明
二 编写驱动代码
- 头文件
/* 参考drivers\input\keyboard\gpio_keys.c */

#include <linux/module.h>
#include <linux/version.h>

#include <linux/init.h>
#include <linux/fs.h>
#include <linux/interrupt.h>
#include <linux/irq.h>
#include <linux/sched.h>
#include <linux/pm.h>
#include <linux/sysctl.h>
#include <linux/proc_fs.h>
#include <linux/delay.h>
#include <linux/platform_device.h>
#include <linux/input.h>
#include <linux/irq.h>

#include <asm/gpio.h>
#include <asm/io.h>
#include <asm/arch/regs-gpio.h>
- 定义input_dev结构体
struct input_dev {


       void *private;
       const char *name;  //设备名字
       const char *phys;  //文件路径,比如 input/buttons
       const char *uniq;
       struct input_id id;


       unsigned long evbit[NBITS(EV_MAX)];  //表示支持哪类事件,常用有以下几种事件(可以多选)
       //EV_SYN      同步事件,当使用input_event()函数后,就要使用这个上报个同步事件
       //EV_KEY       键盘事件
       //EV_REL       (relative)相对坐标事件,比如鼠标
       //EV_ABS       (absolute)绝对坐标事件,比如摇杆、触摸屏感应

       unsigned long keybit[NBITS(KEY_MAX)];   //存放支持的键盘按键值
                                    //键盘变量定义在:include/linux/input.h, 比如: KEY_L(按键L)

       unsigned long relbit[NBITS(REL_MAX)];    //存放支持的相对坐标值
       unsigned long absbit[NBITS(ABS_MAX)];   //存放支持的绝对坐标值
       unsigned long mscbit[NBITS(MSC_MAX)];   //存放支持的其它事件,也就是功能
       unsigned long ledbit[NBITS(LED_MAX)];    //存放支持的各种状态LED
       unsigned long sndbit[NBITS(SND_MAX)];    //存放支持的各种声音
       unsigned long ffbit[NBITS(FF_MAX)];       //存放支持的受力设备
       unsigned long swbit[NBITS(SW_MAX)];     //存放支持的开关功能

 ... ...
- buttons_init函数实现
static struct input_dev *buttons_dev;

static int buttons_init(void)
{


	int i;

	/* 1. 分配一个input_dev结构体 */
	buttons_dev = input_allocate_device();

	/* 2. 设置 */
	/* 2.1 能产生哪类事件 */
	set_bit(EV_KEY, buttons_dev->evbit);//按键类事件
	set_bit(EV_REP, buttons_dev->evbit);//重复类事件

	/* 2.2 能产生这类操作里的哪些事件: L,S,ENTER,LEFTSHIT */
	set_bit(KEY_L, buttons_dev->keybit);
	set_bit(KEY_S, buttons_dev->keybit);
	set_bit(KEY_ENTER, buttons_dev->keybit);
	set_bit(KEY_LEFTSHIFT, buttons_dev->keybit);

	/* 3. 注册 */
	input_register_device(buttons_dev);

	/* 4. 硬件相关的操作 */

	/*4.2 定时器初始化*/
	init_timer(&buttons_timer);//防抖动的
	buttons_timer.function = buttons_timer_function;//定义定时器服务函数
	add_timer(&buttons_timer);

	/*4.2 注册4个中断*/
	for (i = 0; i < 4; i++)
	{


		request_irq(pins_desc[i].irq, buttons_irq, IRQT_BOTHEDGE, pins_desc[i].name,&pins_desc[i]);
	}

	return 0;
}
分析一下:当调用input_register_device的时候dev和handler两者是否匹配?
对应的buttons_exit函数实现
static void buttons_exit(void)
{


	int i;
	for (i = 0; i < 4; i++)
	{


		free_irq(pins_desc[i].irq, &pins_desc[i]);//对应request_irq
	}
	del_timer(&buttons_timer);//对应add_timer
	input_unregister_device(buttons_dev);//对应input_register_device

	input_free_device(buttons_dev);	//对应input_allocate_device
}
- 构建包含四个按键的结构体
struct pin_desc{


	int irq;//中断号
	char *name;//名字
	unsigned int pin;//引脚号
	unsigned int key_val;//键值
};

struct pin_desc pins_desc[4] = {


	{

    IRQ_EINT0,  "S2", S3C2410_GPF0,   KEY_L},//S2按键对应L..
	{

    IRQ_EINT2,  "S3", S3C2410_GPF2,   KEY_S},
	{

    IRQ_EINT11, "S4", S3C2410_GPG3,   KEY_ENTER},
	{

    IRQ_EINT19, "S5",  S3C2410_GPG11, KEY_LEFTSHIFT},
};
- 中断服务程序
static struct pin_desc *irq_pd;
static struct timer_list buttons_timer;//定时器相关结构体

/*按键中断服务函数*/
static irqreturn_t buttons_irq(int irq, void *dev_id)
{


	/* 10ms后启动定时器 */
	irq_pd = (struct pin_desc *)dev_id;
	mod_timer(&buttons_timer, jiffies+HZ/100);
	return IRQ_RETVAL(IRQ_HANDLED);
}

/*定时器中断服务函数*/
static void buttons_timer_function(unsigned long data)
{


	struct pin_desc * pindesc = irq_pd;
	unsigned int pinval;

	if (!pindesc)
		return;

	pinval = s3c2410_gpio_getpin(pindesc->pin);

	if (pinval)
	{


		/*
			struct input_dev *dev, 设备
			unsigned int type, 表示支持哪类事件,键盘事件
			unsigned int code, 表示事件编码,KEY_L,KEY_S,KEY_ENTER,KEY_LEFTSHIFT
			int value,松开 : 最后一个参数: 0-松开, 1-按下 自己定义即可
		*/
		input_event(buttons_dev, EV_KEY, pindesc->key_val, 0);
		/*
		*/
		input_sync(buttons_dev);
	}
	else
	{


		/* 按下 */
		input_event(buttons_dev, EV_KEY, pindesc->key_val, 1);
		input_sync(buttons_dev);
	}
}
工作流程:
初始化完成->
按键按下->
触发中断程序buttons_irq->
修改定时器,10ms后触发定时器中断->
触发定时器中断程序buttons_timer_function->
读取引脚值:按下/松开->
若按下:上报事件input_event
4.分析上报事件后面流程
- input_event函数:(上一篇分析过)
void input_event(struct input_dev *dev, unsigned int type, unsigned int code, int value)
{


	struct input_handle *handle;
	...
	/* 通过input_dev ->h_list链表找到input_handle驱动处理结构体*/
	list_for_each_entry(handle, &dev->h_list, d_node);
	if (handle->open)
		handle->handler->event(handle, type, code, value);
}
- 相对于之前的我们需要自己构造驱动程序的完整结构,现在输入子系统已经构造完成file_operations还有相关函数。我们只需要完成硬件这部分即可!
static const struct file_operations evdev_fops = {


	.owner =	THIS_MODULE,
	.read =		evdev_read,
	.write =	evdev_write,
	.poll =		evdev_poll,
	.open =		evdev_open,
	.release =	evdev_release,
	.unlocked_ioctl = evdev_ioctl,
#ifdef CONFIG_COMPAT
	.compat_ioctl =	evdev_ioctl_compat,
#endif
	.fasync =	evdev_fasync,
	.flush =	evdev_flush
};
5.试验
- 修改makefile:
- 装载驱动程序:
insmod buttons.ko - ls -l /dev/event*

主设备号:13;次设备号:65;名字:event1
static int evdev_connect(struct input_handler *handler, struct input_dev *dev,
			 const struct input_device_id *id)
{


	evdev->exist = 1;
	evdev->minor = minor;
	evdev->handle.dev = dev;
	evdev->handle.name = evdev->name;
	evdev->handle.handler = handler;
	evdev->handle.private = evdev;
	sprintf(evdev->name, "event%d", minor);//设备名 event1

	evdev_table[minor] = evdev;

	//EVDEV_MINOR_BASE=64 次设备号 64+1=65
	//INPUT_MAJOR=13 主设备号13
	devt = MKDEV(INPUT_MAJOR, EVDEV_MINOR_BASE + minor),
	cdev = class_device_create(&input_class, &dev->cdev, devt,dev->cdev.dev, evdev->name);
}
- 测试命令-方法1:
hexdump /dev/event1;
功能:1.open(/dev/event1);2.read();3.把里面读到的数据用16进制显示出来
行号------------秒-----------微秒-------类—code—value
0000000-0bb2 0000-0e48 000c-0001-0026-0001 0000
0000010-0bb2 0000-0e54 000c-0000-0000-0000 0000
0000020-0bb2 0000-5815 000e-0001-0026-0000 0000
0000030-0bb2 0000-581f 000e-0000-0000-0000 0000
static void buttons_timer_function(unsigned long data)
{


	struct pin_desc * pindesc = irq_pd;
	unsigned int pinval;

	if (!pindesc)
		return;

	pinval = s3c2410_gpio_getpin(pindesc->pin);

	if (pinval)
	{


		/* 松开 : 最后一个参数: 0-松开, 1-按下 */
		/*
			type=EV_KEY=0x01;
			code=pindesc->key_val=38/31/28/42=0x26/0x...;
			value=0;
		*/
		input_event(buttons_dev, EV_KEY, pindesc->key_val, 0);
		input_sync(buttons_dev);
	}
	else
	{


		/* 按下 */
		input_event(buttons_dev, EV_KEY, pindesc->key_val, 1);
		input_sync(buttons_dev);
	}
}
- 测试命令-方法2
如果没有启动QT:
cat /dev/tty1 按:s2,s3,s4 就可以得到ls
或者:
exec 0</dev/tty1
关于exec 0</dev/tty1的解释如下:
关于标准输入输出错误:
# ls -l /proc/770/fd #770表示shell
lrwx------    1 0        0              64 Jan  1 00:03 0 -> /dev/s3c2410_serial0 #标准输入是串口
lrwx------    1 0        0              64 Jan  1 00:03 1 -> /dev/s3c2410_serial0 #标准输出是串口
lrwx------    1 0        0              64 Jan  1 00:03 10 -> /dev/tty
lrwx------    1 0        0              64 Jan  1 00:03 2 -> /dev/s3c2410_serial0 #标准错误是串口
exec 0</dev/tty1:表示将/dev/tty1的输入即键盘上的输入作为标准输入。之前是从串口上得到的输入,现在改为从键盘上得到输入。
如果已经启动了QT:
可以点开记事本然后按:s2,s3,s4
为什么启动QT后使用cat /dev/tty1 命令不能达到预期效果呢?
因为这时候执行上述指令通过tty_io.c->keyboard.c程序。keyboard.c也属于输入子系统框架,不是从buttons.c进来。
参见《韦东山第2期驱动大全-002_输入子系统_第13课第2节 keyboard.xmind》

-
测试命令-方法3
exec 0</dev/tty1-表示将/dev/tty1的输入即键盘上的输入作为标准输入
之前是从串口上得到的输入,现在改为从键盘上得到输入。 -
按下按键不松开,如何实现重复输入呢?
static int buttons_init(void)
{


	...
	/* 2. 设置 */
	/* 2.1 能产生哪类事件 */
	set_bit(EV_KEY, buttons_dev->evbit);//按键类事件
	set_bit(EV_REP, buttons_dev->evbit);//重复类事件
	...
}
此时,连续按下键盘时,调用input_event()
参见《韦东山第2期驱动大全-002_输入子系统_第13课第2节 键盘重复输入》