实验名称:搭建ELK日志分析服务器
实验要求:搭建ELK日志分析系统并进行验证
实验环境:
一台centos7操作系统虚拟机,IP地址192.168.22.100,CUP核心数2,4G运行内存,作为ELK主服务器;
一台cnetos7操作系统虚拟机,IP地址192.168.22.110,CUP核心数2,4G运行内存,作为ELK从服务器;
一台centos7操作系统虚拟机,IP地址192.168.22.120,CUP核心数2,4G运行内存,作为客户端来进行验证
实验所用程序(百度网盘)
链接:https://pan.baidu.com/s/1IYhNm_3-nJDvsYNb6IDFlQ
提取码:bg2t
实验步骤:
1,准备实验环境
进入主服务器
[root@localhost ~]# vim /etc/hostname 							#更改主机名称
elk1.server.org
[root@localhost ~]# vim /etc/hosts									#书写hosts缓存文件
192.168.22.100  elk1    elk1.server.org							#ELK主服务器IP和域名
192.168.22.110  elk2    elk2.server.org							#ELK从服务器IP和域名
[root@localhost ~]# vim /etc/selinux/config 					#更改沙河安全等级
SELINUX=permissive														#改为允许
[root@localhost ~]# vim /etc/security/limits.conf 			#配置Linux资源使用配置文件
*       soft    nofile  65536													#设置单用户可打开的最大文件数量(软限制)
*       hard    nofile  131072												#设置单用户可打开的最大文件数量(硬限制)
*       soft    nproc   4096													#设置单用户可使用的最大进程数量(软限制)
*       hard    nproc   8192												#设置单用户可使用的最大进程数量(硬限制)
*       soft    memlock unlimited										#设置最大内存空间(软限制),unlimited无限空间
*       hard    memlock unlimited										#设置最大内存空间(硬限制),unlimited无限空间
[root@elk1 ~]# rz															#上传java11安装包

[root@elk1 ~]# ls
anaconda-ks.cfg              Pictures
Desktop                      Public
Documents                    sgid.20201117
Downloads                    suid.20201117
initial-setup-ks.cfg         Templates
jdk-11_linux-x64_bin.tar.gz  Videos
Music
[root@elk1 ~]# tar -zxf jdk-11_linux-x64_bin.tar.gz 	#解压安装包
[root@elk1 ~]# mv jdk-11 /usr/local/jdk11					#移动Java包,并更改名称方便使用
[root@elk1 ~]# vim /etc/profile									#进入全局配置文件,添加java环境
export JAVA_HOME=/usr/local/jdk11
export CLASSPATH=.:$JAVA_HOME/lib/dt.jar:$JAVA_HOME/lib/tools.jar
export PATH=$JAVA_HOME/bin:$PATH
[root@elk1 ~]# . /etc/profile											#立即生效
[root@elk1 ~]# java -version										#查看java环境是否配置成功
java version "11" 2018-09-25
Java(TM) SE Runtime Environment 18.9 (build 11+28)
Java HotSpot(TM) 64-Bit Server VM 18.9 (build 11+28, mixed mode)
[root@elk1 ~]# reboot													#重启虚拟机,使配置生效
2,安装elasticsearch搜索引擎
[root@elk1 ~]# rz #上传elasticsearch安装包
[root@elk1 ~]# ls
anaconda-ks.cfg
Desktop
Documents
Downloads
elasticsearch-7.6.0-x86_64.rpm
initial-setup-ks.cfg
jdk-11_linux-x64_bin.tar.gz
Music
Pictures
Public
Templates
Videos
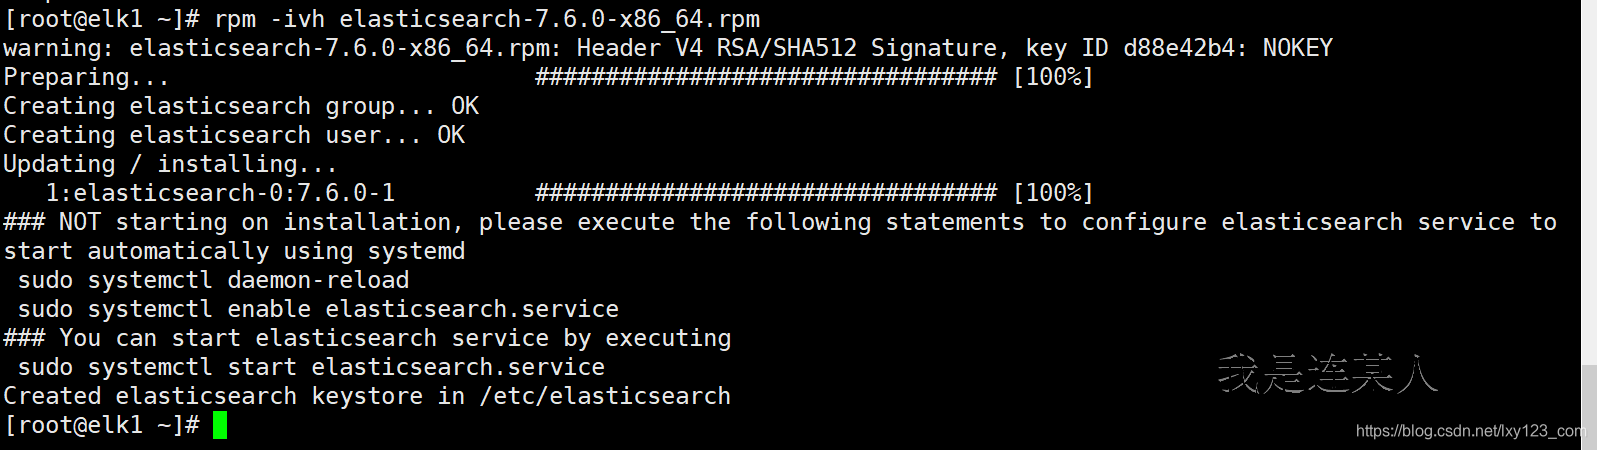
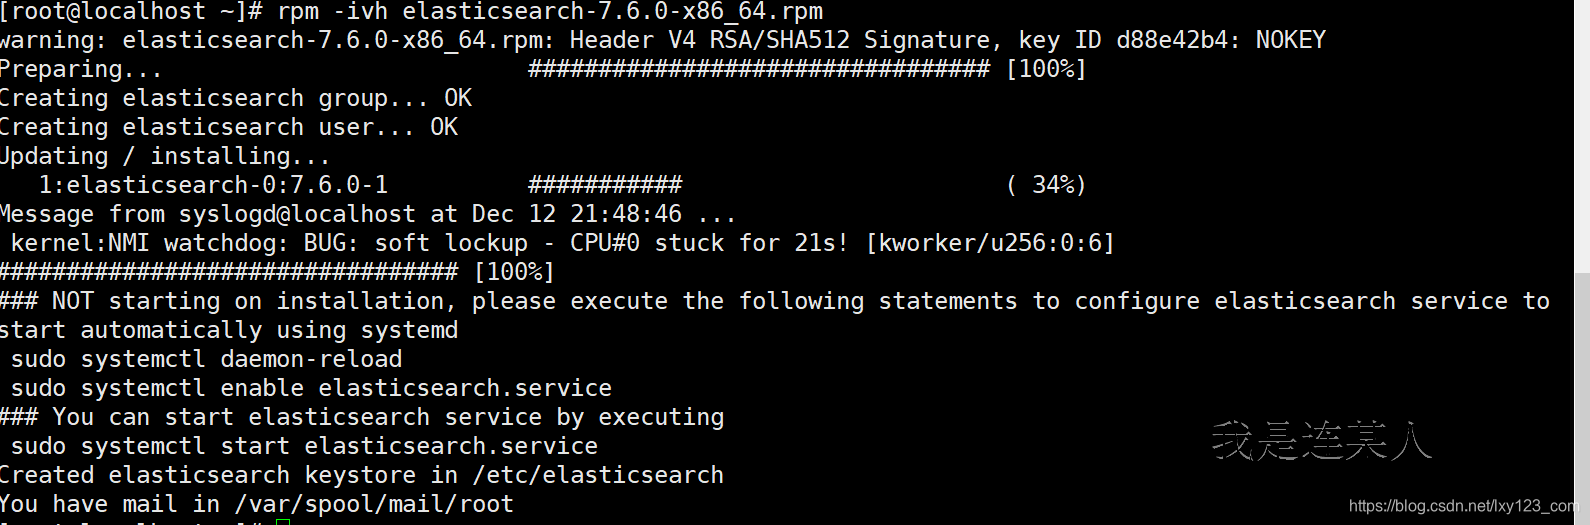
[root@elk1 ~]# rpm -ivh elasticsearch-7.6.0-x86_64.rpm #使用rpm安装
[root@elk1 ~]# mkdir /var/es-data								#创建elasticsearch的数据存放目录
[root@elk1 ~]# chown -R elasticsearch:elasticsearch /var/es-data   					#修改属主属组
[root@elk1 ~]# chown -R elasticsearch:elasticsearch /var/log/elasticsearch/	#修改属主属组
[root@elk1 ~]# vim /etc/elasticsearch/elasticsearch.yml 									#修改elasticsearch的配置文件
cluster.name: my-elk																							#设置群集名称
node.name: elk1																									#设置节点名称
node.master: true																								#当前主机为主节点
node.data: true																									#数据节点
path.data: /var/es-data																						#指定数据存放目录
path.logs: /var/log/elasticsearch																			#指定logs日志的路径
bootstrap.memory_lock: true																				#内存使用交换分区
network.host: 0.0.0.0																							#监听的地址
http.port: 9200																										#开启监听的端口
cluster.initial_master_nodes: ["elk1"]																	#群集主节点名称
discovery.zen.ping.unicast.hosts: ["elk1","elk2"]													#单播通信的节点名称
http.cors.enabled: true																						#
http.cors.allow-origin: "*"																						#使head插件可访问
[root@elk1 ~]# vim /usr/lib/systemd/system/elasticsearch.service 					#添加配置
LimitMEMLOCK=infinity
[root@elk1 ~]# systemctl daemon-reload 															#读取配置
[root@elk1 ~]# systemctl start elasticsearch.service 											#开启elasticsearch引擎
[root@elk1 ~]# systemctl stop firewalld																关闭防火墙方便验证
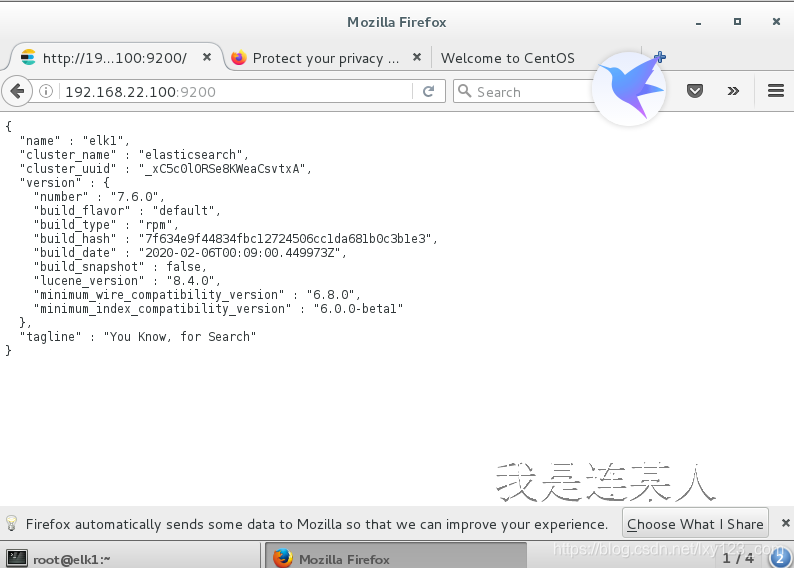
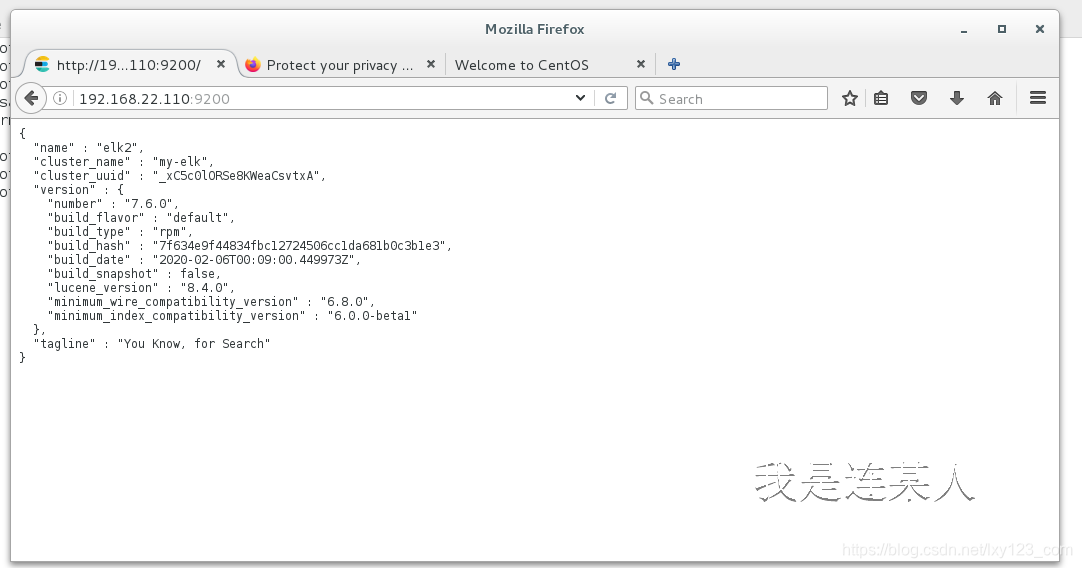
本机访问,查看群集节点是否成功开启
3,配置从服务器
准备从服务器实验环境
[root@localhost ~]# vim /etc/hostname 															#修改主机名
elk2.server.org
[root@localhost ~]# vim /etc/hosts																	#修改hosts缓存文件
192.168.22.100  elk1    elk1.server.org
192.168.22.110  elk2    elk2.server.org
[root@localhost ~]# vim /etc/selinux/config 													#更改沙河安全等级
SELINUX=permissive
[root@localhost ~]# vim /etc/security/limits.conf 											#配置Linux资源使用配置文件
*       soft    nofile  65536
*       hard    nofile  131072
*       soft    nproc   4096
*       hard    nproc   8192
*       soft    memlock unlimited
*       hard    memlock unlimited
[root@localhost ~]# rz																						#上传java安装包

[root@localhost ~]# ls
anaconda-ks.cfg  initial-setup-ks.cfg         Public
Desktop          jdk-11_linux-x64_bin.tar.gz  Templates
Documents        Music                        Videos
Downloads        Pictures
[root@localhost ~]# tar -zxf jdk-11_linux-x64_bin.tar.gz  								#解压java安装包
[root@localhost ~]# mv jdk-11 /usr/local/jdk11												#移动并更改java包名称
[root@localhost ~]# vim /etc/profile																	#添加java环境
export JAVA_HOME=/usr/local/jdk11
export CLASSPATH=.:$JAVA_HOME/lib/dt.jar:$JAVA_HOME/lib/tools.jar
export PATH=$JAVA_HOME/bin:$PATH
[root@localhost ~]# . /etc/profile																		#立即生效
[root@localhost ~]# java -version																	#查看java是否配置成功
java version "11" 2018-09-25
Java(TM) SE Runtime Environment 18.9 (build 11+28)
Java HotSpot(TM) 64-Bit Server VM 18.9 (build 11+28, mixed mode)
[root@localhost ~]# reboot																			#重启,使配置生效
4,安装elasticsearch
[root@localhost ~]# rz 																				#上传elasticsearch
[root@localhost ~]# rpm -ivh elasticsearch-7.6.0-x86_64.rpm 					#使用rpm进行安装
[root@elk2 ~]# mkdir /var/es-data														#创建数据存放目录
[root@elk2 ~]# chown -R elasticsearch:elasticsearch /var/es-data/		#修改属主属组
[root@elk2 ~]# chown -R elasticsearch:elasticsearch /var/log/elasticsearch/		#修改属主属组
[root@elk2 ~]# vim /etc/elasticsearch/elasticsearch.yml 						#更改配置
cluster.name: my-elk
node.name: elk2																							#更改节点名称
node.master: true
node.data: true
path.data: /var/es-data
path.logs: /var/log/elasticsearch
bootstrap.memory_lock: true
network.host: 0.0.0.0
http.port: 9200
cluster.initial_master_nodes: ["elk1"]
discovery.zen.ping.unicast.hosts: ["elk1","elk2"]
http.cors.enabled: true
http.cors.allow-origin: "*"
[root@elk2 ~]# vim /usr/lib/systemd/system/elasticsearch.service 		#修改配置文件
LimitMEMLOCK=infinity
[root@elk2 ~]# systemctl daemon-reload 												#读取配置
[root@elk2 ~]# systemctl stop firewalld													#关闭防火墙
[root@elk2 ~]# systemctl start elasticsearch.service								#启动elasticsearch
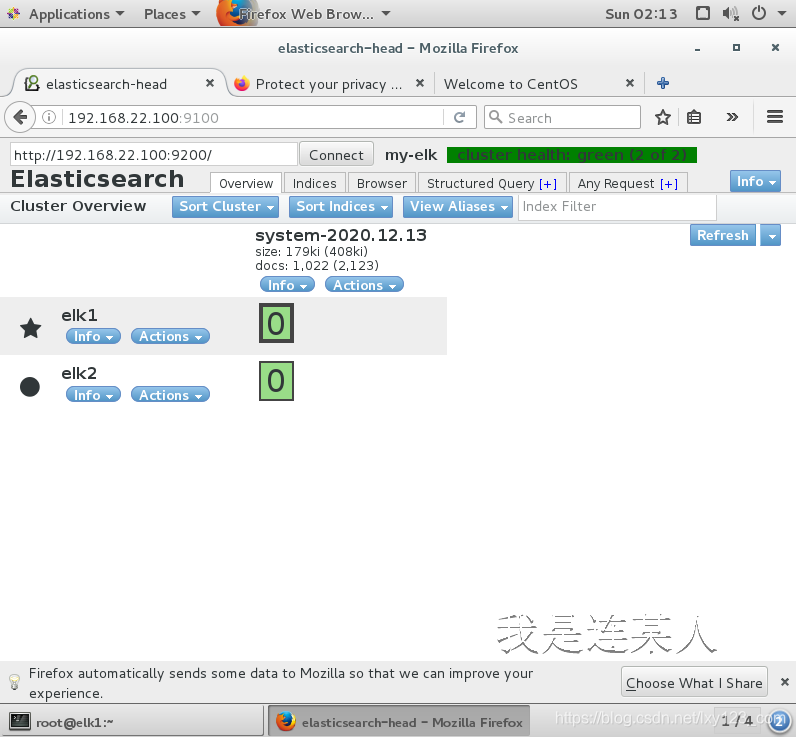
访问验证群集节点是否开启
5,主服务器安装head插件
先配置yum
[root@elk1 ~]# cd /etc/yum.repos.d/
[root@elk1 yum.repos.d]# ls
CentOS-Base.repo       CentOS-Media.repo
CentOS-CR.repo         CentOS-Sources.repo
CentOS-Debuginfo.repo  CentOS-Vault.repo
CentOS-fasttrack.repo
[root@elk1 yum.repos.d]# mkdir yum.repos.d.bak								#创建yum备份目录
[root@elk1 yum.repos.d]# mv C* yum.repos.d.bak/							#移动备份
[root@elk1 yum.repos.d]# vim yum.repo											#配置网络源yum
#CentOS-Base.repo
#
#The mirror system uses the connecting IP address of the client and the
#update status of each mirror to pick mirrors that are updated to and
#geographically close to the client.  You should use this for CentOS updates
#unless you are manually picking other mirrors.
#
#If the mirrorlist= does not work for you, as a fall back you can try the
#remarked out baseurl= line instead.
#
#

[base]
name=CentOS-$releasever - Base
baseurl=https://mirrors.tuna.tsinghua.edu.cn/centos/$releasever/os/$basearch/
#mirrorlist=http://mirrorlist.centos.org/?release=$releasever&arch=$basearch&repo=os
gpgcheck=1
gpgkey=file:///etc/pki/rpm-gpg/RPM-GPG-KEY-CentOS-7

#released updates
[updates]
name=CentOS-$releasever - Updates
baseurl=https://mirrors.tuna.tsinghua.edu.cn/centos/$releasever/updates/$basearch/
#mirrorlist=http://mirrorlist.centos.org/?release=$releasever&arch=$basearch&repo=updates
gpgcheck=1
gpgkey=file:///etc/pki/rpm-gpg/RPM-GPG-KEY-CentOS-7

#additional packages that may be useful
[extras]
name=CentOS-$releasever - Extras
baseurl=https://mirrors.tuna.tsinghua.edu.cn/centos/$releasever/extras/$basearch/
#mirrorlist=http://mirrorlist.centos.org/?release=$releasever&arch=$basearch&repo=extras
gpgcheck=1
gpgkey=file:///etc/pki/rpm-gpg/RPM-GPG-KEY-CentOS-7

#additional packages that extend functionality of existing packages
[centosplus]
name=CentOS-$releasever - Plus
baseurl=https://mirrors.tuna.tsinghua.edu.cn/centos/$releasever/centosplus/$basearch/
#mirrorlist=http://mirrorlist.centos.org/?release=$releasever&arch=$basearch&repo=centosplus
gpgcheck=1
enabled=0
gpgkey=file:///etc/pki/rpm-gpg/RPM-GPG-KEY-CentOS-7
[root@elk1 yum.repos.d]# yum clean all										#清除yum缓存
Loaded plugins: fastestmirror, langpacks
Cleaning repos: base extras updates
Cleaning up everything
Cleaning up list of fastest mirrors
[root@elk1 yum.repos.d]# yum makecache 							#加载数据
Loaded plugins: fastestmirror, langpacks
base                              | 3.6 kB     00:00
extras                            | 2.9 kB     00:00
updates                           | 2.9 kB     00:00
(1/10): base/7/x86_64/group_gz      | 153 kB   00:00
(2/10): base/7/x86_64/primary_db    | 6.1 MB   00:00
(3/10): base/7/x86_64/other_db      | 2.6 MB   00:00
(4/10): extras/7/x86_64/filelists_d | 224 kB   00:00
(5/10): extras/7/x86_64/other_db    | 134 kB   00:00
(6/10): updates/7/x86_64/filelists_ | 2.1 MB   00:00
(7/10): updates/7/x86_64/other_db   | 226 kB   00:00
(8/10): updates/7/x86_64/primary_db | 3.7 MB   00:00
(9/10): base/7/x86_64/filelists_db  | 7.2 MB   00:06
(10/10): extras/7/x86_64/primary_db | 222 kB   00:06
Determining fastest mirrors
Metadata Cache Created
[root@elk1 yum.repos.d]# yum -y install yum-utils							#安装yum扩展程序
安装head插件
[root@elk1 yum.repos.d]# yum -y install epel-release      #安装
[root@elk1 ~]# rz															#上传phantomjs和node

[root@elk1 ~]# tar -jxf phantomjs-2.1.1-linux-x86_64.tar.bz2 	#解压
[root@elk1 ~]# mv phantomjs-2.1.1-linux-x86_64 /usr/local/phantomjs			#移动更名
[root@elk1 ~]# ln -s /usr/local/phantomjs/bin/phantomjs /usr/bin/					#路径优化
[root@elk1 ~]# phantomjs --version																#检查是否安装成功
2.1.1
[root@elk1 ~]# tar -zxf node-v13.8.0-linux-x64.tar.gz 									#解压
[root@elk1 ~]# mv node-v13.8.0-linux-x64 /usr/local/node13.8						#移动更改名称
[root@elk1 ~]# vim /etc/profile																		#加入全局配置
export NODE_HOME=/usr/local/node13.8
export PATH=$PATH:$NODE_HOME/bin
[root@elk1 ~]# . /etc/profile																				#立即生效
[root@elk1 ~]# yum -y install git																		#安装git
[root@elk1 ~]# git clone https://github.com/mobz/elasticsearch-head.git		#使用git下载head项目

[root@elk1 ~]# mv elasticsearch-head/ /opt/ #移动项目目录
[root@elk1 ~]# cd /opt/elasticsearch-head/
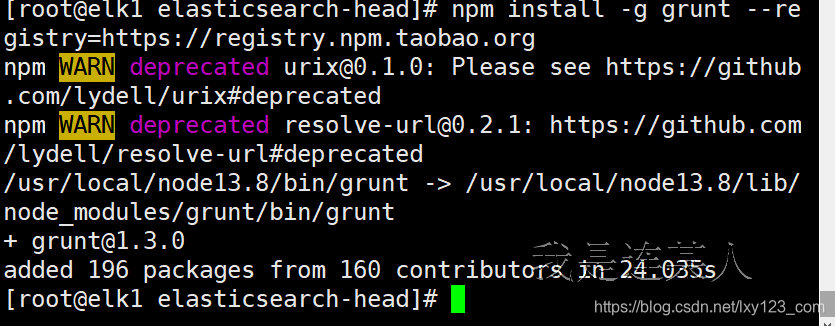
[root@elk1 elasticsearch-head]# npm install -g grunt --registry=https://registry.npm.taobao.org #安装grunt
[root@elk1 elasticsearch-head]# npm config set registry https://registry.npm.taobao.org
[root@elk1 elasticsearch-head]# npm install								#安装插件
部署群集
[root@elk1 elasticsearch-head]# vim Gruntfile.js 						#编辑文件配置
                connect: {
                        server: {
                                options: {
                                        hostname: '192.168.22.100',					#找到此处,添加IP
                                        port: 9100,
                                        base: '.',
                                        keepalive: true
                                }
                        }
                }
[root@elk1 elasticsearch-head]# vim _site/app.js 						#更改配置
                init: function(parent) {
                        this._super();
                        this.prefs = services.Preferences.instance();
                        this.base_uri = this.config.base_uri || this.prefs.get("app-base_uri") ||       "http://192.168.22.100:9200";														#找到此行,修改IP地址
[root@elk1 elasticsearch-head]# npm run start &						#后台启动head插件
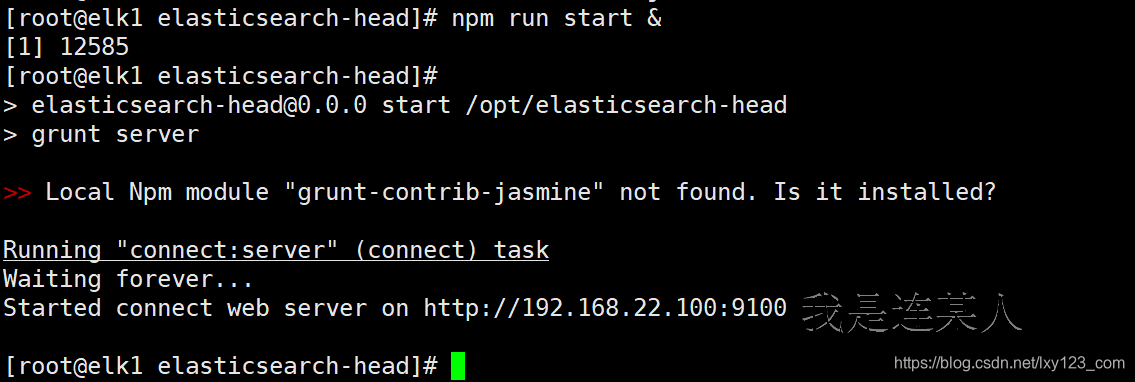
访问验证,集群是否部署成功

6,安装logstash,kibana,filebeat
[root@elk1 elasticsearch-head]# cd
[root@elk1 ~]# rz															#上传logstash,kibana,filebeat

[root@elk1 ~]# rpm -ivh logstash-7.6.0.rpm 					#使用rpm安装logstash
[root@elk1 ~]# vim /etc/logstash/logstash.yml 				#编辑,指定logstash配置文件位置
path.config: /etc/logstash/conf.d/*.conf
[root@elk1 ~]# vim /etc/logstash/conf.d/system.conf		#编辑日志输入和输出配置,手动添加
input {
        file {
                path => "/var/log/messages"
                type => "system"
                start_position => "beginning"
        }
}
output {
        elasticsearch {
                hosts => ["192.168.22.100:9200"]
                index => "system-%{+YYYY.MM.dd}"
        }
}
[root@elk1 ~]# ln -s /etc/logstash/ /usr/share/logstash/config		#建立软链接
[root@elk1 ~]# chmod +r /var/log/messages 									#添加所以用户的可读权限
[root@elk1 ~]# ll /var/log/messages 												#查看权限是否正常
-rw-r--r--. 1 root root 797627 Dec 13 02:01 /var/log/messages
[root@elk1 ~]# systemctl enable logstash										#激活logstash
logstash.service is not a native service, redirecting to /sbin/chkconfig. Executing /sbin/chkconfig logstash on
[root@elk1 ~]# systemctl start logstash											#开启logstash
刷新页面,查看日志
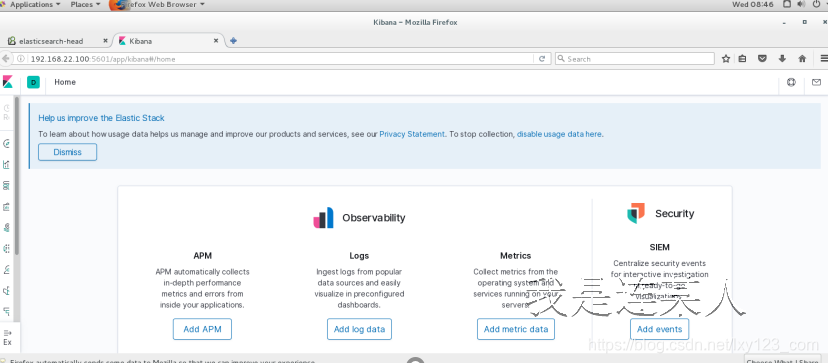
安装kibana
[root@elk1 ~]# rpm -ivh kibana-7.6.0-x86_64.rpm 	#使用rpm安装kibana
[root@elk1 ~]# vim /etc/kibana/kibana.yml 			#进行配置jibana
server.port: 5601														#找到此行,删除#号取消注释
server.host: "0.0.0.0"												#找到此行,删除#号取消注释,进行修改
elasticsearch.hosts: ["http://127.0.0.1:9200"]			#找到此行,删除#号取消注释,进行修改
kibana.index: ".kibana"											#找到此行,删除#号取消注释
[root@elk1 ~]# systemctl enable kibana					#激活kibana
Created symlink from /etc/systemd/system/multi-user.target.wants/kibana.service to /etc/systemd/system/kibana.service.
[root@elk1 ~]# systemctl start kibana						#开启kibana
安装filebeat
[root@elk1 ~]# rpm -ivh filebeat-7.6.0-x86_64.rpm  #使用rpm安装filebeat
[root@elk1 ~]# vim /etc/filebeat/filebeat.yml 			#编辑
output.elasticsearch:
  # Array of hosts to connect to.
  hosts: ["127.0.0.1:9200"]										#找到此处,进行更改

etup.kibana:															#找到此处,在下行添加host IP
        host: "127.0.0.1:5601"
[root@elk1 ~]# filebeat modules enable elasticsearch    #启用
Enabled elasticsearch
[root@elk1 ~]# filebeat setup
[root@elk1 ~]# systemctl start filebeat					#启动filebeat
7,客户机日志输出
[root@localhost ~]# rz #上传ogstash
配置本地yum,安装httpd程序
[root@localhost ~]# cd /etc/yum.repos.d/
[root@localhost yum.repos.d]# ls
CentOS-Base.repo CentOS-Media.repo
CentOS-CR.repo CentOS-Sources.repo
CentOS-Debuginfo.repo CentOS-Vault.repo
CentOS-fasttrack.repo
[root@localhost yum.repos.d]# mkdir yum.repos.d.bak #创建备份目录
[root@localhost yum.repos.d]# mv C* yum.repos.d.bak/ #移动备份
[root@localhost yum.repos.d]# ls
yum.repos.d.bak
[root@localhost yum.repos.d]# vi yum.repo #配置本地yum
[yum]
name=yum
baseurl=file:///media
enabled=1
gpgcheck=0
[root@localhost yum.repos.d]# mount /dev/cdrom /media #挂载光盘
mount: /dev/sr0 is write-protected, mounting read-only
[root@localhost yum.repos.d]# yum -y install httpd #安装httpd服务
[root@localhost yum.repos.d]# systemctl enable httpd #激活httpd
Created symlink from /etc/systemd/system/multi-user.target.wants/httpd.service to /usr/lib/systemd/system/httpd.service.
[root@localhost yum.repos.d]# systemctl start httpd #启动httpd服务
[root@localhost yum.repos.d]# cd
[root@localhost ~]# rpm -ivh logstash-7.6.0.rpm #安装logstash
[root@localhost ~]# ln -s /etc/logstash/ /usr/share/logstash/config #建立软链接
[root@localhost ~]# vim /etc/logstash/logstash.yml #配置,指定conf文件路径
path.config: /etc/logstash/conf.d/*.conf
[root@localhost ~]# vim /etc/logstash/conf.d/apache-access.conf #配置正确日志
input {
file {
path => "/var/log/httpd/access_log"
type => "apache_access"
start_position => "beginning"
}
}
output {
elasticsearch {
action => "index"
hosts => ["192.168.22.100:9200"]
index => "apache_access-%{+YYYY.MM.dd}"
}
}
[root@localhost ~]# vim /etc/logstash/conf.d/apache-error.conf #配置错误日志
input {
file {
path => "/etc/httpd/logs/error_log"
type => "apache_error"
start_position => "beginning"
}
}
output {
elasticsearch {
action => "index"
hosts => ["192.168.22.100:9200"]
index => "apache_error-%{+YYYY.MM.dd}"
}
}
[root@localhost ~]# chmod -R +r /var/log/httpd/ #添加可读权限
[root@localhost ~]# systemctl enable logstash #激活logstash
Created symlink from /etc/systemd/system/multi-user.target.wants/logstash.service to /etc/systemd/system/logstash.service.
[root@localhost ~]# systemctl start logstash #开启logstash
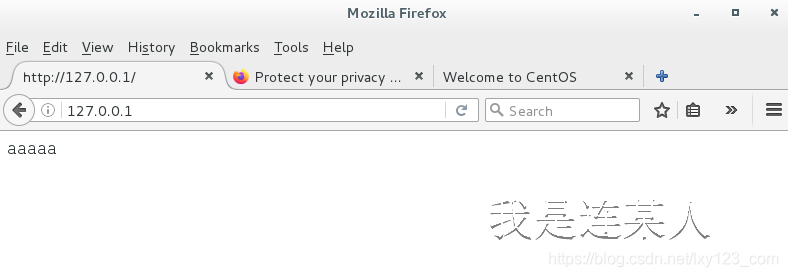
[root@localhost ~]# echo "aaaaa" >> /var/www/html/index.html #书写测试网页
客户机访问,产生日志
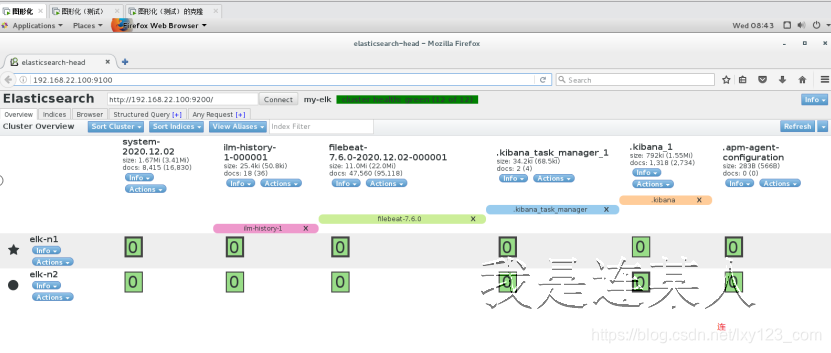
刷新主服务器页面,查看新生成的日志
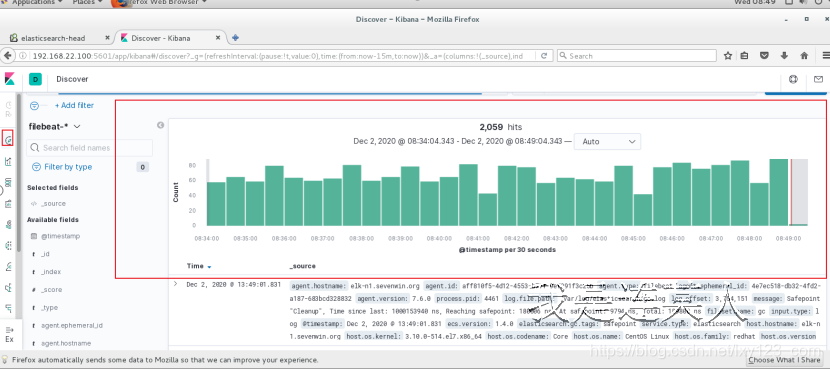
查看 kibana页面