1、插入数据
public static void putData(String tableName, String rk, String cf, String cn, String value) throws IOException {
        //1、获取表对象
        Table table = connection.getTable(TableName.valueOf(tableName));

        //2、创建put对象
        Put put = new Put(Bytes.toBytes(rk));

        //3、给put对象赋值:byte [] family, byte [] qualifier, byte [] value
        put.addColumn(Bytes.toBytes(cf), Bytes.toBytes(cn), Bytes.toBytes(value));

        //4、插入数据
        table.put(put);

        //5、关闭表连接
        table.close();
        /*
        * 若要put多个对象有两种方法
        * 1、put.addColumn时多put是可以创建多个对象的
        * 2、设置多个put,插入是插入put的列表
        * */
    }
需要注意的地方有3个:
①:要创建对象需要对表进行修改,就不能用admin了,需要用connection得到table对象对表进行操作
②:要插入数据需要put对象,而put对象需要的值都要是byte[]类型的,所以需要使用HBase提供的工具类Bytes进行类型转换
③:这里不统一关闭资源的原因是,每次操作的表对象可能不同,所以每次使用完都需要关闭资源
测试:
public static void main(String[] args) throws IOException {
        putData("stu2", "1001", "info1", "age", "19");
    }
结果:


插入成功
2、get表中的数据
public static void getData(String tableName, String rk, String cf, String cn) throws IOException {
        //创建表最少要有一个rowkey
        //1、创建表对象
        Table table = connection.getTable(TableName.valueOf(tableName));
        //2、创建get对象
        Get get = new Get(Bytes.toBytes(rk));
        //3.1、给get设置指定列族和列
        get.addColumn(Bytes.toBytes(cf), Bytes.toBytes(cn));
        //3.2、给get设置指定列族
//        get.addFamily(Bytes.toBytes(cf));
        //4、将get对象传给table,获取result对象
        Result results = table.get(get);
        //5、打印所需要的值
        for(Cell cell : results.rawCells()){
            System.out.println("CF:" + Bytes.toString(CellUtil.cloneFamily(cell)) +
                ",CN:" + Bytes.toString(CellUtil.cloneQualifier(cell)) +
                ",Value:" + Bytes.toString(CellUtil.cloneValue(cell)));
        }
        //6、关闭table
        table.close();
    }

    public static void main(String[] args) throws IOException {
        getData("stu2", "1001", "info1", "age");
    }
需要注意的地方有,这里table.get得到的是result对象,要通过for循环将需要显示的值打印出来,这里用到了CellUtil工具类
结果:

3、scan表中的数据
这里为了方便演示,我多插入了一些数据
hbase(main):011:0> put 'stu2','1001','info1:name','wangwu'
0 row(s) in 0.3650 seconds

hbase(main):012:0> put 'stu2','1002','info1:name','lisi'
0 row(s) in 0.0050 seconds

hbase(main):013:0> put 'stu2','1003','info1:age','20'
0 row(s) in 0.0060 seconds

hbase(main):014:0> put 'stu2','1001','info2:gender','mail'
0 row(s) in 0.3940 seconds

hbase(main):015:0> put 'stu2','1004','info2:gender','femail'
0 row(s) in 0.1180 seconds

hbase(main):016:0> scan 'stu2'
ROW                                         COLUMN+CELL
 1001                                       column=info1:age, timestamp=1603271533575, value=19
 1001                                       column=info1:name, timestamp=1603272173139, value=wangwu
 1001                                       column=info2:gender, timestamp=1603272222751, value=mail
 1002                                       column=info1:name, timestamp=1603272186813, value=lisi
 1003                                       column=info1:age, timestamp=1603272200613, value=20
 1004                                       column=info2:gender, timestamp=1603272235793, value=femail
①扫描全表:
 public static void scanData(String tableName, String startRow, String stopRow) throws IOException {
        //1、创建表对象
        Table table = connection.getTable(TableName.valueOf(tableName));
        //2、创建scan对象
        //2.1、扫描全表
        Scan scan = new Scan();
        //2.2、扫描范围内的列(左闭右开)
//        Scan scan = new Scan(Bytes.toBytes(startRow), Bytes.toBytes(stopRow));
        //3、扫描表
        ResultScanner resultScanner = table.getScanner(scan);
        //4、解析resultScanner并打印
        for (Result result : resultScanner){
            //5、解析result
            for (Cell cell : result.rawCells()){
                //6、打印数据
                System.out.println("RK:" + Bytes.toString(CellUtil.cloneRow(cell)) +
                    ",CF:" + Bytes.toString(CellUtil.cloneFamily(cell)) +
                    ",CN:" + Bytes.toString(CellUtil.cloneQualifier(cell)) +
                    ",Value:" + Bytes.toString(CellUtil.cloneValue(cell)));
            }
        }
        //7、关闭资源
        table.close();
    }

    public static void main(String[] args) throws IOException {
        scanData("stu2", "1001", "1003");
    }
结果:

②扫描部分列:
Scan scan = new Scan(Bytes.toBytes(startRow), Bytes.toBytes(stopRow));结果:

4、delete数据
public static void deleteData(String tableName, String rk, String cf, String cn, long TS) throws IOException {
        //1、创建表对象
        Table table = connection.getTable(TableName.valueOf(tableName));
        //2、创建delete对象
        Delete delete = new Delete(Bytes.toBytes(rk));
        //3、给delete对象赋值
        //3.1、删除指定cell,若加时间戳,则相当于插入了时间戳为设置的deletecolum标签,若不存在此时间戳也是如此
        delete.addColumn(Bytes.toBytes(cf), Bytes.toBytes(cn));
        //3.2、删除指定cell且将此cell的所有备份全部删除,若加时间戳,则删除小于该时间戳的数据
//        delete.addColumns(Bytes.toBytes(cf), Bytes.toBytes(cn));
        //3.3、删除指定列族
//        delete.addFamily(Bytes.toBytes(cf));
        //4、执行delete操作
        table.delete(delete);
        //5、关闭资源
        table.close();
    }

    public static void main(String[] args) throws IOException {
        deleteData("stu2", "1001", "info1", "age", 1561453);
    }
delete分为3个部分,一是删除指定元素,三是删除指定列族
插入了两个版本的数据:
hbase(main):018:0> put 'stu2','1001','info1:age','17'
0 row(s) in 0.0130 seconds

hbase(main):019:0> put 'stu2','1001','info1:name','xiaobai'
0 row(s) in 0.1160 seconds

hbase(main):020:0> scan 'stu2',{RAW=>true,VERSIONS=>10}
ROW                                         COLUMN+CELL
 1001                                       column=info1:age, timestamp=1603273541687, value=17
 1001                                       column=info1:age, timestamp=1603271533575, value=19
 1001                                       column=info1:name, timestamp=1603273571343, value=xiaobai
 1001                                       column=info1:name, timestamp=1603272173139, value=wangwu
 1001                                       column=info2:gender, timestamp=1603272222751, value=mail
 1002                                       column=info1:name, timestamp=1603272186813, value=lisi
 1003                                       column=info1:age, timestamp=1603272200613, value=20
 1004                                       column=info2:gender, timestamp=1603272235793, value=femail
4 row(s) in 0.0200 seconds
结果:

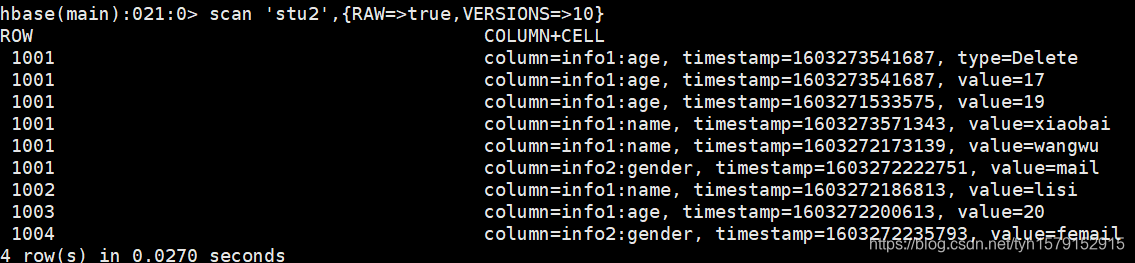
我们发现,只是删除了这个值,那么如何删除这个值的所有版本呢?
我们看看addColumns会如何:
delete.addColumns(Bytes.toBytes(cf), Bytes.toBytes(cn));

public static void main(String[] args) throws IOException {
    deleteData("stu2", "1001", "info1", "name", 1561453);
}
结果:

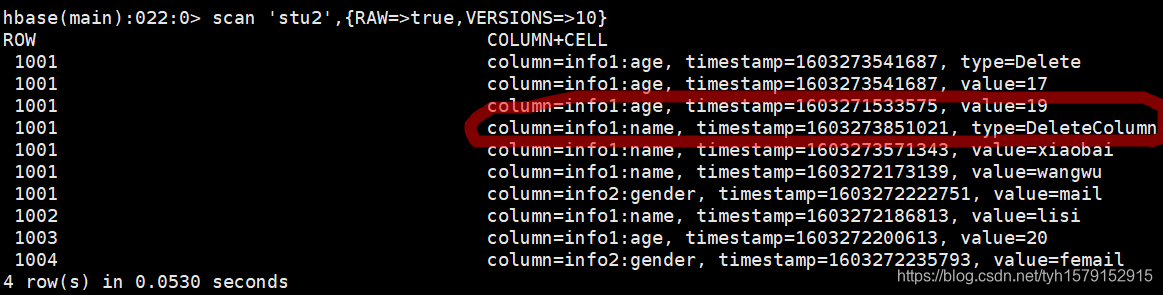
我们发现1001这个rowkey的info1的name这一列已经被打上删除标签了
最后:
delete.addFamily(Bytes.toBytes(cf));结果:
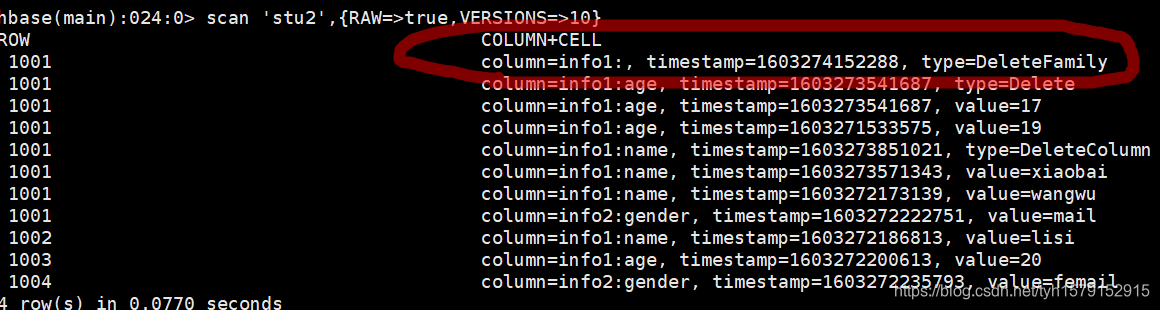
给info1列族加了一个DeleteFamily标签