数字签名
数字签名的方法
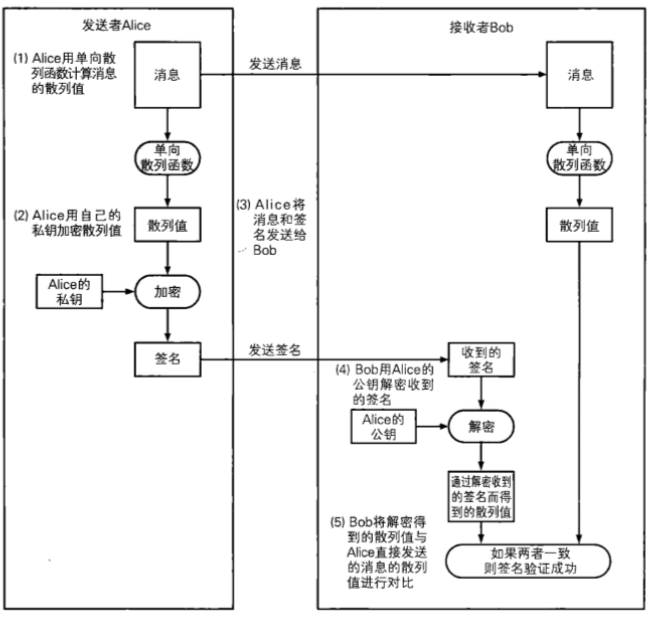
签名的生成和验证
- 签名
- 有原始数据对其进行哈希运算 -> 散列值
- 使用非对称加密的私钥对散列值加密 -> 签名
- 将原始数据和签名一并发送给对方
- 验证
- 接收数据
- 原始数据
- 数字签名
- 数字签名, 需要使用公钥解密, 得到散列值
- 对原始数据进行哈希运算得到新的散列值
非对称加密和数字签名
总结:
- 数据通信
- 公钥加密, 私钥解密
- 数字签名:
- 私钥加密, 公钥解密
使用RSA进行数字签名
-
使用rsa生成密钥对
- 生成密钥对
- 序列化
- 保存到磁盘文件
-
使用私钥进行数字签名
-
打开磁盘的私钥文件
-
将私钥文件中的内容读出
-
使用pem对数据解码, 得到了pem.Block结构体变量
-
x509将数据解析成私钥结构体 -> 得到了私钥
-
创建一个哈希对象 -> md5/sha1
-
给哈希对象添加数据
-
计算哈希值
-
使用rsa中的函数对散列值签名
func SignPKCS1v15(rand io.Reader, priv *PrivateKey, hash crypto.Hash, hashed []byte) (s []byte, err error)
参数1: rand.Reader
参数2: 非对称加密的私钥
参数3: 使用的哈希算法
	crypto.sha1
	crypto.md5
参数4: 数据计算之后得到的散列值
返回值:
- s: 得到的签名数据
- err: 错误信息
-
-
使用公钥进行签名认证
-
打开公钥文件, 将文件内容读出 - []byte
-
使用pem解码 -> 得到pem.Block结构体变量
-
使用x509对pem.Block中的Bytes变量中的数据进行解析 -> 得到一接口
-
进行类型断言 -> 得到了公钥结构体
-
对原始消息进行哈希运算(和签名使用的哈希算法一致) -> 散列值
- 创建哈希接口
- 添加数据
- 哈希运算
-
签名认证 - rsa中的函数
func VerifyPKCS1v15(pub *PublicKey, hash crypto.Hash, hashed []byte, sig []byte) (err error)
参数1: 公钥
参数2: 哈希算法 -> 与签名使用的哈希算法一致
参数3: 将原始数据进行哈希原始得到的散列值
参数4: 签名的字符串
返回值:
	- nil -> 验证成功
	- !=nil -> 失败
-
使用椭圆曲线进行数字签名
椭圆曲线在go中对应的包: import "crypto/elliptic"
使用椭圆曲线在go中进行数字签名: import "crypto/ecdsa"
美国FIPS186-2标准, 推荐使用5个素域上的椭圆曲线, 这5个素数模分别是:
P~192~ = 2^192^ - 2^64^ - 1
P~224~ = 2^224^ - 2^96^ + 1
P~256~ = 2^256^ - 2^224^ + 2^192^ - 2^96^ -1
P~384~ = 2^384^ - 2^128^ - 2^96^ + 2^32^ -1
P~512~ = 2^512^ - 1
-
秘钥对称的生成, 并保存到磁盘
-
使用ecdsa生成密钥对
func GenerateKey(c elliptic.Curve, rand io.Reader) (priv *PrivateKey, err error) -
将私钥写入磁盘
-
使用x509进行序列化
func MarshalECPrivateKey(key *ecdsa.PrivateKey) ([]byte, error) -
将得到的切片字符串放入pem.Block结构体中
block := pem.Block{
Type : "描述....",
Bytes : MarshalECPrivateKey返回值中的切片字符串,
}
-
使用pem编码
pem.Encode();
-
-
将公钥写入磁盘
-
从私钥中得到公钥
-
使用x509进行序列化
func MarshalPKIXPublicKey(pub interface{}) ([]byte, error) -
将得到的切片字符串放入pem.Block结构体中
block := pem.Block{
Type : "描述....",
Bytes : MarshalECPrivateKey返回值中的切片字符串,
}
-
使用pem编码
pem.Encode();
-
-
-
使用私钥进行数字签名
-
打开私钥文件, 将内容读出来 ->[]byte
-
使用pem进行数据解码 -> pem.Decode()
-
使用x509, 对私钥进行还原
func ParseECPrivateKey(der []byte) (key *ecdsa.PrivateKey, err error) -
对原始数据进行哈希运算 -> 散列值
-
进行数字签名
func Sign(rand io.Reader, priv *PrivateKey, hash []byte) (r, s *big.Int, err error)
- 得到的r和s不能直接使用, 因为这是指针
	应该将这两块内存中的数据进行序列化 -> []byte
	func (z *Int) MarshalText() (text []byte, err error)
-
-
使用公钥验证数字签名
-
打开公钥文件, 将里边的内容读出 -> []byte
-
pem解码 -> pem.Decode()
-
使用x509对公钥还原
func ParsePKIXPublicKey(derBytes []byte) (pub interface{}, err error) -
将接口 -> 公钥
-
对原始数据进行哈希运算 -> 得到散列值
-
签名的认证 - > ecdsa
func Verify(pub *PublicKey, hash []byte, r, s *big.Int) bool
- 参数1: 公钥
- 参数2: 原始数据生成的散列值
- 参数3,4: 通过签名得到的连个点
	func (z *Int) UnmarshalText(text []byte) error
-
数字签名无法解决的问题

代码
RSA签名和认证
// RSA签名 - 私钥
func SignatureRSA(plainText []byte, fileName string) []byte{
   //1. 打开磁盘的私钥文件
   file, err := os.Open(fileName)
   if err != nil {
      panic(err)
   }
   //2. 将私钥文件中的内容读出
   info, err := file.Stat()
   if err != nil {
      panic(err)
   }
   buf := make([]byte, info.Size())
   file.Read(buf)
   file.Close()
   //3. 使用pem对数据解码, 得到了pem.Block结构体变量
   block, _ := pem.Decode(buf)
   //4. x509将数据解析成私钥结构体 -> 得到了私钥
   privateKey, err := x509.ParsePKCS1PrivateKey(block.Bytes)
   if err != nil {
      panic(err)
   }
   //5. 创建一个哈希对象 -> md5/sha1 -> sha512
   // sha512.Sum512()
   myhash := sha512.New()
   //6. 给哈希对象添加数据
   myhash.Write(plainText)
   //7. 计算哈希值
   hashText := myhash.Sum(nil)
   //8. 使用rsa中的函数对散列值签名
   sigText, err := rsa.SignPKCS1v15(rand.Reader, privateKey, crypto.SHA512, hashText)
   if err != nil {
      panic(err)
   }
   return sigText
}
// RSA签名验证
func VerifyRSA(plainText, sigText []byte, pubFileName string) bool {
   //1. 打开公钥文件, 将文件内容读出 - []byte
   file, err := os.Open(pubFileName)
   if err != nil {
      panic(err)
   }
   info, err := file.Stat()
   if err != nil {
      panic(err)
   }
   buf := make([]byte, info.Size())
   file.Read(buf)
   file.Close()
   //2. 使用pem解码 -> 得到pem.Block结构体变量
   block, _ := pem.Decode(buf)
   //3. 使用x509对pem.Block中的Bytes变量中的数据进行解析 ->  得到一接口
   pubInterface, err := x509.ParsePKIXPublicKey(block.Bytes)
   if err != nil {
      panic(err)
   }
   //4. 进行类型断言 -> 得到了公钥结构体
   publicKey := pubInterface.(*rsa.PublicKey)
   //5. 对原始消息进行哈希运算(和签名使用的哈希算法一致) -> 散列值
   hashText := sha512.Sum512(plainText)
   //6. 签名认证 - rsa中的函数
   err = rsa.VerifyPKCS1v15(publicKey, crypto.SHA512, hashText[:], sigText)
   if err == nil {
      return true
   }
   return false
}

func main() {
   src := []byte("在消息认证码中,需要发送者和接收者之间共享密钥,而这个密钥不能被主动攻击者Mallory获取。如果这个密钥落入Mallory手中,则Mallory也可以计算出MAC值,从而就能够自由地进行篡改和伪装攻击,这样一来消息认证码就无法发挥作用了。")
   sigText := SignatureRSA(src, "private.pem")
   bl := VerifyRSA(src, sigText, "public.pem")
   fmt.Println(bl)
}