Spring Boot可以轻松创建可以“运行”的独立的,生产级的基于Spring的应用程序。大多数Spring Boot应用程序需要很少的Spring配置。
功能
创建独立的Spring应用程序
直接嵌入Tomcat,Jetty或Undertow(不需要部署WAR文件)
提供好用的POM来简化你的Maven配置
尽可能自动配置Spring
提供生产就绪功能如指标,运行状况检查和外部化配置
绝对没有代码生成,也不需要XML配置.(摘自官方文档)
当我们在做Spring的时候,发现无论是使用xml的,还是java的方式,都有很多配置,稍有不慎就会各种报错。
而如果使用Spring Boot确实方便不少,至少少了很多配置,我们可以直接去官网生成一个来跑一下。
话不多说,我们直接看个简单demo。
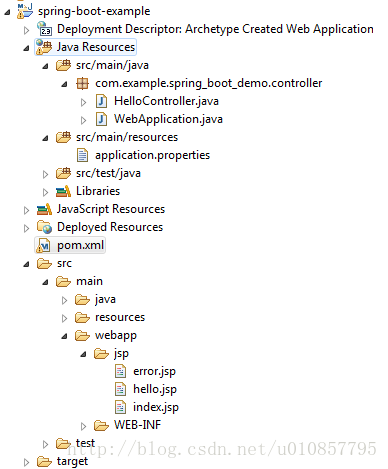
1.pom文件:
<project xmlns="http://maven.apache.org/POM/4.0.0" xmlns:xsi="http://www.w3.org/2001/XMLSchema-instance"
  xsi:schemaLocation="http://maven.apache.org/POM/4.0.0 http://maven.apache.org/maven-v4_0_0.xsd">
  <modelVersion>4.0.0</modelVersion>
  <groupId>com.example</groupId>
  <artifactId>spring-boot-example</artifactId>
  <packaging>war</packaging>
  <version>0.0.1-SNAPSHOT</version>
  <name>spring-boot-example Maven Webapp</name>
  <url>http://maven.apache.org</url>
  <parent>
        <groupId>org.springframework.boot</groupId>
        <artifactId>spring-boot-starter-parent</artifactId>
        <version>1.5.4.RELEASE</version>
    </parent>
    <dependencies>
        <dependency>
            <groupId>junit</groupId>
            <artifactId>junit</artifactId>
            <version>3.8.1</version>
            <scope>test</scope>
        </dependency>
        <dependency>
            <groupId>org.springframework.boot</groupId>
            <artifactId>spring-boot-starter-web</artifactId>
        </dependency>
        <dependency>
            <groupId>org.springframework.boot</groupId>
            <artifactId>spring-boot-devtools</artifactId>
            <optional>true</optional>
        </dependency>
        <!-- JSTL -->
        <dependency>
            <groupId>javax.servlet</groupId>
            <artifactId>jstl</artifactId>
        </dependency>
        <!-- Tomcat Embed -->
        <dependency>
            <groupId>org.springframework.boot</groupId>
            <artifactId>spring-boot-starter-tomcat</artifactId>
            <scope>provided</scope>
        </dependency>
        <dependency>
            <groupId>org.apache.tomcat.embed</groupId>
            <artifactId>tomcat-embed-jasper</artifactId>
            <scope>provided</scope>
        </dependency>
    </dependencies>
    <build>
        <plugins>
            <plugin>
                <groupId>org.springframework.boot</groupId>
                <artifactId>spring-boot-maven-plugin</artifactId>
            </plugin>
        </plugins>
    </build>
</project>
2.application.properties文件,主要是配置jsp的路径,前缀后缀,相当于springmvc-servlet.xml的功能。
spring.mvc.view.prefix=/jsp/
spring.mvc.view.suffix=.jsp
#自定义error需要
server.error.whitelabel.enabled = false
3.HelloController:
这里需要注意,如果要定义自己的error,需要实现ErrorController,因为Spring Boot系统会默认映射 /error。
@Controller
public class HelloController implements ErrorController{
@RequestMapping("/")
public String showIndex() {
return "index";
}
@RequestMapping("/hello")
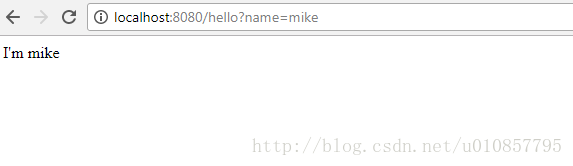
public String showHello(Model model, @RequestParam(value="name", required=false, defaultValue="World") String name) {
model.addAttribute("name", name);
return "hello";
}
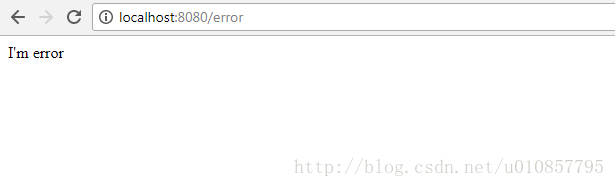
@RequestMapping("/error")
public String showError() {
return getErrorPath();
}
@Override
public String getErrorPath() {
return "error";
}
}
4.error.jsp:
<%@ page language="java" contentType="text/html; charset=ISO-8859-1"
    pageEncoding="ISO-8859-1"%>
<!DOCTYPE html PUBLIC "-//W3C//DTD HTML 4.01 Transitional//EN" "http://www.w3.org/TR/html4/loose.dtd">
<html>
<head>
<meta http-equiv="Content-Type" content="text/html; charset=ISO-8859-1">
<title>Insert title here</title>
</head>
<body>
I'm error
</body>
</html>
5.hello.jsp
<%@ page language="java" contentType="text/html; charset=ISO-8859-1"
    pageEncoding="ISO-8859-1"%>
<!DOCTYPE html PUBLIC "-//W3C//DTD HTML 4.01 Transitional//EN" "http://www.w3.org/TR/html4/loose.dtd">
<html>
<head>
<meta http-equiv="Content-Type" content="text/html; charset=ISO-8859-1">
<title>Insert title here</title>
</head>
<body>
I'm ${name}
</body>
</html>
6.index.jsp
<%@ page language="java" contentType="text/html; charset=ISO-8859-1"
    pageEncoding="ISO-8859-1"%>
<!DOCTYPE html PUBLIC "-//W3C//DTD HTML 4.01 Transitional//EN" "http://www.w3.org/TR/html4/loose.dtd">
<html>
<head>
<meta http-equiv="Content-Type" content="text/html; charset=ISO-8859-1">
<title>Insert title here</title>
</head>
<body>
<a href="/hello?name=mike">click here</a>
</body>
</html>
7.启动类WebApplication.java,定义main方法启动。
当然也可以用maven 启动:mvn spring-boot:run
或者是打包启动:
mvn package
java -jar target/spring-boot-example-0.0.1-SNAPSHOT.jar
这里SpringBootApplication注解已经包含了@SpringBootConfiguration
@EnableAutoConfiguration
@ComponentScan等注解
@SpringBootApplication
public class WebApplication extends SpringBootServletInitializer {


    @Override
    protected SpringApplicationBuilder configure(SpringApplicationBuilder application) {
        return application.sources(WebApplication.class);
    }

    public static void main(String[] args) throws Exception {
        SpringApplication.run(WebApplication.class, args);
    }
}
10.最后启动测试:
输入:http://localhost:8080/
首页:
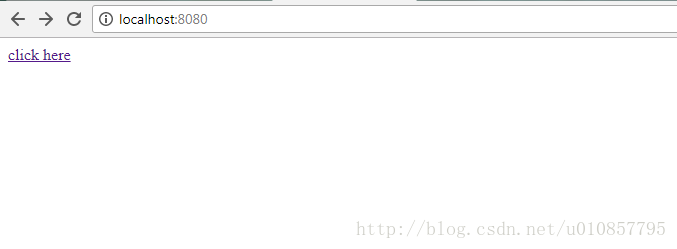
点击link:根据你传的参数显示
错误:http://localhost:8080/error
至此,基本框架已经搭好,可以看出我们基本没有配置,就快速的搭建起了环境,而且如果要与其他框架整合如mybatis等,也有相关的jar包可以引入。