如何提高 ARouter 的初始化速度
- 在 app module 的 build.gradle 中 加入:
apply plugin: 'com.alibaba.arouter'
- 在项目的 build.gradle中加入:
buildscript {


    repositories {


        jcenter()
    }

    dependencies {


        classpath "com.alibaba:arouter-register:1.0.2"
    }
}
我的在 华为 P40 上面能够提高800毫秒,在 荣耀10上提高1.1秒
二、为什么使用插件能够提高启动速度呢?
来看看初始化的代码:
    public static void init(Application application) {


        if (!hasInit) {


            logger = _ARouter.logger;
            _ARouter.logger.info(Consts.TAG, "ARouter init start.");
            hasInit = _ARouter.init(application);

            if (hasInit) {


                _ARouter.afterInit();
            }

            _ARouter.logger.info(Consts.TAG, "ARouter init over.");
        }
    }
真正实现的在 _ARouter.init(application)中,如下:
    protected static synchronized boolean init(Application application) {


        mContext = application;
        LogisticsCenter.init(mContext, executor);
        logger.info(Consts.TAG, "ARouter init success!");
        hasInit = true;
        mHandler = new Handler(Looper.getMainLooper());

        return true;
    }
可以看到是在 LogisticsCenter.init(mContext, executor) 真正实现的:
    public synchronized static void init(Context context, ThreadPoolExecutor tpe) throws HandlerException {


        mContext = context;
        executor = tpe;

        try {


            long startInit = System.currentTimeMillis();
            //billy.qi modified at 2017-12-06
            //load by plugin first
            // 是否使用了插件,如果使用了,那么 registerByPlugin = true,后续的就不会执行了。
            loadRouterMap();
            if (registerByPlugin) {


                logger.info(TAG, "Load router map by arouter-auto-register plugin.");
            } else {


                Set<String> routerMap;

                // debug模式或者是最新版本的话每次都会重建路由表,否则从SP中读取路由表
                if (ARouter.debuggable() || PackageUtils.isNewVersion(context)) {


                    logger.info(TAG, "Run with debug mode or new install, rebuild router map.");
                    // 获取前缀为com.alibaba.android.arouter.routes的class类,放到set集合里面
                    routerMap = ClassUtils.getFileNameByPackageName(mContext, ROUTE_ROOT_PAKCAGE);
                    if (!routerMap.isEmpty()) {


                    // 存到 sp 中
                        context.getSharedPreferences(AROUTER_SP_CACHE_KEY, Context.MODE_PRIVATE).edit().putStringSet(AROUTER_SP_KEY_MAP, routerMap).apply();
                    }
                    // 更新版本
                    PackageUtils.updateVersion(context);    // Save new version name when router map update finishes.
                } else {

    // 从 sp 中获取路由表
                    logger.info(TAG, "Load router map from cache.");
                    routerMap = new HashSet<>(context.getSharedPreferences(AROUTER_SP_CACHE_KEY, Context.MODE_PRIVATE).getStringSet(AROUTER_SP_KEY_MAP, new HashSet<String>()));
                }

                logger.info(TAG, "Find router map finished, map size = " + routerMap.size() + ", cost " + (System.currentTimeMillis() - startInit) + " ms.");
                startInit = System.currentTimeMillis();


                for (String className : routerMap) {


                    if (className.startsWith(ROUTE_ROOT_PAKCAGE + DOT + SDK_NAME + SEPARATOR + SUFFIX_ROOT)) {


                        // 将com.alibaba.android.arouter.routes.ARouter$$Root前缀的class类放到Warehouse.groupsIndex中
                        ((IRouteRoot) (Class.forName(className).getConstructor().newInstance())).loadInto(Warehouse.groupsIndex);
                    } else if (className.startsWith(ROUTE_ROOT_PAKCAGE + DOT + SDK_NAME + SEPARATOR + SUFFIX_INTERCEPTORS)) {


                        // 将com.alibaba.android.arouter.routes.ARouter$$Interceptors前缀的class类放到Warehouse.interceptorsIndex中
                        ((IInterceptorGroup) (Class.forName(className).getConstructor().newInstance())).loadInto(Warehouse.interceptorsIndex);
                    } else if (className.startsWith(ROUTE_ROOT_PAKCAGE + DOT + SDK_NAME + SEPARATOR + SUFFIX_PROVIDERS)) {


                        // 将com.alibaba.android.arouter.routes.ARouter$$Providers前缀的class类放到Warehouse.providersIndex中
                        ((IProviderGroup) (Class.forName(className).getConstructor().newInstance())).loadInto(Warehouse.providersIndex);
                    }
                }
            }

            logger.info(TAG, "Load root element finished, cost " + (System.currentTimeMillis() - startInit) + " ms.");

            if (Warehouse.groupsIndex.size() == 0) {


                logger.error(TAG, "No mapping files were found, check your configuration please!");
            }

            if (ARouter.debuggable()) {


                logger.debug(TAG, String.format(Locale.getDefault(), "LogisticsCenter has already been loaded, GroupIndex[%d], InterceptorIndex[%d], ProviderIndex[%d]", Warehouse.groupsIndex.size(), Warehouse.interceptorsIndex.size(), Warehouse.providersIndex.size()));
            }
        } catch (Exception e) {


            throw new HandlerException(TAG + "ARouter init logistics center exception! [" + e.getMessage() + "]");
        }
    }
主要看看 ClassUtils.getFileNameByPackageName 如下:
    public static Set<String> getFileNameByPackageName(Context context, final String packageName) throws PackageManager.NameNotFoundException, IOException, InterruptedException {


        final Set<String> classNames = new HashSet<>();

        // 获取所有的 dex 路径
        List<String> paths = getSourcePaths(context);
        final CountDownLatch parserCtl = new CountDownLatch(paths.size());

        for (final String path : paths) {


            DefaultPoolExecutor.getInstance().execute(new Runnable() {


                @Override
                public void run() {


                    DexFile dexfile = null;

                    try {


                        if (path.endsWith(EXTRACTED_SUFFIX)) {


                            //NOT use new DexFile(path), because it will throw "permission error in /data/dalvik-cache"
                            dexfile = DexFile.loadDex(path, path + ".tmp", 0);
                        } else {


                            dexfile = new DexFile(path);
                        }

                        Enumeration<String> dexEntries = dexfile.entries();
                        while (dexEntries.hasMoreElements()) {


                            String className = dexEntries.nextElement();
                            if (className.startsWith(packageName)) {


                                classNames.add(className);
                            }
                        }
                    } catch (Throwable ignore) {


                        Log.e("ARouter", "Scan map file in dex files made error.", ignore);
                    } finally {


                        if (null != dexfile) {


                            try {


                                dexfile.close();
                            } catch (Throwable ignore) {


                            }
                        }

                        parserCtl.countDown();
                    }
                }
            });
        }

        parserCtl.await();

        Log.d(Consts.TAG, "Filter " + classNames.size() + " classes by packageName <" + packageName + ">");
        return classNames;
    }
这里面的逻辑很简单:
-
就是通过
getSourcePaths(context)方法获取所有的 dex 路径,==getSourcePaths(context)==稍后再讲,先把 getFileNameByPackageName 方法流程讲完。 -
通过线程池把 dex 路径转换成 DexFile,这里有个区别:
● 如果路径是以 .zip结尾的(即是虚拟机不支持MultiDex,为什么下面分析),那么利用 DexFile.loadDex 生成 DexFile,DexFile.loadDex 过程中会把普通的dex文件转化成成odex,这个过程是很慢的;
● 如果是支持 MultiDex,那么根据 dex 的路径直接 new 一个 DexFile -
过滤所有以 com.alibaba.android.arouter.routes开头的类名,存入集合
-
使用 CountDownLatch 保证线程池的所有任务都执行完后,返回所有类名集合。
再看看 getSourcePaths 方法:
    public static List<String> getSourcePaths(Context context) throws PackageManager.NameNotFoundException, IOException {


        ApplicationInfo applicationInfo = context.getPackageManager().getApplicationInfo(context.getPackageName(), 0);
        File sourceApk = new File(applicationInfo.sourceDir);

        List<String> sourcePaths = new ArrayList<>();
        sourcePaths.add(applicationInfo.sourceDir); //默认生成apk的目录路径...base.apk

        //the prefix of extracted file, ie: test.classes
        String extractedFilePrefix = sourceApk.getName() + EXTRACTED_NAME_EXT;

//        如果VM已经支持了MultiDex,就不要去Secondary Folder加载 Classesx.zip了,那里已经么有了
//        通过是否存在sp中的multidex.version是不准确的,因为从低版本升级上来的用户,是包含这个sp配置的
        if (!isVMMultidexCapable()) {


            //the total dex numbers
            int totalDexNumber = getMultiDexPreferences(context).getInt(KEY_DEX_NUMBER, 1);
            File dexDir = new File(applicationInfo.dataDir, SECONDARY_FOLDER_NAME);

            for (int secondaryNumber = 2; secondaryNumber <= totalDexNumber; secondaryNumber++) {


                //for each dex file, ie: test.classes2.zip, test.classes3.zip...
                String fileName = extractedFilePrefix + secondaryNumber + EXTRACTED_SUFFIX;
                File extractedFile = new File(dexDir, fileName);
                if (extractedFile.isFile()) {


                    sourcePaths.add(extractedFile.getAbsolutePath());
                    //we ignore the verify zip part
                } else {


                    throw new IOException("Missing extracted secondary dex file '" + extractedFile.getPath() + "'");
                }
            }
        }

        if (ARouter.debuggable()) {

     // Search instant run support only debuggable
            sourcePaths.addAll(tryLoadInstantRunDexFile(applicationInfo));
        }
        return sourcePaths;
    }
这个方法可以看出:
如果不支持 Multidex,那么去Secondary Folder加载 Classesx.zip了,返回的路径是以==.zip==结尾的。
上一张流程图:
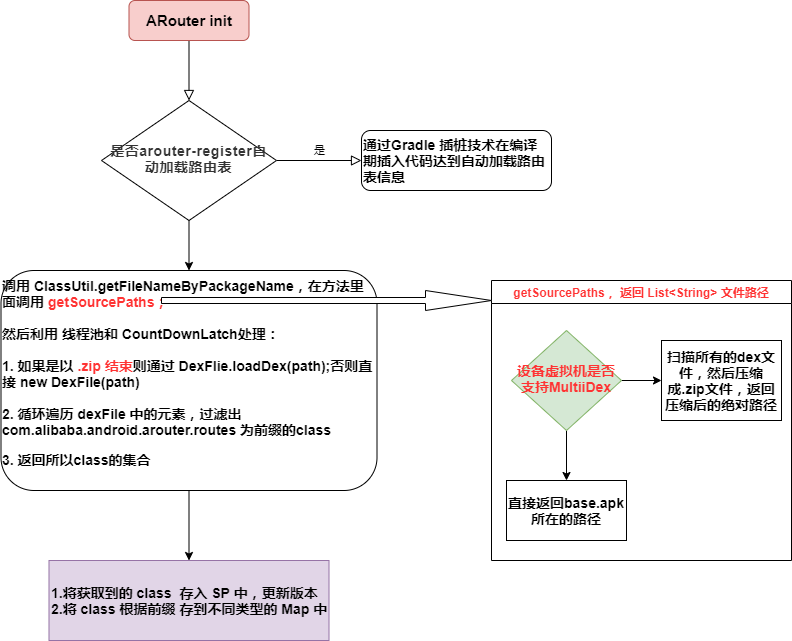
以上分析的是没有使用插件的初始化,那么使用插件后呢?
自动加载路由表是通过arouter-register来实现的,主要通过在编译期给LogisticsCenter的loadRouterMap方法插入register方法调用的代码,反编译后的代码如下:

Arouter自动加载路由表的插件是使用的通过gradle插桩技术在编译期插入代码来达到自动加载路由表信息。那么在 ARouter 初始化的时候就不会再去查找过滤相应的以 com.alibaba.android.arouter.routes开头的类名了,从而达到减少初始化时间的目的。
以后文章会同步到个人公众号,欢迎关注交流