Centos7 零成本搭建web服务器【外网可访问】
一、 技术栈
- 虚拟机:当然是选择 Linux 系统,本人使用的是 centos7 版本。
- 服务器:轻量级服务器nginx,10分钟搭建静态网站。
- 内网穿透:使用Natapp,访问内网。
二、步骤
-
Linux系统安装与配置
安装linux虚拟机就跳过吧,网上一大把,当然最好是Centos系统哦。
-
配置
由于是自己创建的虚拟机,需要手动打开80端口,重新配置防火墙,以及切换源。下面开始吧。
a.切换阿里源备份:mv /etc/yum.repos.d/CentOS-Base.repo /etc/yum.repos.d/CentOS-Base.repo.backup wget -O /etc/yum.repos.d/CentOS-Base.repo http://mirrors.aliyun.com/repo/Centos-7.repo wget -O /etc/yum.repos.d/epel.repo http://mirrors.aliyun.com/repo/epel-7.repo 清理缓存:yum clean all 生成缓存:yum makecacheb.防火墙配置
systemctl stop firewalld.service #停止firewall
systemctl disable firewalld.service #禁止firewall开机启动
yum install iptables-services #安装iptables防火墙
yum install iptables-services #安装iptables防火墙
c.开启80端口
vim /etc/sysconfig/iptables #编辑防火墙配置文件
按i进入文本编辑模式
找到:
-A INPUT -m state --state NEW -m tcp -p tcp --dport 22 -j ACCEPT
在该行下面添加:
-A INPUT -m state --state NEW -m tcp -p tcp --dport 80 -j ACCEPT
保存退出:先按ESC,再输入【:wq!】输入括号里的内容。
systemctl restart iptables.service #重启防火墙使配置生效 systemctl enable iptables.service #设置防火墙开机启动 firewall-cmd --query-port=80/tcp #查询端口是否开启
2. 配置Nginx服务器
简介:Nginx是一个http服务器。是一个使用c语言开发的高性能的http服务器及反向代理服务器。Nginx是一款高性能的http 服务器/反向代理服务器及电子邮件(IMAP/POP3)代理服务器。由俄罗斯的程序设计师Igor Sysoev所开发,官方测试nginx能够支支撑5万并发链接,并且cpu、内存等资源消耗却非常低,运行非常稳定。
a.安装环境
gcc依赖:yum install gcc-c++
Perl库:yum install -y pcre pcre-devel
zlib库:yum install -y zlib zlib-devel
yum install -y openssl openssl-devel
nginx不仅支持http协议,还支持https(即在ssl协议上传输http),所以需要在linux安装openssl库。
b.安装
cd /usr/local
mkdir nginx
cd nginx	#进入nginx文件夹

wget http://nginx.org/download/nginx-1.9.7.tar.gz
tar -zxvf nginx-1.9.7.tar.gz	#解压

./configure		#安装nginx
make
make install

cd sbin
sudo ./nginx	#启动

/usr/local/nginx/sbin/nginx -t	#查询nginx.conf是否正确
c.配置网站文件
准备好自己写的网页,以目录形式上传到 /usr/local/nginx/xxx/ 路径(xxx为网站跟目录名)
cd nginx
vim conf/nginx.conf		#使用vim编辑器
server { listen 80; server_name _; #root /usr/local/nginx/xxx/; # 修改1:xxx为静态页面根目录,index.html文件放在xxx下面 #index index.html; #charset koi8-r; #access_log logs/host.access.log main; location / { root /usr/local/nginx/xxx/; # 修改2 index index.html; } #error_page 404 /404.html; # redirect server error pages to the static page /50x.html # error_page 500 502 503 504 /50x.html; location = /50x.html { root html; }./nginx -s reload #重启 ps aux|grep nginx #查询nginx进程 ./nginx -s stop #停止到这里,就可以实现内网之间的访问了,通过ifconfig查询桥接模式下的内网地址,在本机搜索即可进入网站。但是,做好网站只有自己能看还挺不爽的,接下来就是让别人可以访问的操作辽~
3.Natapp实现内网穿透
简介:内网穿透简单来说就是将内网外网通过natapp隧道打通,让内网的数据让外网可以获取。比如常用的办公室软件等,一般在办公室或家里,通过拨号上网,这样办公软件只有在本地的局域网之内才能访问,那么问题来了,如果是手机上,或者公司外地的办公人员,如何访问到办公软件呢?这就需要natapp内网穿透工具了。运行natapp隧道之后,natapp会分配一个专属域名/端口,办公软件就已经在公网上了,在外地的办公人员可以在任何地方愉快的访问办公软件了~
emmm一句话:别人可以访问你的192.168.xxx.xxx
Natapp网址:点这里a.购买隧道
- 注册账号

- 登录,购买隧道(免费版)
- 选择web隧道协议
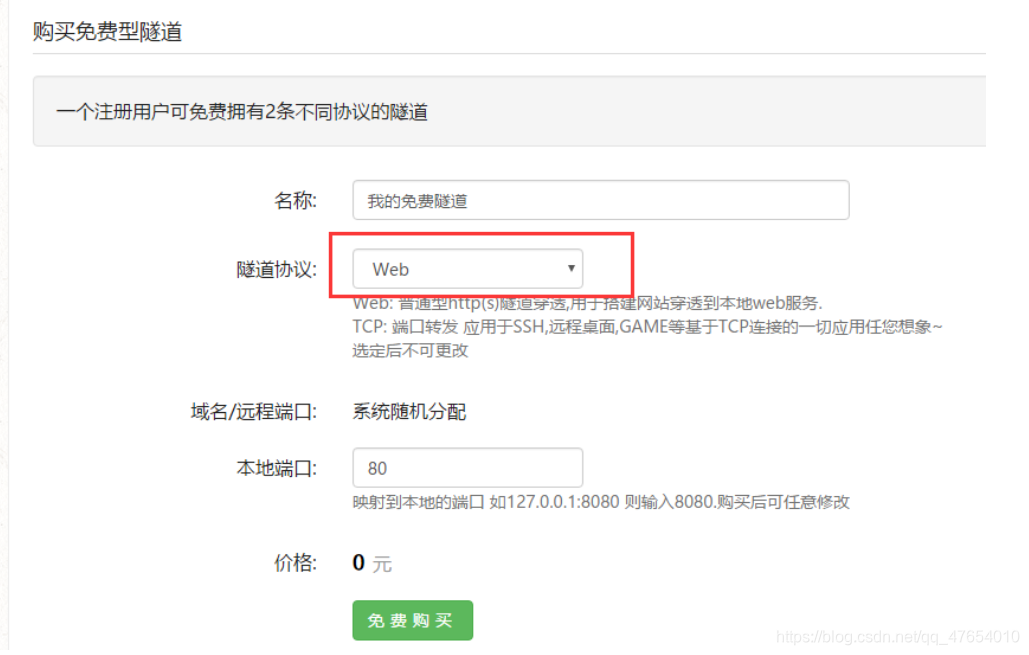
- 获取authtoken,启动时需要用

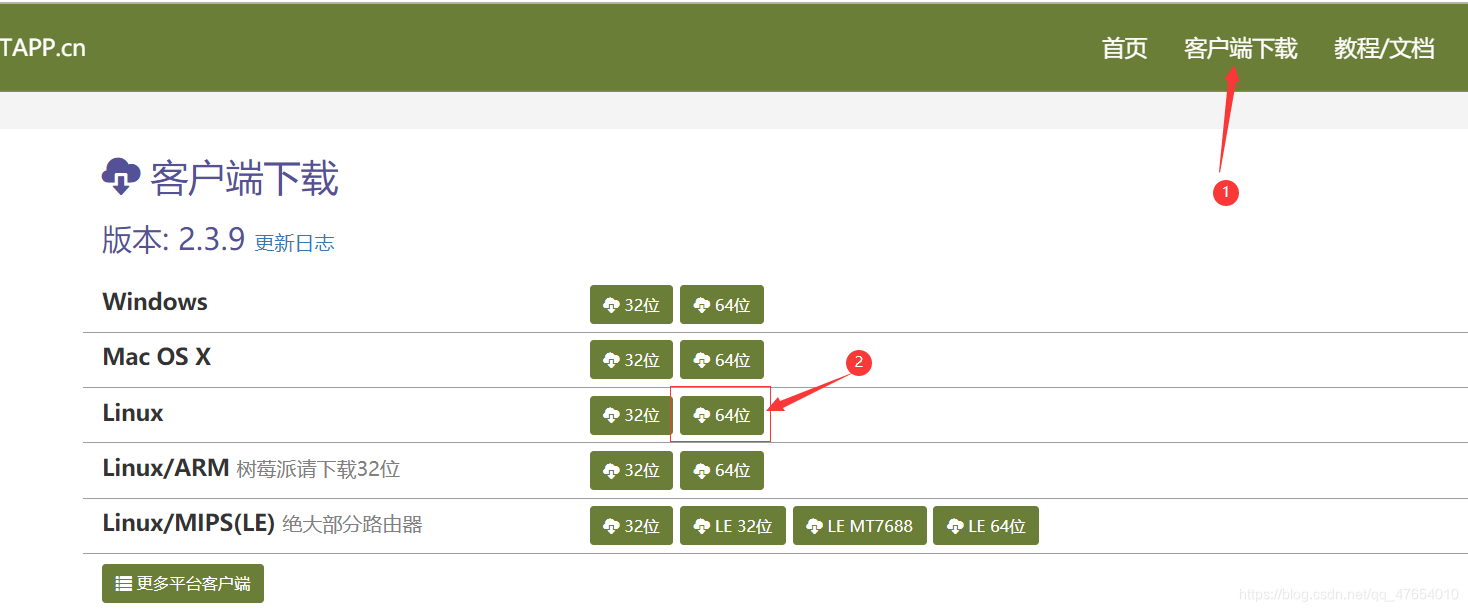
b.下载客户端
Linux可直接wget
c.运行Natapp
chmod a+x natapp	#给执行权限
./natapp			#运行

./natapp -authtoken=9ab6b9040a624f40	#参数方式运行,authtoken购买隧道后即可在控制台查看
注意参数输入正确性,不要有多余的空格等!
运行成功结果:

红框内的网址就是你的内网地址了,接下来就可以访问了,可以发给您的小伙伴试试~更多内容,欢迎访问 宋木头 ~
- 注册账号
原创不易,转载请注明出处:)