O、 阅读要求
本教程并不适合初学者,大家在阅读本文之前,需具备CentOS 8 Linux、Snort 2.9的成功安装经验。本次安装对网络依赖很大,所以大家一定要将网络状态调节好,本指南介绍的内容,仅在测试环境中使用。
一、环境
虚拟机:VMware Workstation V15
安装镜像:CentOS 8 (CentOS-8.2.2004-x86_64-minimal.iso )
安装方式:基于网络安全方面的考虑,本实验采用最小化安装CentOS 8、内存(4G+)、CPU(4 core)、磁盘空间(20G+)。
源码位置:将各类安装源码包存放在/root/sources/,试验之初,软件包可从github克隆。
二、CentOS8 mini系统初始化
当CentOS8初次安装完,系统还无法使用。首先我们要配置网络。这里我们为网卡配置静态IP地址。安装系统时仅选择Minimal Install最小化安装,其他任何选项无需勾选。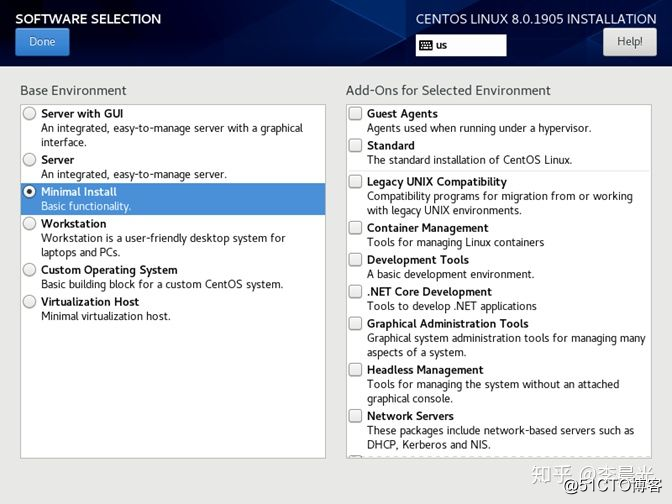
三、启用 EPEL 和 PowerTools软件源
Snort编译过程所需的某些开发包在CentOS 8默认存储库中不可用,所以我们需要在系统中添加EPEL和PowerTools仓库。
[root@localhost ~]#dnf config-manager --add-repo /etc/yum.repos.d/CentOS-PowerTools.repo
[root@localhost ~]# dnf config-manager --set-enabled PowerTools
[root@localhost ~]# dnf install epel-release
Tip:Centos7安装了dnf也可以执行这条命令。
安装PowerTools存储库
启用两个存储库后,请使用以下命令升级所有软件包:
#dnf upgrade
Transaction Summary
===============================Install 13 Packages
Upgrade 259 Packages
Total download size: 291 M
Is this ok [y/N]:
大概升级内容为291M,更新结束后,重启系统。
任务完成之后再次登录系统,在/etc/ld.so.conf.d/目录下创建local.conf配置文件
#vi /etc/ld.so.conf.d/local.conf
添加下面内容:
/usr/local/lib
/usr/local/lib64
保存退出
#ldconfig
四、安装依赖包
安装依赖包的环节非常重要。安装依赖包比较多,我们先分解安装
[root@localhost ~]# dnf install flex bison gcc gcc-c++ make cmake automake autoconf libtool
[root@localhost ~]# dnf install libpcap-devel pcre-devel libdnet-devel hwloc-devel openssl-devel zlib-devel luajit-devel pkgconfig libmnl-devel
[root@localhost ~]# dnf install libnfnetlink-devel libnetfilter_queue-devel
这行命令必须在安装DAQ之前执行。
安装完所有软件包后,下面需要从Git存储库下载LibDAQ,并从下载的源代码中进行编译。
五、安装libDAQ
#cd sources
#git clone snort3/libdaq
#cd libdaq/
#./bootstrap // 该命令执行完毕产生configure文件
#./configure
该命令执行结果如下图所示,如一致,方可继续操作。
#make //make 是单核,make j$(nproc)可以互换。
#make install
这里安装DAQ(数据采集库)。Snort 3和Snort 2.9.x.x系列使用的是不同的DAQ。
六、安装Hyperscan
Snort3将使用Hyperscan快速模式匹配。Hyperscan需要Ragel和Boost头文件,所以我们不能直接安装Hyperscan,为了一次性安装Hyperscan分为下面10个分步:
1.安装 LZMA and UUID
#dnf install xz-devel libuuid-devel
2.安装Python 和 Sqlite
#dnf install python3 sqlite-devel
3.安装colm
[root@localhost sources]# pwd
/root/sources
#tar zxvf colm-0.13.0.7.tar.gz && cd colm-0.13.0.7
#./configure
#make -j$(nproc)
#make -j$(nproc) install
#ldconfig
4.安装ragel
如果ragel包安装不正确,会直接导致hyperscan无法编译。
curl -LO http://www.colm.net/files/ragel/ragel-7.0.0.12.tar.gz
#tar zxvf ragel-7.0.0.12.tar.gz && cd ragel-7.0.0.12
./configure
如果遇到错误configure: error: check colm: expected version 0.13.0.7, but is installed
可能是colm没安装正确,可通过“dnf install colm”一条命令搞定。下面继续编译ragel
#make -j$(nproc) //多核编译速度比单核快很多
#make -j$(nproc) install
#ldconfig
5.安装boost
由于Hyperscan需要Boost C++ Libraries, 要安装Hyperscan,还需要boost库版本为1.58或者更高版本,下面我们下载v1.72(这个包并不需要安装)。
[root@localhost sources]# //当前目录在/root/sources/
下载解压缩bootst
#tar xf boost_1_72_0.tar.gz
将bootst解压到当前目录即可。
6.安装hyperscan
经过上面5个步骤的准备工作之后,下面有请hyperscan正式出场。
#tar xf hyperscan-5.2.1.tar.gz
#mkdir hs-build && cd hs-build
创建软链接文件
[root@localhost hs-build]# ln -s ~/sources/boost_1_72_0/boost ~/sources/hyperscan-5.2.1/include/boost
确保当前目录为/root/sources/hs-build/再输入下列命令。
[root@localhost hs-build]# cmake -DCMAKE_BUILD_TYPE=Release -DCMAKE_INSTALL_PREFIX=/usr/local/ ../hyperscan-5.2.1
我们在安装Hyperscan 5.1.1时,需要Boost头文件引用的源目录路径。
安装编译过程中,出现以下显示内容,表示成功安装:
Configuring done
-- Generating done
-- Build files have been written to: /root/sources/hs-build
下面继续编译Hyperscan (过程较慢)
[root@localhost hs-build]# make -j$(nproc) //nproc是读取CPU的核心数量
见到以下内容,表示成功。
Scanning dependencies of target simplegrep
[ 99%] Building C object examples/CMakeFiles/simplegrep.dir/simplegrep.c.o
[100%] Linking CXX executable ../bin/simplegrep
[100%] Built target simplegrep
如果到这一步,表示编译通过,安装就非常简单了。
#make -j$(nproc) install
见到以下内容表示安装完成
-- Install configuration: "RELEASE"
-- Installing: /usr/local/lib64/pkgconfig/libhs.pc
-- Installing: /usr/local/include/hs/hs.h
-- Installing: /usr/local/include/hs/hs_common.h
-- Installing: /usr/local/include/hs/hs_compile.h
-- Installing: /usr/local/include/hs/hs_runtime.h
-- Installing: /usr/local/lib64/libhs_runtime.a
-- Installing: /usr/local/lib64/libhs.a
-- Installing: /usr/local/share/doc/hyperscan/examples/simplegrep.c
-- Installing: /usr/local/share/doc/hyperscan/examples/http://pcapscan.cc
-- Installing: /usr/local/share/doc/hyperscan/examples/http://patbench.cc
-- Installing: /usr/local/share/doc/hyperscan/examples/README.md
执行完成上面的命令,会在bin目录下,将会产生7个文件
[root@localhost bin]# pwd
/root/sources/hs-build/bin
[root@localhost bin]# ls
hsbench hscheck hscollider patbench pcapscan simplegrep unit-hyperscan
7.测试Hyperscan
安装好不好,测试说了算。下面我们来测试一下安装Hyperscan的成果吧。
[root@localhost bin]# ./unit-hyperscan
[==========] Running 3746 tests from 33 test cases.
[----------] Global test environment set-up.
[----------] 9 tests from CustomAllocator
[ RUN ] CustomAllocator.DatabaseInfoBadAlloc
[ OK ] CustomAllocator.DatabaseInfoBadAlloc (0 ms)
8.安装flatbuffers
首先看一下当前目录
[root@localhost sources]# pwd
/root/sources
#curl -Lo flatbuffers-1.12.tar.gz https://github.com/google/flatbuffers/archive/v1.12.0.tar.gz
#tar xf flatbuffers-1.12.tar.gz
#mkdir fb-build && cd fb-build
[root@localhost fb-build]#cmake ../flatbuffers-1.12.0
见到以下内容表示成功
-- Configuring done
-- Generating done
-- Build files have been written to: /root/sources/fb-build
#make -j$(nproc) //编译时间比较长
[100%] Built target flatsamplebinary
#make -j$(nproc) install //在 /usr/local/lib64目录增加了四个文件。
#ldconfig
#cd ../
9.安装Safec
安装safec有两种方法,我们任选其一即可:
方法1:
#dnf install libsafec libsafec-devel
#ln -s /usr/lib64/pkgconfig/safec-3.3.pc /usr/local/lib64/pkgconfig/libsafec.pc
注意上面这条命令,必须在Hyperscan正确安装完成之后,才能执行。
方法2:
如果首选从源码安装那么下面步骤
#curl -LO https://github.com/rurban/safeclib/releases/download/v08112019/libsafec-08112019.0-gad76c7.tar.gz :
#tar xf libsafec-08112019.0-gad76c7.tar.gz
#cd libsafec-08112019.0-gad76c7
[root@localhost libsafec-08112019.0-gad76c7]# ./configure
#make
make install
cd ../
10.安装Tcmalloc
#wget https://github.com/gperftools/gperftools/releases/download/gperftools-2.8/gperftools-2.8.tar.gz
解包后执行下面命令
#./configure
#make
#make install
七、安装Snort3
第六步中的10个分步骤是最难的一个环节,只有他们都安装正确,才能进行这一步的安装。
[root@localhost sources]#tar xvf snort3.tar.gz cd snort3
[root@localhost sources]# export PKG_CONFIG_PATH=/usr/local/lib/pkgconfig:$PKG_CONFIG_PATH
[root@localhost sources]# export PKG_CONFIG_PATH=/usr/local/lib64/pkgconfig:$PKG_CONFIG_PATH
[root@localhost sources]# echo $PKG_CONFIG_PATH //查看环境变量
Snort 3需要配置几个环境变量才能正确运行。我们将这些变量暂时存储在当前会话并且永久保存到本地.bashrc文件中.直接添加到.bashrc文件中。例如:
#sh -c "echo 'export SNORT_LUA_PATH=/opt/snort/etc/snort' >> ~/.bashrc"
#./configure_cmake.sh --prefix=/usr/local/snort --enable-tcmalloc
其中/usr/local/snort就是snort3的安装路径。
--prefix=/usr/local/snort
上面这个参数,表示snort将文件安装在/usr/local/snort目录中。
#tree /usr/local/snort/ -Ld 3 //查看三层目录
开始编译snort3
[root@localhost snort3]# cd build/
[root@localhost snort3]#make -j$(nproc)
[root@localhost snort3]make -j$(nproc) install
[root@localhost snort3]cd ../../
典型编译报错:
Scanning dependencies of target rna
[ 80%] Building CXX object src/network_inspectors/rna/CMakeFiles/rna.dir/rna_event_handler.cc.o
[ 80%] Building CXX object src/network_inspectors/rna/CMakeFiles/rna.dir/rna_fingerprint_tcp.cc.o
In file included from /root/sources/snort3/src/network_inspectors/rna/rna_fingerprint_tcp.h:30,
from /root/sources/snort3/src/network_inspectors/rna/rna_fingerprint_tcp.cc:25:
/root/sources/snort3/src/network_inspectors/rna/rna_fingerprint.h:24:10: fatal error: uuid/uuid.h: No such file or directory
#include <uuid/uuid.h>
^~~~~
compilation terminated.
make[2]: *** [src/network_inspectors/rna/CMakeFiles/rna.dir/build.make:76: src/network_inspectors/rna/CMakeFiles/rna.dir/rna_fingerprint_tcp.cc.o] Error 1
make[1]: *** [CMakeFiles/Makefile2:5293: src/network_inspectors/rna/CMakeFiles/rna.dir/all] Error 2
make: *** [Makefile:152: all] Error 2
[root@localhost build]#
心得:如果编译到80%失败,经过调试后重新编译,前面0~80%的部分会非常快。
八、启动snort3
[root@localhost ~]# /usr/local/snort/bin/snort -V
,,_ -> Snort++ <-
o" )~ Version 3.0.2 (Build 5)
'''' By Martin Roesch & The Snort Team
Snort - Contact
Copyright (C) 2014-2020 Cisco and/or its affiliates. All rights reserved.
Copyright (C) 1998-2013 Sourcefire, Inc., et al.
Using DAQ version 3.0.0
Using LuaJIT version 2.0.4
Using OpenSSL 1.1.1c FIPS 28 May 2019
Using libpcap version 1.9.0-PRE-GIT (with TPACKET_V3)
Using PCRE version 8.42 2018-03-20
Using ZLIB version 1.2.11
Using FlatBuffers 1.12.0
Using Hyperscan version 5.2.1 2020-08-16
Using LZMA version 5.2.4
九、安装snort3 Extra
[root@localhost sources]# git clone https://github.com/snort3/snort_extra.git
Cloning into 'snort_extra'...
Username for 'GitHub: Where the world builds software': ossimuser
Password for 'GitHub: Where the world builds software':
[root@192 ~]# git clone snort3/snort3_extra
正克隆到 'snort3_extra'...
remote: Enumerating objects: 545, done.
remote: Counting objects: 100% (545/545), done.
remote: Compressing objects: 100% (316/316), done.
remote: Total 3724 (delta 322), reused 433 (delta 227), pack-reused 3179
接收对象中: 100% (3724/3724), 713.88 KiB | 650.00 KiB/s, 完成.
处理 delta 中: 100% (2490/2490), 完成.
进行本实验如果是在线下载源码,必须注册github账户。
在构建额外的插件之前,必须设置环境变量PKG_CONFIG_PATH。可以通过列出Snort安装目录来验证路径。
[root@192 tmp]# cd snort3_extra/
[root@192 snort3_extra]# export PKG_CONFIG_PATH=/usr/local/snort/lib64/pkgconfig:$PKG_CONFIG_PATH
[root@192 snort3_extra]#
[root@192 snort3_extra]# ./configure_cmake.sh --prefix=/usr/local/snort/extra
见到下面输出信息,表示成功
snort_extra version 1.0.0
Install options:
prefix: /usr/local/snort/extra
Compiler options:
CC: /usr/bin/cc
CXX: /usr/bin/c++
EXE_LDFLAGS:
MODULE_LDFLAGS:
-- Configuring done
-- Generating done
-- Build files have been written to: /root/snort3_extra/build
以上介绍的安装Snort3.0扩展为可选项,主要安装就基本到这,后期还有大量有关Snort3配置的话题,我们下期再聊吧。