本系列文章主要是博主在学习spring aop的过程中了解到其使用了java动态代理,本着究根问底的态度,于是对java动态代理的本质原理做了一些研究,于是便有了这篇文章
为了尽快进入正题,这里先跳过spring aop和java动态代理的使用流程的讲解
不过,我们首先还是先看下java dynamic proxy的基本使用方法,假定我们要代理的对象是一个Map,则代码如下:
Map proxyInstance = (Map) Proxy.newProxyInstance(
                HashMap.class.getClassLoader(),
                new Class[]{

    Map.class},
                new DynamicInvocationHandler());
之后proxyInstance就可以作为一个正常的Map对象进行使用了
为了对生成对象的属性做一个基本的了解,我们先打印一下proxyInstance的实际类型名称
System.out.println(proxyInstance.getClass().getName());
得到结果
com.sun.proxy.$Proxy11
如果使用多了,就会发现所有的代理类的名称都是$Proxy加一个数字,且包名是com.sun.proxy
当我们查看Proxy.newProxyInstance方法时,会发现它返回的其实是一个Object对象
public static Object newProxyInstance(ClassLoader loader,
                                          Class<?>[] interfaces,
                                          InvocationHandler h)
而在实际使用的过程中,它是可以被直接转型成我们传入的接口类型,因此可以推测出,该proxyInstance对象的实际类型肯定是实现了我们传入的接口
我们打印一下该类实现的接口
for (Class intf : proxyInstance.getClass().getInterfaces()) {


    System.out.println(intf.getName());
}
得到结果
java.util.Map
符合我们之前的推测
接着我们再打印一下该类的父类
System.out.println(proxyInstance.getClass().getSuperclass().getName());
得到结果
java.lang.reflect.Proxy
因此总结一下,该proxyInstance对象有以下3个属性
1.继承了Proxy类
2.实现了我们传入的接口
3.以$Proxy+随机数字的命名
那么动态生成代理类的功能究竟是如何实现的呢?接下去就来看java的源码
因为源码有点多,所以我只贴出关键的部分
入口自然是Proxy.newProxyInstance方法
其中有2个部分我们需要关心
第一部分,类的创建
/*
 * Look up or generate the designated proxy class.
 */
Class<?> cl = getProxyClass0(loader, intfs);
这个就是实际生成类的方法,后面我们会继续深究,先略放一放
第二部分,实例的创建
final Constructor<?> cons = cl.getConstructor(constructorParams);
final InvocationHandler ih = h;
...
return cons.newInstance(new Object[]{

    h});
最终对象的实例化过程就是通过之前生成的class,获取其指定参数的构造函数,并将InvocationHandler对象传入
查看constructorParams字段
/** parameter types of a proxy class constructor */
private static final Class<?>[] constructorParams =
        {

     InvocationHandler.class };
的确就是获取InvocationHandler对象的一个构造函数
回想一下之前类定义的第一条,继承了Proxy类,因此我们去Proxy类中找一下
/**
 * Constructs a new {@code Proxy} instance from a subclass
 * (typically, a dynamic proxy class) with the specified value
 * for its invocation handler.
 *
 * @param  h the invocation handler for this proxy instance
 *
 * @throws NullPointerException if the given invocation handler, {@code h},
 *         is {@code null}.
 */
protected Proxy(InvocationHandler h) {


    Objects.requireNonNull(h);
    this.h = h;
}
在该构造函数中就是将参数h赋值给了成员变量h,这里名称h可以记一下,在之后的文章中还会遇到
看完实例的创建,让我们回到更重要的第一部分,类的生成
进入getProxyClass0(loader, intfs)方法
/**
 * Generate a proxy class.  Must call the checkProxyAccess method
 * to perform permission checks before calling this.
 */
private static Class<?> getProxyClass0(ClassLoader loader,
                                       Class<?>... interfaces) {


    if (interfaces.length > 65535) {


        throw new IllegalArgumentException("interface limit exceeded");
    }

    // If the proxy class defined by the given loader implementing
    // the given interfaces exists, this will simply return the cached copy;
    // otherwise, it will create the proxy class via the ProxyClassFactory
    return proxyClassCache.get(loader, interfaces);
}
该方法很简单,直接从一个cache中拿取对象
查看proxyClassCache对象
/**
 * a cache of proxy classes
 */
private static final WeakCache<ClassLoader, Class<?>[], Class<?>>
        proxyClassCache = new WeakCache<>(new KeyFactory(), new ProxyClassFactory());
该对象本质就是一个类似于Map的缓存,不过使用的是WeakCache,这个WeakCache本身的特性我们放到另一篇文章中讨论,本文专注于Proxy
我们可以看到该缓存的构造函数获取了2个Factory,顾名思义,第一个是生成key的,第二个是生成ProxyClass的,自然我们需要继续看第二个Factory
类的注解如下
/**
* A factory function that generates, defines and returns the proxy class given
* the ClassLoader and array of interfaces.
*/
private static final class ProxyClassFactory
        implements BiFunction<ClassLoader, Class<?>[], Class<?>>
这个就是我们要寻找的负责具体生成类的工厂了,查看其apply方法
首先其会对传入的接口类型做一些校验,包括loader能否加载到传入的接口,接口是否实际上是接口(因为数组的类型是Class),接口是否有重复
Map<Class<?>, Boolean> interfaceSet = new IdentityHashMap<>(interfaces.length);
        for (Class<?> intf : interfaces) {


    /*
     * Verify that the class loader resolves the name of this
     * interface to the same Class object.
     */
    Class<?> interfaceClass = null;
    try {


        interfaceClass = Class.forName(intf.getName(), false, loader);
    } catch (ClassNotFoundException e) {


    }
    if (interfaceClass != intf) {


        throw new IllegalArgumentException(
                intf + " is not visible from class loader");
    }
    /*
     * Verify that the Class object actually represents an
     * interface.
     */
    if (!interfaceClass.isInterface()) {


        throw new IllegalArgumentException(
                interfaceClass.getName() + " is not an interface");
    }
    /*
     * Verify that this interface is not a duplicate.
     */
    if (interfaceSet.put(interfaceClass, Boolean.TRUE) != null) {


        throw new IllegalArgumentException(
                "repeated interface: " + interfaceClass.getName());
    }
}
接着设置类的默认access_flag,public final
int accessFlags = Modifier.PUBLIC | Modifier.FINAL;
接着检查传入的接口数组中是否包含非public的接口,如果有,则生成的类需要和该接口处于同一个package,且访问属性会去掉public,只保留final。如果有多个不同package中的非public接口,则报错
(具体原因大家应该都可以理解)
/*
 * Record the package of a non-public proxy interface so that the
 * proxy class will be defined in the same package.  Verify that
 * all non-public proxy interfaces are in the same package.
 */
for (Class<?> intf : interfaces) {


    int flags = intf.getModifiers();
    if (!Modifier.isPublic(flags)) {


        accessFlags = Modifier.FINAL;
        String name = intf.getName();
        int n = name.lastIndexOf('.');
        String pkg = ((n == -1) ? "" : name.substring(0, n + 1));
        if (proxyPkg == null) {


            proxyPkg = pkg;
        } else if (!pkg.equals(proxyPkg)) {


            throw new IllegalArgumentException(
                    "non-public interfaces from different packages");
        }
    }
}
如果没有非public类,则会使用默认的package名,即com.sun.proxy
if (proxyPkg == null) {


    // if no non-public proxy interfaces, use com.sun.proxy package
    proxyPkg = ReflectUtil.PROXY_PACKAGE + ".";
}
然后获取一个静态自增的int
/*
 * Choose a name for the proxy class to generate.
 */
long num = nextUniqueNumber.getAndIncrement();
固定的类名前缀
// prefix for all proxy class names
private static final String proxyClassNamePrefix = "$Proxy";
将上面三者组合成最终的类名(回想之前我们打印出的实例的类名)
String proxyName = proxyPkg + proxyClassNamePrefix + num;
上面这几个步骤确定了类的名称,但还是皮毛,接下去是生成类的血肉:字节码
/*
 * Generate the specified proxy class.
 */
byte[] proxyClassFile = ProxyGenerator.generateProxyClass(
        proxyName, interfaces, accessFlags);
具体的探究也先放一下,先看字节码转换成具体类的方法
try {


    return defineClass0(loader, proxyName,
            proxyClassFile, 0, proxyClassFile.length);
} catch (ClassFormatError e) {


    /*
     * A ClassFormatError here means that (barring bugs in the
     * proxy class generation code) there was some other
     * invalid aspect of the arguments supplied to the proxy
     * class creation (such as virtual machine limitations
     * exceeded).
     */
    throw new IllegalArgumentException(e.toString());
}
而该方法是一个native的方法,所以暂时就无法继续探究了,不过知道了这个方法后,如果我们自己有需要,也可以利用这种机制实现自己的动态类生成,后面会想办法做一个demo,本文就不做探讨了
private static native Class<?> defineClass0(ClassLoader loader, String name,
                                                byte[] b, int off, int len);
之前其实都是开胃菜,现在回到之前生成字节码的方法,查看方法源码
public static byte[] generateProxyClass(final String var0, Class<?>[] var1, int var2) {


    ProxyGenerator var3 = new ProxyGenerator(var0, var1, var2);
    final byte[] var4 = var3.generateClassFile();
    if (saveGeneratedFiles) {


        AccessController.doPrivileged(new PrivilegedAction<Void>() {


            public Void run() {


                try {


                    int var1 = var0.lastIndexOf(46);
                    Path var2;
                    if (var1 > 0) {


                        Path var3 = Paths.get(var0.substring(0, var1).replace('.', File.separatorChar));
                        Files.createDirectories(var3);
                        var2 = var3.resolve(var0.substring(var1 + 1, var0.length()) + ".class");
                    } else {


                        var2 = Paths.get(var0 + ".class");
                    }

                    Files.write(var2, var4, new OpenOption[0]);
                    return null;
                } catch (IOException var4x) {


                    throw new InternalError("I/O exception saving generated file: " + var4x);
                }
            }
        });
    }

    return var4;
}
中间if部分的代码可以先忽略,不过我们会在后面的文章中使用到这部分功能,这里先关注下面这2行代码
ProxyGenerator var3 = new ProxyGenerator(var0, var1, var2);
final byte[] var4 = var3.generateClassFile();
这里让我们记一下
var0是类名
var1是接口
var3是access_flag
后面我会尽量将这些varX转换成更实际的命名,方便大家理解
之后就是本文的最终的重点,也是难点,即二进制字节码的实际生成过程,包括jvm操作指令,所以我们需要先对class文件的结构和jvm操作指令有一个了解
jvm文档地址:https://docs.oracle.com/javase/specs/jvms/se7/html/jvms-4.html
下面对字节码的结构简单地做了个说明,大部分都是顾名思义
ClassFile {
    u4             magic;//固定的开头,值为0xCAFEBABE
    u2             minor_version;//版本号,用来标记class的版本
    u2             major_version;//版本号,用来标记class的版本
    u2             constant_pool_count;//静态池大小,是静态池对象数量+1
    cp_info        constant_pool[constant_pool_count-1];//静态池对象,有效索引是1 ~ count-1
    u2             access_flags;//public、final等描述
    u2             this_class;//当前类的信息
    u2             super_class;//父类的信息
    u2             interfaces_count;//接口数量
    u2             interfaces[interfaces_count];//接口对象
    u2             fields_count;//字段数量
    field_info     fields[fields_count];//字段对象
    u2             methods_count;//方法数量
    method_info    methods[methods_count];//方法对象
    u2             attributes_count;//属性数量
    attribute_info attributes[attributes_count];//属性对象
}
为了不成为一篇枯燥的文档翻译,并且尽快进入Proxy的源码,这里并不会对每一个部分做特别详细的说明,以把握整体为主
接下去我们就可以进入generateClassFile()方法了
首先把握整体,我们先跳过一部分细节代码,先看下面这部分(这里我做了一个可读性的变量名修改)
注意对照着Class的字节结构来看
最终输出的字节流
ByteArrayOutputStream byteStream = new ByteArrayOutputStream();
DataOutputStream data = new DataOutputStream(byteStream);
写入固定开头magic,这里-889275714就是对应0xCAFEBABE
data.writeInt(-889275714);
写入版本号
data.writeShort(0);//minor_version
data.writeShort(49);//major_version
写入常量池,这里cp就是指constant pool
this.cp.write(data);
这里我们需要进入cp的write方法看一下,也先不要纠结Entry的细节,我们还是先把握整体
public void write(OutputStream var1) throws IOException {


    DataOutputStream var2 = new DataOutputStream(var1);
    /**
     * 这里写入cp的大小,注意size()+1,可以和之前Class结构中的constant_pool_count对应
     */
    var2.writeShort(this.pool.size() + 1);
    Iterator var3 = this.pool.iterator();
    /**
     * 遍历cp中的对象,写入详细信息,对应Class结构中的cp_info
     */
    while(var3.hasNext()) {


        ProxyGenerator.ConstantPool.Entry var4 = (ProxyGenerator.ConstantPool.Entry)var3.next();
        var4.write(var2);
    }
}
接着我们回到外层方法,继续往下看
写入access_flag
data.writeShort(this.accessFlags);
写入当前类的信息
data.writeShort.writeShort(this.cp.getClass(dotToSlash(this.className)));
写入父类的信息(回想类的属性第一条,继承了Proxy类)
data.writeShort.writeShort(this.cp.getClass("java/lang/reflect/Proxy"));
写入接口数量
data.writeShort.writeShort(this.interfaces.length);
遍历接口,写入接口信息
Class[] interfaces = this.interfaces;
int interfaceLength = interfaces.length;
for (int i = 0; i < interfaceLength; ++i) {


    Class intf = interfaces[i];
    data.writeShort(this.cp.getClass(dotToSlash(intf.getName())));
}
写入字段数量
data.writeShort(this.fields.size());
遍历字段,写入字段信息
fieldInerator = this.fields.iterator();
while(fieldInerator.hasNext()) {


    ProxyGenerator.FieldInfo fieldInfo = (ProxyGenerator.FieldInfo) fieldInerator.next();
    fieldInfo.write(data);
}
写入方法数量
data.writeShort(this.methods.size());
遍历方法,写入方法信息
methodIterator = this.methods.iterator();
while(methodIterator.hasNext()) {


    ProxyGenerator.MethodInfo methodInfo = (ProxyGenerator.MethodInfo) methodIterator.next();
    methodInfo.write(data);
}
因为该类没有特别的attribute,因此attribute数量直接写0
data.writeShort(0);
正和之前的类结构完全一一对应,此时我们对proxy所做的事情就有了一个整体的把握
了解了整体之后,下面再深入介绍一下字节码中部分对象的具体格式,为后面进一步看Proxy的源码做一些准备
为了更好地理解下面的内容,我们先定义一个简单的类Test.java
public class Test implements TestInt {


    private int field = 1;

    public int add(int a, int b) {


        return a + b;
    }
}

interface TestInt {


}
生成.class文件
javac Test.java
查看.class文件
javap -v Test.class
得到结果
Classfile /Users/tianjiyuan/Documents/jvm/Test.class
  Last modified 2020-7-3; size 292 bytes
  MD5 checksum 1afecf9ea44088238bc8aa9804b28208
  Compiled from "Test.java"
public class Test implements TestInt
  minor version: 0
  major version: 52
  flags: ACC_PUBLIC, ACC_SUPER
Constant pool:
   #1 = Methodref          #4.#16         // java/lang/Object."<init>":()V
   #2 = Fieldref           #3.#17         // Test.field:I
   #3 = Class              #18            // Test
   #4 = Class              #19            // java/lang/Object
   #5 = Class              #20            // TestInt
   #6 = Utf8               field
   #7 = Utf8               I
   #8 = Utf8               <init>
   #9 = Utf8               ()V
  #10 = Utf8               Code
  #11 = Utf8               LineNumberTable
  #12 = Utf8               add
  #13 = Utf8               (II)I
  #14 = Utf8               SourceFile
  #15 = Utf8               Test.java
  #16 = NameAndType        #8:#9          // "<init>":()V
  #17 = NameAndType        #6:#7          // field:I
  #18 = Utf8               Test
  #19 = Utf8               java/lang/Object
  #20 = Utf8               TestInt
{
  public Test();
    descriptor: ()V
    flags: ACC_PUBLIC
    Code:
      stack=2, locals=1, args_size=1
         0: aload_0
         1: invokespecial #1                  // Method java/lang/Object."<init>":()V
         4: aload_0
         5: iconst_1
         6: putfield      #2                  // Field field:I
         9: return
      LineNumberTable:
        line 1: 0
        line 2: 4

  public int add(int, int);
    descriptor: (II)I
    flags: ACC_PUBLIC
    Code:
      stack=2, locals=3, args_size=3
         0: iload_1
         1: iload_2
         2: iadd
         3: ireturn
      LineNumberTable:
        line 5: 0
}
SourceFile: "Test.java"
我们先看下面这3个部分正对应minor_version,major_version,access_flags
minor version: 0
major version: 52
flags: ACC_PUBLIC, ACC_SUPER
接着看Constant Pool
Constant pool:
   #1 = Methodref          #4.#16         // java/lang/Object."<init>":()V
   #2 = Fieldref           #3.#17         // Test.field:I
   #3 = Class              #18            // Test
   ...
   #6 = Utf8               field
   ...

  #16 = NameAndType        #8:#9          // "<init>":()V
其中有如下几种类型
Methodref :方法的引用
Fieldref:字段的引用
Class :类的引用
Utf8 :字符串的引用
NameAndType 类型的描述
下面依据jvm文档,一个一个介绍
Class结构
CONSTANT_Class_info {
    u1 tag;
    u2 name_index;
}
表示一个类的引用
tag:表示自身在常量池中的索引
name_index:必须是常量池中的有效索引,用来表示类的名字
例如
#3 = Class #18 // Test
tag = 3,表示自身索引为3
name_index = 18,表示名字的索引是18
此时我们查看#18,即这个类的名字是Test
#18 = Utf8 Test
Field、Method、Interface结构
文档中这3者是放在一起的
CONSTANT_Fieldref_info {
    u1 tag;
    u2 class_index;
    u2 name_and_type_index;
}

CONSTANT_Methodref_info {
    u1 tag;
    u2 class_index;
    u2 name_and_type_index;
}

CONSTANT_InterfaceMethodref_info {
    u1 tag;
    u2 class_index;
    u2 name_and_type_index;
}
表示一个字段、方法、接口方法的引用
tag:表示自身在常量池中的索引
class_index:表示常量池中的一个有效索引
如果是Methodref_info必须是Class类型的
如果是InterfaceMethodref_info则必须是一个Interface
如果是Fieldref_info则可以是Class或者是Interface
name_and_type_index:表示常量池中的一个有效索引(表示方法的名字、返回类型、参数)
如果是Fieldref_info,则必须是一个对字段的描述,否则必须是一个对方法的描述
例如
#1 = Methodref #4.#16 // java/lang/Object."<init>":()V
tag = 1,表示自身索引为1
class_index = 4,表示类型是索引为4的类
name_and_type_index = 16,表示方法的描述为索引16
查看4和16
   #4 = Class              #19            // java/lang/Object
  #16 = NameAndType        #8:#9          // "<init>":()V
即表示这个方法是Object类中的构造函数
NameAndType结构
CONSTANT_NameAndType_info {
    u1 tag;
    u2 name_index;
    u2 descriptor_index;
}
用来表示一个方法或者字段,其中不包括该字段或方法所属的类
tag:表示自身常量池的索引
name_index:常量池中的一个有效索引,必须是Utf8类型(表示方法或字段的名字)
descriptor_index:常量池中的一个有效索引,必须是Utf8类型(表示方法的返回类型和参数)
例如
#16 = NameAndType #8:#9 // "<init>":()V
tag = 16
name_index = 8
descriptor_index = 9
查看索引8和9
   #8 = Utf8               <init>
   #9 = Utf8               ()V
方法名为表示构造函数,参数0个,返回值为void
UTF-8结构
CONSTANT_Utf8_info {
    u1 tag;
    u2 length;
    u1 bytes[length];
}
表示一个字符串常量
tag:表示自身在常量池中的索引
length:表示byte数组的长度
bytes[length]:表示具体数据内容
这个部分其实还有很多细节,不过这里就不展开了,有兴趣的可以自行查看jvm文档,后面会有文章详细分析
常量池的内容就介绍到这里,接下去我们还需要看下类结构的其他成员
this_class,必须是一个有效的常量池索引,需要是CONSTANT_Class_info类型的
super_class,必须是一个有效的常量池索引,需要是CONSTANT_Class_info类型的或者为0,表示没有父类
interfaces_count,接口数量,一个int值
interfaces[],接口数组,数组中的值必须是一个常量池的有效索引,需要是CONSTANT_Class_info类型
fields_count,字段数量
fields[],字段数组,数组中的值都是field_info结构
field_info {
    u2             access_flags;//access_flag
    u2             name_index;//常量池中的一个有效索引,必须是Utf8类型(表示方法或字段的名字)
    u2             descriptor_index;//常量池中的一个有效索引,必须是Utf8类型(表示字段的描述)
    u2             attributes_count;//跳过,本文不涉及
    attribute_info attributes[attributes_count];//跳过,本文不涉及
}
methods_count,方法数量
methods[],方法数组,结构如下
method_info {
    u2             access_flags;//access_flag
    u2             name_index;//常量池中的一个有效索引,必须是Utf8类型(表示方法或字段的名字)
    u2             descriptor_index;//常量池中的一个有效索引,必须是Utf8类型(表示方法的描述)
    u2             attributes_count;//属性数量
    attribute_info attributes[attributes_count];//属性的具体内容
}
class文件的一些基本结构就介绍到这里,接下去我们进一步深入了解class的各种结构究竟是怎么被构造的
回到generateClassFile()方法的开头
第一部分,Object方法的预处理
this.addProxyMethod(hashCodeMethod, Object.class);
this.addProxyMethod(equalsMethod, Object.class);
this.addProxyMethod(toStringMethod, Object.class);
首先无论是什么类,都是继承自Object的,因此Object中的方法是一定需要的
注意,这里addProxyMethod并非直接写字节码了,而是做了一些预处理
我们先看下3个方法中的第一个参数是个啥
在静态构造函数中,可以看到的确就是Object的3个方法
static {


    try {


        hashCodeMethod = Object.class.getMethod("hashCode");
        equalsMethod = Object.class.getMethod("equals", Object.class);
        toStringMethod = Object.class.getMethod("toString");
    } catch (NoSuchMethodException var1) {


        throw new NoSuchMethodError(var1.getMessage());
    }
}
我们进入addProxyMethod方法,这里对变量名做了一个可读性处理
String methodName = method.getName();
Class[] paramTypes = method.getParameterTypes();
Class returnType = method.getReturnType();
Class[] exceptionTypes = method.getExceptionTypes();
String cacheKey = methodName + getParameterDescriptors(paramTypes);
Object cache = (List)this.proxyMethods.get(cacheKey);
...
((List) cache).add(new ProxyGenerator.ProxyMethod(methodName, paramTypes, returnType, exceptionTypes, targetClass));
概括而言,就是根据方法的各个要素生成一个ProxyMethod对象,然后将其加入一个缓存List中
接着我们进入ProxyMethod的构造函数查看
private ProxyMethod(String var2, Class<?>[] var3, Class<?> var4, Class<?>[] var5, Class<?> var6) {


    this.methodName = var2;
    this.parameterTypes = var3;
    this.returnType = var4;
    this.exceptionTypes = var5;
    this.fromClass = var6;
    this.methodFieldName = "m" + ProxyGenerator.this.proxyMethodCount++;
}
值得注意的是,在ProxyMethod的构造函数中有2个字段,在后面会有用到
一个是methodName,表示方法名
另外一个是以m+递增数字的methodFieldName,表示该方法在最终生成的类中的Method类型的字段的名称
第二部分,接口方法的预处理
Class[] interfaces = this.interfaces;
int interfaceLength = interfaces.length;

int i;
Class clazz;
for(i = 0; i < interfaceLength; ++i) {


    clazz = interfaces[i];
    Method[] methods = clazz.getMethods();
    int methodLength = methods.length;

    for(int j = 0; j < methodLength; ++j) {


        Method m = methods[j];
        this.addProxyMethod(m, clazz);
    }
}
既然生成的类实现了传入的接口,因此循环接口,将接口的方法要素添加到proxyMethods中,和之前处理Object的方法一样
第三部分,字段和方法的字节码写入
Iterator iterator;
try {


    this.methods.add(this.generateConstructor());
    iterator = this.proxyMethods.values().iterator();
    while(iterator.hasNext()) {


        list = (List) iterator.next();
        listIterator = list.iterator();

        while(listIterator.hasNext()) {


            ProxyGenerator.ProxyMethod proxyMethod = (ProxyGenerator.ProxyMethod) listIterator.next();
            this.fields.add(new ProxyGenerator.FieldInfo(proxyMethod.methodFieldName, "Ljava/lang/reflect/Method;", 10));
            this.methods.add(proxyMethod.generateMethod());
        }
    }

    this.methods.add(this.generateStaticInitializer());
} catch (IOException var10) {


    throw new InternalError("unexpected I/O Exception", var10);
}
这里的第一行,正是写入构造器的字节码,这一部分因为涉及到jvm的执行指令,我们放到之后再详细看,所以这里先跳过
this.methods.add(this.generateConstructor());
直接看后面的while循环,就是遍历之前我们添加的Object和接口定义的方法,然后生成相应的字段字节码和方法字节码
while(listIterator.hasNext()) {


    ProxyGenerator.ProxyMethod proxyMethod = (ProxyGenerator.ProxyMethod) listIterator.next();
    this.fields.add(new ProxyGenerator.FieldInfo(proxyMethod.methodFieldName, "Ljava/lang/reflect/Method;", 10));
    this.methods.add(proxyMethod.generateMethod());
}
下面先详细看看字段字节码的细节
第四部分,字段字节码
this.fields.add(new ProxyGenerator.FieldInfo(proxyMethod.methodFieldName, "Ljava/lang/reflect/Method;", 10));
FieldInfo构造函数中
第一个参数proxyMethod.methodFieldName是我们在之前提到的m+递增数字生成的methodFieldName
第二个参数是类型描述
第三个参数是accessFlag,10表示private static (Modifier.PRIVATE | Modifier.STATIC)
进入构造函数看一下
public FieldInfo(String var2, String var3, int var4) {


    this.name = var2;
    this.descriptor = var3;
    this.accessFlags = var4;
    ProxyGenerator.this.cp.getUtf8(var2);
    ProxyGenerator.this.cp.getUtf8(var3);
}
回想前文中的field_info类型(忽略attributes)
field_info {
    u2             access_flags;
    u2             name_index;
    u2             descriptor_index;
}
this.name、this.descriptor、this.accessFlags正好和field_info中的结构一一对应
同时,由于name_index和descriptor_index都是常量池中的一个索引,因此需要将其写入常量池
这里的cp就是指Constant pool,把methodFieldName和descriptor写入到静态池
ProxyGenerator.this.cp.getUtf8(var2);
ProxyGenerator.this.cp.getUtf8(var3);
之后我们可以直接看,FieldInfo中的write方法,这就是最后写入的字节的方法
public void write(DataOutputStream var1) throws IOException {


    var1.writeShort(this.accessFlags);
    var1.writeShort(ProxyGenerator.this.cp.getUtf8(this.name));
    var1.writeShort(ProxyGenerator.this.cp.getUtf8(this.descriptor));
    var1.writeShort(0);
}
对照之前的field_info
第一个写入access_flags
接着写入name_index和descriptor_index,值都是索引
最后因为attribute数量是0,因此直接写0
此时一个完整的字段结构就写入完毕了
接着我们回头查看ProxyGenerator.this.cp.getUtf8方法,看看索引是如何确定的
public short getUtf8(String var1) {


    if (var1 == null) {


        throw new NullPointerException();
    } else {


        return this.getValue(var1);
    }
}
接续查看getValue方法
private short getValue(Object var1) {


    Short var2 = (Short)this.map.get(var1);
    if (var2 != null) {


        return var2;
    } else if (this.readOnly) {


        throw new InternalError("late constant pool addition: " + var1);
    } else {


        short var3 = this.addEntry(new ProxyGenerator.ConstantPool.ValueEntry(var1));
        this.map.put(var1, new Short(var3));
        return var3;
    }
}
这里用map做了一个缓存,key就是需要写入的字段,value就是索引值,如果命中了map,则直接返回value
如果没有命中缓存,则需要addEntry
查看addEntry方法
private short addEntry(ProxyGenerator.ConstantPool.Entry var1) {


    this.pool.add(var1);
    if (this.pool.size() >= 65535) {


        throw new IllegalArgumentException("constant pool size limit exceeded");
    } else {


        return (short)this.pool.size();
    }
}
即将生成的entry添加入pool,并返回当前pool的大小,也就是该常量在池中的索引
回想一下cp的结构,其中cp数量是count+1,cp数组有效索引是从1开始的,因此这里直接返回pool的size,而不是size-1
因此
ProxyGenerator.this.cp.getUtf8()方法做了2件事情
1.将值写入常量池
2.返回该值在常量池中的索引
到这里,字段的相关内容就结束了,接下去我们查看方法的字节码
第五部分,方法字节码
先看之前while循环中的代码
this.methods.add(proxyMethod.generateMethod());
查看generateMethod方法
因为方法的结构体其实包含两个大部分,第一部分是和field_info一样的基础属性,第二部分是方法的执行体,之后会单独介绍方法的执行体是怎么写入的,这里我们先关注方法的基本结构
String var1 = ProxyGenerator.getMethodDescriptor(this.parameterTypes, this.returnType);
ProxyGenerator.MethodInfo var2 = ProxyGenerator.this.new MethodInfo(this.methodName, var1, 17);
这里第一行是获取方法的描述,类似于 ()V 描述方法的参数和返回参数,这里*()V*表示获取0个参数,返回为void的方法
第二行就生成一个MethodInfo对象,查看其构造函数
public MethodInfo(String var2, String var3, int var4) {


    this.name = var2;
    this.descriptor = var3;
    this.accessFlags = var4;
    ProxyGenerator.this.cp.getUtf8(var2);
    ProxyGenerator.this.cp.getUtf8(var3);
    ProxyGenerator.this.cp.getUtf8("Code");
    ProxyGenerator.this.cp.getUtf8("Exceptions");
}
同样回顾前文的method_info
method_info {
    u2             access_flags;//access_flag
    u2             name_index;//常量池中的一个有效索引,必须是Utf8类型(表示方法或字段的名字)
    u2             descriptor_index;//常量池中的一个有效索引,必须是Utf8类型(表示方法的描述)
    u2             attributes_count;//属性数量
    attribute_info attributes[attributes_count];//属性的具体内容
}
和field_info不同,除了基础的access_flags、name_index、descriptor_index外,MethodInfo的构造函数还写入了2个额外的常量池对象:Code和Exceptions,表示2种attributes
Code表示执行代码
Exceptions表示方法会抛出的异常
同样,我们接着就查看MethodInfo中的write方法
写入access_flags、name_index、descriptor_index
var1.writeShort(this.accessFlags);
var1.writeShort(ProxyGenerator.this.cp.getUtf8(this.name));
var1.writeShort(ProxyGenerator.this.cp.getUtf8(this.descriptor));
写入属性的数量
var1.writeShort(2);
此时我们就需要看下attributes的基础结构了
attribute_info {
    u2 attribute_name_index;//名字在常量池的索引
    u4 attribute_length;//attribute的字节长度
    u1 info[attribute_length];//attribute的实际数据
}
这里我们就先了解2种具体的attribute,一个是Code,一个是Exception,正是之前在构造函数中看到的
Code的结构
Code_attribute {
    u2 attribute_name_index;
    u4 attribute_length;
    u2 max_stack;
    u2 max_locals;
    u4 code_length;
    u1 code[code_length];
    u2 exception_table_length;
    {   u2 start_pc;
        u2 end_pc;
        u2 handler_pc;
        u2 catch_type;
    } exception_table[exception_table_length];
    u2 attributes_count;
    attribute_info attributes[attributes_count];
}
此时我们对应着代码来看
首先写入attribute_name_index
var1.writeShort(ProxyGenerator.this.cp.getUtf8("Code"));
写入数据长度attribute_length,这里的12和8会在本文后面解释
var1.writeInt(12 + this.code.size() + 8 * this.exceptionTable.size());
写入栈深max_stack和max_locals本地变量数量,这2个值在下一篇文章的generateMethod()方法详细介绍中涉及到,这里就先不展开了
var1.writeShort(this.maxStack);
var1.writeShort(this.maxLocals);
写入方法执行体字节的长度code_length和方法执行体具体字节code[code_length],这2部分也会在generateMethod()方法详细介绍中涉及到,这里就先不展开了
var1.writeInt(this.code.size());
this.code.writeTo(var1);
此时我们看到写入max_stack、max_locals、code_length时,字段的类型分别是short、short、integer,加起共8个字节
写入方法会抛出的异常数量exception_table_length
var1.writeShort(this.exceptionTable.size());
这个时候exception_table_length是一个short类型,加上之前的8个字节,一共是10个字节
写入异常的具体结构
Iterator var2 = this.exceptionTable.iterator();

while(var2.hasNext()) {


    ProxyGenerator.ExceptionTableEntry var3 = (ProxyGenerator.ExceptionTableEntry)var2.next();
    var1.writeShort(var3.startPc);
    var1.writeShort(var3.endPc);
    var1.writeShort(var3.handlerPc);
    var1.writeShort(var3.catchType);
}
每一个异常都有4个字段,start_pc、end_pc、handler_pc、catch_type,都是short类型,因此一个Exception就会有8个字节,这个8正对应了上面attribute_length中的8
最后写入attributes自身的attributes_count,因为没有,所以直接写0
var1.writeShort(0);
这个数量是一个short类型,加上之前累积的10个字节,一共12个字节,对应了attribute_length中的12
接下去看Exception
Exception结构
Exceptions_attribute {
    u2 attribute_name_index;
    u4 attribute_length;
    u2 number_of_exceptions;
    u2 exception_index_table[number_of_exceptions];
}
这个结构相对就简单了很多,下面对应代码来看
先写入常量池的索引attribute_name_index
var1.writeShort(ProxyGenerator.this.cp.getUtf8("Exceptions"));
写入attribute长度attribute_length,这里的2个2也在后面解释,不过我想大家自己也能想到分别代表什么了吧
var1.writeInt(2 + 2 * this.declaredExceptions.length);
写入异常数量number_of_exceptions,类型是short,对应了第一个2
var1.writeShort(this.declaredExceptions.length);
写入具体的异常在常量池中的索引,每一个数据都是一个short,对应了第二个2
var1.writeShort(this.declaredExceptions.length);
short[] var6 = this.declaredExceptions;
int var7 = var6.length;

for(int var4 = 0; var4 < var7; ++var4) {


    short var5 = var6[var4];
    var1.writeShort(var5);
}
以上,字段和方法的写入就基本解析就完成了
之后将探究generateMethod()方法最复杂的执行体内容
因为方法的字节码涉及到了jvm的操作指令,因此我们先做一个基础性的了解
原文地址:https://dzone.com/articles/introduction-to-java-bytecode
jvm指令文档:https://docs.oracle.com/javase/specs/jvms/se7/html/jvms-6.html
文中开始介绍的堆、栈、方法区等概念这里就不详细描述了,主要看它后面对一些简单方法的字节码的解析
首先我们定义一个简单的类
public class Test {


    public static void main(String[] args) {


        int a = 1;
        int b = 2;
        int c = a + b;
    }
}
编译生成Test.class
javac Test.java
查看字节码结构
javap -v Test.class
我们关注其中的main方法部分
public static void main(java.lang.String[]);
    descriptor: ([Ljava/lang/String;)V
    flags: ACC_PUBLIC, ACC_STATIC
    Code:
      stack=2, locals=4, args_size=1
         0: iconst_1
         1: istore_1
         2: iconst_2
         3: istore_2
         4: iload_1
         5: iload_2
         6: iadd
         7: istore_3
         8: return
      LineNumberTable:
        line 3: 0
        line 4: 2
        line 5: 4
        line 6: 8
其中的Code正是方法的执行体,下面按照顺序图解具体操作
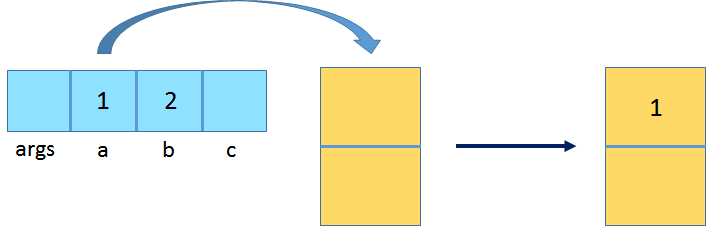
iconst_1:将常量1压入操作栈

istore_1:弹出栈顶的操作数,存入栈的本地变量数组的索引1,也就是变量a
iconst_2:将常量2压入操作栈
istore_2:弹出栈顶的操作数,存入栈的本地变量数组的索引2,也就是变量b

iload_1:从本地变量索引1种读取值,并压入操作栈
iload_2:从本地变量索引2种读取值,并压入操作栈
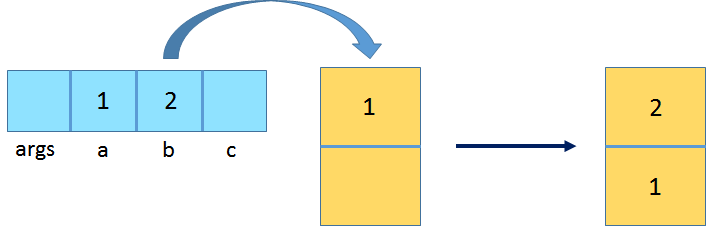
iadd:弹出栈顶的2个操作数,相加后将结果压入操作栈
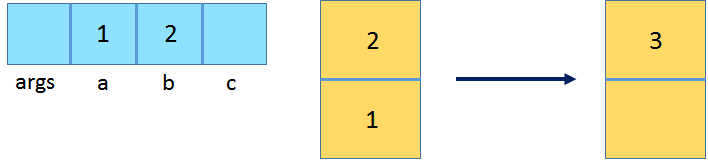
istore_3:弹出栈顶的操作数,存入栈的本地变量数组的索引3,也就是变量c
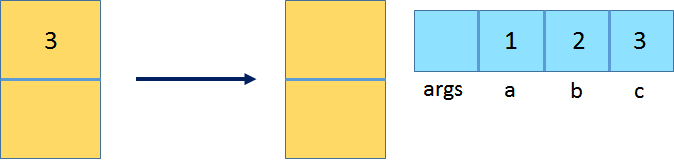
return:从方法返回
如果我们在类中定义一个方法
public class Test {


    public static void main(String[] args) {


        int a = 1;
        int b = 2;
        int c = calc(a, b);
    }
    static int calc(int a, int b) {


        return (int) Math.sqrt(Math.pow(a, 2) + Math.pow(b, 2));
    }
}
得到的字节码如下,这次我把部分Constant pool也展示在下面
Constant pool:
   #1 = Methodref          #8.#19         // java/lang/Object."<init>":()V
   #2 = Methodref          #7.#20         // Test.calc:(II)I
   #3 = Double             2.0d
   #5 = Methodref          #21.#22        // java/lang/Math.pow:(DD)D
   #6 = Methodref          #21.#23        // java/lang/Math.sqrt:(D)D
public static void main(java.lang.String[]);
    descriptor: ([Ljava/lang/String;)V
    flags: ACC_PUBLIC, ACC_STATIC
    Code:
      stack=2, locals=4, args_size=1
         0: iconst_1
         1: istore_1
         2: iconst_2
         3: istore_2
         4: iload_1
         5: iload_2
         6: invokestatic  #2                  // Method calc:(II)I
         9: istore_3
        10: return
      LineNumberTable:
        line 3: 0
        line 4: 2
        line 5: 4
        line 6: 10

  static int calc(int, int);
    descriptor: (II)I
    flags: ACC_STATIC
    Code:
      stack=6, locals=2, args_size=2
         0: iload_0
         1: i2d
         2: ldc2_w        #3                  // double 2.0d
         5: invokestatic  #5                  // Method java/lang/Math.pow:(DD)D
         8: iload_1
         9: i2d
        10: ldc2_w        #3                  // double 2.0d
        13: invokestatic  #5                  // Method java/lang/Math.pow:(DD)D
        16: dadd
        17: invokestatic  #6                  // Method java/lang/Math.sqrt:(D)D
        20: d2i
        21: ireturn
      LineNumberTable:
        line 8: 0
这里我们主要看一下一些新出现的操作指令
在main方法中,编号6
invokestatic #2:调用静态方法,方法在Constant Pool中索引为2,表示Test.calc方法(这里特别注意,调用的方法目标必须是常量池中的一个有效索引)
在cacl方法中
i2d:将int类型的转换成double类型的
ldc2_w:将long型或者double型(思考一下为何是这2种类型放在同一个操作指令中)从静态池中压入栈
dadd:将double相加
d2i:将double类型转换成int类型
ireturn:返回一个int
将上面的jvm指令结合java代码,就可以初步理解每一行java代码究竟是如何被jvm执行的了
接下去我们可以通过Proxy的代码结合实际来看看
方法还是generateClassFile()
在之前“第三部分字节与方法字节码的写入”中,有提到
这里的第一行,正是写入构造器的字节码,这一部分因为涉及到jvm的执行指令,我们放到下篇文章再详细看,所以这里先跳过
this.methods.add(this.generateConstructor());
此时我们就可以详细看下generateConstructor方法究竟干了什么
private ProxyGenerator.MethodInfo generateConstructor() throws IOException {


    ProxyGenerator.MethodInfo var1 = new ProxyGenerator.MethodInfo("<init>", "(Ljava/lang/reflect/InvocationHandler;)V", 1);
    DataOutputStream var2 = new DataOutputStream(var1.code);
    this.code_aload(0, var2);
    this.code_aload(1, var2);
    var2.writeByte(183);
    var2.writeShort(this.cp.getMethodRef("java/lang/reflect/Proxy", "<init>", "(Ljava/lang/reflect/InvocationHandler;)V"));
    var2.writeByte(177);
    var1.maxStack = 10;
    var1.maxLocals = 2;
    var1.declaredExceptions = new short[0];
    return var1;
}
特别注意的是,这里的var2表示的是方法的执行体部分,也就是在上一篇文章中,我们提到的方法attributes中的一个:Code
接下一行一行分析
初始化MethodInfo对象,3个参数分别是,方法名、方法描述、access_flag,1表示public(参见Modifier.java)
因为是构造函数,所以方法名为
方法的描述表示,该方法获取一个java.lang.reflect.InvocationHandler类型的参数,返回值为V(表示void)
方法的access_flag为1,表示public
ProxyGenerator.MethodInfo var1 = new ProxyGenerator.MethodInfo("<init>",
                                                           "(Ljava/lang/reflect/InvocationHandler;)V", 1);
在Code中写入aload_0和aload_1操作指令
this.code_aload(0, var2);
this.code_aload(1, var2);
在Code中写入183号操作指令,查文档得:invokespecial
调用实例方法,特别用来处理父类的构造函数
var2.writeByte(183);
在Code中写入需要调用的方法名和方法的参数
注意,这里的方法是通过this.cp.getMethodRef方法得到的,也就是说,这里写入的最终数据,其实是一个符合该方法描述的常量池中的一个有效索引(这部分知识可以参看之前的3篇文章)
var2.writeShort(this.cp.getMethodRef("java/lang/reflect/Proxy", "<init>",
                                     "(Ljava/lang/reflect/InvocationHandler;)V"));
在Code中写入177号指令,查文档得:return
返回void
var2.writeByte(177);
和上一篇文章中提到的一样,最后还需要写入栈深和本地变量数量,以及方法会抛出的异常数量,因为构造函数不主动抛出异常,所以异常数量直接为0
注意这里并非是直接writeByte,而是对MethodInfo的属性做了一个设置,这部分的字节码依然会在MethodInfo的write方法中写入,参见上一篇文章
var1.maxStack = 10;
var1.maxLocals = 2;
var1.declaredExceptions = new short[0];
到此,一个构造方法的结构就完成了
此时我们总结一下该构造函数的结构,当我们查看class文件的结构时,应当是下面这种结构
aload_0;
aload_1;
invokespecial  #x  //这里x对应Constant pool中构造函数的编号
return;
验证一下,我们建立一个类
import java.lang.reflect.InvocationHandler;
import java.lang.reflect.Proxy;

public class Test extends Proxy {


    protected TestClass(InvocationHandler h) {


        super(h);
    }
}
查看其字节码
protected Test(java.lang.reflect.InvocationHandler);
    descriptor: (Ljava/lang/reflect/InvocationHandler;)V
    flags: ACC_PROTECTED
    Code:
      stack=2, locals=2, args_size=2
         0: aload_0
         1: aload_1
         2: invokespecial #1                  // Method java/lang/reflect/Proxy."<init>":(Ljava/lang/reflect/InvocationHandler;)V
         5: return
      LineNumberTable:
        line 6: 0
        line 7: 5
正和我们之前总结的一模一样
结合之前的一些jvm指令的基本描述,我们就可以对method_info的整体结构有了更深入的了解
此时我们先停一停,思考这样一个问题:
如果由我们自己通过代码来定义一个Proxy的动态类,我们该如何去定义?
首先回顾一下第一篇文章中提到代理类的3个特性
1.继承了Proxy类
2.实现了我们传入的接口
3.以$Proxy+随机数字的命名
假定我们现在定义一个简单的接口,并生成该接口的代理类
接口定义
public interface TestInterface {


    int put(String a);
}
满足3个特性的代理类初步定义如下
import java.lang.reflect.InvocationHandler;
import java.lang.reflect.Proxy;

public class $Proxy11 extends Proxy implements TestInterface {


    protected $Proxy11(InvocationHandler h) {


        super(h);
    }

    @Override
    public int put(String a) {


        return 0;
    }
}
然而在这种情况下h的代理是无法生效的,因为put方法中并没有h的参与
现在我们回顾一下InvocationHandler的invoke方法的定义
public Object invoke(Object proxy, Method method, Object[] args)
第一个proxy是代理自身,method是被代理的方法,args是方法的参数
因此为了使得代理生效,我们可以修改方法,如下
import java.lang.reflect.InvocationHandler;
import java.lang.reflect.Proxy;
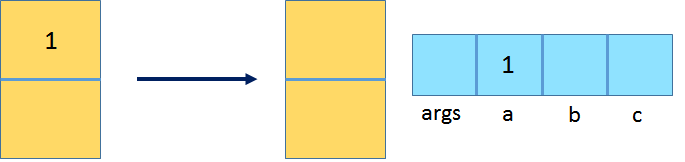
public class $Proxy11 extends Proxy implements TestInterface {
protected $Proxy11(InvocationHandler h) {
super(h);
}
@Override
public int put(String a) {
try {
return (int) h.invoke(this, TestInterface.class.getMethod("put", String.class), new Object[]{
a});
} catch (Throwable e) {
return 0;
}
}
}
这样我们就能使得h的代理生效了
当然,这只是我们所设想的最基本的一种代理形式。有了这个思路之后,我们就可以看看源码中是如何生成方法的字节码
接着我们来看重点,proxy方法的写入
还是回到generateClassFile()方法中关注下面这行代码
this.methods.add(var16.generateMethod());
这个方法就是proxy方法实际执行的code部分了,因为代码比较多,所以我就直接将注释写到代码中
如果你前面的内容都仔细阅读且理解了,那我想你一定会有兴趣看完下面所有的代码,并且会对proxy的实现和class字节码有更深刻的理解
当然,如果你看到源码就非常头疼也没有关系,可以跳过这部分源码直接看最后的验证部分
private ProxyGenerator.MethodInfo generateMethod() throws IOException {


    /**
     * 获取方法描述,如果还打开着之前javap的工具的话,就能看到类似于
     * // java/lang/Object."<init>":()V
     * // Test.calc:(II)I
     */
    String methodDescriptor = ProxyGenerator.getMethodDescriptor(this.parameterTypes, this.returnType);
    /**
     * 这里和之前构造器一样,先生成一个MethodInfo对象
     * 这里17表示public final
     * Modifier.FINAL | Modifier.PUBLIC
     */
    ProxyGenerator.MethodInfo methodInfo = ProxyGenerator.this.new MethodInfo(this.methodName, methodDescriptor, 17);
    /**
     * 新建一个存放静态池编号的数组
     */
    int[] parameterTypesOrders = new int[this.parameterTypes.length];
    /**
     * 这个值是指静态池中的编号,如果还打开着之前javap的话,类似于
     * Constant pool:
     *    #1 = Methodref          #8.#19         // java/lang/Object."<init>":()V
     *    #2 = Methodref          #7.#20         // Test.calc:(II)I
     *    #3 = Double             2.0d
     *    #5 = Methodref          #21.#22        // java/lang/Math.pow:(DD)D
     * 前面的#1,#2,#3,#5
     * 我们注意到缺少了#4,因为double需要占用8个字节,而其他的都只需要占用4个字节
     */
    int constantPoolNumber = 1;

    for(int i = 0; i < parameterTypesOrders.length; ++i) {


        parameterTypesOrders[i] = constantPoolNumber;
        /**
         * 如果是Long或者Double类型的参数,则+2,否则+1,因为Long和Double都是占用8个字节
         */
        constantPoolNumber += ProxyGenerator.getWordsPerType(this.parameterTypes[i]);
    }

    DataOutputStream dataOutputStream = new DataOutputStream(methodInfo.code);
    /**
     * aload_0,加载栈帧本地变量表的第一个参数,因为是实例方法,所以是就是指this
     */
    ProxyGenerator.this.code_aload(0, dataOutputStream);
    /**
     * getfield,获取this的实例字段
     */
    dataOutputStream.writeByte(180);
    /**
     * 从Proxy类中,获取类型是InvocationHandler,字段名为h的对象
     */
    dataOutputStream.writeShort(ProxyGenerator.this.cp.getFieldRef("java/lang/reflect/Proxy", "h", "Ljava/lang/reflect/InvocationHandler;"));
    /**
     * aload_0
     */
    ProxyGenerator.this.code_aload(0, dataOutputStream);
    /**
     * getstatic,获取静态字段
     */
    dataOutputStream.writeByte(178);
    /**
     * 获取当前代理类,名字是methodFieldName,类型是Method的对象(之前在写入静态池的时候,用的也是methodFieldName)
     */
    dataOutputStream.writeShort(ProxyGenerator.this.cp.getFieldRef(ProxyGenerator.dotToSlash(ProxyGenerator.this.className), this.methodFieldName, "Ljava/lang/reflect/Method;"));
    /**
     * 准备写入参数
     */
    if (this.parameterTypes.length > 0) {


        /**
         * 写入参数的数量,如果再仔细看一下code_ipush
         * 当length小于等于5时,写入的命令是iconst_m1~iconst_5
         * 当length在-128~127闭区间时,写入的命令是bipush
         * 否则就写入sipush
         */
        ProxyGenerator.this.code_ipush(this.parameterTypes.length, dataOutputStream);
        /**
         * anewarray,创建一个数组
         */
        dataOutputStream.writeByte(189);
        /**
         * 数组的类型是object
         */
        dataOutputStream.writeShort(ProxyGenerator.this.cp.getClass("java/lang/Object"));

        /**
         * 循环参数
         */
        for(int i = 0; i < this.parameterTypes.length; ++i) {


            /**
             * dup,复制栈顶的操作数
             */
            dataOutputStream.writeByte(89);
            /**
             * iconst、bipush、sipush
             */
            ProxyGenerator.this.code_ipush(i, dataOutputStream);
            /**
             * 对参数类型等做一个编码
             */
            this.codeWrapArgument(this.parameterTypes[i], parameterTypesOrders[i], dataOutputStream);
            /**
             * aastore,将对象存入数组
             */
            dataOutputStream.writeByte(83);
        }
    } else {


        /**
         * 如果没参数的话
         * aconst_null,push一个null
         */
        dataOutputStream.writeByte(1);
    }
    /**
     * invokeinterface 调用接口方法
     */
    dataOutputStream.writeByte(185);
    /**
     * 找到InvocationHandler的invoke方法
     */
    dataOutputStream.writeShort(ProxyGenerator.this.cp.getInterfaceMethodRef("java/lang/reflect/InvocationHandler", "invoke", "(Ljava/lang/Object;Ljava/lang/reflect/Method;[Ljava/lang/Object;)Ljava/lang/Object;"));
    /**
     * iconst_1,将1压入操作栈
     */
    dataOutputStream.writeByte(4);
    /**
     * nop,不做事情
     */
    dataOutputStream.writeByte(0);

    if (this.returnType == Void.TYPE) {


        /**
         * 如果是void方法
         * pop,将栈顶的操作数弹出
         */
        dataOutputStream.writeByte(87);
        /**
         * return
         */
        dataOutputStream.writeByte(177);
    } else {


        /**
         * 对返回值进行编码
         */
        this.codeUnwrapReturnValue(this.returnType, dataOutputStream);
    }

    byte startPc = 0;
    short handlerPc;
    short endPc = handlerPc = (short)methodInfo.code.size();
    /**
     * 获取方法可能抛出的异常
     */
    List catchList = ProxyGenerator.computeUniqueCatchList(this.exceptionTypes);
    if (catchList.size() > 0) {


        Iterator exceptionIterator = catchList.iterator();

        /**
         * 对异常进行预处理
         */
        while(exceptionIterator.hasNext()) {


            Class var12 = (Class)exceptionIterator.next();
            /**
             * 这里注意startPc, endPc, handlerPc参数,和pc register有关,用于抛出Exception时能确定接下去要执行的指令
             */
            methodInfo.exceptionTable.add(new ProxyGenerator.ExceptionTableEntry(startPc, endPc, handlerPc, ProxyGenerator.this.cp.getClass(ProxyGenerator.dotToSlash(var12.getName()))));
        }
        /**
         * athrow,抛出异常
         */
        dataOutputStream.writeByte(191);
        /**
         * 重新获取异常的处理点
         */
        handlerPc = (short)methodInfo.code.size();
        /**
         * 添加异常的基类
         */
        dataOutputStream.exceptionTable.add(new ProxyGenerator.ExceptionTableEntry(startPc, endPc, handlerPc, ProxyGenerator.this.cp.getClass("java/lang/Throwable")));
        /**
         * 根据constantPoolNumber的值
         * astore_0 = 75 (0x4b)
         * astore_1 = 76 (0x4c)
         * astore_2 = 77 (0x4d)
         * astore_3 = 78 (0x4e)
         * astore
         */
        ProxyGenerator.this.code_astore(constantPoolNumber, dataOutputStream);
        /**
         * new 创建一个新对象
         */
        dataOutputStream.writeByte(187);
        /**
         * 对象是UndeclaredThrowableException
         */
        dataOutputStream.writeShort(ProxyGenerator.this.cp.getClass("java/lang/reflect/UndeclaredThrowableException"));
        /**
         * dup 复制栈顶操作数
         */
        dataOutputStream.writeByte(89);
        /**
         * 根据constantPoolNumber的值
         * aload_0 = 42 (0x2a)
         * aload_1 = 43 (0x2b)
         * aload_2 = 44 (0x2c)
         * aload_3 = 45 (0x2d)
         * aload
         */
        ProxyGenerator.this.code_aload(constantPoolNumber, dataOutputStream);
        /**
         * invokespecial,调用父类的方法
         */
        dataOutputStream.writeByte(183);
        /**
         * 父类的构造函数
         */
        dataOutputStream.writeShort(ProxyGenerator.this.cp.getMethodRef("java/lang/reflect/UndeclaredThrowableException", "<init>", "(Ljava/lang/Throwable;)V"));
        /**
         * athrow,抛出异常
         */
        dataOutputStream.writeByte(191);
    }

    if (var2.code.size() > 65535) {


        throw new IllegalArgumentException("code size limit exceeded");
    } else {


        var2.maxStack = 10;
        var2.maxLocals = (short)(var4 + 1);
        var2.declaredExceptions = new short[this.exceptionTypes.length];

        for(int var14 = 0; var14 < this.exceptionTypes.length; ++var14) {


            var2.declaredExceptions[var14] = ProxyGenerator.this.cp.getClass(ProxyGenerator.dotToSlash(this.exceptionTypes[var14].getName()));
        }

        return var2;
    }
}
那么为了看看我们一开始对于方法的猜测是否正确,我们略微改造之前定义的接口和类,然后实际看看
接口和Proxy定义(因为字节码中还包含了一些异常的信息,所以定义接口的时候特别定义了2个异常)
import java.lang.reflect.InvocationHandler;
import java.lang.reflect.Proxy;
import java.util.concurrent.TimeoutException;

public class Proxy11 extends Proxy implements TestInterface {
    protected Proxy11(InvocationHandler h) {
        super(h);
    }

    public void put(String a, Double b) throws TimeoutException {
        try {
            h.invoke(this, TestInterface.class.getMethod("put", String.class, Double.class), new Object[]{a, b});
        } catch (Throwable e) {
        }
    }

    public int get(String a, Long b) throws IndexOutOfBoundsException {
        try {
            return (int) h.invoke(this, TestInterface.class.getMethod("get", String.class, Long.class), new Object[]{a, b});
        } catch (Throwable e) {
            return 0;
        }
    }
}


interface TestInterface {
    void put(String a, Double b) throws TimeoutException;

    int get(String a, Long b) throws IndexOutOfBoundsException;
}
我们生成class后,将字节码的指令集与我们之前的分析一一对比,虽然其中还是有些不同,不过大体上是符合之前源码的顺序
最后为了实际考察Proxy生成类的源码,我们还是需要将Proxy的字节码转换回java文件
首先我们需要添加vm启动参数
-Dsun.misc.ProxyGenerator.saveGeneratedFiles=true
有了这个参数,当我们使用Proxy时,就会把class写入到文件中了
写入的目录是项目下的com/sun/proxy/$Proxy11.class
为了更好地可读性,我们需要使用一个在线工具
http://www.javadecompilers.com/
传入我们之前生成出来class文件
结果如下
package com.sun.proxy;

import java.util.concurrent.TimeoutException;
import java.lang.reflect.UndeclaredThrowableException;
import java.lang.reflect.InvocationHandler;
import java.lang.reflect.Method;
import cn.tera.aopproxy.TestInterface;
import java.lang.reflect.Proxy;

public final class $Proxy11 extends Proxy implements TestInterface
{


    private static Method m1;
    private static Method m3;
    private static Method m2;
    private static Method m4;
    private static Method m0;

    public $Proxy11(final InvocationHandler h) {


        super(h);
    }

    public final boolean equals(final Object o) {


        try {


            return (boolean)super.h.invoke(this, $Proxy11.m1, new Object[] {

     o });
        }
        catch (Error | RuntimeException error) {


            throw;
        }
        catch (Throwable undeclaredThrowable) {


            throw new UndeclaredThrowableException(undeclaredThrowable);
        }
    }

    public final int get(final String s, final Long n) throws IndexOutOfBoundsException {


        try {


            return (int)super.h.invoke(this, $Proxy11.m3, new Object[] {

     s, n });
        }
        catch (Error | RuntimeException error) {


            throw;
        }
        catch (Throwable undeclaredThrowable) {


            throw new UndeclaredThrowableException(undeclaredThrowable);
        }
    }

    public final String toString() {


        try {


            return (String)super.h.invoke(this, $Proxy11.m2, null);
        }
        catch (Error | RuntimeException error) {


            throw;
        }
        catch (Throwable undeclaredThrowable) {


            throw new UndeclaredThrowableException(undeclaredThrowable);
        }
    }

    public final void put(final String s, final Double n) throws TimeoutException {


        try {


            super.h.invoke(this, $Proxy11.m4, new Object[] {

     s, n });
        }
        catch (Error | RuntimeException | TimeoutException error) {


            throw;
        }
        catch (Throwable undeclaredThrowable) {


            throw new UndeclaredThrowableException(undeclaredThrowable);
        }
    }

    public final int hashCode() {


        try {


            return (int)super.h.invoke(this, $Proxy11.m0, null);
        }
        catch (Error | RuntimeException error) {


            throw;
        }
        catch (Throwable undeclaredThrowable) {


            throw new UndeclaredThrowableException(undeclaredThrowable);
        }
    }

    static {


        try {


            $Proxy11.m1 = Class.forName("java.lang.Object").getMethod("equals", Class.forName("java.lang.Object"));
            $Proxy11.m3 = Class.forName("cn.tera.aopproxy.TestInterface").getMethod("get", Class.forName("java.lang.String"), Class.forName("java.lang.Long"));
            $Proxy11.m2 = Class.forName("java.lang.Object").getMethod("toString", (Class<?>[])new Class[0]);
            $Proxy11.m4 = Class.forName("cn.tera.aopproxy.TestInterface").getMethod("put", Class.forName("java.lang.String"), Class.forName("java.lang.Double"));
            $Proxy11.m0 = Class.forName("java.lang.Object").getMethod("hashCode", (Class<?>[])new Class[0]);
        }
        catch (NoSuchMethodException ex) {


            throw new NoSuchMethodError(ex.getMessage());
        }
        catch (ClassNotFoundException ex2) {


            throw new NoClassDefFoundError(ex2.getMessage());
        }
    }
}
是不是有一种恍然大悟的感觉,此时再回头去看之前分析的方法字节码,就能更好地理解其含义了,以及和我们自己定义的类的字节码有区别的原因了。
当然我们更可以直接查看生成的class文件,再通过javap去查看字节码,然后返过去和前面的源码再作对比,这个就留给读者自己去分析了
至此,java动态代理的根本原理和相应的class字节码结构的分析就结束了