1.对三个子界面的实现
---所有的众筹项目---我创建的众筹项目---我参加的众筹项目
import React,{Component} from "react";
import {getFundingDetails}from '../../eth/interaction'
import CardList from "../common/CardList";
class AllFundingTab extends Component{
    state ={
        allFundingDetails :[],
    }
    //在componentWillMount方法中获取我发起的众筹,并设置到state中。
    async componentWillMount() {
        let allFundingDetails=await getFundingDetails(1)
        console.table('1',allFundingDetails)
        this.setState({
            allFundingDetails
        })
    }
//在render方法中从state获取数据。
    render(){
        return(
            <CardList details={this.state.allFundingDetails}/>
        )
    }
}
export default AllFundingTab
三个界面所实现的功能是一样的,所以复制黏贴并更改获取不同功能的函数
现在我们来看看结果吧!!!


2.搭建发起众筹表单
代码使用到了semantic-ui的form组件。具体可以参考:https://react.semantic-ui.com/collections/form/
import React, {Component} from 'react';
import {Dimmer, Form, Label, Loader, Segment} from 'semantic-ui-react'
//import {createFunding} from "../eth/interaction";
class CreateFundingForm extends Component {
// 定义状态变量
state = {
active: false,
projectName: '',
supportMoney: '',
targetMoney: '',
duration: '',
}
render() {
let {active, projectName, targetMoney, supportMoney, duration} = this.state
return (
<div>
<Dimmer.Dimmable as={Segment} dimmed={active}>
<Dimmer active={active} inverted>
<Loader>Loading</Loader>
</Dimmer>
<Form onSubmit={this.handleCreate}>
<Form.Input required type='text' placeholder='项目名称' name='projectName'
value={projectName} label='项目名称:'
onChange={this.handleChange}/>
<Form.Input required type='text' placeholder='支持金额' name='supportMoney'
value={supportMoney} label='支持金额:'
labelPosition='left'
onChange={this.handleChange}>
<Label basic>¥</Label>
<input/>
</Form.Input>
<Form.Input required type='text' placeholder='目标金额' name='targetMoney' value={targetMoney}
label='目标金额:'
labelPosition='left'
onChange={this.handleChange}>
<Label basic>¥</Label>
<input/>
</Form.Input>
<Form.Input required type='text' placeholder='众筹时间' name='duration' value={duration}
label='众筹时间:'
labelPosition='left'
onChange={this.handleChange}>
<Label basic>S</Label>
<input/>
</Form.Input>
<Form.Button primary content='创建众筹'/>
</Form>
</Dimmer.Dimmable>
</div>
)
}
}
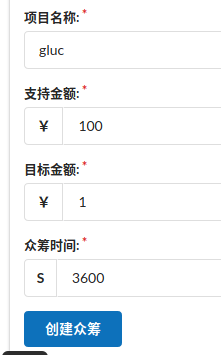
export default CreateFundingForm查看页面结果:

3.与from表单交互
定义表单项的onchange事件函数,该函数把表单项的值设置到状态变量中
handleChange =(e,{name,value}) =>this.setState({[name]:value})
然后写一个函数来看看是否触发了按钮:
handleCreate = () =>{
let {active,projectName,targetMoney,supportMoney,duration} =this.state
console.log('projectName:',projectName)
console.log('targetMoney:',supportMoney)
}
看看结果吧!!

4.与以太坊进行交互
定义表单提交函数
handleCreate = async() =>{
let {active,projectName,targetMoney,supportMoney,duration} =this.state
console.log('projectName:',projectName)
console.log('targetMoney:',supportMoney)
this.setState({active:true})
try {
let res= await createFunding(projectName, targetMoney, supportMoney, duration)
alert('创建合约成功!\n')
this.setState({active:false})
}catch(e){
this.setState({active:false})
console.log(e)
}
}
在interaction.js文件中定义createFunding方法,并导出该方法。
let createFunding = (projectName,targetMoney,supportMoney,duration)=>{
return new Promise(async (resolve,reject)=>{
try {//调用创建方法
let accounts =await web3.eth.getAccounts()
let res = await fundingFactoryInstance.methods.createFunding(projectName, targetMoney, supportMoney, duration).send({
from: accounts[0],
})
resolve(res)
}catch(e){
reject(e)
}
})
}
让我们看看结果吧!!!!!

5.在AllFundingTab添加表单项,在render方法中把状态变量的数据结构出来
render(){
return(
<div>
<CardList details={this.state.allFundingDetails}/>
<div>
<h3>参与众筹</h3>
<Dimmer.Dimmable as={Segment} dimmed={this.state.active}>
<Dimmer active={this.state.active} inverted>
<Loader>支持中</Loader>
</Dimmer>
<Form onSubmit={this.handleInvest}>
<Form.Input type='text' value={''} label='项目名称:'/>
<Form.Input type='text' value={''} label='项目地址:'/>
<Form.Input type='text' value={''} label='支持金额:'
labelPosition='left'>
<Label basic>¥</Label>
<input/>
</Form.Input>
<Form.Button primary content='参与众筹'/>
</Form>
</Dimmer.Dimmable>
</div>
</div>
)
}

给card添加一个onClick方法,就可以点击图像项目,返回这个项目的详细信息
在card中设置一个回调函数,这个回调函数在AllFundingTab实现,通过props逐层传给Card
点击Card时,将card的详细信息通过回调函数返回给主界面AllFundingTab,从而完成数据的获取
将返回的detail设置到状态变量中,展示在界面
发起参与众筹
let onCardClick =props.onCardClick
<Card onClick={()=> onCardClick(detail2)}>
onCardClick =(selectedFundingDetail)=>{
console.log("bbb:",selectedFundingDetail)
<CardList details={this.state.allFundingDetails}onCardClick={this.onCardClick}/>
【通过allFundingTab创建一个函数OncardClick,然后通过cardlist传递给props,Props再传递给cardfunding,
再给card,返回detail2,最后在主界面拿到即可】
6将拿到的数据展示到页面
a.为了展示到页面,引入seletedFundingDetail状态变量

处理投资函数//需要传递选中合约地址 //创建合约实例,发起参与众筹(send,value转钱)
//创建合约实例 //填充地址 //执行投资
let handleInvestFunc = async (fundingAddress,supportMoney) =>{

    try {//创建合约实例
        let fundingInstance = newFundingInstance()
        //填充地址
        fundingInstance.options.address = fundingAddress
        //执行投资
        let accounts = await web3.eth.getAccounts()
        let res = await fundingInstance.methods.invest().send({
            from: accounts[0],
            value: supportMoney,
        })
        return res
    }catch(e){
        throw e
    }

}