一、概述
Buffer 的本质其实就是内存中的一块,类比常见的 ByteBuffer ,可以简单理解为 Byte 数组。Java NIO 将这块内存封装成 Buffer 对象,并提供一系列属性和方法,方便我们操作 Buffer 与 Channel 进行数据交互。
二、用法
我们以 FileChannel 操作来看:
try (RandomAccessFile accessFile =
                     new RandomAccessFile("/demo.txt", "rw");) {
            // 获取 FileChannel
            FileChannel channel = accessFile.getChannel();
            // Buffer 分配空间
            ByteBuffer buffer = ByteBuffer.allocate(1024);
            // 从 channel 中读取数据到 buffer 中
            int readBytes = channel.read(buffer);
            System.out.println("读到 " + readBytes + " 字节");
            // 判断是否到文件结尾
            while (readBytes != -1) {
                buffer.flip();
                // 若 buffer 中还有数据
                while (buffer.hasRemaining()) {
                    System.out.println((char) buffer.get());
                }
                buffer.compact();
                readBytes = channel.read(buffer);
            }
        } catch (Exception e) {
            e.printStackTrace();
        }
从上面例子看要使用 Buffer 有以下步骤:
1、分配空间
- allocate(int capacity)
Buffer 是抽象类,每个 Buffer 的实现类都提供了 allocate(int capacity) 静态方法帮助快速实例化 Buffer 对象。比如常见的 ByteBuffer :public static ByteBufferallocate(int capacity) { if (capacity < 0) throw new IllegalArgumentException(); return new HeapByteBuffer(capacity, capacity); }由其命名也能看出,这个方法分配的空间是基于堆内内存的。 - allocateDirect(int capacity)
基于堆外内存分配空间,实例化 Buffer 对象。public static ByteBufferallocateDirect(int capacity) { return new DirectByteBuffer(capacity); } - wrap(byte[] array,int offset, int length)
每个 Buffer 的实现类都提供了 wrap 方法,将一个数组包装为一个 Buffer 实例。
2、从 Channel 中读取数据到 Buffer
- 使用 channel.read(buffer) 方法
- 使用 buffer.put() 方法
Buffer 的实现都提供了 put() 方法将数据放入 Buffer 中。
3、调用 flip() 方法
4、从 Buffer 中获取数据
channel.write(buffer)
buffer.get()
5、调用 clear() 方法或者 compact() 方法
上面的 flip() , clear() , compact() 方法有什么作用呢?
三、源码分析
Buffer 除了用于保存数据的数组外,还有几个重要的属性:
public abstract class Buffer {

    // Invariants: mark <= position <= limit <= capacity
    private int mark = -1;
    private int position = 0;
    private int limit;
    private int capacity;

    // Used only by direct buffers
    // NOTE: hoisted here for speed in JNI GetDirectBufferAddress
    long address;

    Buffer(int mark, int pos, int lim, int cap) {       // package-private
        if (cap < 0)
            throw new IllegalArgumentException("Negative capacity: " + cap);
        this.capacity = cap;
        limit(lim);
        position(pos);
        if (mark >= 0) {
            if (mark > pos)
                throw new IllegalArgumentException("mark > position: ("
                                                   + mark + " > " + pos + ")");
            this.mark = mark;
        }
    }

    // ... 省略具体方法的代码
}

基于上面四个属性,Buffer 通过控制它们的位置,完成读写操作。我们从 Buffer 的使用过程来分析:
1、分配空间
假定调用 ByteBuffer.allocate(10) 方法为缓冲区分配 10 个字节的空间, 看下 allocate(int capacity) 的代码:
public static ByteBuffer allocate(int capacity) {
        if (capacity < 0)
            throw new IllegalArgumentException();
        return new HeapByteBuffer(capacity, capacity);
}
它调用了 HeapByteBuffer 的构造方法,将 capacity 和 limit 都设置为 10 ,position 为 0 。
HeapByteBuffer(int cap, int lim) {            // package-private

        super(-1, 0, lim, cap, new byte[cap], 0);
        /*
        hb = new byte[cap];
        offset = 0;
        */
    }
此时缓冲区的示意图如下:
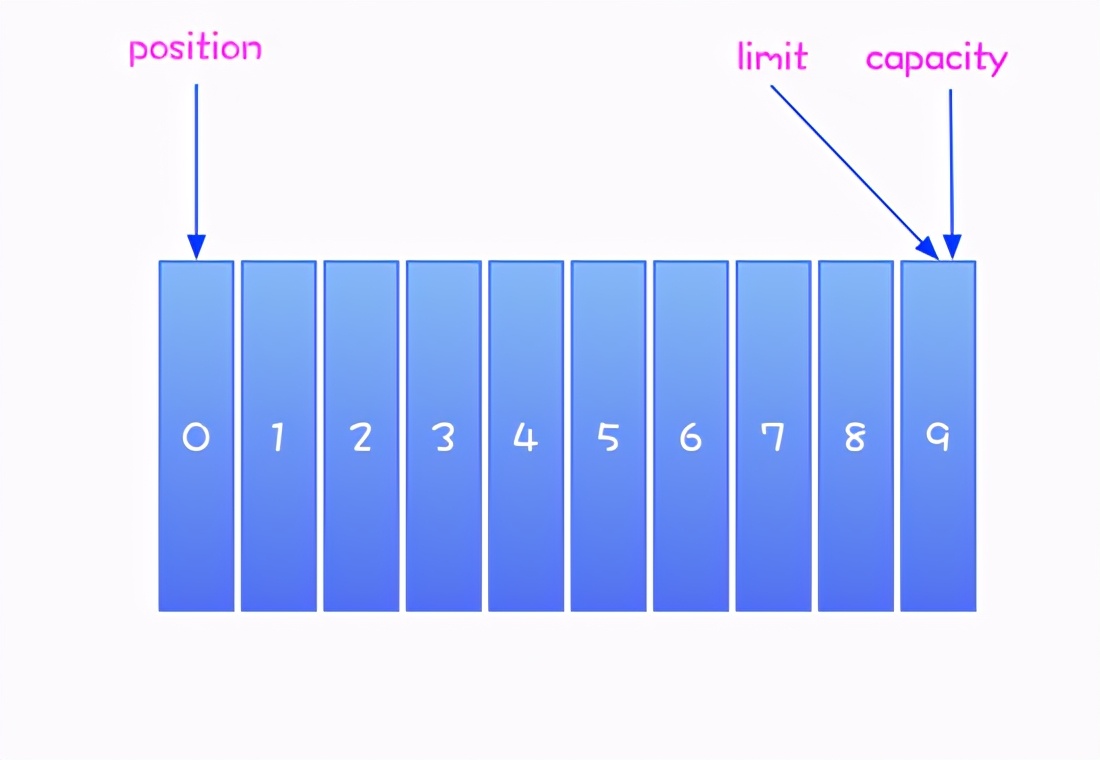
缓冲区在初始状态下, position 的位置为 0 , limit 和 capacity 指向 9 。
2、写入数据到 Buffer
我们向缓冲区写入三个字节的数据,查看 ByteBuffer 的实现之一 HeapByteBuffer#put(byte b)方法:
public ByteBuffer put(byte x) {

        hb[ix(nextPutIndex())] = x;
        return this;

}

protected int ix(int i) {
        return i + offset;
}
ByteBuffer 中的 nextPutIndex() 方法,用于计算下一个写入数据的下标:
final int nextPutIndex() {                          // package-private
        if (position >= limit)
            throw new BufferOverflowException();
        return position++;
}
我们得出结论, 每放入一个字节的数据,position 就加 1 。
此时三个属性的指向变化如下:
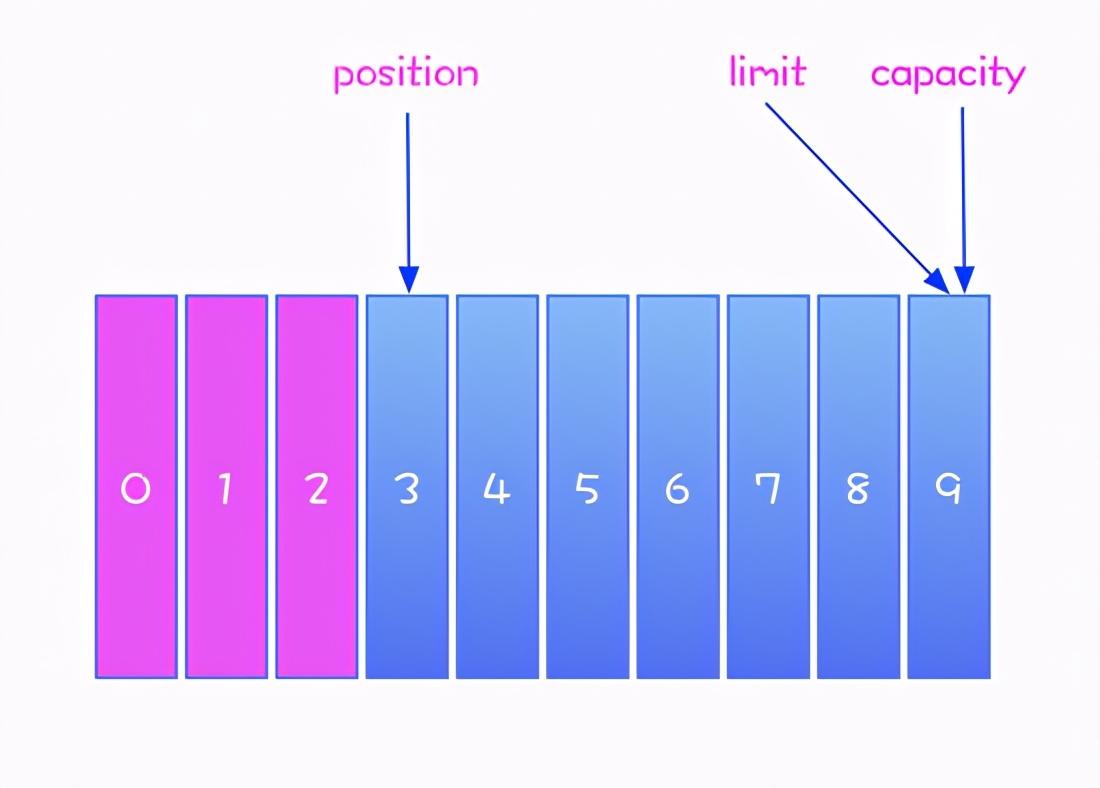
写入三字节数据后, position 指向下一个可操作的位置 3 , limit 和 capacity 的位置不变。
我们将此时缓冲区的状态称为 写模式 :
写模式下,limit 和 capacity 相等。
3、从 Buffer 中读取数据
接下来我们读取 Buffer 中上面的三字节数据,那么我们怎么定位到这三个字节的数据呢?回顾上面 Buffer 的使用,在读取数据前需要调用 Buffer#flip() 方法:
public final Buffer flip() {
	// 将 limit 设置为当前数据大小的下一个坐标
        limit = position;
	// position 设置为 0
        position = 0;
	// 如果有标记还原为默认值
        mark = -1;
        return this;
}
经过上面的操作后,我们获得了数据的开始和结束的范围,此时缓冲区的示意图如下:
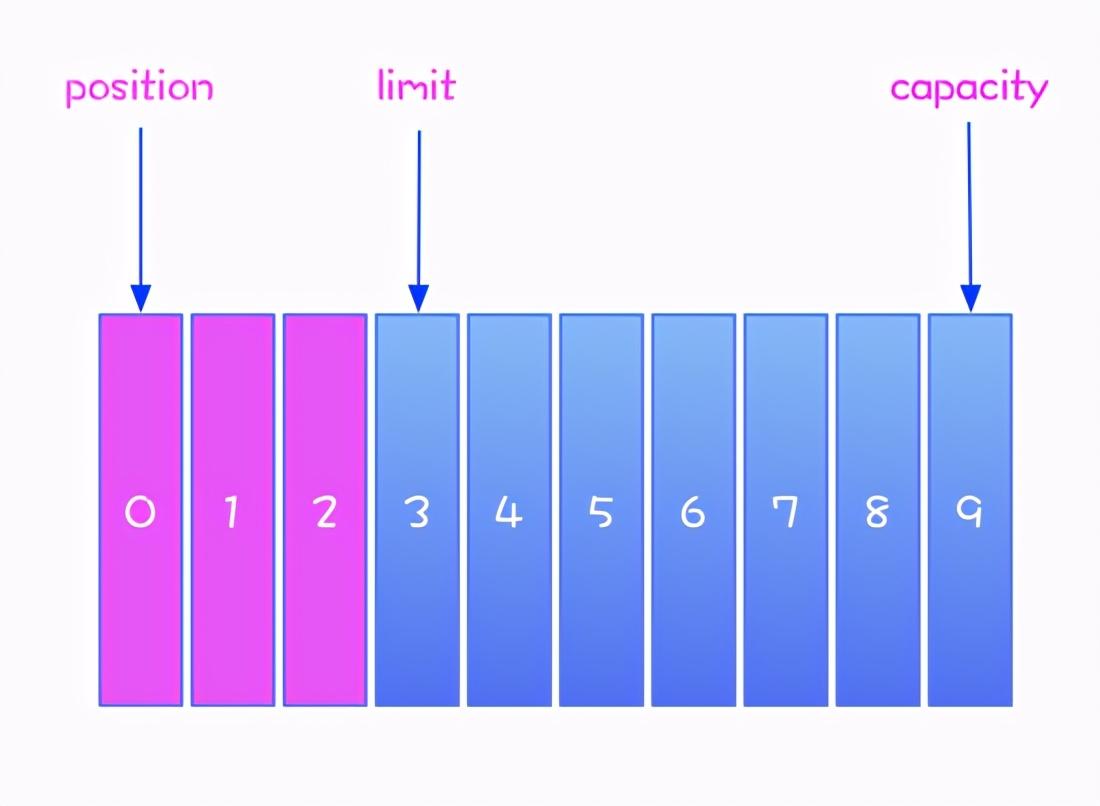
我们将此时缓冲区的状态称为 读模式 :
读模式下,limit 等于缓冲区的实际大小。
通过对比缓冲区的读模式和写模式,我们发现,通过控制 limit ,可以灵活切换 Buffer 的读写。
4、 clear() 与 compact() 方法
通过 clear() 与 compact() 方法,可以从读模式切换到写模式。
- clear() 方法public final Buffer clear() { position = 0; limit = capacity; mark = -1; return this; }
clear() 方法将 position 设置为 0 ,limit 设置为 capacity ,mark 设置为 -1 。即将 Buffer 还原为初识状态,此时数据还存在于 Buffer 中,只是没法确定哪些数据已经读过了,哪些数据还没有读过。
- compact()
cpmpact() 方法在 Buffer 的实现类中。以 ByteBuffer 的 HeapByteBuffer 实现为例:public ByteBuffer compact() { // copy 原有数组到 Buffer 的起始处System.arraycopy(hb, ix(position()), hb, ix(0), remaining()); // position 设置到最后一个未读元素后面 position(remaining()); // limit 设置为 capacitylimit(capacity()); // 取消标记 discardMark(); return this; }由代码可以看出, compact() 方法将所有未读数据拷贝到 Buffer 的起始处,然后将 position 设置到最后一个未读元素的后面,limit 设置成capacity。此时 Buffer 已经切换到写模式,但是不会覆盖未读的数据。
5、 mark() 和 reset() 方法
- mark() 方法public final Buffer mark() { mark = position; return this; }mark() 方法使用 mark 属性存储当前标记的下标位置。
- reset() 方法public final Buffer reset() { int m = mark; if (m < 0) throw new InvalidMarkException(); position = m; return this; }reset() 方法将 position 属性还原为 mark 标记的值。两个方法相互配合可以记录并恢复 position 的值,以便从标记的位置读写。
6、 rewind() 方法
public final Buffer rewind() {
        position = 0;
        mark = -1;
        return this;
    }
rewind() 方法将 position 设置为 0 ,并清除标记。此时 limit 保持不变,在读模式下,可以重读所有的数据。
四、结语
关于 Buffer 相关的讨论就到这里了,还有一些方法比较简单,感兴趣的小伙伴可以自行了解。