说明
本文讲述的是将solr 部署到tomcat下,以及后续的使用。(solr自带jetty容器,可以直接运行,以后可能会写)
软件版本:
| 名称 | 版本 | 下载地址 | 其他版本 |
| Solr | 7.7.2 | https://www.apache.org/dyn/closer.lua/lucene/solr/7.7.2/solr-7.7.2.zip | (当前最新8.2.0)https://lucene.apache.org/solr/downloads.html |
| tomcat | 8.5.43 | https://archive.apache.org/dist/tomcat/tomcat-8/v8.5.43/bin/apache-tomcat-8.5.43.zip | (当前最新9.0.27)https://archive.apache.org/dist/tomcat/ |
| 系统 | win10 |
准备工作
- 下载上述软件,解压
- 将tomcat安装到D盘,目录无中文,修改名称为apache-tomcat-solr (名称修改随意)
开始安装
- 将solr-7.7.2/server/solr-webapp/webapp 复制到apache-tomcat-solr/webapp/下,重命名为solr
- 复制solr-7.3.0/server/lib/ext下的所有jar,到apache-tomcat-solr/webapps/solr/WEB-INF/lib/下
- 复制solr-7.7.2/server/lib/下metrics相关的jar到apache-tomcat-solr/webapps/solr/WEB-INF/lib/下
- 复制solr-7.7.2/server/resources下的log4j2.xml,log4j2.console.xml文件,到apache-tomcat-solr/webapps/solr/WEB-INF/下的classes文件夹中。(classes文件夹如果没有需要自己创建,这是日志文件)修改log4j2.xml中的${sys:solr.log.dir}日志路径为:../logs/solr ,这样日志就会放到tomcat下的logs里面。
<?xml version="1.0" encoding="UTF-8"?> <!-- Licensed to the Apache Software Foundation (ASF) under one or more contributor license agreements. See the NOTICE file distributed with this work for additional information regarding copyright ownership. The ASF licenses this file to You under the Apache License, Version 2.0 (the "License"); you may not use this file except in compliance with the License. You may obtain a copy of the License at http://www.apache.org/licenses/LICENSE-2.0 Unless required by applicable law or agreed to in writing, software distributed under the License is distributed on an "AS IS" BASIS, WITHOUT WARRANTIES OR CONDITIONS OF ANY KIND, either express or implied. See the License for the specific language governing permissions and limitations under the License. --> <Configuration> <Appenders> <Console name="STDOUT" target="SYSTEM_OUT"> <PatternLayout> <Pattern> %d{yyyy-MM-dd HH:mm:ss.SSS} %-5p (%t) [%X{collection} %X{shard} %X{replica} %X{core}] %c{1.} %m%n </Pattern> </PatternLayout> </Console> <RollingFile name="RollingFile" fileName="../logs/solr/solr.log" filePattern="../logs/solr/solr.log.%i" > <PatternLayout> <Pattern> %d{yyyy-MM-dd HH:mm:ss.SSS} %-5p (%t) [%X{collection} %X{shard} %X{replica} %X{core}] %c{1.} %m%n </Pattern> </PatternLayout> <Policies> <OnStartupTriggeringPolicy /> <SizeBasedTriggeringPolicy size="32 MB"/> </Policies> <DefaultRolloverStrategy max="10"/> </RollingFile> <RollingFile name="SlowFile" fileName="../logs/solr/solr_slow_requests.log" filePattern="../logs/solr/solr_slow_requests.log.%i" > <PatternLayout> <Pattern> %d{yyyy-MM-dd HH:mm:ss.SSS} %-5p (%t) [%X{collection} %X{shard} %X{replica} %X{core}] %c{1.} %m%n </Pattern> </PatternLayout> <Policies> <OnStartupTriggeringPolicy /> <SizeBasedTriggeringPolicy size="32 MB"/> </Policies> <DefaultRolloverStrategy max="10"/> </RollingFile> </Appenders> <Loggers> <Logger name="org.apache.hadoop" level="warn"/> <Logger name="org.apache.solr.update.LoggingInfoStream" level="off"/> <Logger name="org.apache.zookeeper" level="warn"/> <Logger name="org.apache.solr.core.SolrCore.SlowRequest" level="info" additivity="false"> <AppenderRef ref="SlowFile"/> </Logger> <Root level="info"> <AppenderRef ref="RollingFile"/> <AppenderRef ref="STDOUT"/> </Root> </Loggers> </Configuration> - 创建solr_home:复制solr-7.7.2/server/下的solr文件夹,到任意目录处(可以重新命名,这里重命名为solr_home),例如我放在D盘下面
- 配置solr_home路径:修改apache-tomcat-solr/webapps/solr/WEB-INF/下的web.xml文件。(1)添加一段配置,name和type固定,vaue修改为5中设置的路径。
<env-entry> <env-entry-name>solr/home</env-entry-name> <env-entry-value>D:/solr_home</env-entry-value> <env-entry-type>java.lang.String</env-entry-type> </env-entry>(2)注释掉下面的代码,注意是 注释掉<!-- -->
<security-constraint>
    <web-resource-collection>
      <web-resource-name>Disable TRACE</web-resource-name>
      <url-pattern>/</url-pattern>
      <http-method>TRACE</http-method>
    </web-resource-collection>
    <auth-constraint/>
  </security-constraint>
   <security-constraint>
    <web-resource-collection>
      <web-resource-name>Enable everything but TRACE</web-resource-name>
      <url-pattern>/</url-pattern>
      <http-method-omission>TRACE</http-method-omission>
    </web-resource-collection>
   </security-constraint>
完整配置文件如下:
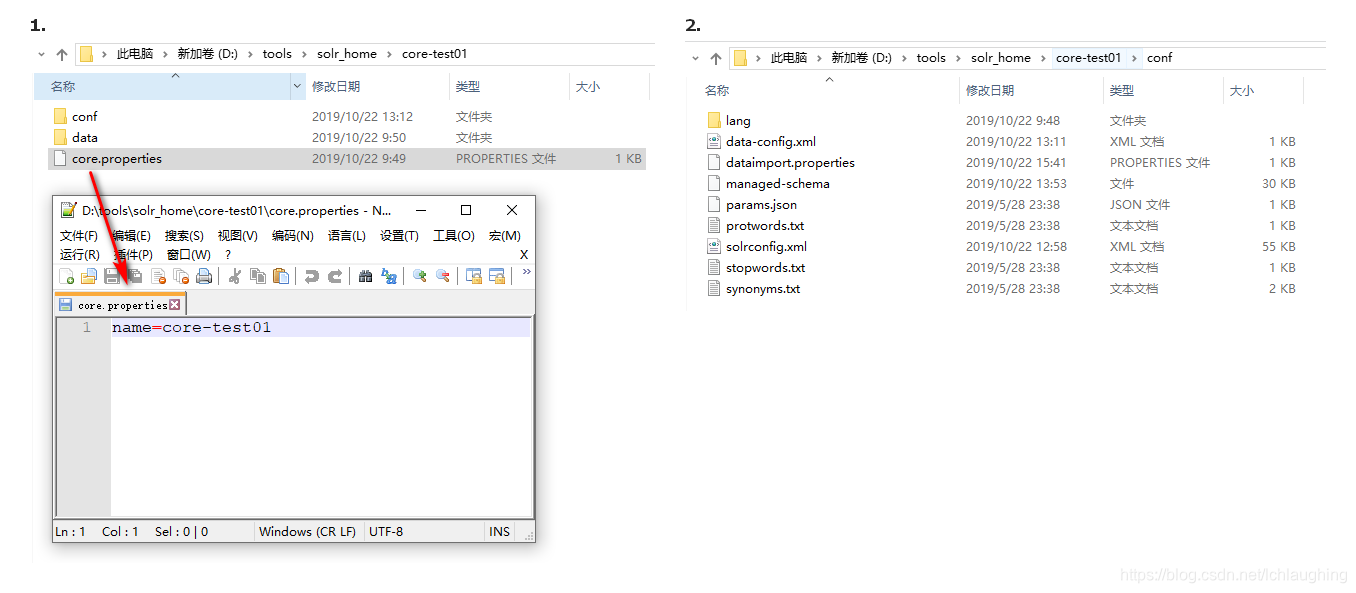
<?xml version="1.0" encoding="UTF-8"?> <!-- Licensed to the Apache Software Foundation (ASF) under one or more contributor license agreements. See the NOTICE file distributed with this work for additional information regarding copyright ownership. The ASF licenses this file to You under the Apache License, Version 2.0 (the "License"); you may not use this file except in compliance with the License. You may obtain a copy of the License at http://www.apache.org/licenses/LICENSE-2.0 Unless required by applicable law or agreed to in writing, software distributed under the License is distributed on an "AS IS" BASIS, WITHOUT WARRANTIES OR CONDITIONS OF ANY KIND, either express or implied. See the License for the specific language governing permissions and limitations under the License. --> <web-app xmlns="http://java.sun.com/xml/ns/javaee" xmlns:xsi="http://www.w3.org/2001/XMLSchema-instance" xsi:schemaLocation="http://java.sun.com/xml/ns/javaee http://java.sun.com/xml/ns/javaee/web-app_2_5.xsd" version="2.5" metadata-complete="true" > <!-- Any path (name) registered in solrconfig.xml will be sent to that filter --> <filter> <filter-name>SolrRequestFilter</filter-name> <filter-class>org.apache.solr.servlet.SolrDispatchFilter</filter-class> <!-- Exclude patterns is a list of directories that would be short circuited by the SolrDispatchFilter. It includes all Admin UI related static content. NOTE: It is NOT a pattern but only matches the start of the HTTP ServletPath. --> <init-param> <param-name>excludePatterns</param-name> <param-value>/partials/.+,/libs/.+,/css/.+,/js/.+,/img/.+,/templates/.+</param-value> </init-param> </filter> <filter-mapping> <filter-name>SolrRequestFilter</filter-name> <url-pattern>/*</url-pattern> </filter-mapping> <servlet> <servlet-name>LoadAdminUI</servlet-name> <servlet-class>org.apache.solr.servlet.LoadAdminUiServlet</servlet-class> </servlet> <servlet> <servlet-name>SolrRestApi</servlet-name> <servlet-class>org.restlet.ext.servlet.ServerServlet</servlet-class> <init-param> <param-name>org.restlet.application</param-name> <param-value>org.apache.solr.rest.SolrSchemaRestApi</param-value> </init-param> </servlet> <servlet-mapping> <servlet-name>LoadAdminUI</servlet-name> <url-pattern>/index.html</url-pattern> </servlet-mapping> <servlet-mapping> <servlet-name>SolrRestApi</servlet-name> <url-pattern>/schema/*</url-pattern> </servlet-mapping> <mime-mapping> <extension>.xsl</extension> <!-- per http://www.w3.org/TR/2006/PR-xslt20-20061121/ --> <mime-type>application/xslt+xml</mime-type> </mime-mapping> <welcome-file-list> <welcome-file>index.html</welcome-file> </welcome-file-list> <env-entry> <env-entry-name>solr/home</env-entry-name> <env-entry-value>D:\tools\solr_home</env-entry-value> <env-entry-type>java.lang.String</env-entry-type> </env-entry> <!-- Get rid of error message --> <!-- <security-constraint> <web-resource-collection> <web-resource-name>Disable TRACE</web-resource-name> <url-pattern>/</url-pattern> <http-method>TRACE</http-method> </web-resource-collection> <auth-constraint/> </security-constraint> <security-constraint> <web-resource-collection> <web-resource-name>Enable everything but TRACE</web-resource-name> <url-pattern>/</url-pattern> <http-method-omission>TRACE</http-method-omission> </web-resource-collection> </security-constraint> --> <!-- RedirectServlet can be used to redirect old endpoints to a new location to support back compatibility. Example below --> <!-- <servlet> <servlet-name>RedirectOldZookeeper</servlet-name> <servlet-class>org.apache.solr.servlet.RedirectServlet</servlet-class> <init-param> <param-name>destination</param-name> <param-value>${context}/admin/zookeeper</param-value> </init-param> </servlet> <servlet-mapping> <servlet-name>RedirectOldZookeeper</servlet-name> <url-pattern>/zookeeper</url-pattern> </servlet-mapping> --> </web-app> - 初始化solr_home的数据。在solr_home文件下建一个core-test01(名字随意取),复制solr_home/configsets/_default/下的conf文件夹,到新建的core-test01下,在core-test01下创建文件夹data(空文件加即可)和core.properties文件(内容只配置name=core-test01即可) ;如果你的conf里面没有data-config.xml和dataimport.properties没有关系,这个是以后说的数据库导入工具
- 然后启动tomcat,访问http://localhost:8080/solr/index.html .tomcat端口根据自己需求修改

出现上图标识,单机部署已经成功。
下篇文章将写中文分词器和dataimport的使用。